devops-4-kubernetes(k8s)
官方文档
尚硅谷文档笔记
尚硅谷视频
概念
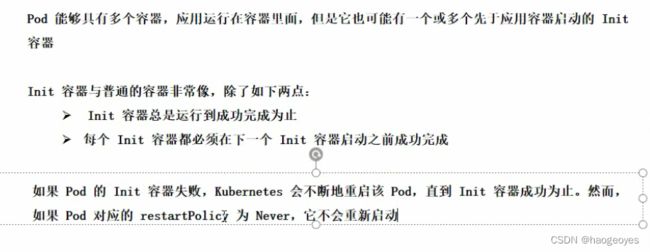
满足 应用程序的
快速精准的部署
即时伸缩容
无缝展现新特性
限制资源
优势
私有、公有、混合、多态云
扩展 模块化 插件化
修复: 自动部署、自动重启、自动复制、自动扩缩容
协调辅助进程、挂在存储系统、分布式机密信息、检查程序状态、复制应用实例、负载均衡、滚动更新、资源监控、访问读取日志、程序调试、验证授权
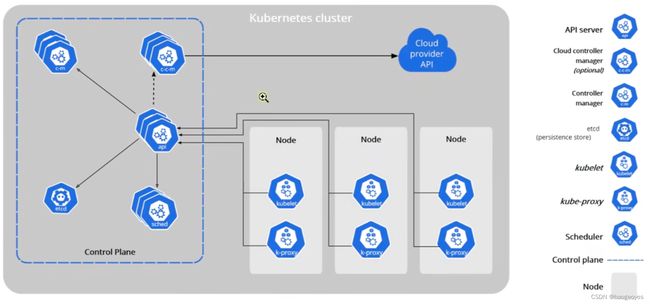
kubectl :命令行工具
apiserver:rest api接口,系统的控制入口
controller-manager:执行系统的后台任务,节点状态,pod个数 和 service服务的关联
etcd:键值对数据库,负责节点间的服务发现和配置共享(高可用、强一致服务发现存储仓库)
kubelet:管理node节点pod、存储、网络
kube-proxy:pod网络代理
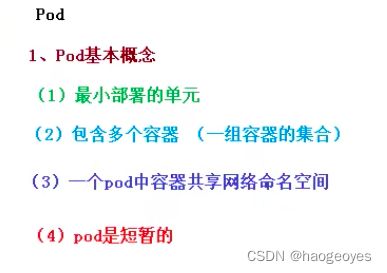
namespace 命名空间 -资源隔离-不隔离网络
pods 部署应用 有所在的命名空间
命令
kubectl  explain pod  对应pod有哪些模版
kubectl  explain pod.apiVersion
kubectl  explain pod.spec.containers

运行pod
kubectl apply -f server.yaml
kubectl create -f server.yaml  #资源清单创建pod
kubectl create -f hao.yaml
删除
kubectl get deploy
kubectl delete apply server名称
kubectl delete podname --all
kubectl delete svc svcname
查看
kubectl get pod
kubectl get pod -o wide 查看详细信息 ip
kubectl get deploy
kubectl get svc 查看集群
kubectl get service
kubectl describe pod hao 查看pod中容器状态信息
kubectl log hao -c hao1  查看pod日志,多个容器-c指定名称
进入
kubectl exec pod podname --it /bin/sh
pod中多个容器需要-c

init 初始化master 各组件
join 其它node 加入集群 令牌24小时过期
重新生成令牌
	kubeadm token create --print-join-command
kubectl get nodes
   name	名字
   status ready 完成
   roles 角色 control-plane,master
   age 时长
   version 版本
kubectl get pod -A
   namespace 命名空间
   name 名字
   ready  完成状态
   status running containerCreating
   restarts 重启次数,故障自愈
   age  启动时长

kubectl apply -f xxx.yml

kubectl  get pod -A -w  # 监控状态变化
查看命名空间
kubectl get pod -A
查看命名空间下得pod
kubectl get pod -n kubernetes-dashboard

服务ip
集群访问
kubectl expose deployment my-dep --port=8000 --target-port=80 --type=ClusterIP
外网访问
kubectl expose deployment my-dep --port=8000 --target-port=80 --type=NodePort

Ingress service 统一网管关入口
安装
# 添加 k8s 安装源
cat < kubernetes.repo
[kubernetes]
name=Kubernetes
baseurl=https://mirrors.aliyun.com/kubernetes/yum/repos/kubernetes-el7-x86_64
enabled=1
gpgcheck=0
repo_gpgcheck=0
gpgkey=https://mirrors.aliyun.com/kubernetes/yum/doc/yum-key.gpg https://mirrors.aliyun.com/kubernetes/yum/doc/rpm-package-key.gpg
EOF
mv kubernetes.repo /etc/yum.repos.d/

# 添加 Docker 安装源
yum-config-manager --add-repo http://mirrors.aliyun.com/docker-ce/linux/centos/docker-ce.repo

yum install -y kubelet-1.22.4 kubectl-1.22.4 kubeadm-1.22.4 docker-ce

systemctl enable kubelet
systemctl start kubelet
systemctl enable docker
systemctl start docker
初始化异常
#kubeadm init --image-repository=registry.aliyuncs.com/google_containers
I0826 10:05:21.490091    4475 version.go:255] remote version is much newer: v1.25.0; falling back to: stable-1.22
[init] Using Kubernetes version: v1.22.13
[preflight] Running pre-flight checks
error execution phase preflight: [preflight] Some fatal errors occurred:
	[ERROR FileContent--proc-sys-net-bridge-bridge-nf-call-iptables]: /proc/sys/net/bridge/bridge-nf-call-iptables contents are not set to 1
[preflight] If you know what you are doing, you can make a check non-fatal with `--ignore-preflight-errors=...`
To see the stack trace of this error execute with --v=5 or higher
解决:
echo 1  > /proc/sys/net/bridge/bridge-nf-call-iptables
初始化
kubeadm init --image-repository=registry.aliyuncs.com/google_containers

I0826 10:20:56.374420   18984 version.go:255] remote version is much newer: v1.25.0; falling back to: stable-1.22
[init] Using Kubernetes version: v1.22.13
[preflight] Running pre-flight checks
[preflight] Pulling images required for setting up a Kubernetes cluster
[preflight] This might take a minute or two, depending on the speed of your internet connection
[preflight] You can also perform this action in beforehand using 'kubeadm config images pull'


[certs] Using certificateDir folder "/etc/kubernetes/pki"
[certs] Generating "ca" certificate and key
[certs] Generating "apiserver" certificate and key
[certs] apiserver serving cert is signed for DNS names [diagnosis-tool011164062250.na62 kubernetes kubernetes.default kubernetes.default.svc kubernetes.default.svc.cluster.local] and IPs [10.96.0.1 11.164.62.250]
[certs] Generating "apiserver-kubelet-client" certificate and key
[certs] Generating "front-proxy-ca" certificate and key
[certs] Generating "front-proxy-client" certificate and key
[certs] Generating "etcd/ca" certificate and key
[certs] Generating "etcd/server" certificate and key
[certs] etcd/server serving cert is signed for DNS names [diagnosis-tool011164062250.na62 localhost] and IPs [11.164.62.250 127.0.0.1 ::1]
[certs] Generating "etcd/peer" certificate and key
[certs] etcd/peer serving cert is signed for DNS names [diagnosis-tool011164062250.na62 localhost] and IPs [11.164.62.250 127.0.0.1 ::1]
[certs] Generating "etcd/healthcheck-client" certificate and key
[certs] Generating "apiserver-etcd-client" certificate and key
[certs] Generating "sa" key and public key
[kubeconfig] Using kubeconfig folder "/etc/kubernetes"
[kubeconfig] Writing "admin.conf" kubeconfig file
[kubeconfig] Writing "kubelet.conf" kubeconfig file
[kubeconfig] Writing "controller-manager.conf" kubeconfig file
[kubeconfig] Writing "scheduler.conf" kubeconfig file
[kubelet-start] Writing kubelet environment file with flags to file "/var/lib/kubelet/kubeadm-flags.env"
[kubelet-start] Writing kubelet configuration to file "/var/lib/kubelet/config.yaml"
[kubelet-start] Starting the kubelet
[control-plane] Using manifest folder "/etc/kubernetes/manifests"
[control-plane] Creating static Pod manifest for "kube-apiserver"
[control-plane] Creating static Pod manifest for "kube-controller-manager"
[control-plane] Creating static Pod manifest for "kube-scheduler"
[etcd] Creating static Pod manifest for local etcd in "/etc/kubernetes/manifests"
[wait-control-plane] Waiting for the kubelet to boot up the control plane as static Pods from directory "/etc/kubernetes/manifests". This can take up to 4m0s
[apiclient] All control plane components are healthy after 7.002982 seconds
[upload-config] Storing the configuration used in ConfigMap "kubeadm-config" in the "kube-system" Namespace
[kubelet] Creating a ConfigMap "kubelet-config-1.22" in namespace kube-system with the configuration for the kubelets in the cluster
[upload-certs] Skipping phase. Please see --upload-certs
[mark-control-plane] Marking the node diagnosis-tool011164062250.na62 as control-plane by adding the labels: [node-role.kubernetes.io/master(deprecated) node-role.kubernetes.io/control-plane node.kubernetes.io/exclude-from-external-load-balancers]
[mark-control-plane] Marking the node diagnosis-tool011164062250.na62 as control-plane by adding the taints [node-role.kubernetes.io/master:NoSchedule]
[bootstrap-token] Using token: r54t2j.eqc99160c8slv45x
[bootstrap-token] Configuring bootstrap tokens, cluster-info ConfigMap, RBAC Roles
[bootstrap-token] configured RBAC rules to allow Node Bootstrap tokens to get nodes
[bootstrap-token] configured RBAC rules to allow Node Bootstrap tokens to post CSRs in order for nodes to get long term certificate credentials
[bootstrap-token] configured RBAC rules to allow the csrapprover controller automatically approve CSRs from a Node Bootstrap Token
[bootstrap-token] configured RBAC rules to allow certificate rotation for all node client certificates in the cluster
[bootstrap-token] Creating the "cluster-info" ConfigMap in the "kube-public" namespace
[kubelet-finalize] Updating "/etc/kubernetes/kubelet.conf" to point to a rotatable kubelet client certificate and key
[addons] Applied essential addon: CoreDNS
[addons] Applied essential addon: kube-proxy

Your Kubernetes control-plane has initialized successfully!

To start using your cluster, you need to run the following as a regular user:

  mkdir -p $HOME/.kube
  sudo cp -i /etc/kubernetes/admin.conf $HOME/.kube/config
  sudo chown $(id -u):$(id -g) $HOME/.kube/config

Alternatively, if you are the root user, you can run:

  export KUBECONFIG=/etc/kubernetes/admin.conf

You should now deploy a pod network to the cluster.
Run "kubectl apply -f [podnetwork].yaml" with one of the options listed at:
  https://kubernetes.io/docs/concepts/cluster-administration/addons/

Then you can join any number of worker nodes by running the following on each as root:

kubeadm join 11.164.62.250:6443 --token r54t2j.eqc99160c8slv45x \
	--discovery-token-ca-cert-hash sha256:62cc9771e7b45290fed79f2e099492aa3a9a8b3fd80652391ccf0498ec54b7ae

# 记得把 kubeadm join xxx 保存起来
# 忘记了重新获取:kubeadm token create --print-join-command

# 复制授权文件,以便 kubectl 可以有权限访问集群
# 如果你其他节点需要访问集群,需要从主节点复制这个文件过去其他节点
mkdir -p $HOME/.kube
cp -i /etc/kubernetes/admin.conf $HOME/.kube/config
chown $(id -u):$(id -g) $HOME/.kube/config

# 在其他机器上创建 ~/.kube/config 文件也能通过 kubectl 访问到集群
节点加入
- kubeadm token create --print-join-command 通过token 和 ca信息加入
- 报错:[kubelet-check] The HTTP call equal to ‘curl -sSL http://localhost:10248/healthz’ failed with error: Get “http://localhost:10248/healthz”: dial tcp 127.0.0.1:10248: connect: connection refused.
- 参考 kubernetes cgroup驱动为systemd 而 yum 安装的docker驱动为system次该驱动
vim /etc/docker/daemon.json

{
  "exec-opts": ["native.cgroupdriver=systemd"]
}
- 加入集群
kubeadm join xxx.xxx.xx.xx:6443 --token 268fma.xxxxx --discovery-token-ca-cert-hash sha256:xxxxxxxxxxxxxxxxxxxxxxxxxxxxx
[preflight] Running pre-flight checks
[preflight] Reading configuration from the cluster...
[preflight] FYI: You can look at this config file with 'kubectl -n kube-system get cm kubeadm-config -o yaml'
[kubelet-start] Writing kubelet configuration to file "/var/lib/kubelet/config.yaml"
[kubelet-start] Writing kubelet environment file with flags to file "/var/lib/kubelet/kubeadm-flags.env"
[kubelet-start] Starting the kubelet
[kubelet-start] Waiting for the kubelet to perform the TLS Bootstrap...

This node has joined the cluster:
* Certificate signing request was sent to apiserver and a response was received.
* The Kubelet was informed of the new secure connection details.

Run 'kubectl get nodes' on the control-plane to see this node join the cluster.
安装ipvs
#kubectl apply -f https://raw.githubusercontent.com/coreos/flannel/master/Documentation/kube-flannel.yml
namespace/kube-flannel created
clusterrole.rbac.authorization.k8s.io/flannel created
clusterrolebinding.rbac.authorization.k8s.io/flannel created
serviceaccount/flannel created
configmap/kube-flannel-cfg created
daemonset.apps/kube-flannel-ds created
flannel 启动报错
- Error registering network: failed to acquire lease: node “k8s-master01” pod cidr not assigned
- kubectl get ds -n kube-flannel
- kubect get pod -n kube-flannel
- kubectl logs kube-flannel-ds-xxxx -n kube-flannel
- 解决方案
- 编辑 /etc/kubernetes/manifests/kube-controller-manager.yaml
加入
–allocate-node-cidrs=true
–cluster-cidr=10.244.0.0/16
查看nodes
#kubectl get nodes
NAME                              STATUS   ROLES                  AGE     VERSION
diagnosis-tool011164062250.na62   Ready    control-plane,master   54m     v1.22.4
diagnosis-tool011164063137.na62   Ready                     2m25s   v1.22.4
命名空间下的pod
kubectl get pods -n kube-system
解决文件系统只读问题
touch /etc/a
touch: cannot touch ‘/etc/a’: Read-only file system
mount
查看文件系统为只读
/dev/vda1 on / type ext4 (ro,relatime,data=ordered)
解决:重新挂载
mount -o remount,rw /
/dev/vda1 on / type ext4 (rw,relatime,data=ordered)
pod
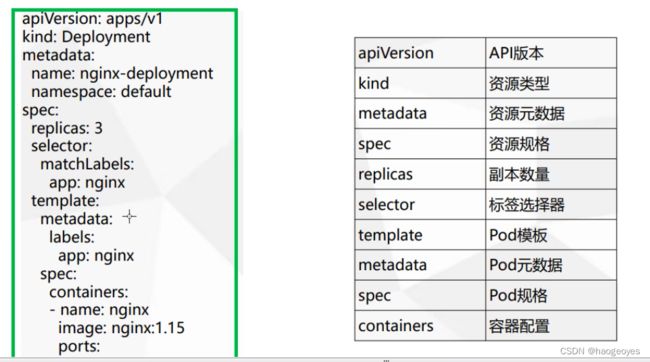
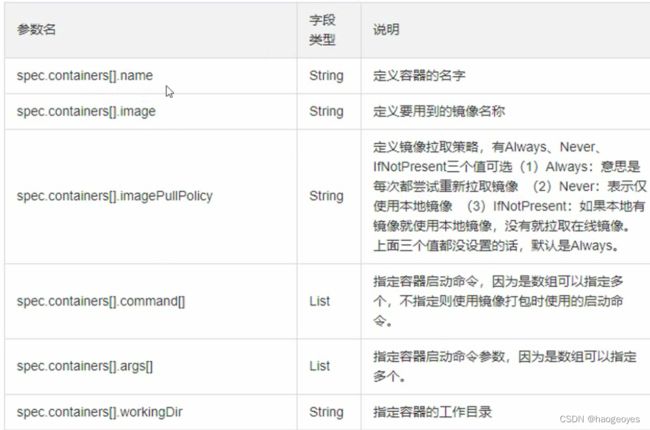
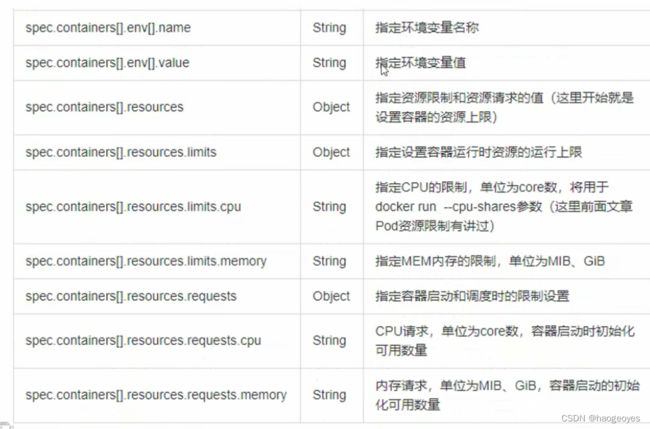
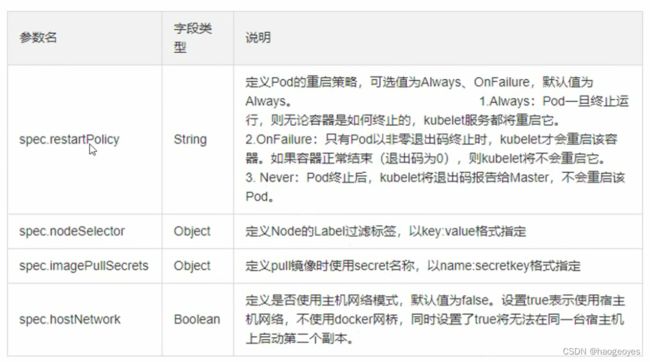
配置文件参数说明


- 生成 yaml
kubectl create deployment web --image=nginx -o yaml --dry-run > nginx.yaml
- 部署好的pod生成yaml
kubectl get pod testapp -o yaml > test.yaml
kubectl run testapp --image=ccr.ccs.tencentyun.com/k8s-tutorial/test-k8s:v1
运行testapp pod 镜像是
#kubectl get pod
NAME      READY   STATUS    RESTARTS   AGE
testapp   0/1     Pending   0          149m
配置文件部署
vi pod.yaml
apiVersion: v1
kind: Pod
metadata:
  name: test-pod
spec:
  # 定义容器,可以多个
  containers:
    - name: test-k8s # 容器名字
      image: ccr.ccs.tencentyun.com/k8s-tutorial/test-k8s:v1 # 镜像
执行
kubectl apply -f pod.yaml
kubectl get pod
查看pod pading原因
#kubectl get pod
NAME       READY   STATUS    RESTARTS   AGE
test-pod   0/1     Pending   0          84m
testapp    0/1     Pending   0          3h58m

kubectl describe node diagnosis-tool011164063137.na62 > detail.node

 58 Allocated resources:
 59   (Total limits may be over 100 percent, i.e., overcommitted.)
 60   Resource           Requests   Limits
 61   --------           --------   ------
 62   cpu                100m (2%)  100m (2%)
 63   memory             50Mi (0%)  50Mi (0%)
 64   ephemeral-storage  0 (0%)     0 (0%)
 65   hugepages-1Gi      0 (0%)     0 (0%)
 66   hugepages-2Mi      0 (0%)     0 (0%)
 67 Events:
 68   Type     Reason         Age                   From     Message
 69   ----     ------         ----                  ----     -------
 70   Warning  ImageGCFailed  2m2s (x25 over 122m)  kubelet  (combined from similar events): wanted to free 10735946137 bytes, but freed 0 bytes     space with errors in image deletion: rpc error: code = Unknown desc = Error response from daemon: conflict: unable to remove repository refer    ence "redis:latest" (must force) - container f0e742b9be40 is using its referenced image 3e42dd4e79c7
处理:
删除镜像
#docker image rm 3e4
Error response from daemon: conflict: unable to delete 3e42dd4e79c7 (must be forced) - image is being used by stopped container f0e742b9be40

停止容器
docker ps -a
docker stop f0e742b9be40
docker rm -f f0e742b9be40

查看网络配置
kubectl describe pod test-pod
ror: code = Unknown desc = failed to set up sandbox container "c45eb240a3b47cd8f800b36b6bc56abb0ed98afdda47985c6eb494daed6bc5b6" network for pod "test-pod": networkPlugin cni failed to set up pod "test-pod_default" network: open /run/flannel/subnet.env: no such file or directory

查看 flannel的地址
wget https://raw.githubusercontent.com/coreos/flannel/master/Documentation/kube-flannel.yml
vi kube-flannel.yml
 82   net-conf.json: |
 83     {
 84       "Network": "10.244.0.0/16",
 85       "Backend": {
 86         "Type": "vxlan"
 87       }
 88     }
解决master 各节点
vi /run/flannel/subnet.env
FLANNEL_NETWORK=10.244.0.0/16
FLANNEL_SUBNET=10.244.0.1/24
FLANNEL_MTU=1450
FLANNEL_IPMASQ=true
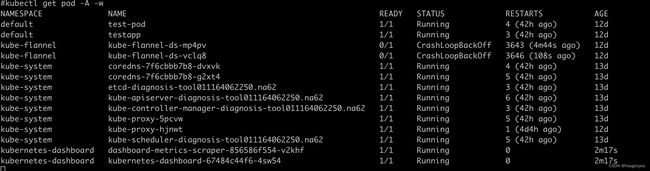
监控pod状态变化
#kubectl  get pod -A -w
NAMESPACE      NAME                                                      READY   STATUS             RESTARTS           AGE
default        test-pod                                                  1/1     Running            4 (41h ago)        12d
default        testapp                                                   1/1     Running            3 (41h ago)        12d
kube-flannel   kube-flannel-ds-mp4pv                                     0/1     CrashLoopBackOff   3641 (80s ago)     12d
kube-flannel   kube-flannel-ds-vclq8                                     0/1     CrashLoopBackOff   3643 (3m28s ago)   12d
k8s web界面 dashboard
master上
kubectl apply -f https://raw.githubusercontent.com/kubernetes/dashboard/v2.3.1/aio/deploy/recommended.yaml

修改类型 设置访问端口
kubectl edit svc kubernetes-dashboard -n kubernetes-dashboard
修改 type: ClusterIP 改为 type: NodePort
kubectl get svc -A |grep kubernetes-dashboard
## 找到端口,在安全组放行
detail
#kubectl apply -f https://raw.githubusercontent.com/kubernetes/dashboard/v2.3.1/aio/deploy/recommended.yaml
namespace/kubernetes-dashboard created
serviceaccount/kubernetes-dashboard created
service/kubernetes-dashboard created
secret/kubernetes-dashboard-certs created
secret/kubernetes-dashboard-csrf created
secret/kubernetes-dashboard-key-holder created
configmap/kubernetes-dashboard-settings created
role.rbac.authorization.k8s.io/kubernetes-dashboard created
clusterrole.rbac.authorization.k8s.io/kubernetes-dashboard created
rolebinding.rbac.authorization.k8s.io/kubernetes-dashboard created
clusterrolebinding.rbac.authorization.k8s.io/kubernetes-dashboard created
deployment.apps/kubernetes-dashboard created
service/dashboard-metrics-scraper created
Warning: spec.template.metadata.annotations[seccomp.security.alpha.kubernetes.io/pod]: deprecated since v1.19; use the "seccompProfile" field instead
deployment.apps/dashboard-metrics-scraper created
#kubectl get svc -A |grep kubernetes-dashboard
kubernetes-dashboard   dashboard-metrics-scraper   ClusterIP   10.107.5.58    <none>        8000/TCP                 6m27s
kubernetes-dashboard   kubernetes-dashboard        NodePort    10.104.27.20   <none>        443:30993/TCP            6m27s
kubectl create -f hao.yaml
hao.yaml
apiVersion: v1
kind: Pod
metadata:
  labels:
    app: hao
    version: v1
  name: hao-pod
spec:
  containers:
  - name: hao
    image: nginx
pod声明周期
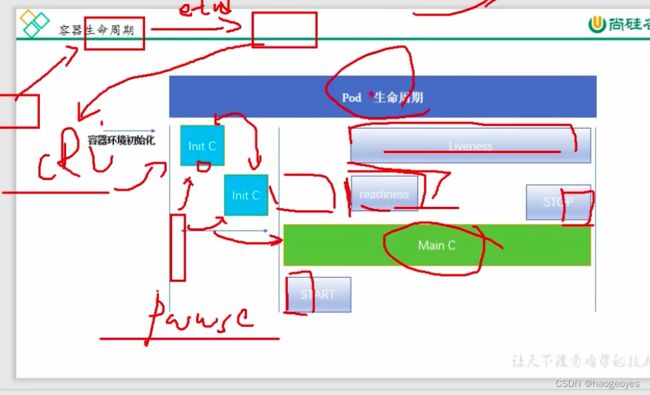
pod 生命周期
InitC 初始化容器:初始化完成后就会死亡,不会一直存在,多个initcs是线性过程
容器运行前后会有一个 start stop操作
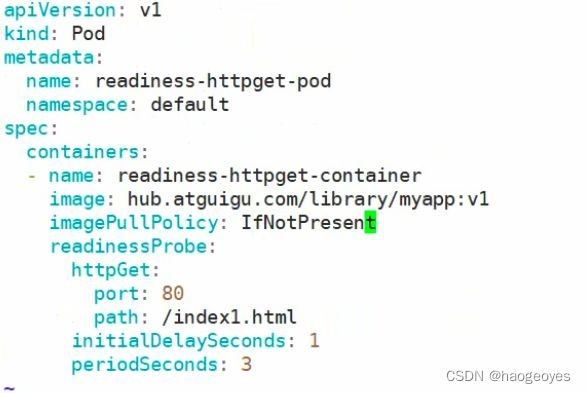
readiness 就绪检测 pod已经就绪但是服务进程未就绪,命令、tcp检测服务是否可用
liveness 生存检测 pod中运行的主容器 main C,出现了僵尸进程
创建过程:
1、kubectl向api接口发送创建请求,调度会将请求分发给kubelet ,etcd在中间存储状态
2、cri完成初始化,在初始化的过程中会创建一个pause的基础容器负责网络和存储卷的共享,pod中所有容器都是共享的。接着会
进行initC的初始化为0就会正常退出
3、initC正常退出以后就会进入到MainC的主容器运行,在启动的时候运行一个start的命令,结束是也会运行stop命令,在这个过
程中会有liveness和readiness的参与
4、只有readiness检测成功pod才会变为running或者ready
5、liveness会伴随整个pod的生命周期,当检测MainC中主程序无法正常工作,可以更具策略执行重启或其他动作
探针检测
kubernetes二次开发
代码库
git clone https://github.com/kubernetes/kubernetes.git
git clone https://github.com/kubernetes-sigs/controller-runtime
kubernetes 问题
- 启动pod systemctl 服务报错:
- Failed to get D-Bus connection: Operation not permitted
- 解决 yaml添加 特权参数
 16       containers:
 17       - name: app
 18         image: app:v1
 19         securityContext:
 20           privileged: true