Spring MVC:域对象共享数据
Spring MVC
- 前言
- 域对象共享数据
-
- 使用 ModelAndView 向 request 域对象中共享数据
- 使用 Map 、Model 或 ModelMap 向 request 域对象中共享数据
- 使用 @SesionAttributes 注解向 session 域对象中共享数据
- 使用 Servlet API 向 application 域对象中共享数据
- 附
前言
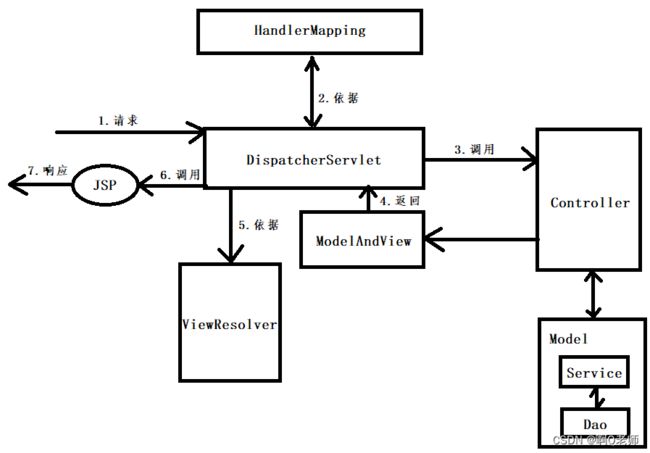
在上一章中,谈到处理器 Controller 获取请求参数的实现。那么,在处理器 Controller 处理请求后,下一步是将模型数据通过域对象共享的方式(结果会封装成模型视图 ModelAndView 对象)返回给前端控制器 DispatcherServlet 。
模型数据:Model 层中请求处理后的结果(会返回给处理器 Controller )
域对象共享数据
域对象共享数据,指在 Spring MVC 应用中,多个 Controller 或 Model 对象可以共享相同的数据。通过共享数据,可以避免重复的数据获取和数据传递,提高程序的性能和可维护性。
在 Spring MVC 中,域对象共享数据可以通过多种方式实现:
- 使用 ModelAndView 向 request 域对象中共享数据
- 使用 Map 、Model 或 ModelMap 向 request 域对象中共享数据
- 使用 @SesionAttributes 注解向 session 域对象中共享数据
- 使用 Servlet API 向 application 域对象中共享数据
使用 ModelAndView 向 request 域对象中共享数据
ModelAndView 对象有 model 和 view 两个属性。model 属性用于向请求域共享数据,而 view 属性用于设置视图。
简单示例:
1.首先进行注入字符串
package cn.edu.springmvcdemo.controller;

import org.springframework.stereotype.Controller;
import org.springframework.web.bind.annotation.RequestMapping;
import org.springframework.web.servlet.ModelAndView;

@Controller
public class DomainObjectSDDemo {
    @RequestMapping("/mavTest")
    public ModelAndView mavTest(){
        ModelAndView mav = new ModelAndView();
        //1.字符串注入
        mav.addObject("name","admin"); //添加数据模型
        mav.setViewName("DomObjSharedData"); //设置视图
        return mav;
    }
}
创建 DomObjSharedData.jsp
<%--
  Created by IntelliJ IDEA.
  User: dell
  Date: 2023/7/22
  Time: 15:04
  To change this template use File | Settings | File Templates.
--%>
<%@ page contentType="text/html;charset=UTF-8" language="java" %>
<html>
<body>
    name = ${name} <%-- 或者 ${requestScope.name} --%>
body>
html>
2.接着进行注入对象
先创建一个实体类 DomainObject ,定义编号、名字和年龄属性 (下面例子中使用到的对象都是 DomainObject )
package cn.edu.springmvcdemo.model;

public class DomainObject {
    private int id;
    private String name;
    private int age;

    public DomainObject() {
        super();
    }

    public DomainObject(int id, String name, int age) {
        this.id = id;
        this.name = name;
        this.age = age;
    }

    public int getId() {
        return id;
    }

    public void setId(int id) {
        this.id = id;
    }

    public String getName() {
        return name;
    }

    public void setName(String name) {
        this.name = name;
    }

    public int getAge() {
        return age;
    }

    public void setAge(int age) {
        this.age = age;
    }

    @Override
    public String toString() {
        return "DomainObject{" +
                "id=" + id +
                ", name='" + name + '\'' +
                ", age=" + age +
                '}';
    }
}
接着,对象注入
package cn.edu.springmvcdemo.controller;

import cn.edu.springmvcdemo.model.DomainObject;
import org.springframework.stereotype.Controller;
import org.springframework.web.bind.annotation.RequestMapping;
import org.springframework.web.servlet.ModelAndView;

@Controller
public class DomainObjectSDDemo {
    @RequestMapping("/mavTest")
    public ModelAndView mavTest(){
        ModelAndView mav = new ModelAndView();
        //1.字符串注入
        mav.addObject("name","admin"); //添加数据模型

        //2.对象注入
        DomainObject domainObject = new DomainObject();
        domainObject.setId(722);
        domainObject.setName("admin");
        domainObject.setAge(18);
        mav.addObject("admin",domainObject);

        mav.setViewName("DomObjSharedData"); //设置视图
        return mav;
    }
}
然后,DomObjSharedData.jsp 添加获取对象的内容
<%@ page contentType="text/html;charset=UTF-8" language="java" %>
<html>
<body>
    name = ${name} <%-- 或者 ${requestScope.name} --%>
    <br>
    user = ${admin}
body>
html>
3.最后进行注入 list 集合与 map 集合
先在 pom.xml 中添加依赖
<dependency>
  <groupId>org.apache.taglibsgroupId>
  <artifactId>taglibs-standard-implartifactId>
  <version>1.2.5version>
dependency>


<dependency>
  <groupId>org.apache.taglibsgroupId>
  <artifactId>taglibs-standard-specartifactId>
  <version>1.2.5version>
dependency>
接着,list 集合和 map 集合注入
package cn.edu.springmvcdemo.controller;

import cn.edu.springmvcdemo.model.DomainObject;
import org.springframework.stereotype.Controller;
import org.springframework.web.bind.annotation.RequestMapping;
import org.springframework.web.servlet.ModelAndView;

import java.util.ArrayList;
import java.util.HashMap;
import java.util.List;
import java.util.Map;

@Controller
public class DomainObjectSDDemo {
    @RequestMapping("/mavTest")
    public ModelAndView mavTest(){
        ModelAndView mav = new ModelAndView();
        //1.字符串注入
        mav.addObject("name","admin"); //添加数据模型

        //2.对象注入
        DomainObject domainObject1 = new DomainObject();
        domainObject1.setId(722);
        domainObject1.setName("admin");
        domainObject1.setAge(18);
        mav.addObject("admin",domainObject1);

        //3. list 集合注入
        DomainObject domainObject2 = new DomainObject();
        domainObject2.setId(723);
        domainObject2.setName("administrator");
        domainObject2.setAge(20);
        mav.addObject("administrator",domainObject2);

        List<DomainObject> domainObjects = new ArrayList<>();
        domainObjects.add(domainObject1);
        domainObjects.add(domainObject2);
        mav.addObject("domainObjects",domainObjects); //存入 List 类型数据

        //3. map 集合注入
        Map<Integer,DomainObject> map = new HashMap<Integer,DomainObject>();
        map.put(1,domainObject1);
        map.put(2,domainObject2);
        mav.addObject("map",map); //存入 Map 类型数据

        mav.setViewName("DomObjSharedData"); //设置视图
        return mav;
    }
}
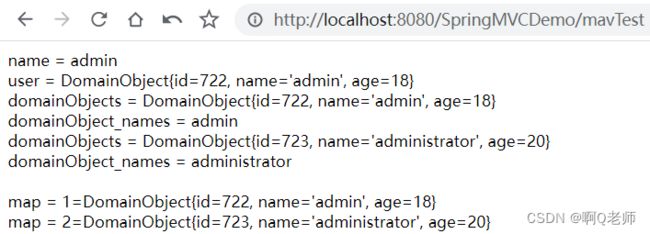
然后,DomObjSharedData.jsp 添加获取 list 集合和 map 集合的内容
<%@ page contentType="text/html;charset=UTF-8" language="java" %>
<%@ taglib prefix="c" uri="http://java.sun.com/jsp/jstl/core" %>
<html>
<body>
    name = ${name} <%-- 或者 ${requestScope.name} --%>
    <br>
    user = ${admin}
    <br>

    <c:forEach var="domainObject" items="${domainObjects}">
        domainObjects = ${domainObject}<br>
        domainObject_names = ${domainObject.name}<br>
    c:forEach>
    <br>

    <c:forEach var="map" items="${map}">
        map = ${map}<br>
    c:forEach>
body>
html>
注:这次需要重启 JRebel 才能正常显示
使用 Map 、Model 或 ModelMap 向 request 域对象中共享数据
使用 Map 、Model 或 ModelMap 向 request 域对象中共享数据是项目开发中相对比较常用的方式。与使用 ModelAndView 相比,更简单便捷些。
简单示例:
在上面案例的基础上,只需在 DomainObjectSDDemo 类中进行修改
1.使用 Map 向 request 域对象中共享数据
package cn.edu.springmvcdemo.controller;

import cn.edu.springmvcdemo.model.DomainObject;
import org.springframework.stereotype.Controller;
import org.springframework.web.bind.annotation.RequestMapping;
import java.util.Map;

@Controller
public class DomainObjectSDDemo {
    @RequestMapping("/mvTest1")
    public String mvTest1(Map<String,Object> map){
        //注入字符串
        map.put("name","admin"); //对比使用 ModelAndView :mav.addObject("name","admin");

        //注入对象
        DomainObject domainObject1 = new DomainObject();
        domainObject1.setId(722);
        domainObject1.setName("admin");
        domainObject1.setAge(18);
        map.put("admin",domainObject1); //对比使用 ModelAndView :mav.addObject("admin",domainObject1);

        //主要区别在于 map.put() 和 mav.addObject(),不一一演示

        return "DomObjSharedData"; /**
                                        对比使用 ModelAndView :
                                        ModelAndView mav = new ModelAndView();
                                        mav.setViewName("DomObjSharedData"); //设置视图
                                        return mav;
                                    **/
    }
}
2.使用 Model 向 request 域对象中共享数据
@RequestMapping("/mvTest2")
//对比使用 map 的方法参数:Map map
public String mvTest2(Model model){
    //注入字符串
    //对比使用 Map:map.put("name","admin"); //对比使用 ModelAndView :mav.addObject("name","admin");
    model.addAttribute("name","admin");

    //注入对象
    DomainObject domainObject1 = new DomainObject();
    domainObject1.setId(722);
    domainObject1.setName("admin");
    domainObject1.setAge(18);
    //对比使用 Map:map.put("admin",domainObject1); //对比使用 ModelAndView :mav.addObject("admin",domainObject1);
    model.addAttribute("admin",domainObject1);

    //主要区别在于 model.addAttribute()、map.put() 和 mav.addObject(),不一一演示

    return "DomObjSharedData"; /**
                                     对比使用 ModelAndView :
                                     ModelAndView mav = new ModelAndView();
                                     mav.setViewName("DomObjSharedData"); //设置视图
                                     return mav;
                               **/
}
3.使用 ModelMap 向 request 域对象中共享数据
@RequestMapping("/mvTest3")
//而 ModelMap 将 model 和 map 综合起来了。即既可以使用 addAttribute() 也可以使用 put()
//方法参数为 ModelMap
public String mvTest3(ModelMap modelMap){
    modelMap.addAttribute("name","admin"); // 或者 modelMap.put("name","admin");

    DomainObject domainObject1 = new DomainObject();
    domainObject1.setId(722);
    domainObject1.setName("admin");
    domainObject1.setAge(18);
    modelMap.put("admin",domainObject1); // 或者 modelMap.addAttribute("admin",domainObject1);
    return "DomObjSharedData";
}
总体来讲,向 request 域对象中共享数据的各种方式区别不大,自行根据个人喜好习惯选择使用即可。
使用 @SesionAttributes 注解向 session 域对象中共享数据
使用 @SesionAttributes 注解可以将数据共享到 session 域对象中,同时也共享到 request 域对象中。
@SesionAttributes 注解属性
- value :通过键来指定共享的值
- types :通过类型来指定共享的值
//只能用于类级别
//书写格式
@SessionAttributes(value = "xxx",types = "xxx.class")
//或者
@SessionAttributes(value = {"xxx","xxx"...},types = {"xxx.class","xxx.class"...})
简单示例:
使用 @SesionAttributes 注解向 session 域对象中共享数据
package cn.edu.springmvcdemo.controller;

import cn.edu.springmvcdemo.model.DomainObject;
import org.springframework.stereotype.Controller;
import org.springframework.ui.ModelMap;
import org.springframework.web.bind.annotation.RequestMapping;
import org.springframework.web.bind.annotation.SessionAttributes;

@SessionAttributes(value = {"name","admin"}) //或者 @SessionAttributes(types = {String.class,DomainObject.class})
@Controller
public class DomainObjectSDDemo_SA {
    @RequestMapping("/saTest")
    public String saTest(ModelMap modelMap){
        //字符串注入
        modelMap.put("name","admin");

        //对象注入
        //实体类 DomainObject ,ModelAndView 的示例中已创建
        DomainObject domainObject1 = new DomainObject();
        domainObject1.setId(722);
        domainObject1.setName("admin");
        domainObject1.setAge(18);
        modelMap.put("admin", domainObject1);
        return "DomObjSharedData_SA";
    }
}
创建 DomObjSharedData_SA.jsp
<%@ page contentType="text/html;charset=UTF-8" language="java" %>
<html>
<body>
    获取 request 域中的 name : ${requestScope.name} <br>
    获取 session 域中的 name : ${sessionScope.name} <br>
    admin = ${admin}
body>
html>
使用 Servlet API 向 application 域对象中共享数据
使用 Servlet API 可以将数据共享到 application 域对象中。虽然不能同时共享到其他域对象中,但也可以使用 Servlet API 将数据共享到 session 域对象与 request 域对象中。
简单示例:
使用 Servlet API 向 application 域对象、session 域对象与 request 域对象中共享数据
package cn.edu.springmvcdemo.controller;

import org.springframework.stereotype.Controller;
import org.springframework.web.bind.annotation.RequestMapping;

import javax.servlet.ServletContext;
import javax.servlet.http.HttpServletRequest;
import javax.servlet.http.HttpSession;

@Controller
public class DomainObjectSDDemo_SAPI {
    @RequestMapping("/sapiTest")
    public String sapiTest(HttpSession session, HttpServletRequest request){
        //1.向 application 域对象共享数据
        ServletContext application = session.getServletContext();
        application.setAttribute("name", "admin1");

        //2.向 session 域对象共享数据
        session.setAttribute("name","admin2");

        //3.向 request 域对象共享数据
        request.setAttribute("name","admin3");
        return "DomObjSharedData_SAPI";
    }
}
创建 DomObjSharedData_SAPI.jsp
<%@ page contentType="text/html;charset=UTF-8" language="java" %>
<html>
<body>
    获取 application 域中的 name : ${applicationScope.name} <br>
    获取 session 域中的 name : ${sessionScope.name} <br>
    获取 request 域中的 name : ${requestScope.name}
body>
html>
附
@ModelAttribute 注解介绍
1.使用 @ModelAttribute 注解在方法上:在执行目标方法前,先从上到下逐一执行有 @ModelAttribute 注解的方法
2.使用 @ModelAttribute 注解在方法的参数上:用于从 Model 、Form 表单或者 URL 请求参数中获取属性值
通常 @ModelAttribute 注解应用在修改对象的某些属性值,而其他属性值不允许修改或保持不变的场景中
简单示例:
创建修改信息的页面 DomObjSharedData_UPDATE.jsp
<%-- 只修改年龄,id 隐藏,名字不允许修改 --%>
<%@ page contentType="text/html;charset=UTF-8" language="java" %>
<html>
<body>
    <h3>信息修改h3>
    <form action="${pageContext.request.contextPath}/updateTest" method="post">
        <input type="hidden" name="id" value="722" />
        年龄:<input type="text" name="age" />
        <input type="submit" value="修改"/>
    form>
body>
html>
创建成功修改跳转的页面 accessing.jsp
<%@ page contentType="text/html;charset=UTF-8" language="java" %>
<html>
<body>
    <h2>提交成功!h2>
body>
html>
在没有使用 @ModelAttribute 注解前:不作修改的属性值可能为空,或者使用传统的方法修改实现
![]()
在 Spring MVC 中,提供的 @ModelAttribute 注解也可以实现修改
package cn.edu.springmvcdemo.controller;

import cn.edu.springmvcdemo.model.DomainObject;
import org.springframework.stereotype.Controller;
import org.springframework.ui.ModelMap;
import org.springframework.web.bind.annotation.ModelAttribute;
import org.springframework.web.bind.annotation.RequestMapping;
import org.springframework.web.bind.annotation.RequestParam;

@Controller
public class DomainObjectSDDemo_MA {
    //先执行有 @ModelAttribute 注解的方法
    @ModelAttribute
    //默认 id 参数赋值为 null ,@RequestParam 注解知识点
    private void getUser(@RequestParam(value = "id",required = false) Integer id, ModelMap modelMap){
        System.out.println("id ==" + id);
        DomainObject domainObject = new DomainObject();
        //通过传递的 id 值匹配数据库中对应的记录,返回一个对应的对象
        //模拟:获取 id 对应的对象属性值
        domainObject.setName("admin");
        domainObject.setAge(18);
        //注入( DomainObject对象,attributeName 规定写为 domainObject )
        modelMap.addAttribute("domainObject",domainObject); //注:attributeName 与对应的对象名字保持一致,首字母改为小写
    }

    //信息修改
    @RequestMapping("/update")
    public String update(){
        return "DomObjSharedData_UPDATE";
    }

    //修改成功
    @RequestMapping("/updateTest")
    public String updateTest(DomainObject domainObject){
        System.out.println("修改后的信息:" + domainObject);
        //信息修改后为:DomainObject{id=722, name='null', age=18},这里 name 为空,直接全部覆盖会把数据库的 name 信息也修改为 null
        //或者
        /**
         * 传统做法:
         * 第一步:通过传递的id值匹配数据库中对应的记录,返回一个对应的对象
         * 第二步:将传递的对象要修改的属性覆盖到从数据库中查询出的对象的属性里
         * 第三步:调用 service 层的修改方法,实现修改
         * 这里思想就是单一对修改的字段进行覆盖。
         * **/

		//使用 @ModelAttribute 注解后,可以直接全部覆盖,省略了传统做法的第一二步,直接调用 service 层的修改方法即可
        return "accessing";
    }
}


