自然语言处理 微调ChatGLM-6B大模型
自然语言处理 微调ChatGLM-6B大模型
- 1、GLM设计原理
- 2、大模型微调原理
- 1、P-tuning v2方案
- 2、LORA方案
1、GLM设计原理

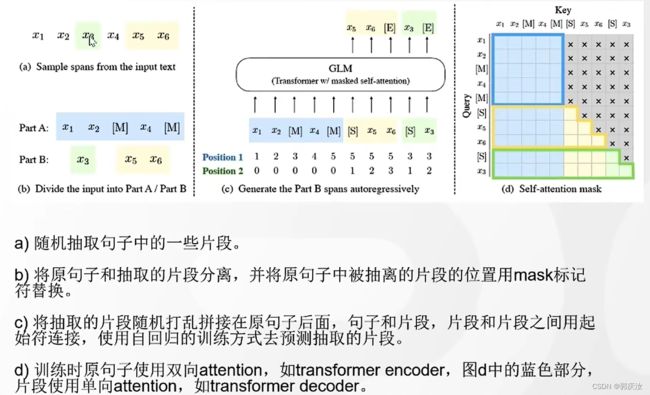
bert的主要任务是随机的去除掉某个单词,使用上下文将其预测出来(相当于完形填空任务);
GPT的主要任务是根据前面一句话,预测下面的内容;
GLM结合了bert的强大双向注意力与gpt的强大生成能力两种能力,被nask的地方使用单向注意力,未被mask的地方使用双向注意力

2、大模型微调原理
1、P-tuning v2方案

原理:由于大模型数据量庞大,如果对模型进行全量微调,需要的算力与数据量不好满足,为了降低要求,传统方法是只对其部分参数进行调整,冻结大部分层;P-tuning 的方案则是并行一个小网络,与大网络相连,原先大网络部分进行冻结,在反向传播时只更新前面小网络的参数,该方法的重要参数就是所加P-tuing大模型前面补丁模型的长度
# cuda 11.7 安装torch
pip install torch==1.13.0+cu117 torchvision==0.14.0+cu117 torchaudio==0.13.0 --extra-index-url https://download.pytorch.org/whl/cu117

# 安装工具库
pip install rouge_chinese nltk jieba datasets
P-tuning v2
微调示例:
下面以 ADGEN (广告生成) 数据集为例介绍代码的使用方法:
数据集下载链接
ADGEN 数据集任务为根据输入(content)生成一段广告词(summary)。
{
    "content": "类型#上衣*版型#宽松*版型#显瘦*图案#线条*衣样式#衬衫*衣袖型#泡泡袖*衣款式#抽绳",
    "summary": "这件衬衫的款式非常的宽松,利落的线条可以很好的隐藏身材上的小缺点,穿在身上有着很好的显瘦效果。领口装饰了一个可爱的抽绳,漂亮的绳结展现出了十足的个性,配合时尚的泡泡袖型,尽显女性甜美可爱的气息。"
}
运行目录ChatGLM-6B-main/ptuning/下的train.sh文件:
PRE_SEQ_LEN=128    # gqr:P-tuing重要参数,即大模型前面补丁模型的长度
LR=2e-2   # gqr:学习率

CUDA_VISIBLE_DEVICES=0 python3 main.py \
    --do_train \   # gqr:是否训练
    --train_file AdvertiseGen/train.json \ # gqr:训练数据集
    --validation_file AdvertiseGen/dev.json \  # gqr:验证数据集
    --prompt_column content \  # gqr:数据集键值
    --response_column summary \  # gqr:数据集键值
    --overwrite_cache \  # gqr:每次训练是否重新生成数据集cache
    --model_name_or_path THUDM/chatglm-6b \
    --output_dir output/adgen-chatglm-6b-pt-$PRE_SEQ_LEN-$LR \   # gqr:训练得到模型路径
    --overwrite_output_dir \  # gqr:是否覆盖
    --max_source_length 64 \ # gqr:最大输入长度
    --max_target_length 64 \ # gqr:最大输出长度
    --per_device_train_batch_size 1 \ # gqr:平均每张卡用几个样本训练
    --per_device_eval_batch_size 1 \ # gqr:平均每张卡用几个样本测试
    --gradient_accumulation_steps 16 \ # gqr:累计多少部更新一下参数
    --predict_with_generate \  # gqr:是否将预测的测试集答案写出
    --max_steps 3000 \   # gqr:训练步数
    --logging_steps 10 \ # gqr:每多少步打印日志
    --save_steps 1000 \ # gqr:每多少步不存一次模型
    --learning_rate $LR \  # 学习率
    --pre_seq_len $PRE_SEQ_LEN \ # P-tuing模型的长度
    --quantization_bit 4   # 模型量化方式,int4
PRE_SEQ_LEN 和 LR 分别是 soft prompt 长度和训练的学习率,可以进行调节以取得最佳的效果。P-Tuning-v2 方法会冻结全部的模型参数,可通过调整 quantization_bit 来被原始模型的量化等级,不加此选项则为 FP16 精度加载。
在默认配置 quantization_bit=4、per_device_train_batch_size=1、gradient_accumulation_steps=16 下,INT4 的模型参数被冻结,一次训练迭代会以 1 的批处理大小进行 16 次累加的前后向传播,等效为 16 的总批处理大小,此时最低只需 6.7G 显存。若想在同等批处理大小下提升训练效率,可在二者乘积不变的情况下,加大 per_device_train_batch_size 的值,但也会带来更多的显存消耗,请根据实际情况酌情调整。
模型在预训练时设置的输入最大长度是2048,超出会被阶段,所以**–max_source_length设置的大些会更好;
–max_target_length:为输出的最大长度,超出也会被截断;
–per_device_train_batch_size 1:为训练阶段每张gpu上训练数据的长度
–gradient_accumulation_steps :即每训练几个轮次进行梯度更新,当显存较小时,可以调整此参数,相当于变相的调整batchsize的参数
–model_name_or_path:参数为预训练模型存放路径,下载地址为https://cloud.tsinghua.edu.cn/d/fb9f16d6dc8f482596c2

微调模型测试
在 P-tuning v2 训练时模型只保存 PrefixEncoder 部分的参数,所以在推理时需要同时加载原 ChatGLM-6B** 模型以及 PrefixEncoder 的权重,因此需要指定 evaluate.sh 中的参数:
--model_name_or_path THUDM/chatglm-6b
--ptuning_checkpoint $CHECKPOINT_PATH
仍然兼容旧版全参保存的 Checkpoint,只需要跟之前一样设定 model_name_or_path:
--model_name_or_path $CHECKPOINT_PATH
测试代码脚本:
import os
import torch
from transformers import AutoConfig, AutoModel, AutoTokenizer


os.environ['CUDA_VISIBLE_DEVICES'] = '0'

model_path = '/home/data/project/ChatGLM/ChatGLM-6B-main/chatglm-6b'  # gqr:官方预训练模型路径
# 载入Tokenizer
tokenizer = AutoTokenizer.from_pretrained(model_path, trust_remote_code=True)

# Fine-tuning 后的表现测试
config = AutoConfig.from_pretrained(model_path, trust_remote_code=True, pre_seq_len=128)
model = AutoModel.from_pretrained(model_path, config=config, trust_remote_code=True)
# 此处使用你的 ptuning 工作目录
prefix_state_dict = torch.load(os.path.join("/home/data/project/ChatGLM/ChatGLM-6B-main/ptuning/output/adgen-chatglm-6b-pt-128-2e-2/checkpoint-3000", "pytorch_model.bin")) # gqr:微调模型存放路径
new_prefix_state_dict = {}
for k, v in prefix_state_dict.items():
    new_prefix_state_dict[k[len("transformer.prefix_encoder."):]] = v
model.transformer.prefix_encoder.load_state_dict(new_prefix_state_dict)
print("_____________________________________________")
#V100 机型上可以不进行量化
#print(f"Quantized to 4 bit")
model = model.quantize(4)
model = model.half().cuda()
model.transformer.prefix_encoder.float()
model = model.eval()

response, history = model.chat(tokenizer, "类型#上衣*版型#宽松*版型#显瘦*图案#线条*衣样式#衬衫*衣袖型#泡泡袖*衣款式#抽绳", history=[])
print("++++++++++++++++++++++++++++++++++++++++++++++++++")
print(response)
print("!!!!!!!!!!!!!!!!!!!!!!!!!!!!!!!!!!!!!!!!!!!!!!!!")
web测试页面脚本:
import os
import torch
from transformers import AutoConfig, AutoModel, AutoTokenizer
import gradio as gr
import mdtex2html
os.environ['CUDA_VISIBLE_DEVICES'] = '0'
model_path = '/home/data/project/ChatGLM/ChatGLM-6B-main/chatglm-6b' # gqr:官方预训练模型路径
# 载入Tokenizer
tokenizer = AutoTokenizer.from_pretrained(model_path, trust_remote_code=True)
# Fine-tuning 后的表现测试
config = AutoConfig.from_pretrained(model_path, trust_remote_code=True, pre_seq_len=128)
model = AutoModel.from_pretrained(model_path, config=config, trust_remote_code=True)
# 此处使用你的 ptuning 工作目录
prefix_state_dict = torch.load(os.path.join("/home/data/project/ChatGLM/ChatGLM-6B-main/ptuning/output/adgen-chatglm-6b-pt-128-2e-2/checkpoint-3000", "pytorch_model.bin")) # gqr:微调模型存放路径
new_prefix_state_dict = {}
for k, v in prefix_state_dict.items():
new_prefix_state_dict[k[len("transformer.prefix_encoder."):]] = v
model.transformer.prefix_encoder.load_state_dict(new_prefix_state_dict)
print("_____________________________________________")
#V100 机型上可以不进行量化
#print(f"Quantized to 4 bit")
model = model.quantize(4)
model = model.half().cuda()
model.transformer.prefix_encoder.float()
model = model.eval()
# response, history = model.chat(tokenizer, "类型#上衣*版型#宽松*版型#显瘦*图案#线条*衣样式#衬衫*衣袖型#泡泡袖*衣款式#抽绳", history=[])
# print("++++++++++++++++++++++++++++++++++++++++++++++++++")
# print(response)
# print("!!!!!!!!!!!!!!!!!!!!!!!!!!!!!!!!!!!!!!!!!!!!!!!!")
"""Override Chatbot.postprocess"""
def postprocess(self, y):
if y is None:
return []
for i, (message, response) in enumerate(y):
y[i] = (
None if message is None else mdtex2html.convert((message)),
None if response is None else mdtex2html.convert(response),
)
return y
gr.Chatbot.postprocess = postprocess
def parse_text(text):
"""copy from https://github.com/GaiZhenbiao/ChuanhuChatGPT/"""
lines = text.split("\n")
lines = [line for line in lines if line != ""]
count = 0
for i, line in enumerate(lines):
if "```" in line:
count += 1
items = line.split('`')
if count % 2 == 1:
lines[i] = f'{items[-1]}
">'
else:
lines[i] = f'
"+line text = "".join(lines) return text def predict(input, chatbot, max_length, top_p, temperature, history): chatbot.append((parse_text(input), "")) for response, history in model.stream_chat(tokenizer, input, history, max_length=max_length, top_p=top_p, temperature=temperature): chatbot[-1] = (parse_text(input), parse_text(response)) yield chatbot, history def reset_user_input(): return gr.update(value='') def reset_state(): return [], [] with gr.Blocks() as demo: gr.HTML("""
ChatGLM
""") chatbot = gr.Chatbot() with gr.Row(): with gr.Column(scale=4): with gr.Column(scale=12): user_input = gr.Textbox(show_label=False, placeholder="Input...", lines=10).style( container=False) with gr.Column(min_width=32, scale=1): submitBtn = gr.Button("Submit", variant="primary") with gr.Column(scale=1): emptyBtn = gr.Button("Clear History") max_length = gr.Slider(0, 4096, value=2048, step=1.0, label="Maximum length", interactive=True) top_p = gr.Slider(0, 1, value=0.7, step=0.01, label="Top P", interactive=True) temperature = gr.Slider(0, 1, value=0.95, step=0.01, label="Temperature", interactive=True) history = gr.State([]) submitBtn.click(predict, [user_input, chatbot, max_length, top_p, temperature, history], [chatbot, history], show_progress=True) submitBtn.click(reset_user_input, [], [user_input]) emptyBtn.click(reset_state, outputs=[chatbot, history], show_progress=True) # demo.queue().launch(share=False, inbrowser=True) # 用于修改端口映射的地方 demo.queue().launch(share=True,server_name="0.0.0.0",server_port=6006)页面效果:

使用自己的数据集
修改 train.sh 和 evaluate.sh 中的 train_file、validation_file和test_file为你自己的 JSON 格式数据集路径,并将 prompt_column 和 response_column 改为 JSON 文件中输入文本和输出文本对应的 KEY。可能还需要增大 max_source_length 和 max_target_length 来匹配你自己的数据集中的最大输入输出长度。
对话数据集
如需要使用多轮对话数据对模型进行微调,可以提供聊天历史,例如以下是一个三轮对话的训练数据:
{"prompt": "长城h3风扇不转。继电器好的。保险丝好的传感器新的风扇也新的这是为什么。就是继电器缺一个信号线", "response": "用电脑能读数据流吗?水温多少", "history": []}
{"prompt": "95", "response": "上下水管温差怎么样啊?空气是不是都排干净了呢?", "history": [["长城h3风扇不转。继电器好的。保险丝好的传感器新的风扇也新的这是为什么。就是继电器缺一个信号线", "用电脑能读数据流吗?水温多少"]]}
{"prompt": "是的。上下水管都好的", "response": "那就要检查线路了,一般风扇继电器是由电脑控制吸合的,如果电路存在断路,或者电脑坏了的话会出现继电器不吸合的情况!", "history": [["长城h3风扇不转。继电器好的。保险丝好的传感器新的风扇也新的这是为什么。就是继电器缺一个信号线", "用电脑能读数据流吗?水温多少"], ["95", "上下水管温差怎么样啊?空气是不是都排干净了呢?"]]}
训练时需要指定 –history_column 为数据中聊天历史的 key(在此例子中是 history),将自动把聊天历史拼接。要注意超过输入长度 max_source_length 的内容会被截断。
可以参考以下指令:
bash train_chat.sh
PRE_SEQ_LEN=128
LR=1e-2

CUDA_VISIBLE_DEVICES=0 python3 main.py \
    --do_train \
    --train_file $CHAT_TRAIN_DATA \
    --validation_file $CHAT_VAL_DATA \
    --prompt_column prompt \
    --response_column response \
    --history_column history \
    --overwrite_cache \
    --model_name_or_path THUDM/chatglm-6b \
    --output_dir $CHECKPOINT_NAME \
    --overwrite_output_dir \
    --max_source_length 256 \
    --max_target_length 256 \
    --per_device_train_batch_size 1 \
    --per_device_eval_batch_size 1 \
    --gradient_accumulation_steps 16 \
    --predict_with_generate \
    --max_steps 3000 \
    --logging_steps 10 \
    --save_steps 1000 \
    --learning_rate $LR \
    --pre_seq_len $PRE_SEQ_LEN \
    --quantization_bit 4
2、LORA方案

原理:给大模型结构并行一个更小模型,大模型部分参数不反向传播,仅对小模型进行反向传播更新参数;后期发现,可以将小模型部分分解成更小的模块,可以降低大量参数。


