Android开发学习持续更新中
Android开发
-
-
- 单个Activity界面内的操作
-
- 控件1TextView控件使用
- 控件2Button控件使用
-
- 1首先对于android的按键格式
- 2对按键监听事件进行绑定
- 控件3EditText文本框的设定
- 控件4 ImageView
- 控件5ProgressBar的使用
- 控件6 Notification通知
- 控件7Toolbar 页面最上方的导航栏
- 控件8AlertDialog通知对话框
- 控件8PopupWindow 点击按钮之后,不跳转到其他的activity,在本界面内显示一个窗口,并且窗口可以视为一个新的布局。
- 布局
-
- 布局1_LinearLayout
- 布局2——RelativeLayout
- 布局3_FrameLayout
- 4——TableLayout 表单显示
- GridLayout 就是和上面的表格一样,只不过更加灵活
- Activity之间相互跳转
- 动画:有三种类型,分别为逐帧动画,补间动画和属性动画
-
- 补间动画:在配置文件设置初始值和结束值和变化时间
-
- 第一种alpha标签通过透明度变化来显示动态的效果。
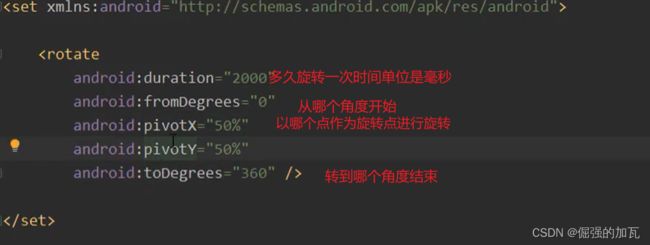
- 第二种rotate标签通过旋转实现动态效果
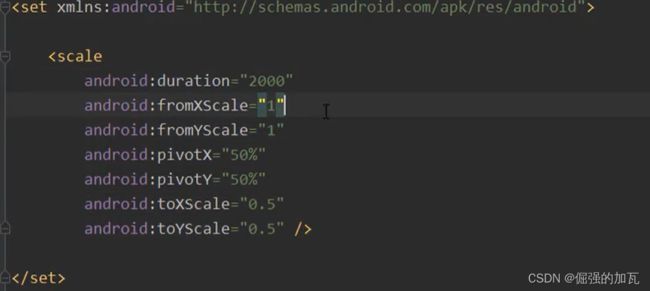
- 第三种scale标签通过调整图片大小实现动态效果
- 第四种translate标签通过平移实现动态效果
- 3属性动画:通过在主类中设置一些属性参数,来调整显示的过程
- ViewPage实现左右滑动切换不同的layout布局。
- Fragment的使用
-
-
- 1创建一个布局,来显示在fragment中
- 2创建好fragment布局之后,创建一个fragment类,获取到此布局中的一些元素,并且可以对布局里面的元素进行修改和获取
- 3在需要显示的目标activity中,加入fragment标签,并且只当此fragment对应的类,即可完成显示
-
- 就需要动态的实现切换fragment,步骤如下:
-
- 如何实现Activity个Fragment之间的通信==Bundle类
- fragment的生命周期
-
单个Activity界面内的操作
控件1TextView控件使用
有点像前端的html+css。
控件2Button控件使用
1首先对于android的按键格式
如背景或者默认的按键格式和按下之后按键的格式
在activity_main.xml文件中指定按键的标签
<Button
        android:id="@+id/btn"
        android:layout_width="200dp"
        android:layout_height="100dp"
        android:background="@drawable/btn_selector"
        android:text="我是一个按钮"
        />
对于背景颜色,可以指定颜色也可以在drowable文件下创建选择器,指定按键的背景图片等
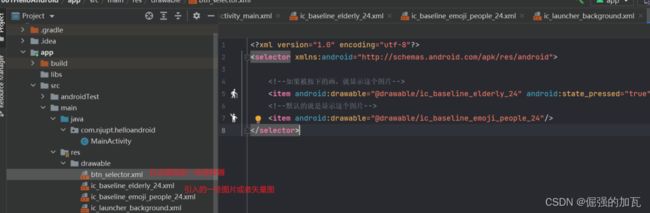
<selector xmlns:android="http://schemas.android.com/apk/res/android">


    <item android:drawable="@drawable/ic_baseline_elderly_24" android:state_pressed="true"/>

    <item android:drawable="@drawable/ic_baseline_emoji_people_24"/>
selector>
2对按键监听事件进行绑定
先对按键标签进行编号,然后再activity类中获取到按键,就可以对按键进行绑定监听事件
protected void onCreate(Bundle savedInstanceState) {
        super.onCreate(savedInstanceState);
        setContentView(R.layout.activity_main);
        //获取事件的按键id
        Button btn = findViewById(R.id.btn);
        //对这个按键进行绑定,如单击事件
        btn.setOnClickListener(new View.OnClickListener() {
            @Override
            public void onClick(View v) {

            }
        });
        //绑定一个长按的一个监听事件
        btn.setOnLongClickListener(new View.OnLongClickListener() {
            @Override
            public boolean onLongClick(View v) {
                return false;
            }
        });
        //绑定一个触摸事件
        btn.setOnTouchListener(new View.OnTouchListener() {
            @Override
            public boolean onTouch(View v, MotionEvent event) {
                return false;
            }
        });

    }
第二种方法,直接可以再button标签中指定绑定onclick事件,然后在主类中添加一个同名的方法


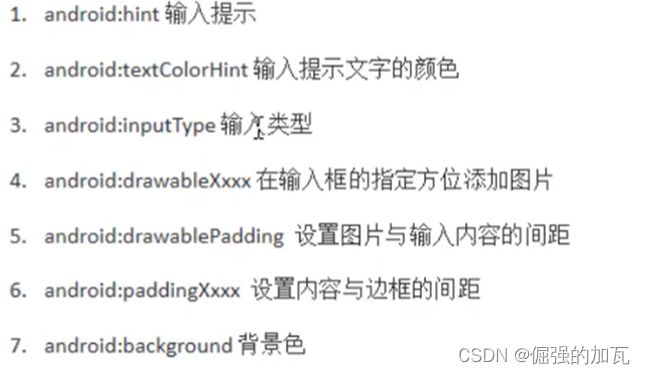
控件3EditText文本框的设定
类似于网页表单登录时的text属性,里面可以输入一些数据,所使用的标签为
《EditText》
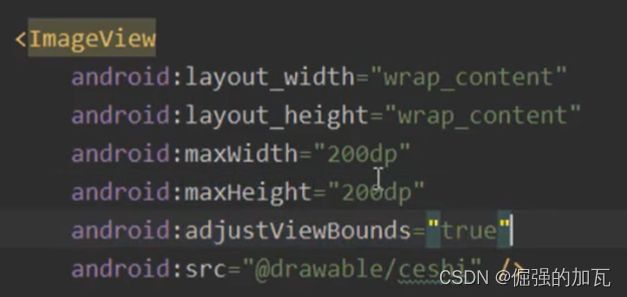
控件4 ImageView
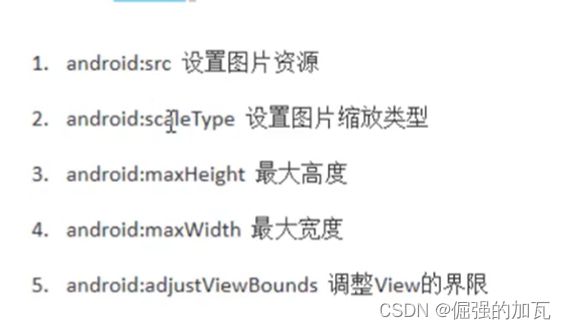
其中比较重要的是图片的缩放类型
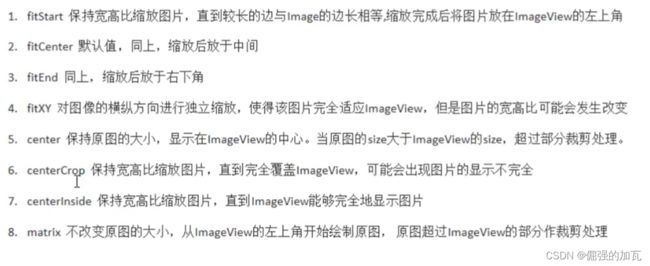
很多情况下,图片大小和imageview的大小是不匹配了,为了让图片不失真或者变形,可以使用下面这个自动填充,会根据图片的大小匹配到相应的图片框。
控件5ProgressBar的使用
这个控件就是显示一个进度,刷新的小圈圈,或者是一个进度条。可以显示下载或者页面加载的过程。

1以小圈圈的方式进行加载
    <ProgressBar
        android:id="@+id/pb1"
        android:layout_width="wrap_content"
        android:layout_height="wrap_content"
        />

    <Button
        android:layout_width="wrap_content"
        android:layout_height="wrap_content"
        android:text="显示或者隐形加载界面"
        android:onClick="pb1Change"/>
在主启动类中加入监听事件
public class MainActivity extends AppCompatActivity {

    private ProgressBar pb1;
    @Override
    protected void onCreate(Bundle savedInstanceState) {
        super.onCreate(savedInstanceState);
        setContentView(R.layout.activity_main);
        pb1 = findViewById(R.id.pb1);
    }


    public void jumpToAnother(View view) {
        startActivity(new Intent(this,MainActivity2.class));
    }

    //按键来控制进度条的显示和隐藏
    public void pb1Change(View view) {
        //如果此时是隐藏的,就显示出来
        if(pb1.getVisibility()==View.GONE){
            pb1.setVisibility(View.VISIBLE);
        }else{
            pb1.setVisibility(View.GONE);
        }
    }
}
2以进度条的方式进行加载
style=“?android:attr/progressBarStyleHorizontal”
    <ProgressBar
        android:id="@+id/pb2"
        style="?android:attr/progressBarStyleHorizontal"
        android:max="100"
        android:layout_width="300dp"
        android:layout_height="wrap_content"/>

    <Button
        android:layout_width="wrap_content"
        android:layout_height="wrap_content"
        android:text="每点击一下就增加10"
        android:onClick="pb2Add"/>
在主启动类中对加载过程进行赋值
/*模拟下载过程,每点击一下就增加10个单位*/
    public void pb2Add(View view) {
        int progress = pb2.getProgress();
        progress+=10;
        pb2.setProgress(progress);

    }
3让进度条不精确的显示出进度,每次像小圈圈那样进行加载
    <ProgressBar
        style="?android:attr/progressBarStyleHorizontal"
        android:layout_width="300dp"
        android:layout_height="wrap_content"
        android:max="100"
        android:indeterminate="true"/>
控件6 Notification通知
 下面这个是为了给通知的内容设定一些形式

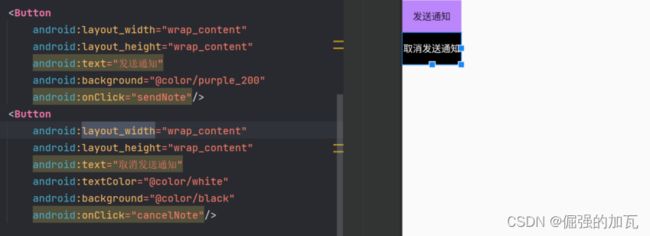
1先创建两个按钮,来绑定发送或者取消通知事件
<Button
        android:layout_width="wrap_content"
        android:layout_height="wrap_content"
        android:text="发送通知"
        android:background="@color/purple_200"
        android:onClick="sendNote"/>
    <Button
        android:layout_width="wrap_content"
        android:layout_height="wrap_content"
        android:text="取消发送通知"
        android:textColor="@color/white"
        android:background="@color/black"
        android:onClick="cancelNote"/>
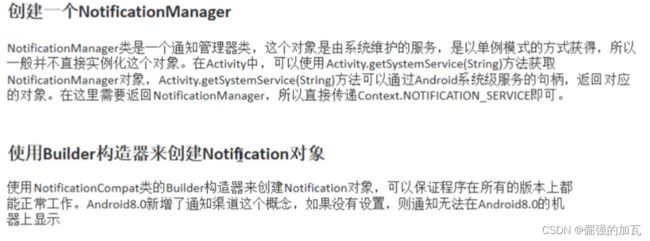
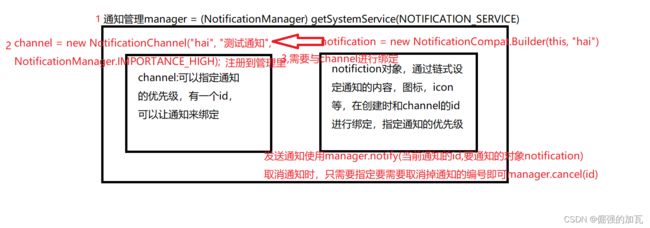
 2在主类中先获取通知管理,在获取通知
public class MainActivity extends AppCompatActivity {
private NotificationManager manager;
private Notification notification;
@Override
protected void onCreate(Bundle savedInstanceState) {
super.onCreate(savedInstanceState);
setContentView(R.layout.activity_main);
//第一步先获取到通知管理对象
manager = (NotificationManager) getSystemService(NOTIFICATION_SERVICE);
//第二步,通过builder来链式的创建notification对象
NotificationChannel channel = null;
//是Android8版本之后推出的因此需要进行版本的判断
if (android.os.Build.VERSION.SDK_INT >= android.os.Build.VERSION_CODES.O) {
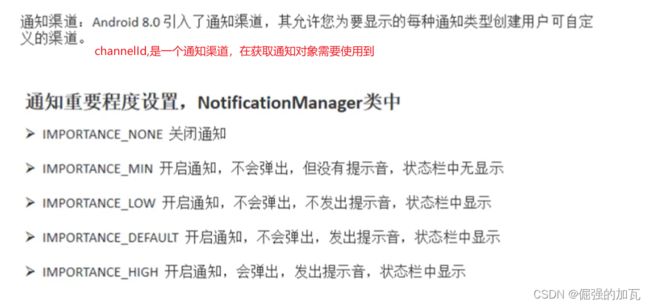
//第一个参数就是id,第二个参数是通知的名字,可以随便设置,第三个参数是通知的等级,有很多的等级,具体可以参照本小节第二张图。
channel = new NotificationChannel("hai", "测试通知", NotificationManager.IMPORTANCE_HIGH);
manager.createNotificationChannel(channel);
}
//新建一个activity来点击通知时进行跳转到指定的界面或者app中
Intent intent = new Intent(this, NotificationActivity.class);
PendingIntent pendingIntend = PendingIntent.getActivity(this, 0, intent, 0);
//对通知的内容或者形式进行修饰
notification = new NotificationCompat.Builder(this, "hai")
.setContentTitle("正规通知(通知的姓名)")
.setContentText("通知的内容,你的银行卡收入100元")
//这里是通知的一个小图标的设定,不能是rgb图片
.setSmallIcon(R.drawable.ic_baseline_person_24)
//设置大图标的图片,但是因为是一个bitmap格式,所以需要将图片转成bitmap格式
.setLargeIcon(BitmapFactory.decodeResource(getResources(),R.drawable.yueyue))
//设置小图标的颜色,
.setColor(Color.parseColor("#ff0000"))
//这个参数是指定点击到通知之后,跳转的界面或者app中,传入的是一个PendingIntent对象
.setContentIntent(pendingIntend)
//这个参数是当点击通知之后,就会将通知销毁
.setAutoCancel(true)
.build();
}
//发送通知的按钮
public void sendNote(View view) {
manager.notify(1,notification);
}
//点击次按钮可以将通知给取消掉,和setAutoCancel作用相同
public void cancelNote(View view) {
manager.cancel(1);
}
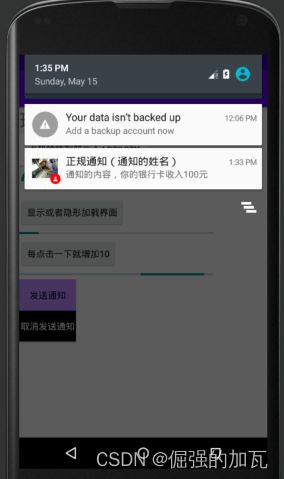
然后就是创建一个跳转之后的activity并且将其注册到清单中。
然后点击发送通知按钮,就是如下界面
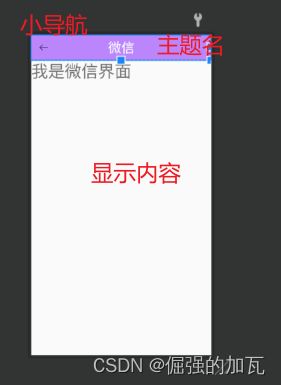
控件7Toolbar 页面最上方的导航栏
常见的属性设置

<androidx.appcompat.widget.Toolbar
        android:id="@+id/tb1"
        android:layout_width="match_parent"
        android:layout_height="?attr/actionBarSize"
        android:background="@color/purple_200"
        app:navigationIcon="@drawable/ic_baseline_west_24"

        >

        <TextView
            android:layout_width="wrap_content"
            android:layout_height="wrap_content"
            android:text="微信"
            android:layout_gravity="center"
            android:gravity="center"
            android:textSize="30dp"
            android:textColor="@color/white"

            />

    </androidx.appcompat.widget.Toolbar>
然后再主类中去对导航栏中的返回和前进绑定事件,当按小图标时,会做出相应的反应。
//先获取到标签,然后再对导航栏的监听事件进行绑定
Toolbar tb1 = findViewById(R.id.tb1);

        tb1.setNavigationOnClickListener(new View.OnClickListener() {
            @Override
            public void onClick(View v) {
                System.out.println("返回按钮被单机了");
            }
        });
控件8AlertDialog通知对话框
一般通知都是在顶部显示出来,需要下拉来查看具体内容,而这个alertDialog对话框就是可以让通知的内容显示在屏幕上,类似于锁屏之后来消息之后的界面。alertDialog简单属性和使用

定义一个布局,用来显示在通知框当中
<LinearLayout
    xmlns:android="http://schemas.android.com/apk/res/android"
    android:layout_width="match_parent"
    android:layout_height="match_parent"
    android:orientation="horizontal">
    <ImageView
        android:layout_width="300px"
        android:layout_height="200px"
        android:src="@drawable/yueyue" />
    <TextView
        android:layout_width="wrap_content"
        android:layout_height="wrap_content"
        android:text="天气很好,你那边边天气怎么样啊"
        android:textSize="20dp"
        android:textColor="@color/black"
        />
LinearLayout>
public void alertNode(View view) {
        //先获取到builder
        AlertDialog.Builder builder = new AlertDialog.Builder(this);

        //准备自定义一个布局,来给view作为参数,自定义一个布局
        View view1 = getLayoutInflater().inflate(R.layout.notification_mian, null);
        //然后通过builder进行链式的设计
        builder.setIcon(R.mipmap.ic_launcher)
                //设置通知对话框的主题
                .setTitle("通知对话框")
                //通知的内容
                .setMessage("今天是5月16号,你那边天气怎么样啊?")

                .setPositiveButton("确定按钮", new DialogInterface.OnClickListener() {
                    @Override
                    public void onClick(DialogInterface dialog, int which) {
                        System.out.println("确定按钮被点击");
                    }
                })
                .setPositiveButton("取消按钮", new DialogInterface.OnClickListener() {
                    @Override
                    public void onClick(DialogInterface dialog, int which) {
                        System.out.println("取消按钮被点击");
                    }
                })
                .setNeutralButton("中间按钮", new DialogInterface.OnClickListener() {
                    @Override
                    public void onClick(DialogInterface dialog, int which) {
                        System.out.println("中间按钮被点击");
                    }
                })
                //传入自定义的布局
                .setView(view1)
                .create()
                .show();
    }

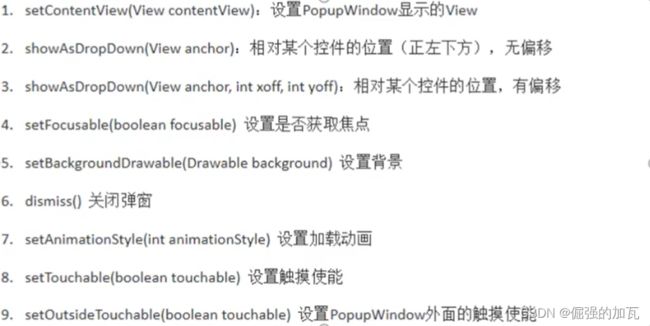
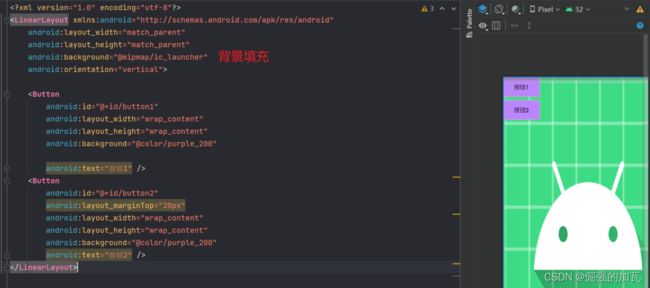
控件8PopupWindow 点击按钮之后,不跳转到其他的activity,在本界面内显示一个窗口,并且窗口可以视为一个新的布局。
使用和属性介绍
 先创建一个新的布局,来供窗口使用
<LinearLayout xmlns:android="http://schemas.android.com/apk/res/android"
    android:layout_width="match_parent"
    android:layout_height="match_parent"
    android:background="@mipmap/ic_launcher"
    android:orientation="vertical">

    <Button
        android:id="@+id/button1"
        android:layout_width="wrap_content"
        android:layout_height="wrap_content"
        android:background="@color/purple_200"

        android:text="按钮1" />
    <Button
        android:id="@+id/button2"
        android:layout_marginTop="20px"
        android:layout_width="wrap_content"
        android:layout_height="wrap_content"
        android:background="@color/purple_200"
        android:text="按钮2" />
LinearLayout>
在一个页面中创建一个按钮,并且为按钮创建一个监听事件,当点击按钮时,就会显示窗口。
public void showWindow(View view) {
        //获取到窗口的布局,作为对象传入到窗口中
        View windowView = getLayoutInflater().inflate(R.layout.window_view, null);
        //获取到窗口内部的按钮,并且为其创建监听事件
        Button bt1 = windowView.findViewById(R.id.button1);
        Button bt2 = windowView.findViewById(R.id.button2);

        //设置窗口内的布局和窗口的大小,最后一个参数是当点击空白处时,会退出弹出的window
        PopupWindow window = new PopupWindow(windowView, ViewGroup.LayoutParams.WRAP_CONTENT,ViewGroup.LayoutParams.WRAP_CONTENT,true);
        //k而已设置窗口的背景图
        window.setBackgroundDrawable(getResources().getDrawable(R.drawable.yueyue));
        //指定展示窗口的位置,显示在按钮的下方,或者其他的构造方法进行窗口的偏移
        window.showAsDropDown(view);
        //创建监听事件
        bt1.setOnClickListener(new View.OnClickListener() {
            @Override
            public void onClick(View v) {
                System.out.println("按钮1被点击");
                //当点击后,让其退出,可以调用dismiss方法来退出窗口
                window.dismiss();

            }
        });
        bt1.setOnClickListener(new View.OnClickListener() {
            @Override
            public void onClick(View v) {
                System.out.println("按钮2被点击");
                window.dismiss();
            }
        });

    }
布局
了解了基本的控件之后,就需要了解一下布局,就是指定页面中元素的摆放位置和形式
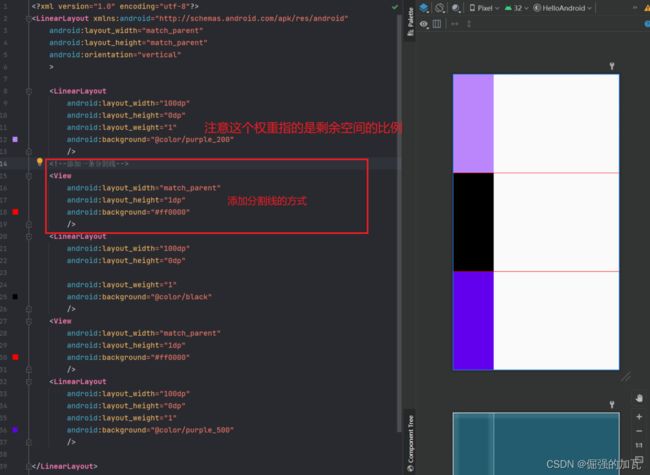
布局1_LinearLayout
基本的操作

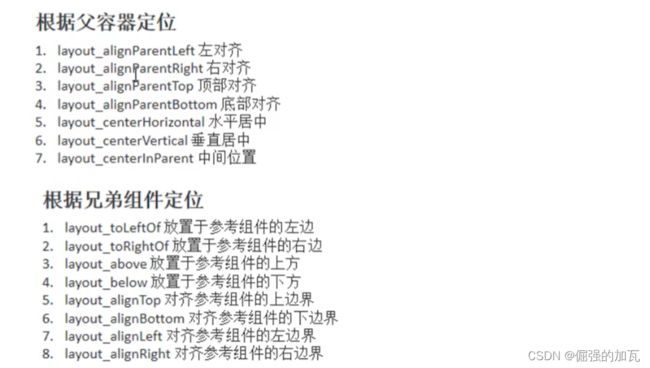
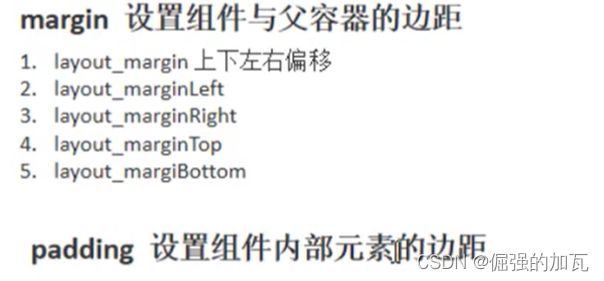
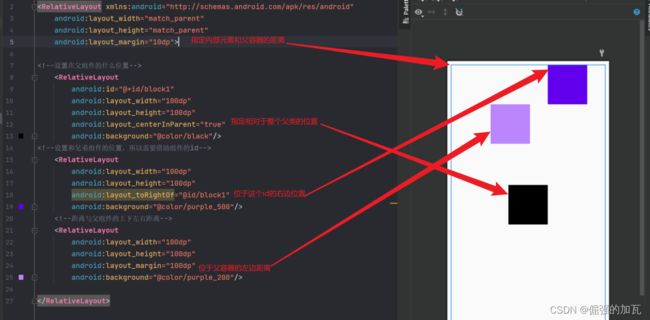
布局2——RelativeLayout
主要的作用就是自己指定添加模块的位置,如果不指定的话,默认放在左上角,常见的位置属性设置

布局3_FrameLayout
每新建一个布局都会将新的放在前一个布局的前面。


4——TableLayout 表单显示
<TableLayout xmlns:android="http://schemas.android.com/apk/res/android"
    android:layout_width="match_parent"
    android:layout_height="match_parent"
    android:collapseColumns="1"
    >
    <TableRow >
        <Button
            android:id="@+id/button01"
            android:layout_width="wrap_content"
            android:layout_height="wrap_content"
            android:text="按钮1"
        >Button>
        <Button
            android:id="@+id/button02"
            android:layout_width="wrap_content"
            android:layout_height="wrap_content"
            android:text="按钮2"
        >Button>

        <Button
            android:id="@+id/button03"
            android:layout_width="wrap_content"
            android:layout_height="wrap_content"
            android:text="按钮3"
        >Button>
    TableRow>

    <TableRow >
        <Button
            android:id="@+id/button04"
            android:layout_width="wrap_content"
            android:layout_height="wrap_content"
            android:text="按钮4"
        >Button>
        <Button
            android:id="@+id/button05"
            android:layout_width="wrap_content"
            android:layout_height="wrap_content"
            android:text="按钮5"
        >Button>
        <Button
            android:id="@+id/button06"
            android:layout_width="wrap_content"
            android:layout_height="wrap_content"
            android:text="按钮6"
        >Button>
    TableRow>

    <TableRow >
        <Button
            android:id="@+id/button07"
            android:layout_width="wrap_content"
            android:layout_height="wrap_content"
            android:text="按钮7"
        >Button>
        <Button
            android:id="@+id/button08"
            android:layout_width="wrap_content"
            android:layout_height="wrap_content"
            android:text="按钮8"
        >Button>
        <Button
            android:id="@+id/button09"
            android:layout_width="wrap_content"
            android:layout_height="wrap_content"
            android:text="按钮9"
        >Button>
    TableRow>
TableLayout>
GridLayout 就是和上面的表格一样,只不过更加灵活

Activity之间相互跳转
我暂时理解一个activity是一个页面,但是如何实现多个activity页面之间相互跳转是个问题。
1首先要先创建一个activity界面,也就是新建一个类,一定要继承AppCompatActivity
public class MainActivity2 extends AppCompatActivity {
    @Override
    protected void onCreate(Bundle savedInstanceState) {
        //重写父类的方法
        super.onCreate(savedInstanceState);
    }
}
2创建好主类之后,需要对此类创建一个布局,也就是当前界面需要展示的内容
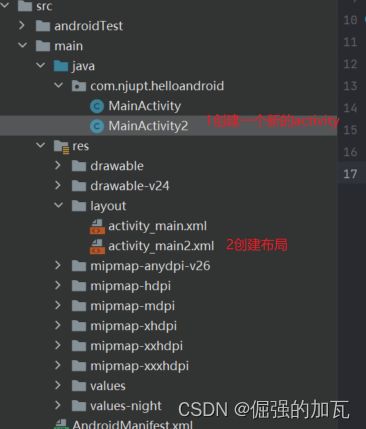 3创建好布局之后,需要在主类中引入布局
public class MainActivity2 extends AppCompatActivity {
    @Override
    protected void onCreate(Bundle savedInstanceState) {
        //重写父类的方法
        super.onCreate(savedInstanceState);
        //引入布局
        setContentView(R.layout.activity_main2);
    }
}
4注意创建好新的activity之后,需要将组件注册到清单中,也就是AndroidManifest.xml中。
 5在第一个界面中,创建按钮,并且为按钮绑定监听事件,点击时跳转到第二个目标的界面中。
<Button
        android:id="@+id/btn"
        android:layout_width="200dp"
        android:layout_height="50dp"
        android:background="@color/white"
        android:text="点我跳转到第二个activity"
        android:onClick="jumpToAnother"
        />
6在主启动类创建一个监听事件
public void jumpToAnother(View view) {
//指定要跳转的界面
        startActivity(new Intent(this,MainActivity2.class));
    }
动画:有三种类型,分别为逐帧动画,补间动画和属性动画
逐帧动画就是用过将一组图片加入到一个集合中,让图片快速切换,从而达到一种出现动画的效果。

然后直接将整个selector可以看作一张图片,直接添加到页面中当背景图片即可实现动态效果,注意在使用时需要使用relativeLayout标签将selector作为图片使用,然后再主类中启动即可。

然后再主启动类中启动
补间动画:在配置文件设置初始值和结束值和变化时间
android会自动将动画补全,主要有四个属性,分别为alpha 透明度,rotate旋转 ,scale缩放 translate平移等
使用方法,先创建对应的xml文件,然后在主方法中引入即可。

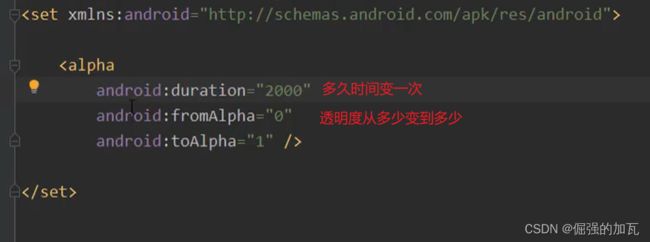
第一种alpha标签通过透明度变化来显示动态的效果。
第二种rotate标签通过旋转实现动态效果
第三种scale标签通过调整图片大小实现动态效果
第四种translate标签通过平移实现动态效果

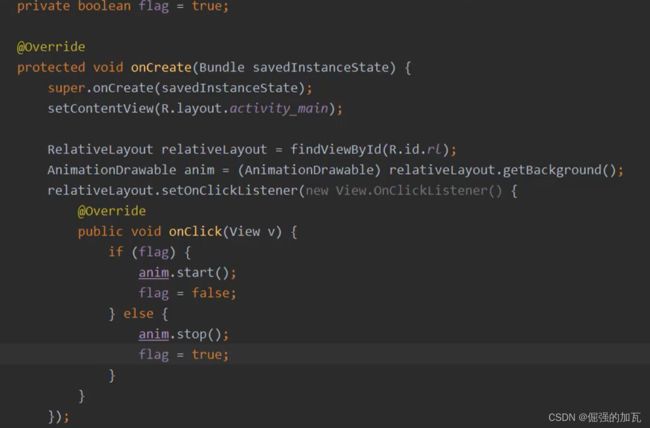
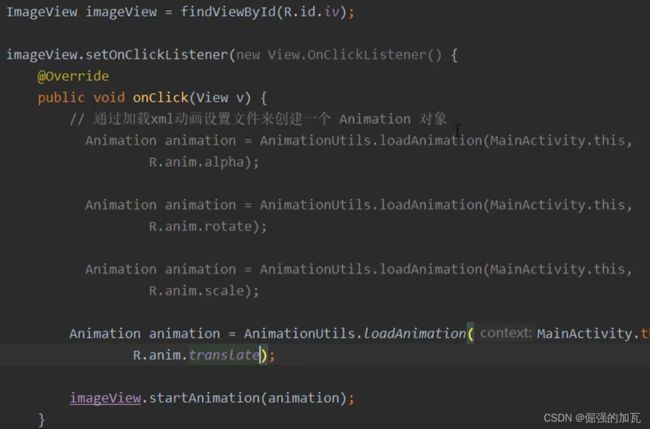
主启动类中动画的使用方式。先对一个目标图片来进行绑定一个监听事件,用监听事件来进行动画的启动。
3属性动画:通过在主类中设置一些属性参数,来调整显示的过程
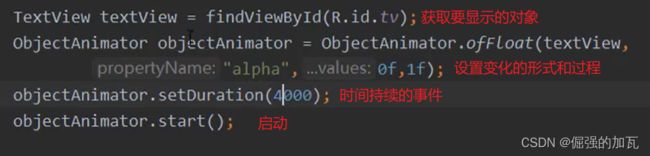
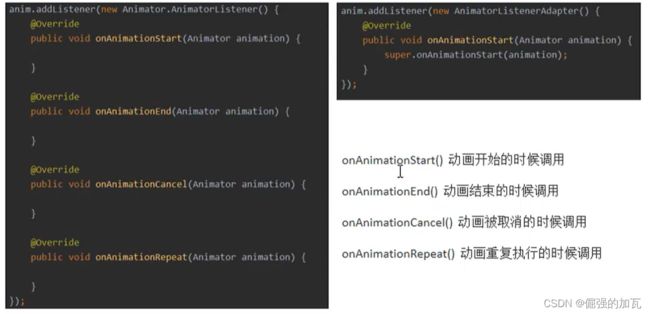
而对于创建出来的objectAnimator对象还有一个事件监听的方法,同时可以对动画绑定监听器,当动画进行开始或者结束等事件发生时,指定会发生的事情。
ViewPage实现左右滑动切换不同的layout布局。
1先准备不同的layout,然后在activity的配置文件中,使用ViewPage来告诉当前界面需要加入其他的viewPage
<androidx.viewpager.widget.ViewPager
        android:id="@+id/vp"
        android:layout_width="match_parent"
        android:layout_height="match_parent"/>
2在主类中获取到所有的layout布局,并且放到集合中
LayoutInflater inflater = getLayoutInflater().from(this);
        View view1 = inflater.inflate(R.layout.layout1, null);
        View view2 = inflater.inflate(R.layout.layout2, null);
        View view3 = inflater.inflate(R.layout.layout3, null);
        ArrayList<View> view = new ArrayList<>();
        view.add(view1);
        view.add(view2);
        view.add(view3);
        MyAdapter myAdapter = new MyAdapter(view);
3需要使用PagerAdpater将创建的布局传入,因为不止一个布局,所以需要创建一个集合当作构造函数,将布局传入,其中继承PagerAdapter时需要重写方法,和加入一些其他方法,如下图。
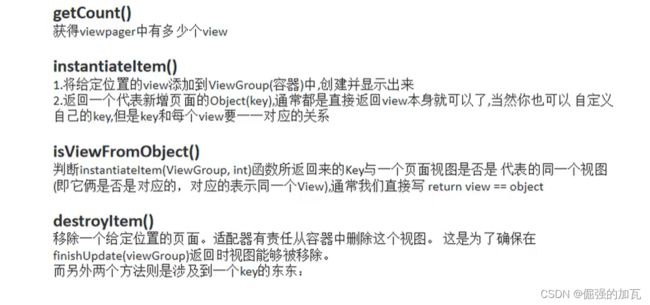
public class MyAdapter extends PagerAdapter {
    private List<View> list;
    public MyAdapter(List<View> list){
        this.list=list;
    }

    @NonNull
    @Override
    public Object instantiateItem(@NonNull ViewGroup container, int position) {
        container.addView(list.get(position),0);
        return list.get(position);
    }

    @Override
    public int getCount() {
        return list.size();
    }

    @Override
    public boolean isViewFromObject(@NonNull View view, @NonNull Object object) {
        return view==object;
    }

    @Override
    public void destroyItem(@NonNull ViewGroup container, int position, @NonNull Object object) {
        container.removeView(list.get(position));
    }
}
最后将两者进行绑定
ViewPager vp = findViewById(R.id.vp);
        vp.setAdapter(myAdapter);
最后,将设定的adapter设置到ViewPage中进行显示即可。
 完成以上,就可以实现左右滑动的效果啦
Fragment的使用
fragment可以直观的理解为是小的activity,可以有其自己的生命周期,然后将fragment可以放在activity中进行显示和进行activity一样的操作。
1创建一个布局,来显示在fragment中
<LinearLayout xmlns:android="http://schemas.android.com/apk/res/android"
    android:layout_width="match_parent"
    android:layout_height="match_parent"
    android:orientation="vertical">

    <TextView
        android:id="@+id/textv"
        android:layout_width="match_parent"
        android:layout_height="30dp"
        android:textColor="@color/purple_200"
        android:text="今天是什么日子"
        android:layout_gravity="center"
        android:gravity="center"/>
    <Button
        android:id="@+id/lovewho"
        android:layout_width="match_parent"
        android:layout_height="50dp"
        android:text="点我显示日期"/>

LinearLayout>
2创建好fragment布局之后,创建一个fragment类,获取到此布局中的一些元素,并且可以对布局里面的元素进行修改和获取
public class BlankFragment1 extends Fragment {
    private View root;
    private TextView textView;
    private Button btn;

    @Override
    public void onCreate(Bundle savedInstanceState) {
        super.onCreate(savedInstanceState);

    }

    @Override
    public View onCreateView(LayoutInflater inflater, ViewGroup container,
                             Bundle savedInstanceState) {
        // Inflate the layout for this fragment
        if(root==null){
            root = inflater.inflate(R.layout.fragment1, container, false);

        }
        textView = root.findViewById(R.id.textv);

        btn =root.findViewById(R.id.lovewho);
        btn.setOnClickListener(new View.OnClickListener() {
            @Override
            public void onClick(View v) {
                textView.setText("2022年5月20日,是和爱的人在一起的日子");
            }
        });
        return root;
    }
}
3在需要显示的目标activity中,加入fragment标签,并且只当此fragment对应的类,即可完成显示
<fragment android:name="com.njupt.helloandroid.BlankFragment1"
        android:id="@+id/frag1"
        android:layout_width="match_parent"
        android:layout_height="80dp"/>
以上只是静态的显示一个fragment,如果希望多个fragment进行切换的话,
就需要动态的实现切换fragment,步骤如下:
先创建一个fragmentLayout在想要显示的activity中。因为需要进行fragment之间的切换,所以需要多准备点fragment.并且需要在主activity中开辟一个空间来放需要展示的fragment,如下加入在主activity中
<FrameLayout
        android:layout_width="match_parent"
        android:layout_height="100dp"
        android:background="@color/purple_500"
        android:id="@+id/fragmentch">//这个id就是在主程序中获取并且将其替换的标志
    </FrameLayout>
第二部,在主类中来获取到按键的监听事件,当切换按钮时,就可以出现不同的fragment,
//准备对动态的fragment进行操作
        Button chang1 = findViewById(R.id.chang1);
        chang1.setOnClickListener(this);
        Button chang2 = findViewById(R.id.chang2);
        chang2.setOnClickListener(this);

        //准备两个fragment进行切换
    }
    @Override
    public void onClick(View v) {
        switch(v.getId()){
            case R.id.chang1:
                changeFragment(new BlankFragment());
                //传入不同的准备的fragment类即可关联到不同的fragment页面
            case R.id.chang2:
                changeFragment(new BlankFragment2());

        }

    }
    //将fragment看成一个事务
    public void changeFragment(Fragment fragment){
    //有一个fragment事务来控制事务的替换,删除和添加的操作
        FragmentManager fragManager = getSupportFragmentManager();
        FragmentTransaction fragmentTransaction = fragManager.beginTransaction();
        fragmentTransaction.replace(R.id.fragmentch,fragment);
        fragmentTransaction.addToBackStack(null);//这里是为了在返回时可以返回之前的那个fragment,
        fragmentTransaction.commit();

    }
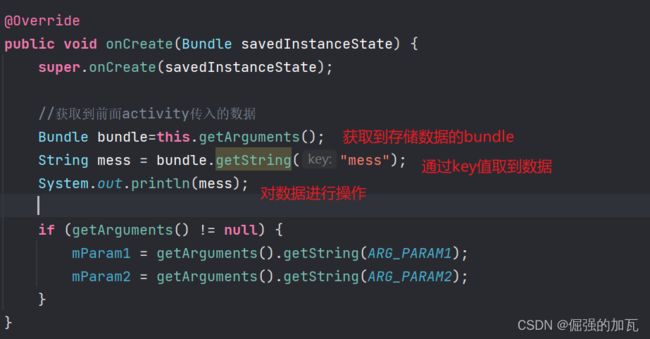
如何实现Activity个Fragment之间的通信==Bundle类
通过bundle将数据存储起来,然后将存储数据的bundle传递到fragment中
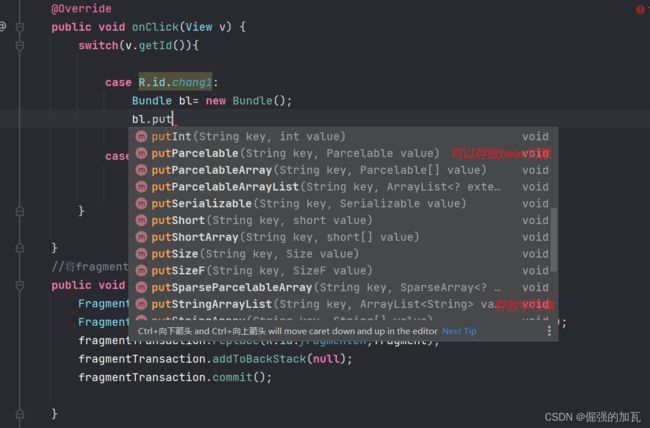
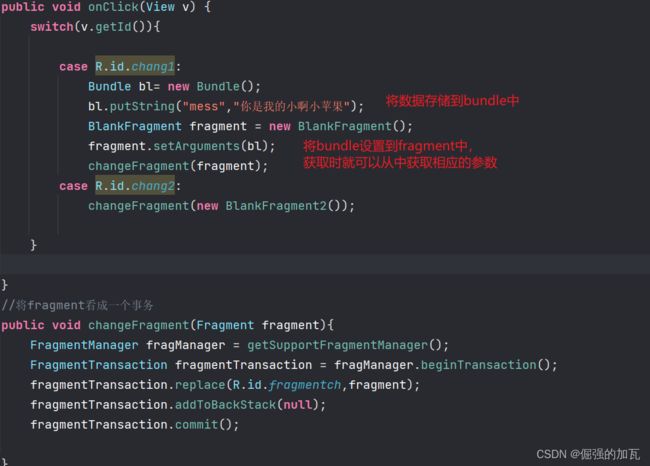
然后fragment对传来的数据进行获取
fragment的生命周期
