IOC容器
什么是IOC?
IOC(Inversion of Control)一般译为控制反转,1996年,Michael Mattson在一篇有关探讨面向对象框架的文章中,首次提出IOC这个概念,是面向对象程序设计的一种编程思想。控制反转就是将对象控制权的转移,从程序代码本身反转到了外部容器(在代码中new对象->容器帮我们创建对象)。把对象的创建、初始化、销毁等工作交给容器来做。由容器控制对象的生命周期。
为什么要IOC?
在面向对象程序设计系统中,底层通过对象之间的相互协调配合实现系统的业务逻辑。
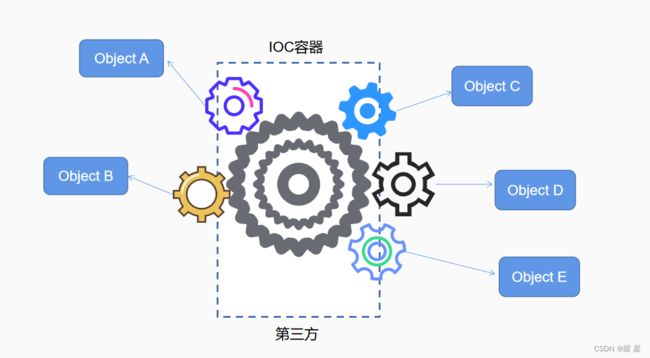
从图中我们可以看到,齿轮之间进行协调配合的进行工作。如果其中一个齿轮出现了问题,那么就会影响全局的工作,如何降低系统之间、模块之间和对象之间的耦合度,是软件工程追求的目标之一,而IOC思想就能够很好的解决该问题。

通过引进“第三方”(IOC容器),使得对象之间的耦合关系很低,齿轮的转动依赖于第三方,对象的控制权掌握在IOC容器手上。
什么是耦合度?
齿轮中的相互关系与软件系统对象之间的耦合关系类似,是指一程序中,模块及模块之间信息或参数依赖的程度。耦合关系是无法避免,也是必要的。
IOC和依赖注入(Dependency Injection)
控制反转中哪些方面的控制被反转了呢?
获取依赖对象的过程被反转了"(往常通过new或反射的方式获取对象).有了IOC容器以后。在程序的运行过程中,动态的将对象注入到类中的行为就是依赖注入(将对象(依赖)注入到当前类)。
依赖注入的前提条件:将bean对象注册到IOC容器。
什么是Bean:由spring管理的对象统称为Bean。
1.注册对象到IOC容器并使用
将对象注入到IOC容器有很多种方法,配置文件、注解法(常用)、配置类。
a:创建一个需要注册到容器的Bean类:
public class UserMapper{
     public void getUser(){
         System.out.println("this is a user");
     }
}
1.配置文件法
b:注册bean到spring容器
<beans xmlns="http://www.springframework.org/schema/beans"
       xmlns:xsi="http://www.w3.org/2001/XMLSchema-instance"
       xsi:schemaLocation="http://www.springframework.org/schema/beans http://www.springframework.org/schema/beans/spring-beans.xsd">

    <bean id="userMapper" class="com.obstar.bean.mapper.UserMapper">bean>
beans>
c:获取和使用bean
public class App {
    public static void main(String[] args) {
        //1.得到Spring的上下文对象
        ApplicationContext context =
                new ClassPathXmlApplicationContext("bean-config.xml");

        //1.根据BeanFactory获取bean
        BeanFactory factory = new XmlBeanFactory(new ClassPathResource("bean-config.xml"));

        //2.从spring上下文根据bean的id取出bean对象
        UserMapper userMapper = (UserMapper) context.getBean("userMapper");

        //2.根据一个Class参数获取bean(前提是只定义了一个该Class类型的bean)
        UserMapper userMapper1 = context.getBean(UserMapper.class);

        //3.根据bean id + Class参数获取bean
        UserMapper userMapper2 = context.getBean("userMapper", UserMapper.class);

        //3.使用bean
        userMapper.getUser();
        userMapper1.getUser();
        userMapper2.getUser();
    }
}
ApplicationContex和BeanFactory区别:
相同点:都是用于获取Spring上下文对象。
不同点:
- 它们是继承关系, ApplicationContext属于BeanFactory的子类,所以ApplicationContext具备了BeanFactory的所有功能,BeanFactory只提供了最基础访问bean的能力,ApplicatonContext具备更多的能力,如资源访问支持和国际化。
- 它们对对象的初始化时机不同,ApplicationContext是一次性加载并初始化所有的bean对象,而BeanFactory是需要的时候再去加载,更加的轻量。
扩展:Spring容器有两个顶级的接口一个是BeanFactory和ApplicationContext,ClassPathXmlApplicationContext是ApplicationContext的子类,通过xml来获取所有Bean。
2.注解法
在xml文件中、添加类配置。
b.配置扫码Bean类的路径
<beans xmlns="http://www.springframework.org/schema/beans"
       xmlns:xsi="http://www.w3.org/2001/XMLSchema-instance"
       xmlns:content="http://www.springframework.org/schema/context"
       xsi:schemaLocation="http://www.springframework.org/schema/beans http://www.springframework.org/schema/beans/spring-beans.xsd http://www.springframework.org/schema/context https://www.springframework.org/schema/context/spring-context.xsd">
    <content:component-scan base-package="com.obstar.bean.mapper">content:component-scan>
beans>
1. 5大类注解如下:
- @Controllec:控制器,标识和前端进行交互的类,读取参数和验证参数。
- @Service: 服务,标识实现各种业务逻辑提供服务的类
- @Repository:持久层,标识操作数据库的类
- @Component:组件,标识通用化的工具类。
- @Configuration:配置,标识项目中的配置类
思考1:为什么需要这么多的类注解?
在日常的开发中,项目比较复杂,不同的类注解代表了不同的标识,让我们在看代码的时候,很快就能知道的这个类是干嘛的。
思考2:五大类注解之间的关系?
@Controller、@Service、@Repository、@Configuration都是基于Component实现的。它们的作用都是将Bean存储到Spring中。
使用注解定义Bean类
@Repository
public class UserMapper{
     public void getUser(){
         System.out.println("this is a user");
     }
}
取出Bean和配置文件法相同,当然这种方式可以和配置文件法配合使用~~~~
注意:添加了注解的类,如果不在配置文件的扫码目录,那这注解没有什么作用。
2.方法注解@Bean
将方法返回的对象存储到IOC容器中。
@Component
public class UserMapperBean {
    @Bean
    public UserMapper getUserMapper(){
        return new UserMapper();
    }
}
    public static void main(String[] args) {
        //1.得到Spring的上下文对象
        ApplicationContext context =
                new ClassPathXmlApplicationContext("bean-config1.xml");

        UserMapper userMapper = context.getBean("getUserMapper", UserMapper.class);

        userMapper.getUser();
    }
注意:
- Bean注解一定要配合五大类注解一起使用,主要是为了性能考虑;
- @Bean注解只能使用在无参方法上(初始化没办法提供参数);
- 如果有相同的方法名,前面的会被覆盖。
@Bean命名规则:以方法名为bean对象的名字。
关于Bean的重命名:在@Bean注解中添加name参数进行重命名,且可以命名一个或多个名字(重命名之后就不能使用方法名获取bean了)。
@Component
public class UserMapperBean {
    @Bean(name="getUserMapper1")
    public UserMapper getUserMapper(){
        return new UserMapper();
    }
}
3.五大类注解的命名规则
默认情况:使用五大类注解的Bean名称是将类的首字母小写的命名规则。如UserMapper->userMapper
特例:如果首字母和第二个字母都是大写,那么Bean名称为原来的类名。
命名的源码:由JDK的Introspector类提供的。
 public static String decapitalize(String name) {
        if (name == null || name.length() == 0) {
            return name;
        }
        if (name.length() > 1 && Character.isUpperCase(name.charAt(1)) &&
                        Character.isUpperCase(name.charAt(0))){
            return name;
        }
        char chars[] = name.toCharArray();
        chars[0] = Character.toLowerCase(chars[0]);
        return new String(chars);
    }
3.配置类
配置类可以不使用xml就能完成配置,只需要定义一个配置类就可以。
4.简单取出bean的方式
1.属性注入
使用@Autowired注解,标识是一个由Spring容器获取的对象。
@Controller
public class UserController {
    //使用属性注入、将UserService装配
    @Autowired
    private UserService userService;

    public void doController(){
        System.out.println("do Controller");
        userService.doService();
    }

}
属性注入的缺点:
- 不能注入一个由final修饰的变量。
- 通用性问题,只适用于IOC框架/容器。
- 使用简单,容易造成滥用,更容易违背单一原则。
2.构造方法注入
是Spring官方4.x推荐的依赖注入方式。
@Controller
public class UserController {
    private UserService userService;

    @Autowired
    public UserController(UserService userService){
        this.userService = userService;
    }

    public void doController(){
        System.out.println("do Controller");
        userService.doService();
    }

}
优点:
- 可以注入到由final修饰的变量上
- 注入的对象不会被修改
- 注入的对象会被完全初始化(因为依赖对象是在构造方法中执行的,在使用之前一定会被初始化)
3.Setter注入
- 不能注入一个由final修饰的变量。
- setter注入对象可能会被改变
 @Controller
public class UserController {
    private UserService userService;

    public void doController(){
        System.out.println("do Controller");
        userService.doService();
    }

    @Autowired
    public void setUserService(UserService userService) {
        this.userService = userService;
    }
}

