Unity3D URP 仿蜘蛛侠风格化Bloom&AO
Unity3D URP 仿蜘蛛侠风格化Bloom&AO
- Bloom
-
- Bloom效果流程:
- 制作控制面板VolumeComponent.CS
- Custom Renderer Feather
- Custom Renderer Pass
-
- Bloom Shader
- Composite Shader
- 完善Custom Feather
- 风格化AO
- 总结
本篇文章介绍在URP中如何进行风格化后处理,使用Renderer Feather 和自定义 Render Pass 实现。这种做法比起使用PostProcessing具有很大的自由度,能够自由控制渲染时机,减少束缚。
本教程使用Unity2022.3.5f1 版本。较低版本Shader Graph 没有Full Screen Sample Buffer。
以下两张图是蜘蛛侠动画剧照,高光Bloom部分很多是点阵的方式表现,一些AO使用混合平行斜线来表现。


类似的卡通渲染方案也被游戏 HiFi Rush 所使用。
Bloom
Bloom效果流程:
先制作Bloom效果,将Bloom渲染到一张Texture上,再将这个Texture通过我们的风格化Shader最后渲染到屏幕上
原始Bloom基本参照Unity的做法,在Packages/com.unity.render-pipelines.core/Runtime 文件夹中可找到相关代码
制作控制面板VolumeComponent.CS
- 直接复制Unity Bloom需要的控制参数。
- 添加我们风格化点阵需要的控制参数。
[VolumeComponentMenuForRenderPipeline("CustomBloomEffect", typeof(UniversalRenderPipeline))]
public class CustomBloomEffectComponent : VolumeComponent, IPostProcessComponent
{
    //bloom settings copy from Unity default Bloom
    [Header("Bloom Settings")]
    public FloatParameter threshold = new FloatParameter(0.9f,true);
    public FloatParameter intensity = new FloatParameter(1,true);
    public ClampedFloatParameter scatter = new ClampedFloatParameter(0.7f,0,1,true);
    public IntParameter clamp = new IntParameter(65472,true);
    public ClampedIntParameter maxIterations = new ClampedIntParameter(6,0,10);
    public NoInterpColorParameter tint = new NoInterpColorParameter(Color.white);

	//Custom Bloom Dots
    [Header("Dots")]
    public IntParameter dotsDensity = new IntParameter(10,true);
    public ClampedFloatParameter dotsCutoff = new ClampedFloatParameter(0.4f,0,1, true);
    public Vector2Parameter scrollDirection = new Vector2Parameter(new Vector2());

    [Header("AOLines")]
    public ClampedFloatParameter linesWidth = new ClampedFloatParameter(0.001f,0.001f,0.01f, true);
    public ClampedFloatParameter linesIntensity = new ClampedFloatParameter(0.05f,0,0.05f, true);
    public ColorParameter linesColor = new ColorParameter(Color.black, true, true, true);
    public FloatParameter linesAngle = new FloatParameter(30f, true);

    public bool IsActive()
    {
        return true;
    }

    public bool IsTileCompatible()
    {
        return false;
    }
}
- 将这个脚本挂载到场景中,我们就得到了一个和Unity原生很相识的一个控制面板,并且有新增的Dots控制功能:

Custom Renderer Feather
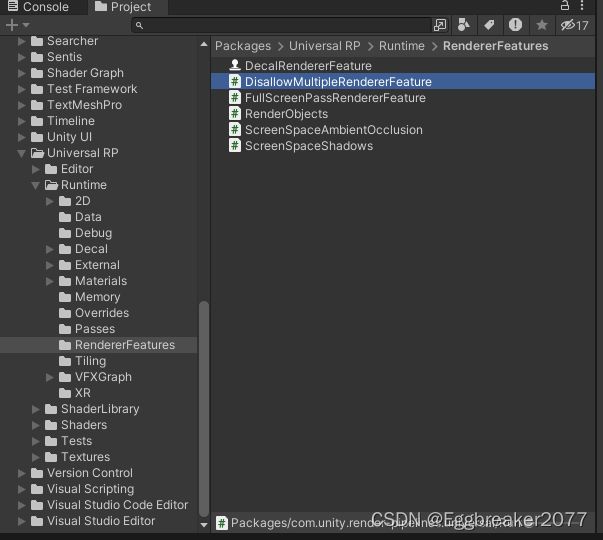
参照Unity自带的Renderer Feather 我们可仿写一个我们自己的Renderer Feather
Unity自带Renderer Feather 目录:
Custom Renderer Pass
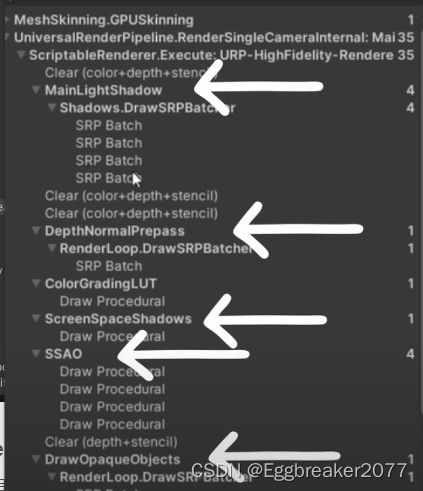
先创建一个简单的自定义Pass,这是渲染Pass,在FrameDebugger中这些根节点都是一个Pass,如图:
最简代码如下:
[System.Serializable]
public class CustomPostProcessPass : ScriptableRenderPass{
	public override void Execute(ScriptableRenderContext context,ref RenderingData renderingData)
	}

	}
}
然后我们再创建一个Custom Renderer Feather
代码:
[System.Serializable]
public class CustomPostProcessRendererFeature : ScriptableRendererFeature{
	private CustomPostProcessPass m_customPass;
	public override void AddRenderPasses(ScriptableRenderer renderer,ref RenderingData renderingData){
		renderer.EnqueuePass(m_customPass);
	}
	public override void Create(
		m_customPass = new CustomPostProcessPass()
	}
}
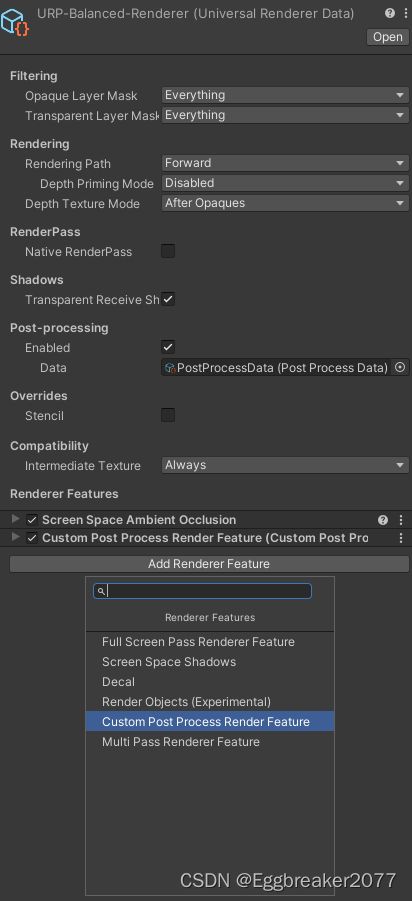
有了这两个后,我们就能在Renderer Data 面板中添加这个新Feather了
Bloom Shader
这个为了方便直接复制Unity自带的Bloom。地址:Packages/com.unity.render-pipelines.universal/Shaders/PostProcessing/Bloom.shader
Composite Shader
- 使用Shader Graph 制作用于风格化Bloom后的Texture。创建一个FullscreenShaderGraph(Unity 2022以上)

- 创建SampleTexture2D 节点,并且修改名称,注意Reference名称,我们需要通过这个名称向shader传入bloom texture

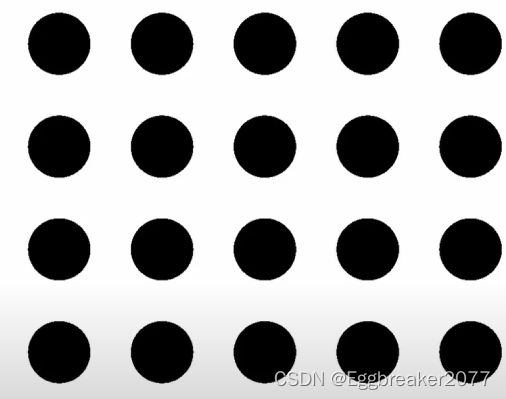
- 使用Voronoi Node输 设置AngleOffset为0, 使用Screen Position 作为UV 得到一组排列整齐的圆点格子,创建Density属性,用于控制格子密度(大小)

- 再通过一个Comparision Node 这样得到1,0分明的圆点,并创建Cutoff属性进行圆点占据格子比例大小控制
- 使用URP Sample Buffer(这个就是当前屏幕渲染图像Screen Texture) 和点阵相加。

- 完整的shader graph:

完善Custom Feather
这个主要参考Unity URP的Bloom PostProcession写法。
CustomPostProcessRenderFeature 完整代码:
public class CustomPostProcessRenderFeature : ScriptableRendererFeature
{
    [SerializeField]
    private Shader m_bloomShader;
    [SerializeField]
    private Shader m_compositeShader;

    private Material m_bloomMaterial;
    private Material m_compositeMaterial;

    private CustomPostProcessPass m_customPass;

    public override void Create()
    {
        m_bloomMaterial = CoreUtils.CreateEngineMaterial(m_bloomShader);
        m_compositeMaterial = CoreUtils.CreateEngineMaterial(m_compositeShader);
        m_customPass = new CustomPostProcessPass(m_bloomMaterial, m_compositeMaterial);
    }

    public override void AddRenderPasses(ScriptableRenderer renderer, ref RenderingData renderingData)
    {

        renderer.EnqueuePass(m_customPass);
    }

    public override void SetupRenderPasses(ScriptableRenderer renderer, in RenderingData renderingData)
    {
        if (renderingData.cameraData.cameraType == CameraType.Game)
        {
            m_customPass.ConfigureInput(ScriptableRenderPassInput.Depth);
            m_customPass.ConfigureInput(ScriptableRenderPassInput.Color);
            m_customPass.SetTarget(renderer.cameraColorTargetHandle, renderer.cameraDepthTargetHandle);
        }
    }

    protected override void Dispose(bool disposing)
    {
        CoreUtils.Destroy(m_bloomMaterial);
        CoreUtils.Destroy(m_compositeMaterial);
    }
}
CustomPostProcessingPass 完整代码:
using System.Collections;
using System.Collections.Generic;
using UnityEngine;
using UnityEngine.Experimental.Rendering;
using UnityEngine.Rendering;
using UnityEngine.Rendering.Universal;
using UnityEngine.Rendering.Universal.Internal;

public class CustomPostProcessPass : ScriptableRenderPass
{
    private Material m_bloomMaterial;
    private Material m_compositeMaterial;

    //RTHandles 是一种特殊RenderTexture,它可以在运行时动态调整大小,而不是在编辑器中预先分配固定大小的RenderTexture。
    private RTHandle m_CameraColorTarget;
    private RTHandle m_CameraDepthTarget;

    const int k_MaxPyramidSize = 16;
    private int[] _BloomMipUp;
    private int[] _BloomMipDown;
    private RTHandle[] m_BloomMipUp;
    private RTHandle[] m_BloomMipDown;
    private GraphicsFormat hdrFormat;
    private CustomBloomEffectComponent m_BloomEffect;
    private RenderTextureDescriptor m_Descriptor;
    private static readonly int ScreenSpaceOcclusionTexture = Shader.PropertyToID("_ScreenSpaceOcclusionTexture");


    public void SetTarget(RTHandle cameraColorTarget, RTHandle cameraDepthTarget)
    {
        this.m_CameraColorTarget = cameraColorTarget;
        this.m_CameraDepthTarget = cameraDepthTarget;
    }

    public override void OnCameraSetup(CommandBuffer cmd, ref RenderingData renderingData)
    {
        m_Descriptor = renderingData.cameraData.cameraTargetDescriptor;
    }

    public CustomPostProcessPass(Material bloomMaterial, Material compositeMaterial)
    {
        this.m_bloomMaterial = bloomMaterial;
        this.m_compositeMaterial = compositeMaterial;

        renderPassEvent = RenderPassEvent.BeforeRenderingPostProcessing;

        _BloomMipUp = new int[k_MaxPyramidSize];
        _BloomMipDown = new int[k_MaxPyramidSize];
        m_BloomMipUp = new RTHandle[k_MaxPyramidSize];
        m_BloomMipDown = new RTHandle[k_MaxPyramidSize];

        for (int i = 0; i < k_MaxPyramidSize; i++)
        {
            _BloomMipUp[i] = Shader.PropertyToID("_BloomMipUp" + i);
            _BloomMipDown[i] = Shader.PropertyToID("_BloomMipDown" + i);

            m_BloomMipUp[i] = RTHandles.Alloc(_BloomMipUp[i], name: "_BloomMipUp" + i);
            m_BloomMipDown[i] = RTHandles.Alloc(_BloomMipDown[i], name: "_BloomMipDown" + i);
        }

        const FormatUsage usage = FormatUsage.Linear | FormatUsage.Render;
        if (SystemInfo.IsFormatSupported(GraphicsFormat.B10G11R11_UFloatPack32, usage)) //判断是否支持HDR格式
        {
            hdrFormat = GraphicsFormat.B10G11R11_UFloatPack32;
        }
        else
        {
            hdrFormat = QualitySettings.activeColorSpace == ColorSpace.Linear ? GraphicsFormat.R8G8B8_SRGB : GraphicsFormat.R8G8B8_UNorm;
        }
    }

    public override void Execute(ScriptableRenderContext context, ref RenderingData renderingData)
    {
        VolumeStack stack = VolumeManager.instance.stack;
        m_BloomEffect = stack.GetComponent<CustomBloomEffectComponent>();

        CommandBuffer cmd = CommandBufferPool.Get();

        //使用ProfilingScope 才能在FrameDebugger中看到
        using (new ProfilingScope(cmd, new ProfilingSampler("Custom Post Process Effect")))
        {
            Texture ssaoTex = Shader.GetGlobalTexture(ScreenSpaceOcclusionTexture);
            m_compositeMaterial.SetTexture("_SSAOTexture", ssaoTex);
            //Shader.SetGlobalTexture("_SSAOTexture", ssaoTex);

            SetupBloom(cmd, m_CameraColorTarget);

            m_compositeMaterial.SetFloat("_Cutoff", m_BloomEffect.dotsCutoff.value);
            m_compositeMaterial.SetFloat("_Density", m_BloomEffect.dotsDensity.value);
            m_compositeMaterial.SetVector("_Direction", m_BloomEffect.scrollDirection.value);
            m_compositeMaterial.SetFloat("_LineWidth", m_BloomEffect.linesWidth.value);
            m_compositeMaterial.SetFloat("_LineIntensity", m_BloomEffect.linesIntensity.value);
            m_compositeMaterial.SetColor("_LineColor", m_BloomEffect.linesColor.value);
            m_compositeMaterial.SetFloat("_LineAngle", m_BloomEffect.linesAngle.value);

            Blitter.BlitCameraTexture(cmd, m_CameraColorTarget, m_CameraColorTarget, m_compositeMaterial, 0);
        }

        context.ExecuteCommandBuffer(cmd);
        cmd.Clear();
        CommandBufferPool.Release(cmd);
    }

    private void SetupBloom(CommandBuffer cmd, RTHandle source)
    {
        // 初始大小减半 降采样
        int downres = 1;
        int tw = m_Descriptor.width >> downres;
        int th = m_Descriptor.height >> downres;

        //Determine the iteration count based on the size of the pyramid
        int maxSize = Mathf.Max(tw, th);
        int iterations = Mathf.FloorToInt(Mathf.Log(maxSize,2f) - 1);
        int mipCount = Mathf.Clamp(iterations,1, m_BloomEffect.maxIterations.value);

        // Pre-filtering parameters
        float clamp = m_BloomEffect.clamp.value;
        float threshold = Mathf.GammaToLinearSpace(m_BloomEffect.threshold.value);
        float thresholdKnee = threshold * 0.5f;// Hardcoded soft knee

        // Material setup
        float scatter = Mathf.Lerp(0.05f,0.95f,m_BloomEffect.scatter.value);
        var bloomMaterial = m_bloomMaterial;
        bloomMaterial.SetVector("_Params",new Vector4(scatter,clamp,threshold,thresholdKnee));

        //Prefilter
        var desc = GetCompatibleDescriptor(tw,th,hdrFormat);
        for (int i = 0; i < mipCount; i++)
        {
            RenderingUtils.ReAllocateIfNeeded(ref m_BloomMipUp[i],desc,FilterMode.Bilinear,TextureWrapMode.Clamp,name: m_BloomMipUp[i].name);
            RenderingUtils.ReAllocateIfNeeded(ref m_BloomMipDown[i], desc, FilterMode.Bilinear, TextureWrapMode.Clamp,
                name: m_BloomMipDown[i].name);
            desc.width = Mathf.Max(1, desc.width >> 1);
            desc.height = Mathf.Max(i, desc.height >> i);
        }

        Blitter.BlitCameraTexture(cmd, source, m_BloomMipDown[0], RenderBufferLoadAction.DontCare, RenderBufferStoreAction.Store, bloomMaterial, 0);

        //Downsample
        var lastdown = m_BloomMipDown[0];
        for (int i = 0; i < mipCount - 1; i++)
        {
            //第一个Pass是 2x 降采样 + 9tap高斯模糊
            //第二个Pass是 使用5tap过滤的9tap高斯模糊 + 双线性过滤
            Blitter.BlitCameraTexture(cmd, lastdown, m_BloomMipUp[i], RenderBufferLoadAction.DontCare, RenderBufferStoreAction.Store, bloomMaterial, 1);
            Blitter.BlitCameraTexture(cmd, m_BloomMipUp[i], m_BloomMipDown[i], RenderBufferLoadAction.DontCare, RenderBufferStoreAction.Store, bloomMaterial, 2);

            lastdown = m_BloomMipDown[i];
        }

        // Upsample
        for (int i = mipCount - 2; i >= 0; i--)
        {

            var lowMip = (i == mipCount - 2)? m_BloomMipDown[i + 1] : m_BloomMipUp[i + 1];
            var highMip = m_BloomMipDown[i];
            var dst = m_BloomMipUp[i];

            cmd.SetGlobalTexture("_SourceTexLowMip", lowMip);

            Blitter.BlitCameraTexture(cmd, highMip, dst, RenderBufferLoadAction.DontCare, RenderBufferStoreAction.Store, bloomMaterial, 3);
        }

        m_compositeMaterial.SetTexture("_Bloom_Texture", m_BloomMipUp[0]);
        m_compositeMaterial.SetFloat("_BloomIntensity", m_BloomEffect.intensity.value);
        cmd.SetGlobalFloat("_BloomIntensity", m_BloomEffect.intensity.value);
    }

    private RenderTextureDescriptor GetCompatibleDescriptor()
    {
        return GetCompatibleDescriptor(m_Descriptor.width, m_Descriptor.height, m_Descriptor.graphicsFormat);
    }

    private RenderTextureDescriptor GetCompatibleDescriptor(int tw, int th, GraphicsFormat graphicsFormat, DepthBits depthBufferBits = DepthBits.None)
    {
        return GetCompatibleDescriptor(m_Descriptor, tw, th, graphicsFormat, depthBufferBits);
    }

    internal static RenderTextureDescriptor GetCompatibleDescriptor(RenderTextureDescriptor desc, int tw, int th, GraphicsFormat format, DepthBits depthBufferBits = DepthBits.None)
    {
        desc.depthBufferBits = (int)depthBufferBits;
        desc.width = tw;
        desc.height = th;
        desc.graphicsFormat = format;
        desc.msaaSamples = 1;
        return desc;
    }

}
在Renderer Data上吧Bloom Shader 和Composite Shader 拖拽进去

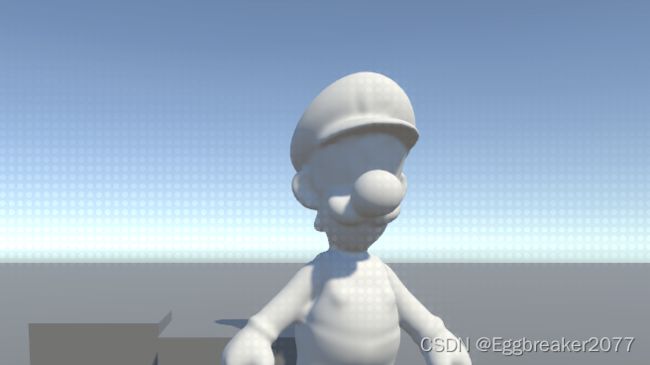
成功运行就能看到结果了:
风格化AO
要点: 添加Screen Space Ambient Occlusion 然后通过_ScreenSpaceOcclusionTexture 获取AO贴图,再把AO贴图作为Mask,在Mask内画斜线。
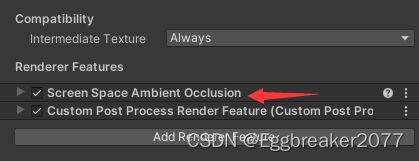
private static readonly int ScreenSpaceOcclusionTexture = Shader.PropertyToID("_ScreenSpaceOcclusionTexture");
可以在Composite Shader一起处理
一种效果如下:

总结
在实际游戏中,这些效果处理要更加复杂一些,这里给大家开个头,发挥想象把效果做得更出彩吧~