ChatGLM6B LORA微调
ChatGLM6B&ChatGLM2-6B微调
目录
ChatGLM6B&ChatGLM2-6B微调
微调硬件需求
3.1. LoRA概述
3.2. LoRA微调ChatGLM步骤
3.2.1. 项目和环境搭建
3.2.2. 数据集处理
3.2.3. 微调
3.2.4. 推理
3.2.5. 完整过程
3.3. LoRA微调ChatGLM步骤-——huggingface PEFT
3.3.1. 项目和环境搭建
官方文档:ChatGLM微调实训
【官方教程】ChatGLM-6B 微调:P-Tuning,LoRA,Full parameter
微调硬件需求
| 量化等级 |
最低GPU显存(推理) |
最低GPU显存(高效参数微调) |
| FP16(无量化) |
13G |
14G |
| INT8 |
8G |
9G |
| INT4 |
6G |
7G |
- P-Tuning 微调
- P-Tuning v2 微调
- LoRA微调
paper:LORA: LOW-RANK ADAPTATION OF LARGE LANGUAGE MODELS
3.1. LoRA概述
LoRA方法,通过精心设计的策略和技术手段,最大限度地提升模型在低资源环境下的性能。
传统的 微调方法可能需要大量的训练数据和计算资源,但是现实场景中,往往存在数据有限、计算资源有限的情况。因此,LoRA的目标是克服这些限制,实现高效低资源微调。
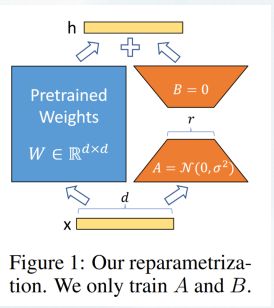
LoRA(Low-Rank Adaptation)微调冻结了预训练的模型权重,并将可训练的秩分解矩阵注入到Transformers架构的每一层,极大地减少了下游任务的可训练参数的数量。基于LoRA的微调产生保存了新的权重,可以将生成的LORA权重认为是一个原来预训练模型的补丁权重。所以LORA模型无法单独使用,需要搭配原模型,两者进行合并即可获得完整版权重。
如下图所示,左边是预训练模型的权重,输入输出维度都是d,在训练期间被冻结,不接受梯度更新。右边部分对A使用随机的高斯初始化,B在训练开始时为零,r是秩,会对△Wx做缩放 α/r。
原理:
目前 LORA 已经被 HuggingFace 集成在了PEFT(Parameter-Efficient Fine-Tuning)代码库里,模型微调好之后需要额外加载 LORA 参数。
3.2. LoRA微调ChatGLM步骤
【NLP修炼系列之玩转LLM】基于LORA的高效微调ChatGLM方法 - 知乎
3.2.1. 项目和环境搭建
采用提供好的LORA微调方法:
# step1:clone
git clone https://github.com/mymusise/ChatGLM-Tuning.git
# step2:安装环境
pip install -r requirements.txt
'''
# requirements.txt 文件如下
pip install bitsandbytes==0.37.1 accelerate==0.17.1 protobuf>=3.19.5 transformers==4.27.1 icetk cpm_kernels==1.0.11 torch>=1.13.1 tensorboard datasets==2.10.1 git+https://github.com/huggingface/peft.git
'''
3.2.2. 数据集处理
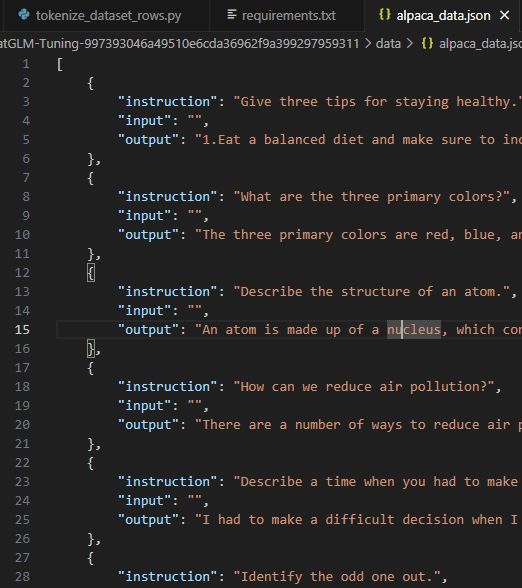
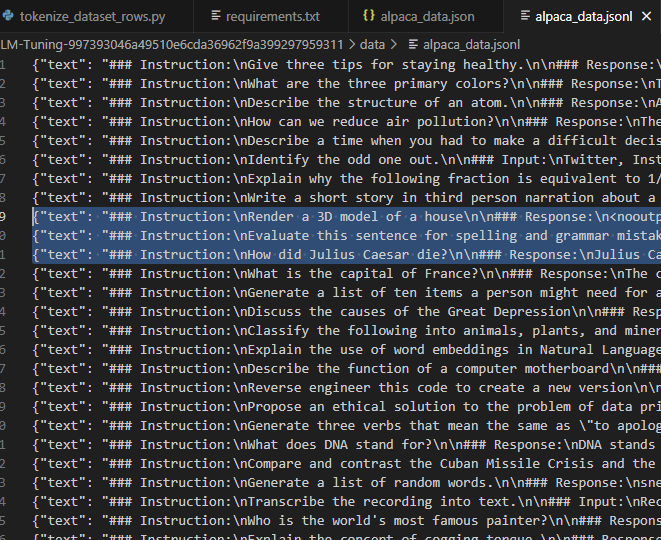
这里微调的数据集格式采用的是斯坦福的羊驼(Stanford Alpaca)数据集格式alpaca_data.json进行参数高效微调。将alpaca_data.json 转化成alpaca_data.jsonl数据【即每行一条json语料】
| alpaca_data.json |
alpaca_data.jsonl |
# step3:数据处理
python cover_alpaca2jsonl.py \
    --data_path data/alpaca_data.json \
    --save_path data/alpaca_data.jsonl \
3.2.3. 微调
首先对处理好的数据进行 Tokenizer处理
# step4:数据Tokenizer处理,修改tokenize_data_rows.py文件中的 read_jsonl()
# 修改Tokenizer为本地模型ChatGLM-6b
# tokenizer = AutoTokenizer.from_pretrained("THUDM/chatglm-6b", trust_remote_code=True)
chatglm_6b_model_path = "/root/new_datas/ChatGLM-Tuning/model/chatglm-6b"
tokenizer = AutoTokenizer.from_pretrained(chatglm_6b_model_path, trust_remote_code=True)
config = AutoConfig.from_pretrained(chatglm_6b_model_path, trust_remote_code=True, device_map='auto')

python tokenize_dataset_rows.py \
    --jsonl_path data/alpaca_data.jsonl \
    --save_path data/alpaca \
    --max_seq_length 200 \
    --skip_overlength
--jsonl_path: 微调的数据路径,格式【jsonl】,对每行的【'context'】&【'target'】字段进行encode
--max_seq_length 最大样本长度
--save_path 输出路径
# step5: 修改 finetune.py中的main()
# init model
model = AutoModel.from_pretrained(chatglm_6b_model_path, load_in_8bit=True, trust_remote_code=True, device_map="auto"
)
python finetune.py \
    --dataset_path data/alpaca \
    --lora_rank 8 \
    --per_device_train_batch_size 6 \
    --gradient_accumulation_steps 1 \
    --max_steps 500 \
    --save_steps 50 \
    --save_total_limit 2 \
    --learning_rate 1e-4 \
    --fp16 \
    --remove_unused_columns false \
    --logging_steps 50 \
    --output_dir output
以上模型的微调就结束了,微调出来的LORA模型保存在output文件夹下,后面推理过程需要用到LORA模型参数加载。
3.2.4. 推理
from peft import PeftModel
def get_model():
    tokenizer = AutoTokenizer.from_pretrained("/root/new_datas/chatglm/ChatGLM-6B/model/chatglm-6b", trust_remote_code=True)
    model = AutoModel.from_pretrained("/root/new_datas/chatglm/ChatGLM-6B/model/chatglm-6b", trust_remote_code=True).half().cuda()
    model = PeftModel.from_pretrained(model, "output").half()
    model = model.eval()
    return tokenizer, model
3.2.5. 完整过程
# step1:clone
git clone https://github.com/mymusise/ChatGLM-Tuning.git

# step2:安装环境
pip install -r requirements.txt

# step3:数据处理
python cover_alpaca2jsonl.py \
    --data_path data/alpaca_data.json \
    --save_path data/alpaca_data.jsonl

# step4:数据Tokenizer处理,修改tokenize_data_rows.py文件中的 read_jsonl()
# 修改Tokenizer为本地模型ChatGLM-6b
# tokenizer = AutoTokenizer.from_pretrained("THUDM/chatglm-6b", trust_remote_code=True)
chatglm_6b_model_path = "/root/new_datas/ChatGLM-Tuning/model/chatglm-6b"
tokenizer = AutoTokenizer.from_pretrained(chatglm_6b_model_path, trust_remote_code=True)
config = AutoConfig.from_pretrained(chatglm_6b_model_path, trust_remote_code=True, device_map='auto')

python tokenize_dataset_rows.py \
    --jsonl_path data/alpaca_data.jsonl \
    --save_path data/alpaca \
    --max_seq_length 200 \
    --skip_overlength

# step5: 修改 finetune.py中的main()
# init model
model = AutoModel.from_pretrained(chatglm_6b_model_path, load_in_8bit=True,trust_remote_code=True, device_map="auto")
python finetune.py \
    --dataset_path data/alpaca \
    --lora_rank 8 \
    --per_device_train_batch_size 6 \
    --gradient_accumulation_steps 1 \
    --max_steps 500 \
    --save_steps 50 \
    --save_total_limit 2 \
    --learning_rate 1e-4 \
    --fp16 \
    --remove_unused_columns false \
    --logging_steps 50 \
    --output_dir output

# step6: 推理

from peft import PeftModel
def get_model():
    tokenizer = AutoTokenizer.from_pretrained("/root/new_datas/chatglm/ChatGLM-6B/model/chatglm-6b", trust_remote_code=True)
    model = AutoModel.from_pretrained("/root/new_datas/chatglm/ChatGLM-6B/model/chatglm-6b", trust_remote_code=True).half().cuda()
    model = PeftModel.from_pretrained(model, "output").half()
    model = model.eval()
    return tokenizer, modelcbn
3.3. LoRA微调ChatGLM步骤-——huggingface PEFT
PEFT(Parameter-Efficient Fine-Tuning)
【微调】CHATGLM2-6B LoRA 微调 - 知乎
3.3.1. 项目和环境搭建
# step1: clone项目
git clone https://github.com/huggingface/peft.git

# step2:环境准备
pip install -r requirements.txt


