今日学习 Mybatis 的关联映射
关联映射的三种关系:
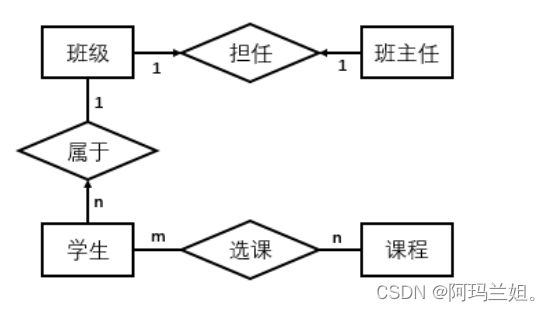
我们首先绘制一个简化的 E-R 图来表示三种关联关系。
上图表示的三种关系:
- 一对一:一个班主任只属于一个班级,一个班级也只能有一个班主任
- 一对多:一个班级有多个学生,一个学生只属于一个班级
- 多对多:一个学生可以选多门课,一门课可以有多个学生选
一对一关联映射
新建一个数据库并取名 mybatis,在数据库里创建班主任表 tb_head_teacher 并插入一条数据,创建班级表 tb_class 并插入一条数据。
创建项目OneToOne。
项目文件结构如图
具体步骤如下:
在src/main/java 的包 shiyanlou.mybatis.onetoone.model 下新建类 HeadTeacher.java,一个班主任具有 id、name、age 属性。HeadTeacher.java 的代码如下:
package shiyanlou.mybatis.onetoone.model;

public class HeadTeacher {
    private Integer id;
    private String name;
    private Integer age;

    public HeadTeacher() {

    }

    public HeadTeacher(Integer id, String name, Integer age) {
        this.id = id;
        this.name = name;
        this.age = age;
    }

    public Integer getId() {
        return id;
    }

    public void setId(Integer id) {
        this.id = id;
    }

    public String getName() {
        return name;
    }

    public void setName(String name) {
        this.name = name;
    }

    public Integer getAge() {
        return age;
    }

    public void setAge(Integer age) {
        this.age = age;
    }

}
再在包 shiyanlou.mybatis.onetoone.model 下新建类 Classes.java,一个班级有 id,name,teacher(HeadTeacher teacher)属性。teacher 属性用来映射一对一的关联关系,表示这个班级的班主任。Classes.java 的代码如下:
package shiyanlou.mybatis.onetoone.model;

public class Classes {
    private Integer id;
    private String name;
    private HeadTeacher teacher;

    public Classes() {

    }

    public Classes(Integer id, String name, HeadTeacher teacher) {
        this.id = id;
        this.name = name;
        this.teacher = teacher;
    }

    public Integer getId() {
        return id;
    }

    public void setId(Integer id) {
        this.id = id;
    }

    public String getName() {
        return name;
    }

    public void setName(String name) {
        this.name = name;
    }

    public HeadTeacher getTeacher() {
        return teacher;
    }

    public void setTeacher(HeadTeacher teacher) {
        this.teacher = teacher;
    }

}
新建包 shiyanlou.mybatis.onetoone.mapper ,并在包下新建方法接口 ClassesMapper.java。
ClassesMapper 接口的代码如下:
package shiyanlou.mybatis.onetoone.mapper;

import shiyanlou.mybatis.onetoone.model.Classes;

public interface ClassesMapper {

    /*
     * 根据 id 查询班级 Classes
     * @param id
     * @return
     * @throws Exception
     */
    public Classes selectClassById(Integer id) throws Exception;

}
在包 shiyanlou.mybatis.onetoone.mapper 下新建映射文件 ClassesMapper.xml ,映射文件与接口名相同。
ClassesMapper.xml 的配置如下:
在这里,采用的是关联的嵌套结果映射的方式,使用了
如果想要 HeadTeacher 的结果映射可以重用,我们可以采用下面的方式,先定义 HeadTeacher 的 resultMap:
在项目目录 src/main/resources 下新建 MyBatis 配置文件 mybatis.cfg.xml ,用来配置 Mybatis 的运行环境、数据源、事务等。
mybatis.cfg.xml 的配置如下,具体解释注释已经给出:
使用日志文件是为了查看控制台输出的 SQL 语句。
在项目目录 src/main/resources 下新建 MyBatis 日志记录文件 log4j.properties ,在里面添加如下内容:
# Global logging configuration
log4j.rootLogger=DEBUG, stdout
# Console output...
log4j.appender.stdout=org.apache.log4j.ConsoleAppender
log4j.appender.stdout.layout=org.apache.log4j.PatternLayout
log4j.appender.stdout.layout.ConversionPattern=%5p [%t] - %m%n
在包 shiyanlou.mybatis.onetoone.test 下新建测试类 Test.java ,代码如下:
package shiyanlou.mybatis.onetoone.test;

import java.io.IOException;
import java.io.InputStream;

import org.apache.ibatis.io.Resources;
import org.apache.ibatis.session.SqlSession;
import org.apache.ibatis.session.SqlSessionFactory;
import org.apache.ibatis.session.SqlSessionFactoryBuilder;

import shiyanlou.mybatis.onetoone.mapper.ClassesMapper;
import shiyanlou.mybatis.onetoone.model.Classes;

public class Test {
    private static SqlSessionFactory sqlSessionFactory;

    public static void main(String[] args) {
        // Mybatis 配置文件
        String resource = "mybatis.cfg.xml";

        // 得到配置文件流
        InputStream inputStream = null;
        try {
            inputStream = Resources.getResourceAsStream(resource);
        } catch (IOException e) {
            e.printStackTrace();
        }

        // 创建会话工厂,传入 MyBatis 的配置文件信息
        sqlSessionFactory = new SqlSessionFactoryBuilder().build(inputStream);

        // 通过工厂得到 SqlSession
        SqlSession session = sqlSessionFactory.openSession();

        ClassesMapper mapper = session.getMapper(ClassesMapper.class);
        try {
            Classes classes = mapper.selectClassById(1);
            session.commit();
            System.out.println(classes.getId() + "," + classes.getName() + ",["
                    + classes.getTeacher().getId() + ","
                    + classes.getTeacher().getName() + ","
                    + classes.getTeacher().getAge()+"]");

        } catch (Exception e) {
            e.printStackTrace();
            session.rollback();
        }

        // 释放资源
        session.close();

    }
}
运行测试类 Test.java, 查询 对应班级的所有信息及其班主任的信息,得到的输出信息与数据库中的数据一致。
一对多关联映射
项目文件结构
打开数据库,新建一个数据库并取名 mybatis,创建班级表 tb_class 并插入数据,创建学生表 tb_student 并插入数据。
新建项目 OneToMany。
在src/main/java 的包 shiyanlou.mybatis.onetomany.model 下新建类 Student.java,一个学生具有 id、name、sex、age 属性。Student.java 的代码如下:
package shiyanlou.mybatis.onetomany.model;

public class Student {
    private Integer id;
    private String name;
    private String sex;
    private Integer age;

    public Student() {

    }

    public Student(Integer id, String name, String sex, Integer age) {
        this.id = id;
        this.name = name;
        this.sex = sex;
        this.age = age;
    }

    public Integer getId() {
        return id;
    }

    public void setId(Integer id) {
        this.id = id;
    }

    public String getName() {
        return name;
    }

    public void setName(String name) {
        this.name = name;
    }

    public String getSex() {
        return sex;
    }

    public void setSex(String sex) {
        this.sex = sex;
    }

    public Integer getAge() {
        return age;
    }

    public void setAge(Integer age) {
        this.age = age;
    }

}
再在包 shiyanlou.mybatis.onetomany.model 下新建类 Classes.java,一个班级有 id,name,students 属性。List 用来表示一对多的关系,一个班级可以有多个学生。students 是一个 List 集合。Classes.java 的代码如下:
package shiyanlou.mybatis.onetomany.model;

import java.util.List;

public class Classes {
    private Integer id;
    private String name;
    // 班级和学生是一对多的关系,即一个班级可以有多个学生
    private List students;

    public Classes() {

    }

    public Classes(Integer id, String name, List students) {
        this.id = id;
        this.name = name;
        this.students = students;
    }

    public Integer getId() {
        return id;
    }

    public void setId(Integer id) {
        this.id = id;
    }

    public String getName() {
        return name;
    }

    public void setName(String name) {
        this.name = name;
    }

    public List getStudents() {
        return students;
    }

    public void setStudents(List students) {
        this.students = students;
    }

}
新建包 shiyanlou.mybatis.onetomany.mapper ,并在包下新建方法接口 ClassesMapper.java。
ClassesMapper 接口的代码如下:
package shiyanlou.mybatis.onetomany.mapper;

import shiyanlou.mybatis.onetomany.model.Classes;

public interface ClassesMapper {

    /*
     * 根据 id 查询班级 Classes 和它的学生
     * @param id
     * @return
     * @throws Exception
     */
    public Classes selectClassAndStudentsById(Integer id) throws Exception;

}
在包 shiyanlou.mybatis.onetomany.mapper 下新建映射文件 ClassesMapper.xml ,映射文件与接口名相同。
ClassesMapper.xml 的配置如下:
在这里,采用的是集合的嵌套结果映射的方式,使用了
如果想要 Student 的结果映射可以重用,我们可以定义一个 Student 类型的 resultMap,再在 resultMap= 引用,同一对一关联映射的
在项目目录 src/main/resources 下新建 MyBatis 配置文件 mybatis.cfg.xml ,用来配置 Mybatis 的运行环境、数据源、事务等。
mybatis.cfg.xml 的配置如下,具体解释注释已经给出:
使用日志文件是为了查看控制台输出的 SQL 语句。
在项目目录 src/main/resources 下新建 MyBatis 日志记录文件 log4j.properties ,在里面添加如下内容:
# Global logging configuration
log4j.rootLogger=DEBUG, stdout
# Console output...
log4j.appender.stdout=org.apache.log4j.ConsoleAppender
log4j.appender.stdout.layout=org.apache.log4j.PatternLayout
log4j.appender.stdout.layout.ConversionPattern=%5p [%t] - %m%n
在包 shiyanlou.mybatis.onetomany.test 下新建测试类 Test.java ,代码如下:
package shiyanlou.mybatis.onetomany.test;

import java.io.IOException;
import java.io.InputStream;

import org.apache.ibatis.io.Resources;
import org.apache.ibatis.session.SqlSession;
import org.apache.ibatis.session.SqlSessionFactory;
import org.apache.ibatis.session.SqlSessionFactoryBuilder;

import java.util.List;

import shiyanlou.mybatis.onetomany.mapper.ClassesMapper;
import shiyanlou.mybatis.onetomany.model.Classes;
import shiyanlou.mybatis.onetomany.model.Student;

public class Test {
    private static SqlSessionFactory sqlSessionFactory;

    public static void main(String[] args) {
        // Mybatis 配置文件
        String resource = "mybatis.cfg.xml";

        // 得到配置文件流
        InputStream inputStream = null;
        try {
            inputStream = Resources.getResourceAsStream(resource);
        } catch (IOException e) {
            e.printStackTrace();
        }

        // 创建会话工厂,传入 MyBatis 的配置文件信息
        sqlSessionFactory = new SqlSessionFactoryBuilder().build(inputStream);

        // 通过工厂得到 SqlSession
        SqlSession session = sqlSessionFactory.openSession();

        ClassesMapper mapper = session.getMapper(ClassesMapper.class);
        try {
            Classes classes = mapper.selectClassAndStudentsById(1);
            session.commit();
            System.out.println("班级信息:"+classes.getId()+","+classes.getName());
            List students = classes.getStudents();
            System.out.println("班级的所有学生信息:");
             for(Student stu:students){
                 System.out.println(stu.getId()+","+stu.getName()+","+stu.getSex()+","+stu.getAge());
             }

        } catch (Exception e) {
            e.printStackTrace();
            session.rollback();
        }
        // 释放资源
        session.close();
    }
}
运行测试类 Test.java,查询 对应id 的班级的所有信息及其班主任的信息。
多对一的实现和一对一的方式一样。
多对多关联映射
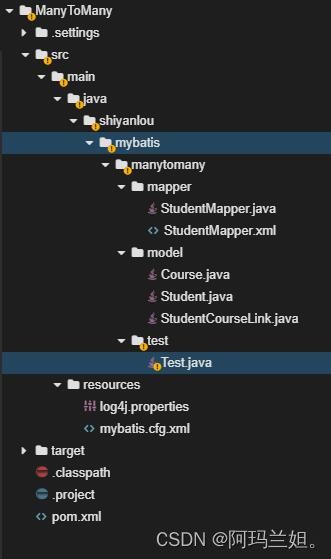
项目文件结构
新建一个数据库并取名 mybatis,创建学生表 tb_student 并插入数据
create table tb_student(
s_id int primary key auto_increment,
s_name varchar(20),
s_sex varchar(10),
s_age int);

insert into tb_student(s_name,s_sex,s_age) values('Tom','male',18);
insert into tb_student(s_name,s_sex,s_age) values('Jack','male',19);
创建课程表 tb_course 并插入数据
create table tb_course(
c_id int primary key auto_increment,
c_name varchar(20),
c_credit int);

insert into tb_course(c_name,c_credit) values('Math',5);
insert into tb_course(c_name,c_credit) values('Computer',4);
由于学生和课程是多对多的关联关系,因此创建中间表:选课表 tb_select_course 并插入数据
create table tb_select_course(
sc_s_id int,
sc_c_id int,
sc_date date,
primary key(sc_s_id,sc_c_id),
foreign key(sc_s_id) references tb_student(s_id),
foreign key(sc_c_id) references tb_course(c_id));

insert into tb_select_course(sc_s_id,sc_c_id,sc_date) values(1,1,'2017-03-01');
insert into tb_select_course(sc_s_id,sc_c_id,sc_date) values(1,2,'2017-03-01');
insert into tb_select_course(sc_s_id,sc_c_id,sc_date) values(2,1,'2017-03-02');
insert into tb_select_course(sc_s_id,sc_c_id,sc_date) values(2,2,'2017-03-02');
新建项目 ManyToMany。
导入所需 jar 包,打开 pom.xml,修改为以下内容(前两个没加,感觉没必要,如果需要,就看这样照着改一下)
  4.0.0
  shiyanlou.mybatis.manytomany
  ManyToMany
  jar
  1.0-SNAPSHOT
  ManyToMany
  http://maven.apache.org


            org.mybatis
            mybatis
            3.4.6


            mysql
            mysql-connector-java
            6.0.6


            log4j
            log4j
            1.2.17


                src/main/java

                    **/*.xml


                src/main/resources

                    **/*.*
实体类
在src/main/java 的包 shiyanlou.mybatis.manytomany.model 下新建类 Student.java,一个学生具有 id、name、sex、age、courses(List属性。学生和课程之间是多对多关系,一个学生可以选多门课。
Student.java 的代码如下:
package shiyanlou.mybatis.manytomany.model;

import java.util.List;

public class Student {
    private Integer id;
    private String name;
    private String sex;
    private Integer age;
    private List courses;

    public Student() {

    }

    public Student(Integer id, String name, String sex, Integer age,List courses) {
        this.id = id;
        this.name = name;
        this.sex = sex;
        this.age = age;
        this.courses = courses;
    }

    public Integer getId() {
        return id;
    }

    public void setId(Integer id) {
        this.id = id;
    }

    public String getName() {
        return name;
    }

    public void setName(String name) {
        this.name = name;
    }

    public String getSex() {
        return sex;
    }

    public void setSex(String sex) {
        this.sex = sex;
    }

    public Integer getAge() {
        return age;
    }

    public void setAge(Integer age) {
        this.age = age;
    }

    public List getCourses() {
        return courses;
    }

    public void setCourses(List courses) {
        this.courses = courses;
    }

}
再在包 shiyanlou.mybatis.manytomany.model 下新建类 Course.java,一个班级有 id,name,credit、students(List 属性。课程和学生之间是多对多关系,一个课程可以由多个学生选。
Course.java 的代码如下:
package shiyanlou.mybatis.manytomany.model;

import java.util.List;

public class Course {
    private Integer id;
    private String name;
    private Integer credit;
    private List students;

    public Course() {

    }

    public Course(Integer id, String name, Integer credit,
            List students) {
        this.id = id;
        this.name = name;
        this.credit = credit;
        this.students = students;
    }

    public Integer getId() {
        return id;
    }

    public void setId(Integer id) {
        this.id = id;
    }

    public String getName() {
        return name;
    }

    public void setName(String name) {
        this.name = name;
    }

    public Integer getCredit() {
        return credit;
    }

    public void setCredit(Integer credit) {
        this.credit = credit;
    }

    public List getStudents() {
        return students;
    }

    public void setStudents(List students) {
        this.students = students;
    }
}
最后在包 shiyanlou.mybatis.manytomany.model 下新建类 StudentCourseLink.java,用来描述学生和课程之间的关系,其包含 student(Student)、course(Course)、date 属性。
package shiyanlou.mybatis.manytomany.model;

import java.util.Date;

public class StudentCourseLink {
    private Student student;
    private Course course;
    private Date date;

    public StudentCourseLink() {

    }

    public StudentCourseLink(Student student, Course course, Date date) {
        this.student = student;
        this.course = course;
        this.date = date;
    }

    public Student getStudent() {
        return student;
    }

    public void setStudent(Student student) {
        this.student = student;
    }

    public Course getCourse() {
        return course;
    }

    public void setCourse(Course course) {
        this.course = course;
    }

    public Date getDate() {
        return date;
    }

    public void setDate(Date date) {
        this.date = date;
    }

}
创建方法接口和定义映射文件
新建包 shiyanlou.mybatis.manytomany.mapper ,并在包下新建方法接口 StudentMapper.java。
StudentMapper 接口的代码如下:
package shiyanlou.mybatis.manytomany.mapper;

import shiyanlou.mybatis.manytomany.model.Student;
import shiyanlou.mybatis.manytomany.model.StudentCourseLink;

import java.util.List;

public interface StudentMapper {
    /*
     * 查询所有学生及他们的选择课程的信息
     * @return
     * @throws Exception
     */
    public List selectStudentCourse() throws Exception;

    /*
     * 删除指定 id 用户的某门课(根据课程 id)的选课情况
     * @param StudentCourseLink
     * @throws Exception
     */
    public void deleteStudentCourseById(StudentCourseLink scLink) throws Exception;
}
在包 shiyanlou.mybatis.onetomany.mapper 下新建映射文件 StudentMapper.xml ,映射文件与接口名相同。
StudentMapper.xml 的配置如下:
delete from tb_select_course where sc_s_id=#{student.id} and sc_c_id=#{course.id}
在这里,采用的是集合的嵌套结果映射的方式,使用了
配置文件 mybatis.cfg.xml
在项目目录 src/main/resources 下新建 MyBatis 配置文件 mybatis.cfg.xml ,用来配置 Mybatis 的运行环境、数据源、事务等。
mybatis.cfg.xml 的配置如下,具体解释注释已经给出:
日志记录 log4j.properties
感觉也不必要
使用日志文件是为了查看控制台输出的 SQL 语句。
在项目目录 src/main/resources 下新建 MyBatis 日志记录文件 log4j.properties ,在里面添加如下内容:
# Global logging configuration
log4j.rootLogger=DEBUG, stdout
# Console output...
log4j.appender.stdout=org.apache.log4j.ConsoleAppender
log4j.appender.stdout.layout=org.apache.log4j.PatternLayout
log4j.appender.stdout.layout.ConversionPattern=%5p [%t] - %m%n
测试类 Test
在包 shiyanlou.mybatis.manytomany.test 下新建测试类 Test.java ,代码如下:
package shiyanlou.mybatis.manytomany.test;

import shiyanlou.mybatis.manytomany.mapper.StudentMapper;
import shiyanlou.mybatis.manytomany.model.Course;
import shiyanlou.mybatis.manytomany.model.Student;
import shiyanlou.mybatis.manytomany.model.StudentCourseLink;

import java.io.IOException;
import java.io.InputStream;
import java.util.List;

import org.apache.ibatis.io.Resources;
import org.apache.ibatis.session.SqlSession;
import org.apache.ibatis.session.SqlSessionFactory;
import org.apache.ibatis.session.SqlSessionFactoryBuilder;

public class Test {
    private static SqlSessionFactory sqlSessionFactory;

    public static void main(String[] args) {
        // Mybatis 配置文件
        String resource = "mybatis.cfg.xml";

        // 得到配置文件流
        InputStream inputStream = null;
        try {
            inputStream = Resources.getResourceAsStream(resource);
        } catch (IOException e) {
            e.printStackTrace();
        }

        // 创建会话工厂,传入 MyBatis 的配置文件信息
        sqlSessionFactory = new SqlSessionFactoryBuilder().build(inputStream);

        selectStudentCourse();
        //deleteStudentCourseById();

    }

    // 查询所有学生及他们的选择课程的信息
    private static void selectStudentCourse(){
        // 通过工厂得到 SqlSession
        SqlSession session = sqlSessionFactory.openSession();

        StudentMapper mapper = session.getMapper(StudentMapper.class);
        try {
            List students = mapper.selectStudentCourse();
            session.commit();
            for(Student stu:students){
                System.out.println(stu.getId()+","+stu.getName()+","+stu.getSex()+","+stu.getAge()+":");
                List courses = stu.getCourses();
                for(Course cou:courses){
                    System.out.println(cou.getId()+","+cou.getName()+","+cou.getCredit());
                }
            }

        } catch (Exception e) {
            e.printStackTrace();
            session.rollback();
        }

        // 释放资源
        session.close();
    }

    // 根据学生 id 和课程 id 删除该学生该门课的选课情况
    private static void deleteStudentCourseById(){
        SqlSession session = sqlSessionFactory.openSession();

        StudentMapper mapper = session.getMapper(StudentMapper.class);
        try {
            Student student = new Student();
            student.setId(1);
            Course course = new Course();
            course.setId(2);
            StudentCourseLink scLink = new StudentCourseLink();
            scLink.setStudent(student);
            scLink.setCourse(course);
            mapper.deleteStudentCourseById(scLink);
            session.commit();
        } catch (Exception e) {
            e.printStackTrace();
            session.rollback();
        }

        session.close();
    }
}
运行测试类 Test.java。


