SpringCloudStream简单集成RocketMQ及事务消息
Spring Cloud Stream整合消息系统
简介
Spring Cloud Stream是统一消息中间件编程模型的框架,屏蔽底层消息中间件的差异,降低学习成本及切换成本,其核心就是对消息中间件进一步封装。官方定义Spring Cloud Stream是一个用于构建基于消息的微服务应用框架。
Spring Cloud Stream的Binder对象概念非常重要,不同的消息中间件产品Binder的实现是不同的。如,Kafka的实现是KafkaMessageChannelBinder,RabbitMQ的实现是RabbitMessageChannelBinder,RocketMQ的实现是RocketMQMessageChannelBinder。(来自官网https://spring.io/projects/spring-cloud-stream),目前支持的消息中间件产品:
还有一个重要概念,Binding,分为Input Binding和Output Binding。通过Binding来绑定消息生产者和消息消费者,构建一座沟通的桥梁。底层使用Binder对象与消息中间件交互。
那么为什么使用Spring Cloud Stream呢?
- 业务代码和消息中间件解耦:不需要关注是哪个消息中间件(要看Spring Cloud Stream是否支持的),只需要遵守Spring Cloud Stream的编程规范即可。如果更换消息中间件,只需修改配置文件中相关配置,Binder对下给你自动切换
- 学习成本低:集成一个Spring Cloud Stream,其他的中间件就算没学过,也能快速集成使用
常用注解
- @Input:标记为输入信道,消费消息
- @Output:标记为输出信道,生产消息
- @StreamListener:监听某个队列,接收消息
- @EnableBinding:绑定通道
集成RocketMQ
既然要使用Spring Cloud Stream,那么就需要选择一款消息中间件,这里用RocketMQ。
RocketMQ前身是Metaq,当Metaq发布3.0版本时,更名为RocketMQ,经历淘宝双十一大流量的考验,值得信赖。RocketMQ是一款分布式消息中间件,以下优点:
- 高性能、高可靠、高实时
- 保证严格的消息顺序
- 支持消息拉取模式
- 支持事务
- 亿级消息堆积能力
- 高效的订阅者水平扩展能力
- 可集群部署
下载安装
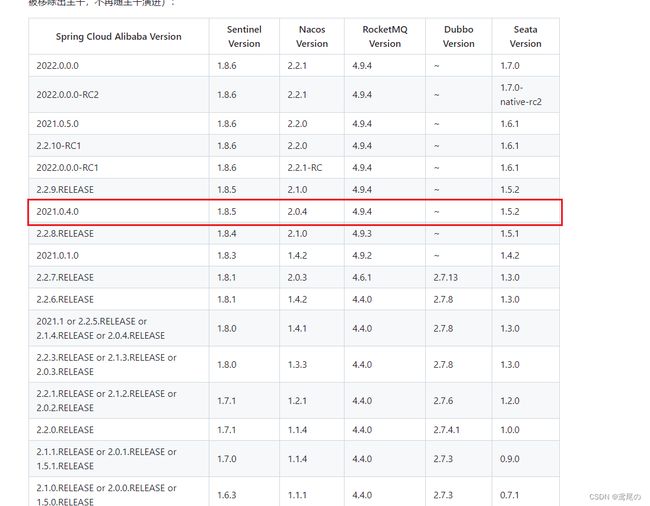
还是按照对应的版本去下载,笔者使用的spring cloud alibaba的版本是2021.0.4.0,那么RocketMQ版本选择4.9.4即可

下载地址贴到这里https://archive.apache.org/dist/rocketmq/4.9.4/rocketmq-all-4.9.4-bin-release.zip
下载速度过慢,这里提供下网盘资源:
链接:https://pan.baidu.com/s/1cwpVD2to-vkyNMpJ25kEbg
提取码:9609
安装
windows下启动rocketmq时,只需进入bin目录下,点击mqnamesrv.cmd和mqbroker.cmd分别启动Name Server和Broker服务。
如果是linux系统,只要有JDK环境,无需额外配置,到RocketMQ目录下能直接运行
nohup sh bin/mqnamesrv &
nohup sh bin/mqbroker -n localhost:9876 &
启动RocketMQ需要内存大一点,如linux虚拟机512MB内存,一般是启动不了的。可以修改bin/runbroker.sh文件的JAVA_OPT参数;windows系统启动不了的话,到bin/runbroker.cmd修改JAVA_OPT参数
Spring Cloud Stream+RocketMQ生产者代码
- 添加RocketMQ依赖和健康监控依赖,在pom.xml文件中
<dependency>
    <groupId>com.alibaba.cloudgroupId>
    <artifactId>spring-cloud-starter-alibaba-nacos-discoveryartifactId>
dependency>


<dependency>
    <groupId>org.springframework.bootgroupId>
    <artifactId>spring-boot-starter-actuatorartifactId>
dependency>


<dependency>
    <groupId>com.alibaba.cloudgroupId>
    <artifactId>spring-cloud-starter-stream-rocketmqartifactId>
dependency>


<dependency>
    <groupId>org.springframework.cloudgroupId>
    <artifactId>spring-cloud-stream-binder-rocketmqartifactId>
    <version>0.9.0.RELEASEversion>
dependency>
- 声明Source绑定通道,其实就是消息输出
public interface CustomSource {
    @Output("output1")
    MessageChannel output1();
}
在启动类中或其他相关的配置类绑定通道,增加@EnableBinding注解
@SpringBootApplication
@EnableDiscoveryClient
@EnableBinding(CustomSource.class)
public class StreamProduceApplication {

    public static void main(String[] args) {
        SpringApplication.run(StreamProduceApplication.class, args);
    }
}
- 在yml配置文件中增加对RocketMQ服务和
output1输出通道及暴露Spring Cloud Stream监控端点的配置
server:
  port: 8081
spring:
  application:
    name: produce # 应用名

  cloud:
    nacos:
      discovery:
        server-addr: localhost:8848 # nacos服务地址
    stream:
      rocketmq:
        binder:
          name-server: localhost:9876 # rocketmq的服务地址
		  group: group
      bindings:
        output1:
          destination: test-topic # 消息主题
          content-type: application/json # 数据类型

management:
  endpoints:
    web:
      exposure:
        include: '*' # 公开所有端点, SpringCloudStream的端点: /actuator/bindings, /actuator/channels, /actuator/health

  endpoint:
    health:
      show-details: always # 显示服务信息详情
- 创建SendMessageService类,生产消息
@Service
public class SendMessageService {

    @Resource
    private CustomSource customSource;
    public String sendMessage() {
        String payload = "发送简单字符串测试" + RandomUtils.nextInt(0, 500);
        customSource.output1().send(MessageBuilder.withPayload(payload).build());   // 发送消息
        return payload;
    }
}
- 写个接口,发送消息的
@RestController
public class TestController {

    @Resource
    SendMessageService messageService;

    @RequestMapping("/sendMessage")
    public String sendMessage() {
        return messageService.sendMessage();
    }

}
Spring Cloud Stream+RocketMQ消费者
- 同样的,先去导入RocketMQ的依赖,这里不再赘述
- 自定义Sink,就是消息的输入
public interface CustomSink {

    @Input("input1")
    SubscribableChannel input1();
}
并且在启动类中绑定
@SpringBootApplication
@EnableDiscoveryClient
@EnableBinding(CustomSink.class)
public class StreamConsumerApplication {

    public static void main(String[] args) {
        SpringApplication.run(StreamConsumerApplication.class, args);
    }
}
- 在yml配置文件中
server:
  port: 8082
spring:
  application:
    name: consumer # 应用名

  cloud:
    nacos:
      discovery:
        server-addr: localhost:8848 # nacos服务地址
    stream:
      rocketmq:
        binder:
          name-server: localhost:9876 # rocketmq的服务地址
		  group: group
      bindings:
        input1:
          destination: test-topic # 消息主题
          content-type: application/json # 数据类型
          group: test-group # 消费者组,防止多个实例重复消费,相同组只有一个实例能收到

management:
  endpoints:
    web:
      exposure:
        include: '*' # 公开所有端点, SpringCloudStream的端点: /actuator/bindings, /actuator/channels, /actuator/health

  endpoint:
    health:
      show-details: always # 显示服务信息详情
- 定义消息监听者,处理消息数据,这里定义两种,可以选择不同的接收方式
@Component
public class ConsumerListener {
    // 接收处理消息,接收字符串
    @StreamListener("input1")
    public void input1Consumer(String message) {
        System.out.println("input1Consumer received " + message);
    }
    // 接收处理消息,接收最原始的Message
    @StreamListener("input1")
    public void input1ConsumerMessage(Message<String> message) {
        String payload = message.getPayload();
        MessageHeaders headers = message.getHeaders();

        System.out.println("input1Consumer Message - 消息内容 " + payload + " 消息头 " + headers );
    }
}
input1Consumer()和input1ConsumerMessage()都可以消费信息,不同的是它们接收的数据不相同,
input1ConsumerMessage()可以拿到更多的信息,如头信息等
验证消息生产和消费
将生产者和消费者启动起来,cmd测下接口
curl localhost:8081/sendMessage
发送简单字符串测试13
看到消费者日志,也拿到了消息
发送对象消息
生产者创建一个对象类
public class User {

    private Integer id;
    private String name;

    public Integer getId() {
        return id;
    }

    public void setId(Integer id) {
        this.id = id;
    }

    public String getName() {
        return name;
    }

    public void setName(String name) {
        this.name = name;
    }
}
SendMessageService类增加sendObjectMessage方法
public String sendObjectMessage() {
    User user = new User();
    user.setId(RandomUtils.nextInt(0, 500));
    user.setName("ZhangSan");
    customSource.output1().send(MessageBuilder.withPayload(user).build());   // 发送消息
    return "用户id" + user.getId() + " 用户名:" + user.getName();
}
- 接口增加
/sendObjectMessage
@RequestMapping("/sendObjectMessage")
public String sendObjectMessage() {
    return messageService.sendObjectMessage();
}
- 测试下
curl localhost:8081/sendObjectMessage
用户id221 用户名:ZhangSan
日志
重复消费问题
若出现重复消费问题,一般是以下两种情况导致:
- 消费者有两个实例,但是它们的
spring.cloud.stream.bindings..group的组不同,那么它们会没人消费一次,造成多次消费,解决:把它们放置到相同的组中即可 - 消费者收到消息后,业务处理时抛出异常。有重试机制,会造成多次重复消费。可以将异常捕获记录保存起来,进行后续业务处理,或后续人工补偿数据,达到数据最终一致性
消息过滤
消息过滤有两种方案
- @StreamListener注解condition属性
- 设置tags过滤
@StreamListener注解condition属性
消息生产者SendMessageService类中,增加sendConsitionMessage方法,发送自定义头Custom-header的消息
public String sendConditionMessage() {
    String payload = "发送请求头字符串测试" + RandomUtils.nextInt(0, 500);
    customSource.output1().send(MessageBuilder
                                .withPayload(payload)
                                .setHeader("custom-header", "customHeader") // 设置头信息
                                .build());   // 发送消息
    return payload;
}
- 增加接口
@RequestMapping("/sendConditionMessage")
public String sendConditionMessage() {
    return messageService.sendConditionMessage();
}
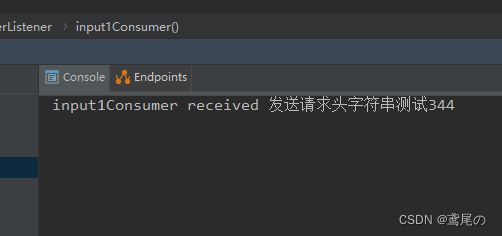
- 消费者监听消息时,过滤条件(我这里只留了一个监听方法),那么这个方法只监听,头信息存在custom-header且值是customHeader的信息
@StreamListener(value = "input1", condition = "headers['custom-header']=='customHeader'")
public void input1Consumer(String message) {
    System.out.println("input1Consumer received " + message);
}
- 测试
curl localhost:8081/sendConditionMessage
发送请求头字符串测试344
消息过滤–tags
生产者SendMessageService增加sendTagsMessage方法
public String sendTagsMessage() {
    String payload = "发送带有tags测试" + RandomUtils.nextInt(0, 500);
    customSource.output1().send(MessageBuilder
                                .withPayload(payload)
                                .setHeader(RocketMQConst.Headers.TAGS, "test") // 设置头信息
                                .build());   // 发送消息
    return payload;
}
- 增加接口
/sendTagsMessage
@RequestMapping("/sendTagsMessage")
public String sendTagsMessage() {
    return messageService.sendTagsMessage();
}
- 消费者yml配置类中过滤
server:
  port: 8082
spring:
  application:
    name: consumer # 应用名

  cloud:
    nacos:
      discovery:
        server-addr: localhost:8848 # nacos服务地址
    stream:
      rocketmq:
        binder:
          name-server: localhost:9876 # rocketmq的服务地址
          group: group
        bindings:
          input1:
            consumer:
              tags: test # 指定input1消费带有tags为test的消息,若多个用 || 隔开,如 test1 || test2,就是消费test1或test2
      bindings:
        input1:
          destination: test-topic # 消息主题
          content-type: application/json # 数据类型
          group: test-group # 消费者组,防止多个实例重复消费,相同组只有一个实例能收到

management:
  endpoints:
    web:
      exposure:
        include: '*' # 公开所有端点, SpringCloudStream的端点: /actuator/bindings, /actuator/channels, /actuator/health

  endpoint:
    health:
      show-details: always # 显示服务信息详情
- 测试
curl localhost:8081/sendTagsMessage
发送带有tags测试323
异常处理
消息统一的异常处理分为局部异常处理和针对某个主题的全局异常处理
局部
在消费者端,创建一个异常处理类
@Component
public class HandleConsumerError {

    // 处理test-topic下的test-group分组中的异常
    @ServiceActivator(inputChannel = "test-topic.test-group.errors")
    public void handleError(ErrorMessage message) {
        Throwable payload = message.getPayload();
        System.out.println("截获异常:" + payload.getMessage());

        System.out.println("原始消息:" + new String((byte[])
                ((MessagingException) payload).getFailedMessage().getPayload()));
    }

}
- 消费者使报错
@StreamListener("input1")
public void input1Consumer(String message) {
    System.out.println("input1Consumer received " + message);
    int i = 1/0;
}
- 测试下
从日志中看出来,消费了三次,然后捕获异常,那么也就是有2次重试的机制。重试完毕后,还报错,那么就会捕获此异常
全局如何配置呢?
@StreamListener("errorChannel")
public void errorChannel(ErrorMessage message) {
    Throwable payload = message.getPayload();
    System.out.println("截获异常:" + payload.getMessage());

    System.out.println("原始消息:" + new String((byte[])
                                            ((MessagingException) payload).getFailedMessage().getPayload()));
}
全局的是需要监听errorChannel的通道即可。
那么需要注意:当局部和全局都配置时,先走局部的,局部的捕获后,全局就不会再去走了
事务消息
生产者
生产者中的yml配置文件中,增加事务消息的输出信道,output2,事务订阅主题及事务分组等
server:
  port: 8081
spring:
  application:
    name: produce # 应用名

  cloud:
    nacos:
      discovery:
        server-addr: localhost:8848 # nacos服务地址
    stream:
      rocketmq:
        binder:
          name-server: localhost:9876 # rocketmq的服务地址
          group: group
      bindings:
        output1:
          destination: test-topic # 消息主题
          content-type: application/json # 数据类型
        output2:
          destination: transaction-topic # 消息主题
          content-type: application/json # 数据类型

management:
  endpoints:
    web:
      exposure:
        include: '*' # 公开所有端点, SpringCloudStream的端点: /actuator/bindings, /actuator/channels, /actuator/health

  endpoint:
    health:
      show-details: always # 显示服务信息详情
- CustomSource增加信道输出
@Output("output2")
MessageChannel output2();
- 生产者增加发送消息事务方法
@Autowired
private RocketMQTemplate rocketMQTemplate;
public String sendTransactionalMessage() {
    String uuid = UUID.randomUUID().toString();
    String payload = "发送事务测试消息" + uuid;
    Message<String> build = MessageBuilder
        .withPayload(payload)
        .setHeader(RocketMQHeaders.TRANSACTION_ID, uuid) // 设置头信息
        .build();
    rocketMQTemplate.sendMessageInTransaction("myTxProducerGroup", "transaction-topic", build, uuid);
    return payload;
}
- 增加接口
/sendTransactionalMessage
@RequestMapping("/sendTransactionalMessage")
public String sendTransactionalMessage() {
    return messageService.sendTransactionalMessage();
}
- 重要步骤:生产者增加TransactionalListener类,执行本地事务和检查本地事务
@RocketMQTransactionListener(txProducerGroup = "myTxProducerGroup", corePoolSize = 5, maximumPoolSize = 10) // 配置文件中配置的事务分组
public class TransactionalListener implements RocketMQLocalTransactionListener {
    @Override
    public RocketMQLocalTransactionState executeLocalTransaction(Message msg, Object arg) { // 执行本地事务
        try {
            String transactionalId = (String) msg.getHeaders().get(RocketMQHeaders.TRANSACTION_ID);

            System.out.println("executeLocalTransaction transactionalId:" + transactionalId +" date = " +new Date());

            // 这里做业务处理逻辑
            // 成功则返回 RocketMQLocalTransactionState.COMMIT
            // 失败返回 RocketMQLocalTransactionState.ROLLBACK

            // 提交
            return RocketMQLocalTransactionState.COMMIT;
        } catch (Exception e) {
            // 报错回滚
            return RocketMQLocalTransactionState.ROLLBACK;
        }

    }

    @Override
    public RocketMQLocalTransactionState checkLocalTransaction(Message msg) {   // 检查本地事务
        // 一定时间后,还有消息为确认发出,RocketMQ会主动调用发送方,让调用方决定消息是否该发出,该方法决定该消息是否应该提交还是回滚
        String transactionalId = (String) msg.getHeaders().get(RocketMQHeaders.TRANSACTION_ID);

        System.out.println("checkLocalTransaction transactionalId:" + transactionalId +" date = " +new Date());

        // todo 这里可以检验数据库是否成功入库,成功返回 commit,否则rollback

        // 提交
        return RocketMQLocalTransactionState.COMMIT;
    }
}
executeLocalTransaction()方法:发送预备消息后,首先在此方法中执行本地事务,若成功,则提交事务,否则回滚事务,具体步骤:
- 调用service层执行数据库的操作逻辑
- 判断数据是否成功入库,成功返回提交(RocketMQLocalTransactionState.COMMIT),失败返回回滚(RocketMQLocalTransactionState.ROLLBACK)
checkLocalTransaction()方法:若一定时间后,还有消息未确认发出,RocketMQ会主动调用发送方,最后调用checkLocalTransaction()方法,让调用方决定消息提交还是回滚,具体步骤:
- 通过transactionId或其他关联属性,查询数据库,看在executeLocalTransaction上是否成功
- 成功提交,失败回滚
消费者
在消费者yml配置中
server:
  port: 8082
spring:
  application:
    name: consumer # 应用名

  cloud:
    nacos:
      discovery:
        server-addr: localhost:8848 # nacos服务地址
    stream:
      rocketmq:
        binder:
          name-server: localhost:9876 # rocketmq的服务地址
          group: group
        bindings:
          input1:
            consumer:
              tags: test # 指定input1消费带有tags为test的消息,若多个用 || 隔开,如 test1 || test2,就是消费test1或test2
      bindings:
        input1:
          destination: test-topic # 消息主题
          content-type: application/json # 数据类型
          group: test-group # 消费者组,防止多个实例重复消费,相同组只有一个实例能收到
        input2:
          destination: transaction-topic # 消息主题
          content-type: text/plain # 数据类型
          group: transaction-group # 消费者组,防止多个实例重复消费,相同组只有一个实例能收到


management:
  endpoints:
    web:
      exposure:
        include: '*' # 公开所有端点, SpringCloudStream的端点: /actuator/bindings, /actuator/channels, /actuator/health

  endpoint:
    health:
      show-details: always # 显示服务信息详情
- 消费者CustomSink增加信道input2
@Input("input2")
SubscribableChannel input2();
- ConsumerListener类增加消费事务消息的方法
receiveTransactionalMsg
@StreamListener("input2")
public void receiveTransactionalMsg(String message) {
    try {
        System.out.println("receiveTransactionalMsg received " + message);
    } catch (Exception e) {
        // 处理报错时,可以记录消息数据,采用人工干预手段,达到数据一致行
        // 或者要回滚上游事务时,将此条消息数据反馈给上游,上游删除此条数据
    }

}
- 测试
curl localhost:8081/sendTransactionalMessage
发送事务测试消息67d2785d-9f07-4489-84ad-516bd1764633
生产者日志
当执行本地事务时,如果发生异常回滚后,消费者是接收不到这条消息的,且上游(生产者)自行回滚自己的数据就可以了。


