Vue+Vite+TS
目录
- #、基础配置
-
- 1、安装Node.js
- 2、修改npm镜像源
- 3、配置vscode
-
- ①插件安装
- 一、创建项目
- 二、安装模块
-
- 1、Element-plus 控件组件
- 2、Vue Router 路由
- 3、animate.css 动画
- 4、SVG 图片图标
- 5、axios 接口访问
- 6、打包时使用Gzip压缩
- 7、TailwindCSS
- 8、markdown编辑器
- 9、Vueuse
- 10、file-saver
- 三、配置项
-
- 1、vite.config.ts
- 2、tsconfig.ts
- 3、引入全局css文件
- 四、Ref全家桶
- 五、computed计算属性
-
- js中数组使用的高阶函数
- 六、watch监听器
- 七、打包运行
-
- 1、使用http-server运行
- 2、使用Nginx部署Vue项目
- 八、typescript解决方案
-
- 1、索引签名
#、基础配置
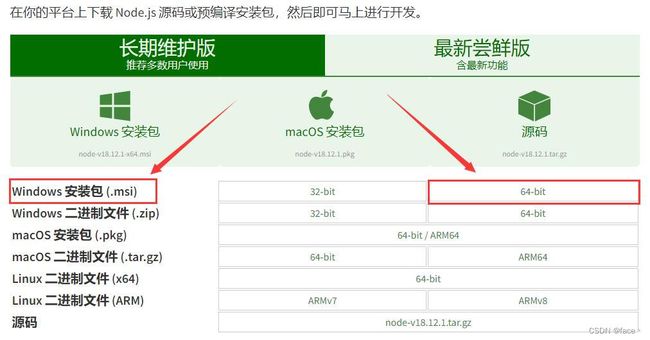
1、安装Node.js
下载地址:https://nodejs.org/zh-cn/download/
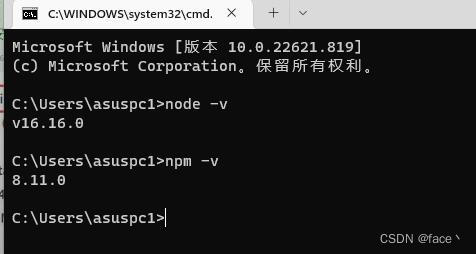
安装成功,查看版本
node -v和npm -v
2、修改npm镜像源
// 持久修改npm的镜像
npm config set registry https://registry.npm.taobao.org
// 验证是否成功
npm config get registry
3、配置vscode
①插件安装
| 插件名称 | 说明 |
|---|---|
| Vue Language Features (Volar) | 专门为 Vue 3 构建的语言支持插件 |
| TypeScript Vue Plugin (volar) | 专门为 Vue 3 构建的语言支持插件 |
| Prettier - Code formatter | 代码格式化 |
| Path Intellisense | 路径智能感知 |
| Live Server | 本地服务器 |
| Chinese (Simplified) | 简体中文 |
| Better Comments | 代码注释高亮 |
| Tailwind CSS IntelliSense | 配合tailwind使用 |
| PostCSS Language Support | 配合tailwind使用 |
一、创建项目
1、在需要建项目的文件夹下打开powershell执行下面代码,依次填写【项目名称】,选择【vue】,选择【typescript】
npm init vite@latest
2、切换到项目根目录执行代码安装相应文件
npm install
3、创建完成在项目根目录执行以下代码,解决从vue导入模块报错的问题(找不到模块“vue”或其相应的类型声明)
npm i --save-dev @types/node
在typescript对应的编译配置文件tsconfig.json写入以下代码:
"compilerOptions": {
    ...

    "types": [
      "node"
    ],
  },
二、安装模块
npm install -D就是npm install --save-dev对应package.json中的devDependencies
npm insatll -S就是npm install --save对应package.json中的dependencies
npm install module_name -g全局安装,将安装包放在/usr/local下或者你node的安装目录
npm install本地安装 (根据目录下package.json文件,根据devDependencies和dependencies配置,下载依赖,依赖放在当前目录下的nodel_modules)
1、Element-plus 控件组件
npm install element-plus -S
===================================
main.ts

// 导入element-plus
import ElementPlus from 'element-plus'
import 'element-plus/dist/index.css'
import zhCn from 'element-plus/dist/locale/zh-cn.mjs' // 国际化
import * as ElementPlusIconsVue from '@element-plus/icons-vue' // 导入图标

// 使用element-plus
for (const [key, component] of Object.entries(ElementPlusIconsVue)) {
    app.component(key, component)
}
app.use(ElementPlus, {
    locale: zhCn,
})

===================================
vite-env.d.ts

// 声明文件中注册中文
declare module 'element-plus/dist/locale/zh-cn.mjs'
2、Vue Router 路由
npm install vue-router@4 -S
===================================
src/router/router.ts

//引入路由对象
import { createRouter, createWebHistory, RouteRecordRaw } from 'vue-router'

declare module 'vue-router' {
    interface RouteMeta {
        title: string,
        transition: string,
        name: string,
        permission: string
    }
}

//路由数组的类型 RouteRecordRaw
// 定义一些路由
// 每个路由都需要映射到一个组件。
const routes: Array<RouteRecordRaw> = [
    {
        path: '/',
        component: () => import('../components/common/navigation.vue'),
        meta: {
            title: '首页~',
            transition: "animate__fadeIn",
            name: "index",
            permission: "",
        }
    },
]

const router = createRouter({
    history: createWebHistory(import.meta.env.BASE_URL),
    routes
})

// 白名单
const whileList = ['/login', '/register', '/', '/permission', '/404']

router.beforeEach(async (to, from, next) => {
    // 跳转页面修改标题
    if (to.meta.title) {// 判断是否有标题
        document.title = to.meta.title
    }
    // 获取令牌数据
    let token = sessionStorage.getItem('token')

    // 白名单直接进入
    if (whileList.includes(to.path)) {
        next()
        return
    }
    // 查看令牌数据,没有令牌,进入登录
    if (!token) {
        next({
            path: '/login'
        })
        return
    }
})


//导出router
export default router
3、animate.css 动画
npm install animate.css -S
===================================
main.ts

// 导入动画
import "animate.css"
4、SVG 图片图标
npm i vite-plugin-svg-icons -S
npm i fast-glob -S
在SVG图片文件夹下新增组件
===================================
SvgIcon.vue

<template>
    <svg class="svg-icon" aria-hidden="true">
        <use :xlink:href="iconName" rel="external nofollow" />
    </svg>
</template>

<script lang="ts">
import { computed, defineComponent } from 'vue'
export default defineComponent({
    props: {
        iconClass: {
            type: String,
            required: true,
        },
        className: {
            type: String,
            default: '',
        },
        color: {
            type: String,
            default: '#889aa4',
        },
    },
    setup(props) {
        return {
            iconName: computed(() => `#icon-${props.iconClass}`),
            svgClass: computed(() => {
                if (props.className) {
                    return `svg-icon ${props.className}`
                }
                return 'svg-icon'
            }),
        }
    },
})

</script>

<style scoped>
.svg-icon {
    width: 1em;
    height: 1em;
    fill: currentColor;
    vertical-align: middle;
}
</style>
main.ts 中引入
// 引入svg注册脚本
import 'virtual:svg-icons-register'
// 全局svg图标组件
import svgIcon from './assets/SVG/SvgIcon.vue'

// 使用SVG
app.component('svg-icon', svgIcon)
组件中使用
<div>
    <svg-icon icon-class="vite" style="margin-left: 30%;font-size: 40px;" />
</div>
5、axios 接口访问
npm install axios -S
根目录新建文件
============开发环境=============
.env.development

VITE_MODE_ENV = "development"
VITE_BASE_API = 'http://127.0.0.1:8000'

============生产环境=============
.env.production

VITE_MODE_ENV = "production"
VITE_BASE_API = '***.***.***.***'
package.json配置
"scripts": {
  "dev": "vite --mode development",
  "pro": "vite --mode production",
  "build": "vue-tsc --noEmit && vite build --mode production",
  "preview": "vite preview"
},
request.ts 封装axiso
import axios from 'axios'

// console.log(JSON.stringify(import.meta.env))
// console.log(import.meta.env.VITE_BASE_API)
const request = axios.create({
    baseURL: '/devApi',
    timeout: 3000,
    headers: {
        'X-Custom-Header': 'XMLHttprequest',
        // 'Authorization': `Token ${sessionStorage.getItem('token')}` || ""
    }
})

// 添加请求拦截器
request.interceptors.request.use(function (config) {
    // 在发送请求之前做些什么
    // console.log('查看配置项:',typeof(config));
    let token = sessionStorage.getItem("token");
    if (token && token !== '' && config.headers) {
        config.headers['Authorization'] = `Token ${token}` // 让每个请求携带自定义token 请根据实际情况自行修改
    }
    return config;
}, function (error) {
    // 对请求错误做些什么
    // return Promise.reject(error);
    return error.response
});

// 添加响应拦截器
request.interceptors.response.use(function (response) {
    // 2xx 范围内的状态码都会触发该函数。
    // 对响应数据做点什么
    return response;
  }, function (error) {
    // 超出 2xx 范围的状态码都会触发该函数。
    // 对响应错误做点什么
    // return Promise.reject(error);
    if (error.response) {
        return error.response
    } else {
        return {response:'响应超时'}
    }

  });

export default request

// // 请求携带cookie
// axios.defaults.withCredentials = true
// // 异步请求  不阻塞      headers请求头
// axios.defaults.headers["X-Requested-With"] = "XMLHttprequest"
// // 获取本地token   没有则为空字符串
// axios.defaults.headers['token'] = localStorage.getItem("token")||""
// // 内容类型
// axios.defaults.headers.post["Content-Type"] = "application/json"
6、打包时使用Gzip压缩
npm add -D vite-plugin-compression
配置文件:vite.config.ts
import viteCompression from 'vite-plugin-compression'

export default defineConfig({
  plugins: [
    // ...
    viteCompression({
      threshold: 1024000 // 对大于 1mb 的文件进行压缩
    })
  ],
});
插件的其它配置
filter:过滤器,对哪些类型的文件进行压缩,默认为 ‘/.(js|mjs|json|css|html)$/i’
verbose: true:是否在控制台输出压缩结果,默认为 true
threshold:启用压缩的文件大小限制,单位是字节,默认为 0
disable: false:是否禁用压缩,默认为 false
deleteOriginFile:压缩后是否删除原文件,默认为 false
algorithm:采用的压缩算法,默认是 gzip
ext:生成的压缩包后缀
7、TailwindCSS
npm install -D tailwindcss postcss autoprefixer
npx tailwindcss init -p
tailwind.config.cjs配置
/** @type {import('tailwindcss').Config} */
module.exports = {
  content: ["./index.html", "./src/**/*.{vue,js,ts,jsx,tsx}"],
  theme: {
    extend: {},
  },
  plugins: [],
}
新建tailwind.css
@tailwind base;
@tailwind components;
@tailwind utilities;
main.ts中导入
// 导入tailwind
import '@/tailwind/tailwind.css'
配置vscodesetting.json
// tailwind在class中的智能提示
"editor.quickSuggestions": {
  "strings": true
},
// 忽略@apply的警告
"css.lint.unknownAtRules": "ignore",
8、markdown编辑器
插件官网:md-editor-v3
npm i md-editor-v3 -S
在组件中使用
<template>
	<-- 编辑 -->
	<md-editor style="height: 88vh;" @save="Save" v-model="ruleForm.content" @on-get-catalog="onGetCatalog"
	                :toolbarsExclude="['github']" />
	<-- 预览 -->
	<md-editor style="height: 65vh;margin-top: 10px;" v-model="tempItem.content" previewOnly />
</template>

<script setup lang="ts">
import MdEditor from 'md-editor-v3';
import 'md-editor-v3/lib/style.css';

// 编辑器数据
const state = reactive({
    theme: 'dark',
    catalogList: []
});
// 获取目录
const onGetCatalog = (list: any) => {
    state.catalogList = list;
};
// 保存数据
const Save = async (text: string) => {
    DialogEdit.value = true
}
</script>
9、Vueuse
npm i @vueuse/core -S
<template>
  <div>{{ formatted }}</div>
</template>

<script setup lang="ts">
import { useNow, useDateFormat } from '@vueuse/core'

const formatted = useDateFormat(useNow(), 'YYYY-MM-DD HH:mm:ss')
</script>
10、file-saver
npm i file-saver -S
后端数据
======方式一:pandas直接生成的excel======

from django.http import HttpResponse

df = pd.DataFrame([[1,2,3],
                   [2,3,4]],columns=['A','B','C'])
bio = BytesIO()
writer = pd.ExcelWriter(bio, engine='openpyxl')
df.to_excel(writer, sheet_name='Sheet1', index=False)
sheet = writer.sheets['Sheet1']
from openpyxl.styles import Font, Alignment, Border, Side, PatternFill
pattern_fill_1 = PatternFill(fill_type='solid', fgColor='538DD5')  # 暗板岩蓝
# todo:调整字段颜色
cells = sheet.iter_rows(min_row=1, max_row=1, min_col=1, max_col=5)
for row in cells:  # 遍历行
    for cell in range(len(row)):  # 遍历列
        row[cell].fill = pattern_fill_1

writer.close()

bio.seek(0)

r = HttpResponse(bio)
r['content_type'] = 'application/octet-stream'
r['Content-Disposition'] = ('attachment;filename=%s.xlsx' % escape_uri_path(name)).encode(
    'utf-8', 'ISO-8859-1')
r["Access-Control-Expose-Headers"] = "Content-Disposition"

return r

======方式二:返回现有的excel======

from django.http import HttpResponse

r = HttpResponse(open('./temp/%s/%s.xlsx' % (request.user.id, name), 'rb'))
r['content_type'] = 'application/octet-stream'
r['Content-Disposition'] = ('attachment;filename=%s.xlsx' % escape_uri_path(name)).encode(
    'utf-8', 'ISO-8859-1')
r["Access-Control-Expose-Headers"] = "Content-Disposition".

return r
前端使用
====res是包含headers和data的Blob数据====

import { saveAs } from 'file-saver'

var disposition = res.headers['content-disposition']
var fileName = decodeURI(disposition.substring(disposition.indexOf('filename=') + 9, disposition.length))

saveAs(res.data, fileName)
三、配置项
1、vite.config.ts
import { defineConfig } from 'vite'
import vue from '@vitejs/plugin-vue'
import { resolve } from "path";
import { createSvgIconsPlugin } from 'vite-plugin-svg-icons';
import { loadEnv } from "vite";

export default ({ mode }) => {
    const env = loadEnv(mode, process.cwd());

    return defineConfig({
        // ******插件配置******
        plugins: [
            vue(),
            createSvgIconsPlugin({
                // 配置路径在你的src里的svg存放文件
                iconDirs: [resolve(process.cwd(), 'src/assets/SVG/')],
                symbolId: 'icon-[dir]-[name]',
            }),
            viteCompression({
                threshold: 1024000 // 对大于 1mb 的文件进行压缩
            })
        ],
        // ******resolver配置******
        resolve: {
            // 别名配置
            alias: [
                {
                    find: '@',
                    replacement: resolve(__dirname, './src'),
                }
            ]
        },
        // ******开发服务器配置******
        server: {
            // https: true, //(使用https)启用 TLS + HTTP/2。注意:当 server.proxy 选项 也被使用时,将会仅使用 TLS
            // host: true, // 监听所有地址
            // port: 8080, //指定开发服务器端口:默认3000
            open: true, //启动时自动在浏览器中打开
            // cors: false, //为开发服务器配置 CORS
            proxy: {
                //配置自定义代理规则
                '/devApi': {
                    target: env.VITE_BASE_API,  // (必选)API服务器的地址
                    changeOrigin: true, // (必选)是否允许跨域
                    ws: false, // (可选)是否启用websockets
                    secure: false, // (可选)是否启用https接口
                    rewrite: path => path.replace(/^\/devApi/, '') //匹配开头为/devApi的字符串,并替换为空字符串
                }
            }
            // hmr: {
            //   overlay: false
            // }
        },
        // ******项目构建配置******
        // build: {
        //     target: 'modules', //设置最终构建的浏览器兼容目标  //es2015(编译成es5) | modules
        //     outDir: 'dist', // 构建得包名  默认:dist
        //     assetsDir: 'assets', // 静态资源得存放路径文件名  assets
        //     sourcemap: false, //构建后是否生成 source map 文件
        //     brotliSize: false, // 启用/禁用 brotli 压缩大小报告。 禁用该功能可能会提高大型项目的构建性能
        //     minify: 'esbuild', // 项目压缩 :boolean | 'terser' | 'esbuild'
        //     chunkSizeWarningLimit: 1000, //chunk 大小警告的限制(以 kbs 为单位)默认:500
        //     cssTarget: 'chrome61' //防止 vite 将 rgba() 颜色转化为 #RGBA 十六进制符号的形式  (要兼容的场景是安卓微信中的 webview 时,它不支持 CSS 中的 #RGBA 十六进制颜色符号)
        // },
    })
}
2、tsconfig.ts
{
  "compilerOptions": {
    "target": "ESNext",
    "experimentalDecorators": true, // 关闭装饰器警告
    "useDefineForClassFields": true,
    "module": "ESNext",
    "moduleResolution": "Node",
    "strict": true,
    "jsx": "preserve",
    "resolveJsonModule": true,
    "isolatedModules": true,
    "esModuleInterop": true,
    "lib": ["ESNext", "DOM"],
    "skipLibCheck": true,
    "noEmit": true,
    "paths": {
      "@/*": ["./src/*"] // 使用@通配符
    },
    "types": ["vite/client"]
  },
  "include": ["src/**/*.ts", "src/**/*.d.ts", "src/**/*.tsx", "src/**/*.vue"],
  "references": [{ "path": "./tsconfig.node.json" }]
}
3、引入全局css文件
main.ts

// 导入全局样式文件
import '@/assets/css/global.css'
四、Ref全家桶
响应式值使用ref,获取值需要使用.value
isRef 判断对象是不是ref对象
shallowRef 浅层次的响应
ref 深层次的响应
import { ref, Ref } from "vue";

type M = {
  name:string
}

const Man = ref<M>({name:'张三'})

console.log(Man.value.name);  // 张三

// const Man:Ref = ref({ name: '张三' })  // 推荐类型比较复杂时使用
读取dom元素
<div ref="dom">我是dom</div>

const dom = ref<HTMLDivElement>()
console.log(dom.value?.innerText);
ref 支持所有的类型
reactive 支持引用类型Array object Map set
reactive的使用,直接获取属性
reactive不能直接赋值
readonly让对象变成可读对象
import { reactive } from "vue";

type P = {
  name:string,
  age:number
}

const form = reactive<P>({
  name: '张三',
  age: 20
})

console.log(form.age);
五、computed计算属性
import { ref, computed } from "vue";

let A = ref('')
let B = ref('')

写法一:
const name = computed(() => {
  return A.value + B.value
})

写法二:
const name = computed({
  get: (val) => {
    return A.value + B.value
  },
  set: (val) => {
    A.value + B.value
  }
})
js中数组使用的高阶函数
1、filter函数:
作用:对数组进行过滤
传入值:需要传入一个返回布尔值的函数作为过滤标准
返回值:返回一个过滤之后的数组
array2 = array1.filter(function(n){
  return n < 100;
})
2、map函数:
作用:映射操作,具体说就是对数组内的每个值进行计算,再存储到新的数组中
传入值:一个函数
返回值:一个运算后的数组
array3 = array2.map(function(n){
  return n + 100;
})
3、reduce函数:
作用:对数组中的所有内容进行汇总
传入值(2个):一个函数(函数内部有两个参数,前一个是自动获取的上一次遍历产生的计算结果、后一个是数组的某一个值)、还要传入一个计算结果的初始化值(一般为零)
返回值:可以是数字、字符串(不会再产生一个数组)
total = array3.reduce(function(prevValue, n){
  return prevValue + n;
}, 0)
六、watch监听器
import { ref, watch } from "vue";

let message = ref<string>('张三')
let message2 = ref<string>('李四')

watch([message, message2], (newVal, oldVal) => {
    console.log(newVal, oldVal);
}, {
    deep: true, // 开启深度监听
    immediate: true,  // 立即执行一次
    flush: "pre", // pre组件更新之前调用,sync同步执行post,组件更新之后执行
})
watchEffect的用法
import { watchEffect, ref } from "vue"

let message = ref<string>('AAA')
let message2 = ref<string>('BBB')

watchEffect((oninvalidate) => {
    console.log(message.value);
    console.log(message2.value);
    oninvalidate(()=>{
        console.log("在监听之前做事"); // 函数名称自定义

    })
})
停止监听
const stop = watchEffect((oninvalidat) => {
    console.log(message.value);
    console.log(message2.value);
    oninvalidat(() => {
        console.log("在监听之前做事");

    })
})

const stopWatch = () => stop() // 转换为对象,被调用之后将停止监听
七、打包运行
1、使用http-server运行
安装
http-server
npm install -g http-server
项目打包
npm run build
进入dist文件夹,cmd运行
http-server -p 8888命令(运行的前提是安装了node.js和http-server)
-p 或者 --port         端口设置,默认是 8080
-a                    监听地址设置默认是 0.0.0.0
-d                    是否显示文件列表 默认true
-i                    显示自动索引 默认true
-g 或者 --gzip         默认false,当文件的gzip版本存在且请求接受gzip编码时,它将服务于./public/some-file.js.gz,而不是./public/some-file.js
-e 或者 --ext          如果没有提供默认文件扩展名(默认为html)
-s 或者 --silent       禁止控制台日志信息输出
–cors                 允许跨域资源共享
-o                    启动服务后打开默认浏览器
-c                    设置缓存cache-control max-age heade存留时间(以秒为单位),示例:-c10是10秒,默认是3600秒,如果要禁用缓存就使用-c-1
-U 或者 --utc          使用 UTC格式,在控制台输出时间信息
-P 或者 --proxy        通过一个 url地址,代理不能通过本地解析的资源
-S 或者 --ssl          使用https协议
-C 或者 --cert         ssl证书文件的路径,默认是cert.pem
-K 或者 --key          ssl密匙文件路径
-h 或者 --help         显示帮助
2、使用Nginx部署Vue项目
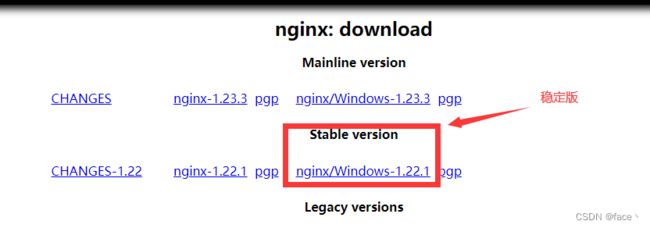
1、windows安装Nginx,下载地址: http://nginx.org/en/download.html
2、解压后修改配置文档(nginx.conf)
server {
    # nginx端口
    listen       1222;
    # nginx域名
    server_name  localhost;

    # 访问前端地址/api/,会自动转换为后端地址,从而解决跨域问题
    location /api/ {
        # 后端的真实接口
        proxy_pass http://127.0.0.1:5005/;
        proxy_redirect off;
        proxy_set_header Host $host;
        proxy_set_header X-Real-IP $remote_addr;
        proxy_set_header X-Forwarded-For $proxy_add_x_forwarded_for;
        proxy_set_header   Cookie $http_cookie;
    }
    # 访问主页的设置
    location / {
        # VUE项目路径
        root D:/software/nginx-1.22.1/html/myvue;
        # 此处的 @router 实际上是引用下面的转发,否则在 Vue 路由刷新时可能会抛出 404
        try_files $uri $uri/ @router;
        # 请求指向的首页
        index index.html;
    }

    # 由于路由的资源不一定是真实的路径,无法找到具体文件
    # 所以需要将请求重写到 index.html 中,然后交给真正的 Vue 路由处理请求资源
    location @router {
    rewrite ^.*$ /index.html last;
    }

    # 错误请求返回的页面
    error_page   500 502 503 504  /50x.html;
    location = /50x.html {
        root   html;
    }

}
3、常用命令
start nginx			启动Nginx服务
nginx -s stop       快速关闭Nginx,可能不保存相关信息,并迅速终止web服务。
nginx -s quit       平稳关闭Nginx,保存相关信息,有安排的结束web服务。
nginx -s reload     因改变了Nginx相关配置,需要重新加载配置而重载。
nginx -s reopen     重新打开日志文件。
nginx -c filename   为 Nginx 指定一个配置文件,来代替缺省的。
nginx -t            不运行,而仅仅测试配置文件。nginx 将检查配置文件的语法的正确性,并尝试打开配置文件中所引用到的文件。
nginx -v            显示 nginx 的版本。
nginx -V            显示 nginx 的版本,编译器版本和配置参数。
4、nginx管理脚本bat
@echo off
rem 提供Windows下nginx的启动,重启,关闭功能

echo ==================begin========================

cls
::ngxin 所在的盘符
set NGINX_PATH=D:

::nginx 所在目录
set NGINX_DIR=D:\software\nginx-1.22.1\
color 0a
TITLE Nginx 管理程序增强版

CLS

echo.
echo. ** Nginx 管理程序  ***
echo. *** create 2017-09-22 ***
echo.

:MENU

echo. ***** nginx 进程list ******
::tasklist|findstr /i "nginx.exe"
tasklist /fi "imagename eq nginx.exe"

echo.

    if ERRORLEVEL 1 (
        echo nginx.exe不存在
    ) else (
        echo nginx.exe存在
    )

echo.
::*************************************************************************************************************
echo.
	echo.  [1] 启动Nginx
	echo.  [2] 关闭Nginx
	echo.  [3] 重启Nginx
	echo.  [4] 刷新控制台
	echo.  [5] 重新加载Nginx配置文件
	echo.  [6] 检查测试nginx配置文件
	echo.  [7] 查看nginx version
	echo.  [0] 退 出
echo.

echo.请输入选择的序号:
set /p ID=
	IF "%id%"=="1" GOTO start
	IF "%id%"=="2" GOTO stop
	IF "%id%"=="3" GOTO restart
	IF "%id%"=="4" GOTO MENU
	IF "%id%"=="5" GOTO reloadConf
	IF "%id%"=="6" GOTO checkConf
	IF "%id%"=="7" GOTO showVersion
	IF "%id%"=="0" EXIT
PAUSE

::*************************************************************************************************************
::启动
:start
	call :startNginx
	GOTO MENU

::停止
:stop
	call :shutdownNginx
	GOTO MENU

::重启
:restart
	call :shutdownNginx
	call :startNginx
	GOTO MENU

::检查测试配置文件
:checkConf
	call :checkConfNginx
	GOTO MENU

::重新加载Nginx配置文件
:reloadConf
    call :checkConfNginx
	call :reloadConfNginx
	GOTO MENU

::显示nginx版本
:showVersion
    call :showVersionNginx
	GOTO MENU


::*************************************************************************************
::底层
::*************************************************************************************
:shutdownNginx
	echo.
	echo.关闭Nginx......
	taskkill /F /IM nginx.exe > nul
	echo.OK,关闭所有nginx 进程
	goto :eof

:startNginx
	echo.
	echo.启动Nginx......
	IF NOT EXIST "%NGINX_DIR%nginx.exe" (
        echo "%NGINX_DIR%nginx.exe"不存在
        goto :eof
     )

	%NGINX_PATH%
	cd "%NGINX_DIR%"

	IF EXIST "%NGINX_DIR%nginx.exe" (
		echo "start '' nginx.exe"
		start "" nginx.exe
	)
	echo.OK
	goto :eof


:checkConfNginx
	echo.
	echo.检查测试 nginx 配置文件......
	IF NOT EXIST "%NGINX_DIR%nginx.exe" (
        echo "%NGINX_DIR%nginx.exe"不存在
        goto :eof
     )

	%NGINX_PATH%
	cd "%NGINX_DIR%"
	nginx -t -c conf/nginx.conf

	goto :eof

::重新加载 nginx 配置文件
:reloadConfNginx
	echo.
	echo.重新加载 nginx 配置文件......
	IF NOT EXIST "%NGINX_DIR%nginx.exe" (
        echo "%NGINX_DIR%nginx.exe"不存在
        goto :eof
     )

	%NGINX_PATH%
	cd "%NGINX_DIR%"
	nginx -s reload

	goto :eof

::显示nginx版本
:showVersionNginx
	echo.
	%NGINX_PATH%
	cd "%NGINX_DIR%"
	nginx -V
 	goto :eof
八、typescript解决方案
1、索引签名
元素隐式具有 “any” 类型,因为类型为 “string” 的表达式不能用于索引类型 “obj”。 在类型 “obj” 上找不到具有类型为 “string” 的参数的索引签名。
解决方案:
添加 as keyof typeof item
item[column.property as keyof typeof item]


