MessageQueue消息队列——基础(笔记)
文章目录
- 一、异步与同步
-
- 1.1 同步通讯与异步通讯
- 1.2 同步调用的问题
- 1.3 异步调用方案
- 二、MQ消息队列
-
- 2.1 单机部署MQ
- 2.2 结构和概念
- 2.3 常见的消息模型
- 三、SpringAMQP
-
- 3.1 用非自动装配的方式使用消息队列
- 3.2 SpringAMQP介绍
- 3.3 基础消息队列功能使用
- 3.4 工作队列的配置
- 3.5 发布与订阅模式
-
- 3.5.1 SpringAMQP交换机类
- 3.5.2 Fanout Exchange
- 3.5.3 DirectExchange
- 3.5.4 TopicExchange
- 3.6 消息转换器
- 参考文献
一、异步与同步
1.1 同步通讯与异步通讯
- 同步通讯:时效性强。比如视频电话,实时传到对方,同时对方出回应。
- 异步通讯:比如网络聊天,非实时反馈的,不会立即得到结果,可以之后再回复。
1.2 同步调用的问题
微服务基于Feign的调用就是同步的方式。
以购物场景为例
但是如果要加业务就需要为支付服务加业务,改动其代码,耦合度高。
同时,同步调用,要等待服务结束后,在进行下一个服务。支付总耗时,是支付服务依次调用服务耗时的时间和,耗时过长。
此外,如果仓储服务挂掉了,支付服务就会被卡在那里。当过多的支付服务都卡在那里,于是资源耗尽,支付服务也挂掉了。
问题:
- 耦合度高
- 性能下降
- 资源浪费
- 级联失败
1.3 异步调用方案
异步调用常见的就是事件驱动模式
当支付服务告知了Broker后,就可以继续自己的事情了,而不需要等待。
优势:
- 代码解耦合:不需要改动支付服务,只需要让服务订阅或者取消订阅Broker即可。
- 耗时减少了:只计算支付服务和通知Broker的时间。
- 不存在级联失败的问题,仓储服务挂了不再影响支付服务。
- 流量消峰:当流量过大时,请求排在Broker中,服务能做几个就做几个,做不了的就排着。
缺点:
- Broker挂了也会出问题,依赖于Broker的可靠性,安全性,吞吐能力
- 架构复杂了,业务没有明显的流程线,不好追踪管理
二、MQ消息队列
在上述的结构中,就是Broker。
常用的MQ有几种实现。
| RabbitMQ | ActiveMQ | RocketMQ | Kafaka | |
|---|---|---|---|---|
| 公司/社区 | Rabbit | Apache | 阿里 | Apache |
| 开发语言 | Erlang | Java | Java | Scala&Java |
| 协议支持 | AMQP、XMPP、SMTP、STOMP | OpenWire、STOMP、REST、XMPP、AMQP | 自定义协议 | 自定义协议 |
| 可用性 | 高 | 一般 | 高 | 高 |
| 单机吞吐量 | 一般 | 差 | 高 | 非常高 |
| 消息延迟 | 微秒级 | 毫秒级 | 毫秒级 | 毫秒以内 |
| 消息可靠性 | 高 | 一般 | 高 | 一般 |
- 一般中小型公司,用的就是RabbitMQ。
- 如果大型企业,做深度定制,可以用RocketMQ
- Kafaka则是用于大量数据情况下的处理,但安全可靠性相对较差。
- ActiveMQ是很早的消息队列,如今几乎没有维护。
2.1 单机部署MQ
通过docker部署最简单,
docker pull rabbitmq:3-management
也可以用命令安装,这里直接用容器了。
启动信息如下
docker run -e RABBITMQ_DEFAULT_USER=yjx23332 -e RABBITMQ_DEFAULT_PASS=123456 -v mq-plugins:/plugins --name mq --hostname mq1 -p 15672:15672 -p 5672:5672 -d rabbitmq:3-management
-e 为设置环境变量
两个端口,15672是管理平台端口,5672是发送消息的端口。
记得开放对应端口。如果是腾讯云或者阿里云,也要在购买的服务器管理页面打开放行端口。
firewall-cmd --zone=public --add-port=15672/tcp --permanent
firewall-cmd --zone=public --add-port=5672/tcp --permanent
firewall-cmd --reload
查询端口是否开放
- firewall-cmd --query-port=15672/tcp 查看某个端口
- firewall-cmd --zone=public --list-ports 查看所有
登陆成功后,即可进入以下界面。

我们可在这里为添加用户和角色
virtualhosts虚拟主机:对不用户进行隔离,避免相互影响。
此处可以添加

点击用户,可以配置其虚拟主机权限等。
2.2 结构和概念
使用消息队列中消息的对象。我们称之为消费者。
在一个virtualhost下:
2.3 常见的消息模型
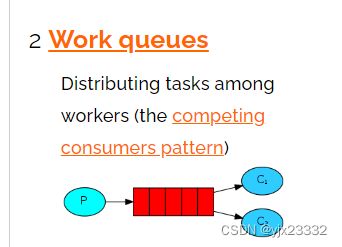
- 基本消息队列BasicQueue:最简单的实现
-
发布订阅带有交换机,分为:
三、SpringAMQP
3.1 用非自动装配的方式使用消息队列
需要在项目中引入AMQP,记得加入父类spring-boot-starter-parent
		<dependency>
            <groupId>org.springframework.bootgroupId>
            <artifactId>spring-boot-starter-amqpartifactId>
        dependency>
引入Junit方便测试
		<dependency>
            <groupId>junitgroupId>
            <artifactId>junitartifactId>
            <scope>testscope>
        dependency>
测试一下MQ
我们创建如下两个子项目。

为test写一个测试用例

package com.yjx23332.mq.helloworld;

import com.rabbitmq.client.Channel;
import com.rabbitmq.client.Connection;
import com.rabbitmq.client.ConnectionFactory;
import org.junit.Test;

import java.io.IOException;
import java.util.concurrent.TimeoutException;


public class PublisherTest {
    @Test
    public void testSendMessage() throws IOException, TimeoutException{
        //1.建立连接
        ConnectionFactory factory = new ConnectionFactory();
        //1.2.设置连接参数
        factory.setHost("IP");//MQ地址设置
        factory.setPort(5672);//端口设置
        factory.setVirtualHost("/");//设置虚拟主机
        factory.setUsername("账号");
        factory.setPassword("密码");
        //1.2 建立连接
        Connection connection = factory.newConnection();

        //2.创建通道
        Channel channel = connection.createChannel();

        //3.创建消息队列
        String queueName = "simple.queue";
        channel.queueDeclare(queueName,false,false,false,null);

        //4.发送消息
        String message = "hello,rabbitmq!";
        channel.basicPublish("",queueName,null,message.getBytes());
        System.out.println("已发送消息:【"+message+"】");

        //5.关闭通道
        if(channel != null){
            channel.close();
        }
        if(connection != null){
            connection.close();
        }
    }
}
我们在发送消息前打上断点,用junit运行,就可以看到连接创建和通道创建.。
因为发完就不管了,因此必须打断点,才看得到连接和通道。


完成后可以看到队列中


接下来我们处理消息,基本一样,只需要修改几个部分。
注意我们没有关闭连接,因为在业务中,要一直处理。

package com.yjx23332.mq.helloworld;

import com.rabbitmq.client.*;
import org.junit.Test;

import java.io.IOException;
import java.util.concurrent.TimeoutException;


public class ConsumerTest {
    @Test
    public static void main(String[] args) throws IOException, TimeoutException{
        //1.建立连接
        ConnectionFactory factory = new ConnectionFactory();
        //1.2.设置连接参数
        factory.setHost("101.43.65.53");//MQ地址设置
        factory.setPort(5672);//端口设置
        factory.setVirtualHost("/");//设置虚拟主机
        factory.setUsername("yjx23332");
        factory.setPassword("123456");
        //1.2 建立连接
        Connection connection = factory.newConnection();

        //2.创建通道
        Channel channel = connection.createChannel();

        //3.创建消息队列
        //为什么这里也要创建?避免消费者先执行,还没有队列。同时,相同的队列创建重复执行没有影响。
        String queueName = "simple.queue";
        channel.queueDeclare(queueName,false,false,false,null);

        //4.处理消息
        String message = "hello,rabbitmq!";
        //DefaultConsumer 是回调函数,一旦有消息,异步处理
        channel.basicConsume(queueName,true,new DefaultConsumer(channel){
            @Override
            public void handleDelivery(String consumerTag, Envelope envelope,AMQP.BasicProperties properties,byte[] body)throws  IOException{
                System.out.println("接收到消息:【"+ new String (body)+"】");
            }
        });
        System.out.println("####################等待接收消息##################");
//
//        //5.关闭通道
//        if(channel != null){
//            channel.close();
//        }
//        if(connection != null){
//            connection.close();
//        }
    }
}
3.2 SpringAMQP介绍
AMQP:Advanced Message Queuing Protocol:高级消息队列协议。于应用程序之间传递业务消息的开放标准。
Spring AMQP:基于AMQP协议的一套API规范,提供模板来发送和接收消息。其中Spring-amqp是基础抽象,Spring-rabbit是底层的默认实现。可参考Spring AMQP官网。
3.3 基础消息队列功能使用
导入依赖
		<dependency>
            <groupId>org.springframework.bootgroupId>
            <artifactId>spring-boot-starter-amqpartifactId>
        dependency>
为了方便测试,我们引入SpringBoot单元测试
	<dependency>
  		<groupId>org.springframework.bootgroupId>
  		<artifactId>spring-boot-starter-testartifactId>
  		<scope>testscope>
	dependency>
	<dependency>
        <groupId>junitgroupId>
        <artifactId>junitartifactId>
    	<scope>testscope>
    dependency>
然后准备一个yml文件,配置和之前用代码写得相似。
spring:
  rabbitmq:
    host:
    port: 5672
    virtual-host: /
    username:
    password:
我们直接走单元测试,这里就不创建一个队列了,直接放消息。
package com.yjx23332.mq.helloworld;


import org.junit.Test;
import org.junit.runner.RunWith;
import org.springframework.amqp.rabbit.core.RabbitTemplate;
import org.springframework.beans.factory.annotation.Autowired;
import org.springframework.boot.test.context.SpringBootTest;
import org.springframework.test.context.junit4.SpringRunner;

import java.io.IOException;
import java.util.concurrent.TimeoutException;


@SpringBootTest
@RunWith(SpringRunner.class)
public class PublisherTest {
    @Autowired
    private RabbitTemplate rabbitTemplate;
    @Test
    public void testSimpleQueue() throws IOException, TimeoutException{
        rabbitTemplate.convertAndSend("simple.queue","hello,spring amqp");
    }
}
package com.yjx23332.mq.listener;

import org.springframework.amqp.rabbit.annotation.RabbitListener;
import org.springframework.stereotype.Component;

@Component
public class SpringRabbitListener {
    @RabbitListener(queues = "simple.queue")
    public void listenSimpleQueueMessage(String msg) throws InterruptedException{
        System.out.println("spring 消费者接收到消息:【"+msg+"】");
    }
}
消息一旦消费,就会被移除,Rabbit MQ不存在回溯功能。
3.4 工作队列的配置
一个队列绑定多个消费者。
我们准备发送50条消息
package com.yjx23332.mq.helloworld;


import org.junit.Test;
import org.junit.runner.RunWith;
import org.springframework.amqp.rabbit.core.RabbitTemplate;
import org.springframework.beans.factory.annotation.Autowired;
import org.springframework.boot.test.context.SpringBootTest;
import org.springframework.test.context.junit4.SpringRunner;


@SpringBootTest
@RunWith(SpringRunner.class)
public class PublisherTest {
    @Autowired
    private RabbitTemplate rabbitTemplate;
    @Test
    public void testSimpleQueue() throws InterruptedException{
        for(int i = 0;i < 50;i++){
            rabbitTemplate.convertAndSend("simple.queue","hello,spring amqp___" + i);
            Thread.sleep(20);
        }
    }
}
修改消费者
package com.yjx23332.mq.listener;

import org.springframework.amqp.rabbit.annotation.RabbitListener;
import org.springframework.stereotype.Component;

import java.time.LocalTime;

@Component
public class SpringRabbitListener {
    @RabbitListener(queues = "simple.queue")
    public void listenSimpleQueueMessage(String msg) throws InterruptedException{
        System.out.println("spring 消费者接收到消息:【"+msg+"】" + LocalTime.now());
        Thread.sleep(20);
    }
    @RabbitListener(queues = "simple.queue")
    public void listenSimpleQueueMessage2(String msg) throws InterruptedException{
        System.err.println("spring 消费者接收到消息:【"+msg+"】"+ LocalTime.now());
        Thread.sleep(200);
    }
}
从结果会发现处理总时长超过了1秒达到了5秒,查看输出会发现消息被平均分配给了两个。一个处理偶数,一个处理奇数。但由于处理速度不同,因此处理总时长超过了1秒。
这里是因为消费预取导致的,在执行前会提前把消息从队列拿出,然后各自处理。
但我们希望的是,做的快的多做,做的慢的少做。
因此我们可以修改yml文件:
spring:
  rabbitmq:
    host:
    port: 5672
    virtual-host: /
    username:
    password:
    listener:
      simple:
        prefetch:  1 # 每次只能获取几条消息,执行完了再取下一条,默认是无限
重启后再次执行就会发现正常了。
3.5 发布与订阅模式
我们需要将同一消息发送给多个消费者。需要加入交换机来实现。注意,交换机只负责消费路由,但不存储消息,丢失一概不负责。
3.5.1 SpringAMQP交换机类
3.5.2 Fanout Exchange
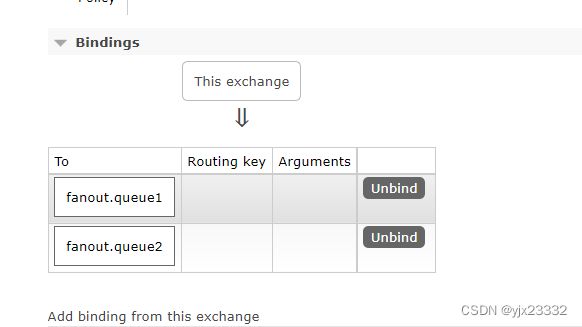
我们在consumer服务中声明Exchange、Queue、Binding.
package com.yjx23332.mq.confg;

import org.springframework.amqp.core.Binding;
import org.springframework.amqp.core.BindingBuilder;
import org.springframework.amqp.core.FanoutExchange;
import org.springframework.amqp.core.Queue;
import org.springframework.context.annotation.Bean;
import org.springframework.context.annotation.Configuration;

@Configuration
public class FanoutConfig {
    //声明FanoutExchange交换机
    @Bean
    public FanoutExchange fanoutExchange(){
        return new FanoutExchange("yjx23332.fanout");
    }
    //声明一个队列
    @Bean
    public Queue fanoutQueue1(){
        return new Queue("fanout.queue1");
    }
    //绑定队列和交换机
    @Bean
    public Binding bindingQueue1(Queue fanoutQueue1,FanoutExchange fanoutExchange){
        return BindingBuilder.bind(fanoutQueue1).to(fanoutExchange);
    }
    //声明第二个队列
    @Bean
    public Queue fanoutQueue2(){
        return new Queue("fanout.queue2");
    }
    //绑定第二个队列和交换机
    @Bean
    public Binding bindingQueue2(Queue fanoutQueue2,FanoutExchange fanoutExchange){
        return BindingBuilder.bind(fanoutQueue2).to(fanoutExchange);
    }
}
修改监听器
package com.yjx23332.mq.listener;

import org.springframework.amqp.rabbit.annotation.RabbitListener;
import org.springframework.stereotype.Component;


@Component
public class MQlistener {
    @RabbitListener(queues = "fanout.queue1")
    public void listenFanoutQueue1(String msg){
        System.out.println("spring 消费者接收q1到消息:【"+msg+"】");
    }
    @RabbitListener(queues = "fanout.queue2")
    public void listenFanoutQueue2(String msg){
        System.err.println("spring 消费者接收到q2消息:【"+msg+"】");
    }
}
我们再修改publisher的测试代码
package com.yjx23332.mq;

import org.junit.Test;
import org.junit.runner.RunWith;
import org.springframework.amqp.rabbit.core.RabbitTemplate;
import org.springframework.beans.factory.annotation.Autowired;
import org.springframework.boot.test.context.SpringBootTest;
import org.springframework.test.context.junit4.SpringRunner;

@SpringBootTest
@RunWith(SpringRunner.class)
public class test {
    @Autowired
    private RabbitTemplate rabbitTemplate;
    @Test
    public void testFanoutExchange(){
        String exchangeName = "yjx23332.fanout";
        String message = "hello world!";
        rabbitTemplate.convertAndSend(exchangeName,"",message);
    }
}
3.5.3 DirectExchange
将接收到的消息根据规则路由到指定的Queue,因此称为路由模式(routes)。
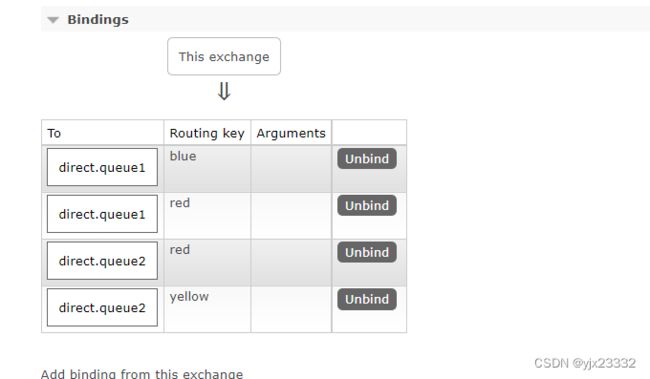
- 每一个Queue都与Exchange设置一个BindingKey
- 发布者发送消息时,指定消息的RoutingKey
- Exchange将消息路由到BindingKey与消息RoutingKey一致的队列
- 一个队列可以指定多个BindingKey,且队列之间的BindingKey可以重复
由于基于Config创建队列交换机的方式很麻烦,我们用新的方式声明交换机、队列。
删除上一节我们在config中的声明代码。
然后在listener中进行
package com.yjx23332.mq.listener;

import org.springframework.amqp.core.ExchangeTypes;
import org.springframework.amqp.rabbit.annotation.Exchange;
import org.springframework.amqp.rabbit.annotation.Queue;
import org.springframework.amqp.rabbit.annotation.QueueBinding;
import org.springframework.amqp.rabbit.annotation.RabbitListener;
import org.springframework.stereotype.Component;


@Component
public class MQlistener {
    @RabbitListener(bindings = @QueueBinding(
            value = @Queue(name = "direct.queue1"),
            exchange = @Exchange(value = "yjx23332.direct",type = ExchangeTypes.DIRECT),
            key = {"red","blue"} //bindingkey
    ))
    public void listenDirectQueue1(String msg){
        System.out.println("spring 消费者接收q1到消息:【"+msg+"】");
    }
    @RabbitListener(bindings = @QueueBinding(
            value = @Queue(name = "direct.queue2"),
            exchange = @Exchange(value = "yjx23332.direct" , type = ExchangeTypes.DIRECT),
            key = {"red","yellow"}
    ))
    public void listenDirectQueue2(String msg) {
        System.err.println("spring 消费者接收到q2消息:【"+msg+"】");
    }


}
接下来,我们修改Test代码
package com.yjx23332.mq;

import org.junit.Test;
import org.junit.runner.RunWith;
import org.springframework.amqp.rabbit.core.RabbitTemplate;
import org.springframework.beans.factory.annotation.Autowired;
import org.springframework.boot.test.context.SpringBootTest;
import org.springframework.test.context.junit4.SpringRunner;

@SpringBootTest
@RunWith(SpringRunner.class)
public class test {
    @Autowired
    private RabbitTemplate rabbitTemplate;
    @Test
    public void testDirectExchange(){
        String exchangeName = "yjx23332.direct";
        rabbitTemplate.convertAndSend(exchangeName,"red","hello red");
        rabbitTemplate.convertAndSend(exchangeName,"blue","hello blue");
        rabbitTemplate.convertAndSend(exchangeName,"yellow","hello yellow");
    }
}
3.5.4 TopicExchange
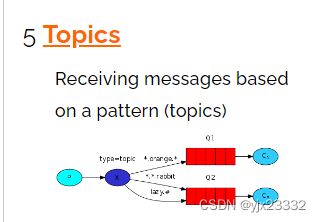
与DirectExchange类似,但是它的routingKey必须是多个单词表,并用’.'分割。
当队列与交换机绑定时,可以使用通配符。避免当bindkey过多导致的麻烦。
#:代表0个或多个单词
*:代指一个单词
比如
China.news
Japan.news
就可以用 #.news
同理
China.weather
China.news
就可以用 China.#
我们沿用上一节的代码,做一点修改即可
package com.yjx23332.mq.listener;

import org.springframework.amqp.core.ExchangeTypes;
import org.springframework.amqp.rabbit.annotation.Exchange;
import org.springframework.amqp.rabbit.annotation.Queue;
import org.springframework.amqp.rabbit.annotation.QueueBinding;
import org.springframework.amqp.rabbit.annotation.RabbitListener;
import org.springframework.stereotype.Component;


@Component
public class MQlistener {
    @RabbitListener(bindings = @QueueBinding(
            value = @Queue(name = "topic.queue"),
            exchange = @Exchange(value = "yjx23332.topic",type = ExchangeTypes.TOPIC),
            key = {"China.#"} //bindingkey
    ))
    public void listenTopicQueue1(String msg){
        System.out.println("spring 消费者接收q1到消息:【"+msg+"】");
    }
    @RabbitListener(bindings = @QueueBinding(
            value = @Queue(name = "topic.queue2"),
            exchange = @Exchange(value = "yjx23332.topic",type = ExchangeTypes.TOPIC),
            key = {"#.news"}
    ))
    public void listenTopicQueue2(String msg) {
        System.err.println("spring 消费者接收到q2消息:【"+msg+"】");
    }


}
重启后,可看到
package com.yjx23332.mq;

import org.junit.Test;
import org.junit.runner.RunWith;
import org.springframework.amqp.rabbit.core.RabbitTemplate;
import org.springframework.beans.factory.annotation.Autowired;
import org.springframework.boot.test.context.SpringBootTest;
import org.springframework.test.context.junit4.SpringRunner;

@SpringBootTest
@RunWith(SpringRunner.class)
public class test {
    @Autowired
    private RabbitTemplate rabbitTemplate;
    @Test
    public void testDirectExchange(){
        String exchangeName = "yjx23332.topic";
        rabbitTemplate.convertAndSend(exchangeName,"China.news","江苏地表最高温度将达到72摄氏度");
        rabbitTemplate.convertAndSend(exchangeName,"China.weather","未来温度仍将升高");
        rabbitTemplate.convertAndSend(exchangeName,"Japan.news","安培中枪");
    }
}
3.6 消息转换器
在发送中,我们接收消息的类型是Object。SpringAMQP会帮我们序列化后变为字节发送。
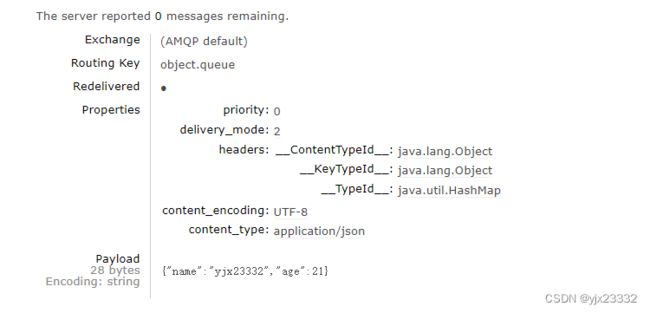
用默认JDK的序列化ObjectOutputStream是没有问题的,但是中间过程是乱码,我们这里改用JSON方式的序列化,这样在消息队列中查看也是正常的。
接下来我们配置消息转换。
我们先在消费者声明一个queue,并设置处理方式
package com.yjx23332.mq.listener;


import org.springframework.amqp.rabbit.annotation.Queue;
import org.springframework.amqp.rabbit.annotation.RabbitListener;
import org.springframework.stereotype.Component;


@Component
public class MQlistener {
    @RabbitListener(queuesToDeclare = @Queue("object.queue"))
    public void listenObjectQueue(String msg){
        System.out.println("spring 消费者接收到Object消息:【"+msg+"】");
    }
}
我们为发送类引入依赖并编写配置
		<dependency>
            <groupId>com.fasterxml.jackson.dataformatgroupId>
            <artifactId>jackson-dataformat-yamlartifactId>
        dependency>
package com.yjx23332.mq.config;


import org.springframework.amqp.support.converter.Jackson2JsonMessageConverter;
import org.springframework.amqp.support.converter.MessageConverter;
import org.springframework.context.annotation.Bean;
import org.springframework.context.annotation.Configuration;

@Configuration
public class MessageConverterConfig {
    @Bean
    public MessageConverter jsonMessageConverter(){
        return new Jackson2JsonMessageConverter();
    }
}
随后修改Test
package com.yjx23332.mq;

import org.junit.Test;
import org.junit.runner.RunWith;
import org.springframework.amqp.rabbit.core.RabbitTemplate;
import org.springframework.beans.factory.annotation.Autowired;
import org.springframework.boot.test.context.SpringBootTest;
import org.springframework.test.context.junit4.SpringRunner;

import java.util.HashMap;
import java.util.Map;

@SpringBootTest
@RunWith(SpringRunner.class)
public class test {
    @Autowired
    private RabbitTemplate rabbitTemplate;
    @Test
    public void testObjectQueue(){
        String queueName = "object.queue";
        Map<String,Object> msg = new HashMap<>();
        msg.put("name","yjx23332");
        msg.put("age",21);
        rabbitTemplate.convertAndSend(queueName,msg);
    }
}
我们在为消费者配置转换,并修改监听器。当然,如果我们在两边都不配置消息转换器,这里结果是一样的。
package com.yjx23332.mq.listener;


import org.springframework.amqp.rabbit.annotation.Queue;
import org.springframework.amqp.rabbit.annotation.RabbitListener;
import org.springframework.stereotype.Component;

import java.util.Map;


@Component
public class MQlistener {
    @RabbitListener(queuesToDeclare = @Queue("object.queue"))
    public void listenObjectQueue(Map<String,Object> msg){
        System.out.println("spring 消费者接收到Object消息:【 name = "+msg.get("name")+",age = "+msg.get("age")+"】");
    }

}
参考文献
[1]Spring AMQP官网
[2]黑马程序员Java微服务
[3]RabbitMQ官方文档


