深入理解React
接下来就项目中经常使用的React技术栈的一些概念的方法做更加深入的解读。大概分成下面几个
一.React部分
1.React的设计理念
React是一个View层的组件库,核心是组件化的编程思想,通过定义不同的组件,给组件的实例传入不同的属性,实现不同的渲染效果,达到组件的高度复用,设计很简单,没有很多高级的功能,因此要配合许多第三方库,我们叫它们React技术栈。比如用React-router做路由控制,redux做数据管理,axios库做http请求,prototypes做类型检测等等,这都是我们常用的。
2.React JSX语法
JSX是React.createElement的一个语法糖,为了与原生JavaScript属性不冲突,采用驼峰命名的方式对组件进行命名,比如class转成className
如下所示:我们封装了一个DeleteAccount组件,用babel转译成ES5,其实DeleteAccount就是一个函数,
const DeleteAccount = () => (
Are you sure?
Confirm
);
//ES5
var DeleteAccount = function DeleteAccount() {
return React.createElement(
'div',
null,
React.createElement(
'p',
null,
'Are you sure?'
),
React.createElement(
DangerButton,
null,
'Confirm'
),
React.createElement(
Button,
{ color: 'blue' },
'Cancel'
)
);
}3.React 生命周期
这是React的重中之重,也是非常精彩的一部分,首先我简单叙述一下什么是React的生命周期:React中的组件分为三种状态,一种是挂载Mount,一种是卸载UnMount,还有一种是更新Update。
挂载:一个组件在第一次挂载的时候会首先执行state和props的初始化,然后调用ComponentWillMount然后调用组件的render方法,render完成后,再调用ComponentDIdMount,完成一次渲染,如果在ComponentWillMount中调用setState,那啥也不发生,state会改变,但是还没有挂载,因此不会触发组件的重新渲染,但是在ComponentDidMount中,如果改变了state,比如我们会把数据获取放到这儿,数据获取改变了state,通过redux的数据流,订阅了发生了改变你的state的相关组件都会触发一次重新渲染。
卸载:卸载会调用ComponentWillUnMount(),在这里我们最常做的事儿就是解除绑定在DOM上的事件监听来防止内存泄漏
更新:依次调用shouldComponentUpdate(nextProps,nextState),ComponentWillUpdate,render,ComponentDidUpdate,
重点是在shouldComponentUpdate中,这是React优化的重点,如下是点评WebApp中商品详情的获取,如果传入ProductDetail的name和state变化了,我们才渲染,否则我们不重新渲染,也就是return false
shouldComponentUpdate(nextProps,nextState) {
    if(nextProps.name !== this.props.name) {//这里的name必须是JavaScript的基本数据类型,string boolean number
      return true
    }
    if(nextState !== this.state) {
      return true
    }
    return false;
  }
mountComponent 本质上是通过递归渲染内容的,由于递归的特性,父组件的
componentWillMount 在其子组件的 componentWillMount 之前调用,而父组件的 componentDidMount
在其子组件的 componentDidMount 之后调用。
3.unmountComponent:
如果存在 componentWillUnmount,则执行并重置所有相关参数、更新队列以及更新状态,如
果此时在 componentWillUnmount 中调用 setState,是不会触发 re-render 的,这是因为所有更新
队列和更新状态都被重置为 null,并清除了公共类,完成了组件卸载操作。unmountComponent 的
代码如下:,
unmountComponent: function(safely) {
 if (!this._renderedComponent) {
 return;
 }
 var inst = this._instance;
 // 如果存在 componentWillUnmount,则调用
 if (inst.componentWillUnmount) {
 if (safely) {
 var name = this.getName() + '.componentWillUnmount()';
 ReactErrorUtils.invokeGuardedCallback(name, inst.componentWillUnmount.bind(inst));
 } else {
 inst.componentWillUnmount();
 }
 }
 // 如果组件已经渲染,则对组件进行 unmountComponent 操作
 if (this._renderedComponent) {
 ReactReconciler.unmountComponent(this._renderedComponent, safely);
 this._renderedNodeType = null;
 this._renderedComponent = null;
 this._instance = null;
 }
 // 重置相关参数、更新队列以及更新状态
 this._pendingStateQueue = null;
 this._pendingReplaceState = false;
 this._pendingForceUpdate = false;
 this._pendingCallbacks = null;
 this._pendingElement = null;
 this._context = null;
 this._rootNodeID = null;
 this._topLevelWrapper = null;
 // 清除公共类
 ReactInstanceMap.remove(inst);
}
总结:不要再shouldComponentUpdate和ComponentWillUpdate中调用setState,它们会重新触发updatecomponent的流程,循环触发导致崩溃,在ComponentWillMount中改变setState,会把触发state更新合并,把这个state要改变成的值放到pendingstatequeue中,而不会直接触发重新渲染,在componentDidmount中获取数据,因为这个时候才有真的DOM节点,在shouldComponentUpdate中可以做nextprops和nextState和this.props的比较来返回 true或者false来决定是否要重新渲染
组件的初始状态只会在第一次挂载的时候调用一次getInitialState,后面不会再调用
4.React setState()方法
setState是React中的核心方法。setState是通过一个队列机制实现state更新,当执行setState的时候,会把需要更新的state合并然后放到队列中去,并不会立刻更新,而是批量的更新。如果我们直接修改state的值,那么state会被直接修改,下一个批量更新时间点的时候,state又会被重新改变,直接的修改可能就被覆盖了,React用一个更新队列来存储需要更新的state,React根据这个队列和shouldComponentUpdate方法是否存在和如果存在其返回值来决定是否要更新:
// 将新的 state 合并到状态更新队列中
var nextState = this._processPendingState(nextProps, nextContext);
// 根据更新队列和 shouldComponentUpdate 的状态来判断是否需要更新组件
var shouldUpdate =
 this._pendingForceUpdate ||
 !inst.shouldComponentUpdate ||
 inst.shouldComponentUpdate(nextProps, nextState, nextContext);
因此setState看着是一个异步更新。如果我们在shouldComponentUpdate或者是componentWillUpdate中调用setSate的时候会怎么样呢,这两个方法会this._oendingStateQueue !== null,更新队列又不是空了,那又要更新,就又触发updateComponent,就又要进入ComponentWillUpdate中,形成循环调用,浏览器就崩了。
setState最终通过enqueueUpdate来执行state的更新,那么setState的调用的栈是怎么样的?

componentDidMount{
this.setState({val: this.state.val + 1});
 console.log(this.state.val); // 第 1 次输出
 this.setState({val: this.state.val + 1});
 console.log(this.state.val); // 第 2 次输出
 setTimeout(() => {
 this.setState({val: this.state.val + 1});
console.log(this.state.val); // 第 3 次输出
 this.setState({val: this.state.val + 1});
console.log(this.state.val); // 第 4 次输出
 }, 0);
 }
上面的console输出什么呢?答案是原生的js事件是立刻执行的,所有后面输出的就是2,3 前两个是批量更新,所有输出的时候,都还没有更新,都是0 0
setState并不总是异步的,一句话;
setState在原生事件,setTimeout,setInterval,Promise等异步操作中,state会同步更新
而在React的合成事件中改变的state,会进行批量更新,不会直接改变。比如上面是在React的生命周期函数里,调用的setState会批量更新,不会直接拿到state的值,但是setTimeout不会,它会直接拿到最新的state值,是同步的
5.React高阶组件
React高阶组件我们经常使用,我们最常用的react-redux提供的connect函数来为组件注入props就是一个高阶函数,它接受一个React组件作为输入,返回一个新的增强了的React组件。我们知道React组件本质上就是函数,class的实现也是用function实现的。我们还使用过组件的异步加载,也是使用了我们自定义的高阶组件:我们自定义一个异步加载的组件,这里的import和typeof一样,是运算符,这个运算符返回一个Promise对象。在路由跳转的时候,我们跳转的时候会触发这个() => {import},从而在跳转的时候再触发回调加载,这也是React的路由的一个优化
import React, { Component } from 'react';
export default function asyncComponent(importComponent) {
class AsyncComponent extends Component {
constructor(props) {
super(props);
this.state = {
component: null
}
}
//mod就是返回的module,default就是该组件名
//我们可以再组件挂载的时候,再异步加载,用importCompenent函数,返回一个promise对象
componentDidMount() {
importComponent().then((mod) => {
this.setState({
component: mod.default
})
})
}
render() {
const C = this.state.component;
return C?
{error ? 同样的connect函数帮我们完成了对组件注入props,也就是来自redux中的state:
const mapStateToProps = (state, props) => {
  const productId = props.match.params.id;
  return {
    product: getProduct(state, productId),
    quantity: getQuantity(state),
    showTip: getTipStatus(state),
    phone: getUsername(state),
    totalPrice: getTotalPrice(state, productId)
  };
};

const mapDispatchToProps = dispatch => {
  return {
    purchaseActions: bindActionCreators(purchaseActions, dispatch),
    detailActions: bindActionCreators(detailActions, dispatch)
  };
};

export default connect(
  mapStateToProps,
  mapDispatchToProps
)(Purchase);
我们还可以用其他元素来包裹一个component,比如给一个component附加了一些新的样式和布局,父组件和子组件也可以看做这样一种关系
6.React refs
React 提供了refs,供我们可以直接访问某个DOM的实例,在需要指定ref的DOM上绑定回调,把这个节点的ref赋值给组件的state,一般用在输入组件中,input,我们可以直接拿到这个组件的实例.React仍然有一些DOM操作是不可避免的,比如就是input元素的focus,input元素上绑定onClick事件,就需要定义ref,直接拿到这个input的实例,才能触发focus()函数让文本框获得焦点
 render() {
 return (

          this.myTextInput = ref} />


 );
 }

//拿到ref,调用它的focus事件
handleClick() {
 if (this.myTextInput !== null) {
 this.myTextInput.focus();
 }
 }
7.React合成事件与原生事件
我们知道DOM上市定义了DOM事件的,比如我们最常用的阻止冒泡和阻止a标签的默认事件。对应的React中也定义了stopPropagation和preventDefault函数。
DOM上定义的DOM0级事件是直接绑定到HTML元素上的,React借用了这种写法,构造了自己独特的合成事件。
React使用了一个叫做事件代理的机制,React不会把我们定义的事件直接绑定到真实的DOM上,而是把所有事件都绑定到结构的最外层,使用的是时间的冒泡机制来委派,最外层使用一个统一的监听器。这个最外层的事件监听器上维持了一个映射来保存所有组件内部的事件监听和对应的回调函数。当组件挂载和卸载的时候,Recat只是在这个统一的监听器上插入一些对象和删除一些对象。当一个事件比如onClick事件发生后,首先被事件统一监听器处理,然后更加映射找到对应的回调,然后处理,这样简化了事件处理的方式,提升了效率
React中的自动绑定(this):Recat组件中定义的方法在执行时候的上下文是指向这个组件的实例的,但是如果我们使用了class来定义,那么这个this就不会自动绑定了(在组件的实例中可以调用this,this指向实例,但是如果在组件外,比如const {getName} = mypeople)这个时候getName函数中调用的this就会丢失,当然指向的是window,node中为undefined。如果想要在render方法中要渲染的元素上绑定回调,要么把回调函数写成ES6的箭头函数的写法,要么在组件类的构造函数中,使用bind函数将构造时候的this(指向实例)绑定到函数执行时候的this。
使用原生事件:如果要在React中使用原生事件,可以再componentDidMount后用,因为这个时候vDom已经挂载到浏览器真实的DOM上了,但是我们要再componentWillUnMount中手动移除这个函数,使用addEventListener和removeEventListener
class NativeEventDemo extends Component {
componentDidMount() {
this.refs.button.addEventListener('click', e => {
this.handleClick(e);
});
}
handleClick(e) {
console.log(e);
}
componentWillUnmount() {
this.refs.button.removeEventListener('click');
}
render() {
return ;
}
}记住:不要混用合成与原生事件
比如下面,点击div code的时候,二维码不隐藏,我们应该在body上绑定一个addEventListener,然后在这个div上使用querySelecter单独阻止冒泡,而不要再React中定义一个onClick的合成事件,再在合成事件中调用stopPropagation这个原生事件。
constructor(props) {
super(props);
this.handleClick = this.handleClick.bind(this);
this.handleClickQr = this.handleClickQr.bind(this);
this.state = {
active: false,
};
}
class QrCode extends Component {
componentDidMount() {
document.body.addEventListener('click', e => {
this.setState({
active: false,
});
});
}
componentWillUnmount() {
document.body.removeEventListener('click');
}
handleClick() {
this.setState({
active: !this.state.active,
});
}
handleClickQr(e) {
e.stopPropagation();
}
render() {
return (
 );
}
}
);
}
}React中没有事件的捕获!
8 React组件间通信的基本方式
父组件和子组件之间的通信主要靠的是回调函数,这个经常发生在我们需要监听一个输入框的文本的时候,父组件给子组件传入一个回调,子组件传入发生在子组件的input元素上的event事件:e.target,value,使用箭头函数,我们可以把this绑定在定义箭头函数的上下文也就是父组件。在这个回调里,父组件调用action函数,dispatch这个e.tartget.value然后改变state,触发重新渲染
如果我们要跨级进行通信呢?父组件可以传递给子组件props,子组件可以通过调用父组件传入的回调把发生在子组件上的参数变更传递到action函数中进而改变state。如果不是直接父组件的话,我们就可以利用React给我们提供的context了。听起来有点陌生,我们不太会直接使用context,但是它在我们的React开发中其实无处不在,我们最常使用的react-router,react-redux的provider,都是利用context实现的,context在顶层父组件注入,在所有的子组件中都可以从context中拿到这个属性,我们平时还是避免使用,因为我们不知道这个context是从子组件的哪一级的父组件传入的。
9 React纯组件
React纯组件是一个很重要的优化,纯组件只有一个render方法
//只有一个render方法,我们可以省略,这也是React函数式编程思想的体现,接受数据,直接渲染
const SubItem = ({rowData,index,updateItem}) => {
    console.log('SubItem.render',rowData.uername);
    return (

            updateItem(index)} style={styles.updataBtn}>
                {rowData.uername||''}
                {'点我修改'}

            {rowData.useid||''}
            {rowData.remark||'暂无备注'}

    );
}
纯组件不会继承那么多的生命周期函数,因此不需要在组件挂载的时候调用这么多,但是shouldComponentUpdate方法被保留用于我们的优化。
纯组件是通过控制shouldComponentUpdate生命周期函数,减少render调用次数来减少性能损耗的。这相对于Component来说,减少了手动判断state变化的繁琐操作,但该组件也具有一定的缺陷,因为它只能进行一层浅比较,简单来说,它只比较props和state的内存地址,如果内存地址相同,则shouldComponentUpdate生命周期就返回false。PureComponent的使用场景应该是局部数据发生改变的场景,比如带有输入框、switch开关等的UI组件就可以使用PureComponent组件封装。PureComponent中如果有数据操作最好配合一个第三方组件——Immutable一起使用,Immutable需要使用npm安装该插件才可以使用,因为Immutable可以保证数据的不变性。
每次调用React组件的时候,就算传入的数组或者对象属性没有变化,也会因为引用地址变化使得需要重新创建组件
请看下面的例子:这样就不行,因为创建Account组件的时候,color这个对象字面量是重新生成的,它的引用地址是变了的,春组件在shouldComponentUpdate中做浅比较发现不一样,所有又重新渲染,哪怕color的指向的地址存储的值一直是‘black’
10 React受控与非受控组件
在不使用redux来帮我们管理React的state数据的时候,我们Recat组件是要维持一个自己的state的,在constructior中初始化,
受控组件就是render中的元素依赖组件自身的state,非受控就是组件的渲染压根就和state和props无关,需要用this.refs.myinput来直接访问真实的DOM元素,比如从this.refs.myinput中解析出value来,然后渲染
redux就帮我们实现组件依赖于父组件传入的props,都是受控组件
11 React vDom原理
原生的js操作DOM的代价比较高,vDOM把真实的DOM转换为JavaScript中的对象树。我们很容易知道,vDOM应该就是js中的一个个对象,这个对象有不同的对象字面量去表示真实DOM中的属性:
{
 // 标签名
 tagName: 'div',
 // 属性
 properties: {
 // 样式
 style: {}
 },
 // 子节点
 children: [],
 // 唯一标识
 key: 1
}
Virtual DOM中的节点称为ReactNode,分为三种类型:ReactElement ReactFragment ReactText,其中ReactElement又分为ReactComponentElement和ReactDOMELement。
我们首先看一下React.createElement的源码
ReactElement.createElement = function(type, config, children) {
 // 初始化参数
 var propName;
 var props = {};
 var key = null;
 var ref = null;
 var self = null;
 var source = null;
 // 如果存在 config,则提取里面的内容
 if (config != null) {
 ref = config.ref === undefined ? null : config.ref;
 key = config.key === undefined ? null : '' + config.key;
 self = config.__self === undefined ? null : config.__self;
 source = config.__source === undefined ? null : config.__source;
// 复制 config 里的内容到 props(如 id 和 className 等)
 for (propName in config) {
 if (config.hasOwnProperty(propName) &&
 !RESERVED_PROPS.hasOwnProperty(propName)) {
 props[propName] = config[propName];
 }
 }
 }
// 处理 children,全部挂载到 props 的 children 属性上。如果只有一个参数,直接赋值给 children,
 // 否则做合并处理
 var childrenLength = arguments.length - 2;
 if (childrenLength === 1) {
 props.children = children;
 } else if (childrenLength > 1) {
 var childArray = Array(childrenLength);
 for (var i = 0; i < childrenLength; i++) {
 childArray[i] = arguments[i + 2];
 }
 props.children = childArray;
 }
// 如果某个 prop 为空且存在默认的 prop,则将默认 prop 赋给当前的 prop
 if (type && type.defaultProps) {
 var defaultProps = type.defaultProps;
 for (propName in defaultProps) {
 if (typeof props[propName] === 'undefined') {
 props[propName] = defaultProps[propName];
 }
 }
 }

// 返回一个 ReactElement 实例对象
 return ReactElement(type, key, ref, self, source, ReactCurrentOwner.current, props);
};
12 React diff算法
这是React的重中之重了,React就是通过高效的diff算法实现了O(n)级别的对比。传统对比两颗树是否一样,我们要O(n^3)的时间复杂度,那React的diff算法是怎么实现的呢?
首先我们知道我们React最终是要变成浏览器上的真实的DOM树的,这里面就很强的几个设定:
1.WebUI中,我们很少跨层级移动节点
2,.相同的组件渲染成的DOM树是一样的结构,不同的组件渲染出的结构不一样
3.同一个层级的节点,我们可以给它们都赋一个唯一的key值作为唯一标识
对于1,React就会分层对树进行比较,即两颗vDOM树,待更新和更新后应该变成的树只会对同层比较,就是只比较同一个父节点下面的所有子节点,如果节点不存在的话,子节点和子节点的子节点都会被直接删除,不会再比较,英雌只需要一次遍历
如果跨层级更新了,比如:

R节点下的A节点为根节点的子树就被直接删除,而不是移动,在D节点下回重新创建,这个相当的耗时,React建议不要这样做
对于2: 如果同一层级的节点的类型不一样,直接删了,如果类型是一样的比如都是OrderList,还可以可以用shouldComponentUpdate我们来优化,
对于3 React提供了一个key属性让我们优化,这也是为什么我们渲染List类型的组件的时候,都要加上一个key,比如点评App中国,product我们都用product的id当做了渲染时候的key值,React可以通过对比key值,来判断是否有新的元素加入,还是只需要对旧元素进行为位置的移动,但是,如果我们做出了把最后一个元素放到第一个元素,这样React的diff算法就要比较比较久,影响性能,因此不要做这样的操作
然后我们在vDOM上操作了这么多,改变了state,构建了tree diff,最后一步怎么更新成真实的DOM呢,那就是React的Patch方法
React Patch:
新建一个DOM,就是获取vDOM的tag,atts,children然后调用document的createElement方法,setArrtibue方法,递归的渲染成真实的DOM,最后返回这个新建的element
//patch(contanier,vNode),等于新建一个

function createElement(vNode) {
  const tag = vNode.tag;
  const attrs = vNode.attrs || {};
  const children = vNode.children || {};

  if(!tag) {
    return null
  }

  const element = document.createElement(tag);
  for(let attrName in attrs) {
    if(attrs.hasOwnProperty(attrName)) {
      element.setAttribute(attrName,attrs[attrName]);
    }
  }

  children.forEach(childVnode => {
    element.appendChild(createElement(childVnode))
  });

  return element;
}

//patch(vNode,newVnode),等于更新
//我们更新一个节点的时候,一般来说,根节点不变,就是子节点发生了删除,内容的更新,新增等等


function updateChildren(vnode,newVode) {
  if(vnode.children.length === 0) {
    return
  }
  const children = vnode.children || [];
  const newChildVnode = newVode.children || [];

  //遍历现有的children

  children.forEach((childVnode,index) => {
    const newChildVnode = newChildVnode[index];
    if(childVnode.tag === newChildVnode.tag) {
      updateChildren(childVnode,newChildVnode);//递归深层次对比
    } else {
      replaceNode(childVnode,newChildVnode);
    }
  })
}

function replaceNode(vnode,newVnode){
  const ele = vnode.elem//real Dom node
  const newElem = createElement(newVnode);
  //repalce

  // elem = newElem;

}
13 React Hooks
React Hooks是在React16.8中正式发布的新特性,我们可以用函数式组件来实现类组组件(class Listitem extends React.Component)才具有的生命周期函数。解决啥问题呢?答案就是:解决有状态的组件的复用问题
我们使用redux进行单向数据管理,但是有个组件还是要维持自己的state,这类组件还有自己的生命周期函数,很难复用
Hooks组件可以记住改变后的state状态,接着用,类似我们使用闭包,react帮我们记住hooks组件的局部变量state,使得它在其他地方调用的时候,改变state可以承接上一次state的值
useEffect:代替生命周期钩子函数,渲染的时候执行定义的回调
二.Redux部分
1.redux设计思想
redux的设计就是严格的控制数据,实现时间旅行,state的不可变,可回溯,帮助我们管理大型项目中的数据流动问题,它通过定义action,dispatch不同的action,reducer处理不同的action来改变state,来实现单向的,可控制的state变化。
2.redux中间件使用及其原理
redux中间件的原理,redux中间件借鉴了koa中间件的思想,实现一个自由拔插,自由组合的机制,中间件就是对dispatch
来的action的处理和增强,我们在store中注入middleware来增强:
import { createStore, applyMiddleware } from "redux";
import thunk from "redux-thunk";
import api from "./middleware/api";
import rootReducer from "./modules";

let store;

if (
  process.env.NODE_ENV !== "production" &&
  window.__REDUX_DEVTOOLS_EXTENSION__
) {
  const composeEnhancers = window.__REDUX_DEVTOOLS_EXTENSION_COMPOSE__;
  store = createStore(rootReducer, composeEnhancers(applyMiddleware(thunk, api)));
} else {
  //store = createStore(rootReducer,applyMiddleware(thunk,api))
  store = createStore(rootReducer, applyMiddleware(thunk, api));
}

export default store;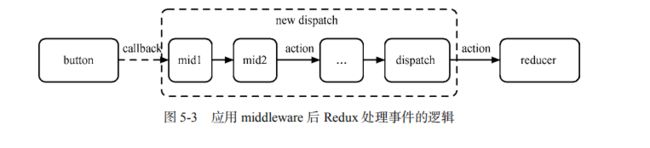
如上图,每一个dispatch的action,都会经过中间件的处理,然后使用next交给下一个中间件处理,最后再交给reducer处理,
我们很自然的想到,applyMiddleware函数应该是维护了一个队列,然后链式执行。
我们看一个logger middleware
export default store => next => action => {
    console.log('dispatch',action);
    next(action);
    console.log('finish',action)
}
其中nexgt和dispatch的不同在哪儿呢?前者是把这个action交给下一个中间件处理,而dispatch会重新回到第一个中间件
3.redux异步请求
我们来看一下redux-thunk这个包,源码很少,当我们的action是一个函数的时候,它会先执行这个函数,然后交给下一个中间件处理。
function createThunkMiddleware(extraArgument) {
 return ({ dispatch, getState }) => next => action => {
 if (typeof action === 'function') {
 return action(dispatch, getState, extraArgument);
 }
 return next(action);
 };
}
三.React-Router部分
1.浏览器路由原理,location与history
首先看看location和history这两个window对象:
window.location

location.href
location.hash
location.search
location.pathname

window.history

history.pushState()
history.replaceState()
history.go()
history.back()
history.forward()
在单页应用中,我们是不刷新url的,而是只改变url中hash部分来实现也就是#后的字符串,但loaction的search是会刷新url的,我们在SSR渲染cnode的时候用到了search,但history通过pushState把url添加到浏览器历史栈中,用history.go跳转到历史记录中的某个页面,还有就是back和forward完成后退和前进
首先我们知道React-router是基于context和history库实现的,context我们之前介绍了,那history是什么呢,它是一个js库,可以在js运行的任何地方轻松管理我们的浏览历史,我们用的是BrowserHistory,那么它干了啥呢?它创建了一个history对象:
const history = {
 length: globalHistory.length,
 action: "POP",
 location: initialLocation,
 createHref,
 push, // 改变location
 replace,
 go,
 goBack,
 goForward,
 block,
 listen //监听路由变化
};
我们讲一下路由的匹配原则:路由会从最上面的Route开始匹配路径(path)这也是为什么我们要把根路由放到最下面,这样的如果匹配到子路由往下匹配就不会重复匹配了,但是还可以使用exact属性,表明我这个路径必须要严格匹配
return (
{error ? 同样的,我们还可以用Redirect组件重定位,比如个人中心登录的时候,如果没登录,就重定位到登录页
if (login) {
if(state && state.from) {
return 四.React优化部分
1.常见的React优化方法有哪些?
1.React reselected优化:
使用redux的时候,我们创建了很多selector函数从store中读取数据(比如领域实体数据),但是这种情况有个问题就是:
state改变的时候,这些selector都要重新计算,reselect为selector设置了缓存,只会重新计算‘
2.shouldComponentUpdate优化
3.添加key值
4.组件按需加载