Unity里的延迟渲染
延迟渲染
延迟渲染渲染下,光源计算的消耗的消耗和光源占屏幕的范围(像素)相关,而不是像正向渲染中,和光源照射的物体数量相关。
延迟渲染也分为2个Pass(不在同一个shader里)
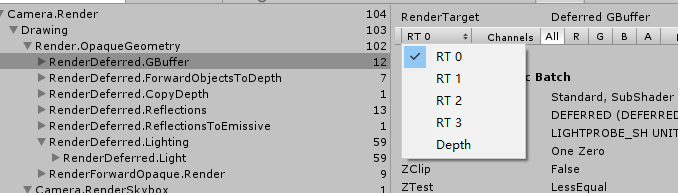
GBuffer Pass(Defferred Pass):这个pass写在想要支持延迟渲染的游戏物体的shader里,和正向渲染不同,Gbuffer会渲染输出4份贴图(如果用了混合光照还有第五份)
- RT0, ARGB32 format: Diffuse color (RGB), occlusion (A).
- RT1, ARGB32 format: Specular color (RGB), roughness (A).
- RT2, ARGB2101010 format: World space normal (RGB), unused (A).
- RT3, ARGB2101010 (non-HDR) or ARGBHalf (HDR) format: Emission + lighting + lightmaps
+ reflection probes buffer.- RT4, ARGB32 format: Light occlusion values (RGBA).
- 还有个深度缓存 Zbuffer
LightPass(shader) :这个shader是独立于游戏物体的,又可以分成两个pass(第一个正常的渲染光源,第二个处理LDR的转码),你可以粗浅把它想成一个屏幕特效 ,每个光源会调用一次,它通过Gbuffer得到屏幕空间的各种物体信息,并结合这些信息渲染出灯光和阴影叠加到原来的图像上。这个shader你可以不写,因为Unity有内建的。
延迟渲染不支持正交视图也不支持MSAA,只能渲染不透明的物体
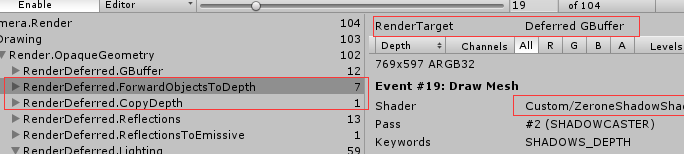
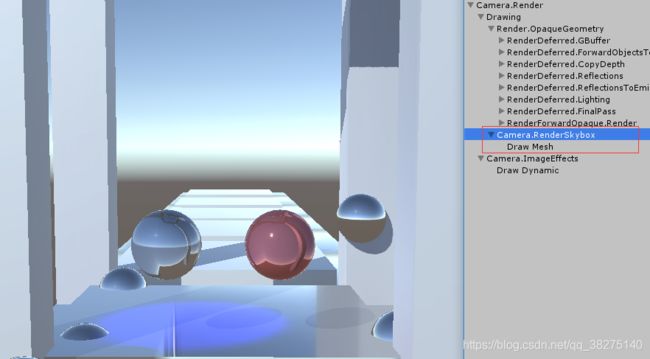
前向渲染和延迟渲染可以混合使用,打开frame debugger 看一下流程
场景里的物体一部分我用了支持延迟渲染的标准着色器,一部分用来之前自己写的只支持正向渲染的着色器。
首先渲染的自然是Gbuffer
然后Gbuffer中的深度贴图值包含了延迟渲染物体的深度, 我们要把正向渲染的物体深度也算进去,因为计算阴影时,我们不能够让正向和延迟渲染物体的阴影相互独立,正向物体应当可以投射到延迟物体,反之亦然 ,下图可以看到,它有重新写进了Gbuffer里,用的是shader就是正向物体身上的(自己写的)shader的投影pass
再然后是反射贴图
理论上讲,反射贴图应该是算在Gbuffer的RT3里面的,但是可能这样是优化还是怎么的,反射探测器本身被渲染。它们被投影到与其体积相交的几何体上。


可以看到,有反射的位置差不多就和黄框(反射探针的cube) 差不多,这里有点缩放和渐变是因为右边的Blend Distance,设置为0就是刚好在黄框范围了。
你可以把它关闭,这样反射就在G-buffer RT3里正确读取了(开启时,Gbufferpass里采样的环境贴图设置为黑色)。
Edit =>Project Setting=>Graphics

左边是开启Deffered reflections的,可以看到在Gbuffer的RT3里并没有加上环境反射,右边是关闭后的RT3,此时环境反射就直接在Gbuffer pass里就算上了,就像正向渲染里添加环境反射的过程一样。


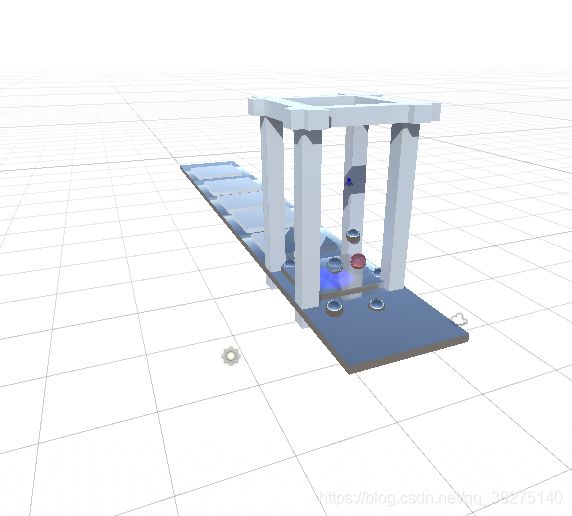
然后就是LightPass啦,我在场景里放了两个光源,一个是直射光(红),一个聚光灯 (黄)
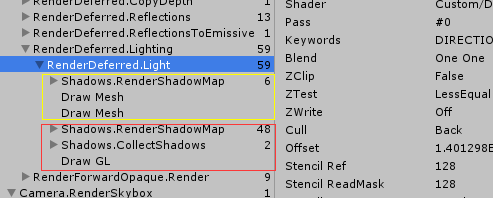

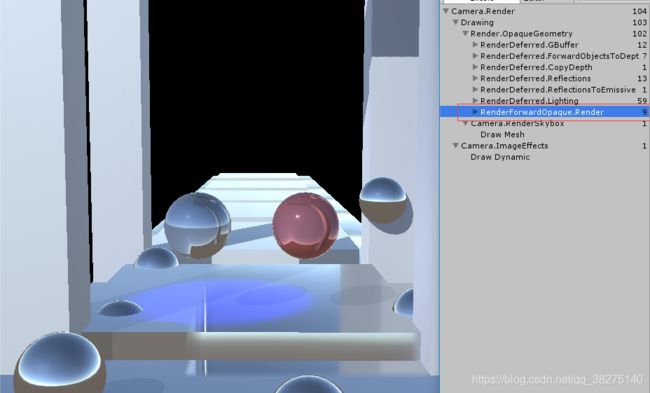
截止至此,延迟渲染结束,可以看到有许多球状的灰色坑,这些坑就属于正向渲染的物体,接下来的正向渲染就会把这些坑填上
Add:还记得Light有两个Pass吗,第二个Pass用于LDR的转码,当相机组件的HDR选项关闭时,这个Pass就有用了

关闭后,会发现LightPass渲染的颜色很奇怪

而framedebuger里多了一个findPass,这一步后颜色就正常了

就是大概的渲染过程。
Deffered Pass
Pass{
    Tags{"LightMode"="Deferred"}
    CGPROGRAM
    #include "MyLighting.cginc"
    //之前正向函数中用到方法的文件,教程有几章我略过了,我懒得再写一遍了,所以直接用原作者的文件了,可以直接在原文里下
    #pragma target 3.0//延迟渲染要求Shader Model要在3.0以上
    #pragma multi_compile _ UNITY_HDR_ON 区分是否开启HDR
    #pragma exclude_renderers nomrt
    //exclude_renderers指令是不用给定的渲染器(如d3d11、opengles...)编译着色器,这里就是不用nomrt类型的渲染器,
    //nomrt(no multiple render targets)代表不支持写入多个渲染目标的平台,因为延迟渲染需要,所以不支持的平台就要排除掉
    //https://unity3d.com/cn/unity/whats-new/unity-5.0
    //其余指令:https://docs.unity3d.com/Manual/SL-ShaderPrograms.html
    ...
    ENDCG
		}
顶点函数函正向渲染的一样,就是片元函数要修改一下
首先是输出返回的数据
struct fragout{//片元函数应该输出4个,而不是单一的一个SV_target
    float4 gBuffer0 : SV_Target0;
    float4 gBuffer1 : SV_Target1;
    float4 gBuffer2 : SV_Target2;
    float4 gBuffer3 : SV_Target3;
};
fragout DeferedFragment(Interpolators i){
    //相关信息的计算
    ...

    //最后赋值
    fragout output;

    //第一层 rgb 反射率 a 遮蔽
    output.gBuffer0.rgb = albedo;
    output.gBuffer0.a = GetOcclusion(i);//这些方法自己写,不是Unity提供的

    //第二层 rgb 高光 a 光滑度
    output.gBuffer1.rgb = specularTint;
    output.gBuffer1.a = GetSmoothness(i);

    //第三层 法线
    output.gBuffer2 = float4(i.normal * 0.5 + 0.5, 1);

    //第四层 自放光和反射等等
    //Color是把在basePass中用到的BRDF宏的light设为0,这样计算得到的只剩下了indirectLight中的环境反射等了
    color+=GetEmission(i);
    //如果没开启HDR,要给颜色编码转换一下数据exp2,后面在lightpass2里则是进行解码log2
    #if !defined(UNITY_HDR_ON)
    color.rgb = exp2(-color.rgb);
    #endif
    output.gBuffer3 = color;

}
再提一下,如果开启了Deffered reflection,那么unity_SpecCube0等用于采样环境反射的立体贴图,都会设为黑色。也就是说这时候采样是浪费时间,所以此时最好不进行采样 UNITY_ENABLE_REFLECTION_BUFFERS 可以用于判断是否开启。
Light Pass
LightPass其实Unity已经内置了,当然你也可以换成自己的shader

Pass2
先说第二个Pass,因为第二个比较简单,就是用在在LDR的情况下,把颜色解码成正确的颜色
        //转换颜色
        Pass{
            Cull Off
            ZTest Always
            ZWrite Off

            //修改模板缓冲区,避免破坏天空盒颜色
            Stencil {
                //_StencilNonBackground是unity提供的天空盒遮蔽模板

                Ref [_StencilNonBackground]
                //声明_StencilNonBackground

                ReadMask [_StencilNonBackground]
                //读取_StencilNonBackground

                //只有模板缓冲区的值和_StencilNonBackground读取的值相同时,才可以渲染
                CompBack Equal
                CompFront Equal
            }

            CGPROGRAM

            #pragma target 3.0
            #pragma vertex vert
            #pragma fragment frag

            #pragma exclude_renderers nomrt

            #include "UnityCG.cginc"

            sampler2D _LightBuffer;

            struct a2v {
                float4 vertex : POSITION;
                float2 uv : TEXCOORD0;
            };

            struct v2f {
                float4 pos : SV_POSITION;
                float2 uv : TEXCOORD0;
            };

            v2f vert (a2v v) {
                v2f i;
                i.pos = UnityObjectToClipPos(v.vertex);
                i.uv = v.uv;
                return i;
            }

            float4 FragmentProgram (v2f i) : SV_Target {
                //解码颜色
                return -log2(tex2D(_LightBuffer, i.uv));
            }

            ENDCG
        }
主要就是把每个颜色用-log2解码成正确的颜色
另外这里有一个模板缓冲区,可以想成PS里的蒙版 因为我们要转码的颜色不包括天空盒,天空盒不受光照影响是独立渲染的,所以不应该进行转码。
如果我们把 Stencil 这部分注释掉,在Game视图里是正常的,因为game视图里天空盒渲染的顺序在延迟渲染后面(有些平台可能天空盒先渲染)
但是在Scene视图里就gg了,天空盒是先渲染的,而我们这个Pass仍然对天空盒部分进行-log2的解码,结果被错误的计算成了白色
 右边是正常的
关于模板缓冲区
Unity官方文档:https://docs.unity3d.com/Manual/SL-Stencil.html
一个博主的文章:https://blog.csdn.net/u013833399/article/details/47340447
Pass1
第一个Pass就是计算光照的Pass
先把框架写好
Pass{
    Blend One One//光源应该是混合不是叠加
    ZWrite Off//本来就是一个屏幕面片,深度写入莫得用

    CGPROGRAM
    #include "UnityPBSLighting.cginc"
    #pragma target 3.0
    #pragma exclude_renderers nomrt
    //提供lightpass各种光源类型关键字的shader变种
    #pragma multi_compile_lightpass
    #pragma multi_compile _ UNITY_HDR_ON

    #pragma vertex vert
    #pragma fragment frag
    struct a2v{
        float4 vertex:POSITION;
        float3 normal:NORMAL;
        float3 ray : TEXCOORD1;
    };
    struct v2f{
        float4 pos:SV_POSITION;
        float4 uv:TEXCOORD0;
    };

    v2f vert(a2v v){

    };

    float4 frag(v2f i):SV_Target{

    };
    ENDCG
}
直射光
光照
            UNITY_DECLARE_DEPTH_TEXTURE(_CameraDepthTexture);//声明一下深度图,至于为什么要用宏我懒得深究了
            sampler2D _CameraGBufferTexture0;
            sampler2D _CameraGBufferTexture1;
            sampler2D _CameraGBufferTexture2;
            float4 _LightColor, _LightDir;//直射光相关信息
            UnityLight CreateLight (){
                UnityLight light;
	            light.dir = -_LightDir;
	            light.color =_LightColor.rgb;
	            return light;
            }
            UnityIndirect NullIndirectLight(){
                UnityIndirect indirectLight;
	            indirectLight.diffuse = 0;
	            indirectLight.specular = 0;
	            return indirectLight;
            }

            float4 frag(v2f i):SV_Target{
                float2 uv=i.uv.xy/i.uv.w;//得到屏幕uv坐标
                //通过深度和方向,重构每个像素的世界坐标
                float depth = SAMPLE_DEPTH_TEXTURE(_CameraDepthTexture, uv);
                depth = Linear01Depth(depth);
                //rayToFarPlane表示从该点到远平面的向量,ray只能表示方向,但长度不一定
                //_ProjectionParams.z是远平面的距离。
                //因为xyz都是等比的,所以_ProjectionParams.z / i.ray.z就是rayToFarPlane向量和ray向量的比值
                float3 rayToFarPlane = i.ray * _ProjectionParams.z / i.ray.z;
                float3 viewPos = rayToFarPlane * depth;
                float3 worldPos = mul(unity_CameraToWorld, float4(viewPos, 1)).xyz;

                //从Gbuffer中提取集合信息
                float3 albedo = tex2D(_CameraGBufferTexture0, uv).rgb;
                float3 specularTint = tex2D(_CameraGBufferTexture1, uv).rgb;
                float3 smoothness = tex2D(_CameraGBufferTexture1, uv).a;
                float3 normal = tex2D(_CameraGBufferTexture2, uv).rgb * 2 - 1;
                //计算PBR BRDF需要的信息,返回值
                float3 viewDir = normalize(_WorldSpaceCameraPos - worldPos);
                float oneMinusReflectivity = 1 - SpecularStrength(specularTint);
                //间接光已经算在Gbuffer的RT3里了,所以这里用值都为0的间接光
                float4 color = UNITY_BRDF_PBS(
                    albedo, specularTint, oneMinusReflectivity, smoothness,
                    normal, viewDir, CreateLight(), NullIndirectLight()
                );

                return color;
            }
LDR颜色
在第二个pass里会对非hdr的颜色解码,如果是非hdr,这里就要进行转码,另外编码LDR颜色必须乘以光源缓冲区的颜色
LDR:Blend DstColor Zero HDR:Blend One One
为了让shader在两种状况下自动变化,用Unity提供的混合选项的变量
Blend [_SrcBlend] [_DstBlend]
当场景以低动态光照渲染(LDR)进行渲染的时候,Unity执行这个操作,这是默认的行为。在这种情况下,颜色将写入ARGB32纹理。Unity对颜色进行对数编码以达到比通常情况更大的动态范围。 最终的延迟渲染通道将结果转换为正常的颜色。
当场景以高动态光照渲染(HDR)进行渲染的时候,Unity使用ARGBHalf格式。在这种情况下,不需要特殊的编码,并且没有最终的延迟渲染通道。是否启用高动态光照渲染是相机的属性。打开这个属性,那么当使用帧调试器的时候,我们就能看到正常的颜色。
Blend [_SrcBlend] [_DstBlend]
...
#pragma multi_compile _ UNITY_HDR_ON
...

float4 frag(v2f i):SV_Target{
    ...
    #if !defined(UNITY_HDR_ON)
    color = exp2(-color);
    #endif
    return color;
}
阴影和cookie
            //因为没有用相关的库文件帮我们定义 所以这些信息要我们自己先声明一下
            float4 _LightColor, _LightDir;
            float4x4 unity_WorldToLight;
            sampler2D _LightTexture0;
            //方向光的阴影贴图,UnityShadowLibrary中他也被定义为聚光灯和点光源变种的阴影,所以不要重复定义
			#ifdef SHADOWS_SCREEN
            sampler2D _ShadowMapTexture;
            #endif
然后修改CreateLight
UnityLight CreateLight (float2 uv,float3 worldPos,float viewZ){
    UnityLight light;
    light.dir = -_LightDir;
    float attenuation=1;
    float shadowAttenuation=1;

    #ifdef DIRECTIONAL_COOKIE
    //用光源空间的xy采样cookie
    float2 uvCookie = mul(unity_WorldToLight, float4(worldPos, 1)).xy;
    attenuation *= tex2D(_LightTexture0, uvCookie).w;
    //优化显示,避免锯齿
    attenuation *= tex2Dbias(_LightTexture0, float4(uvCookie, 0, -8)).w
    #endif

    #ifdef SHADOWS_SCREEN
    //阴影采样
    shadowAttenuation=tex2D(_ShadowMapTexture,uv).r;
    //阴影距离渐变 (Shadow Distance)
    float shadowFadeDistance =UnityComputeShadowFadeDistance(worldPos, viewZ);
    float shadowFade = UnityComputeShadowFade(shadowFadeDistance);
    shadowAttenuation=saturate(shadowAttenuation+shadowFade);
    #endif
    light.color =_LightColor.rgb*(attenuation*shadowAttenuation);
    return light;
}
Shadow Distance 是指QualitySetting里的这个值

其余光源
一开始提到,延迟渲染光源的计算量和光源所占屏幕像素的多少相关,直射光是全屏的,所以每个像素都会计算,但是聚光灯和点光源就不一样了,他只会计算处在光源范围内的像素,怎么判断是不是在范围内呢,光源会当做一个mesh来绘制,聚光灯是一个锥体,而点光源则是一个球体
如下图所示,一个聚光灯光源的计算由两个DrawMesh组成,第二个就是我们绘制光源的pass,但第一个就不同了,第一个是draw就是用来限制渲染的范围的,可以看到用的shader是unity内置的,名字写的很清楚,其实就是通过模板缓冲区来规定范围,这样后面的第二个drawmesh(黄色),就只能在规定的mesh范围内渲染了,超出部分不会进行无用的计算
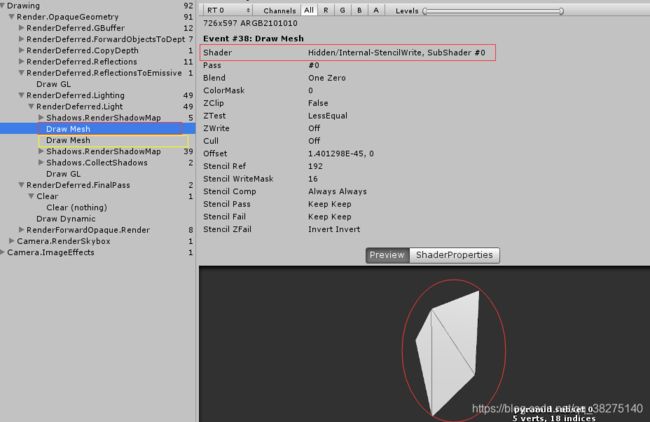
聚光灯
首先把直射光和其他光源区分开来
UnityLight CreateLight (float2 uv,float3 worldPos,float viewZ){
                UnityLight light;

	            float attenuation=1;
	            float shadowAttenuation=1;
	            bool shadowed=false;
	            #if defined(DIRECTIONAL) || defined(DIRECTIONAL_COOKIE)
                    light.dir = -_LightDir;
                    #ifdef DIRECTIONAL_COOKIE
                    //用光源空间的xy采样cookie
                    float2 uvCookie = mul(unity_WorldToLight, float4(worldPos, 1)).xy;
                    attenuation *= tex2D(_LightTexture0, uvCookie).w;
                    //优化显示,避免锯齿
                    attenuation *= tex2Dbias(_LightTexture0, float4(uvCookie, 0, -8)).w
                    #endif

                    #ifdef SHADOWS_SCREEN
                    shadowed=true;
                    //阴影采样
                    shadowAttenuation=tex2D(_ShadowMapTexture,uv).r;
                    #endif
	            #else
	                //聚光点光有位置,所以重新计算光源方向,_LightPos也要自己定义好
	                float3 lightVec = _LightPos.xyz - worldPos;
                    light.dir = normalize(lightVec);
	            #endif
	            //阴影渐变是通用的所以把它提出来
	            if(shadowed){
	                //阴影距离渐变 (Shadow Distance)
                    float shadowFadeDistance =UnityComputeShadowFadeDistance(worldPos, viewZ);
                    float shadowFade = UnityComputeShadowFade(shadowFadeDistance);
                    shadowAttenuation=saturate(shadowAttenuation+shadowFade);
                    //计算优化
                    #if defined(UNITY_FAST_COHERENT_DYNAMIC_BRANCHING) && defined(SHADOWS_SOFT)
			        UNITY_BRANCH
			        if (shadowFade > 0.99) {
				        shadowAttenuation = 1;
			        }
                    #endif
	            }
	            light.color =_LightColor.rgb*(attenuation*shadowAttenuation);
	            return light;
            }
首先要修改一下顶点函数里ray的计算
float _LightAsQuad;
xxx vert(xxx){
//....
//如果不是直射光的全屏的四边形,就不能用法线表示方向,得自己算,
//_LightAsQuad在处理四边形(也就是直射光时返回1,else 0)
i.ray = lerp(UnityObjectToViewPos(v.vertex) * float3(-1, -1, 1),v.normal,_LightAsQuad);
}
//聚光点光有位置,所以重新计算光源方向,_LightPos也要自己定义好
	                float3 lightVec = _LightPos.xyz - worldPos;
                    light.dir = normalize(lightVec);

                    //乘以光源随中心距离的衰减值,衰减纹理在_LightTextureB0中,必须用距离(_LightPos.w)平方采样
	                //应该使用哪个纹理通道,因平台而异,由UNITY_ATTEN_CHANNEL宏进行定义
	                attenuation *= tex2D(_LightTextureB0,(dot(lightVec, lightVec) * _LightPos.w).rr).UNITY_ATTEN_CHANNEL;

                    #if defined(SPOT)
                    float4 uvCookie = mul(unity_WorldToLight, float4(worldPos, 1));
                    uvCookie.xy /= uvCookie.w;//透视
                    attenuation *= tex2Dbias(_LightTexture0, float4(uvCookie.xy, 0, -8)).w;
                    //只要向前的光锥,因为存在xy相同,z互为正负的两边,只有其中一侧才是光源范围,虽然模板缓冲会帮我们筛掉,但还是多个判断保险
                    attenuation *= uvCookie.w < 0;
                    #if defined(SHADOWS_DEPTH)
                    //聚光灯阴影
                    shadowed = true;
                    shadowAttenuation = UnitySampleShadowmap(mul(unity_WorldToShadow[0], float4(worldPos, 1)));
                    #endif
点光源
点光源的cookie贴图应该用立体贴图
#if defined(POINT_COOKIE)
samplerCUBE _LightTexture0;
#else
sampler2D _LightTexture0;
#endif
#if defined(DIRECTIONAL) || defined(DIRECTIONAL_COOKIE)
//直射光
#else
//聚光..
#else
    #if defined(POINT_COOKIE)
        //点光源cookie
        float3 uvCookie =mul(unity_WorldToLight, float4(worldPos, 1)).xyz;
        attenuation *=texCUBEbias(_LightTexture0, float4(uvCookie, -8)).w;
    #endif
    #if defined(SHADOWS_CUBE)
        //点光源阴影
        shadowed = true;
        shadowAttenuation = UnitySampleShadowmap(-lightVec);
    #endif
#endif
完整版
Shader "Custom/MyDefferedShader" {
	Properties {

	}
	SubShader {
	    //计算光照
		Pass{
		    Blend [_SrcBlend] [_DstBlend]
		    //Blend DstColor Zero
		    //Blend One One//光源应该是混合不是叠加
			ZWrite Off//本来就是一个屏幕面片,深度写入莫得用

			CGPROGRAM


            #pragma target 3.0
			#pragma vertex vert
			#pragma fragment frag

			#pragma exclude_renderers nomrt
			//提供lightpass各种光源类型关键字的shader变种
            #pragma multi_compile_lightpass
			#pragma multi_compile _ UNITY_HDR_ON

			#include "UnityPBSLighting.cginc"
			#include "UnityCG.cginc"


			struct a2v{
			    float4 vertex:POSITION;
			    float3 normal:NORMAL;
			};
			struct v2f{
			    float4 pos:SV_POSITION;
			    float4 uv:TEXCOORD0;
			    float3 ray : TEXCOORD1;
			};
            float _LightAsQuad;
            v2f vert(a2v v){
                v2f i;
                i.pos=UnityObjectToClipPos(v.vertex);
                i.uv=ComputeScreenPos(i.pos);
                //在方向光源的情况下,四边形的四个顶点的光线会作为法向矢量提供
                //也就是摄像头视锥体的四条边,插值后就可以得到每个像素点朝前的发射方向
                //如果不是直射光的全屏的四边形,就不能用法线表示方向,得自己算,
                //_LightAsQuad在处理四边形(也就是直射光时返回1,else 0)
                i.ray = lerp(UnityObjectToViewPos(v.vertex) * float3(-1, -1, 1),v.normal,_LightAsQuad);
                return i;
            };

            UNITY_DECLARE_DEPTH_TEXTURE(_CameraDepthTexture);//声明一下深度图,至于为什么要用宏我懒得深究了,
			sampler2D _CameraGBufferTexture0;
            sampler2D _CameraGBufferTexture1;
            sampler2D _CameraGBufferTexture2;
            //因为没有用相关的库文件帮我们定义 所以这些信息要我们自己先声明一下
            float4 _LightColor, _LightDir,_LightPos;
            float4x4 unity_WorldToLight;
            sampler2D  _LightTextureB0;
            //方向光的阴影贴图,UnityShadowLibrary中他也被定义为聚光灯和点光源变种的阴影,所以不要重复定义
			#ifdef SHADOWS_SCREEN
            sampler2D _ShadowMapTexture;
            #endif

            #if defined(POINT_COOKIE)
            samplerCUBE _LightTexture0;
            #else
            sampler2D _LightTexture0;
            #endif

            UnityLight CreateLight (float2 uv,float3 worldPos,float viewZ){
                UnityLight light;

	            float attenuation=1;
	            float shadowAttenuation=1;
	            bool shadowed=false;

	            #if defined(DIRECTIONAL) || defined(DIRECTIONAL_COOKIE)
                    light.dir = -_LightDir;
                    #ifdef DIRECTIONAL_COOKIE
                        //用光源空间的xy采样cookie
                        float2 uvCookie = mul(unity_WorldToLight, float4(worldPos, 1)).xy;
                        attenuation *= tex2D(_LightTexture0, uvCookie).w;

                        //优化显示,避免锯齿
                        attenuation *= tex2Dbias(_LightTexture0, float4(uvCookie, 0, -8)).w
                    #endif
                    #ifdef SHADOWS_SCREEN
                        shadowed=true;
                        //阴影采样
                        shadowAttenuation=tex2D(_ShadowMapTexture,uv).r;
                    #endif
	            #else
	                //聚光点光有位置,所以重新计算光源方向,_LightPos也要自己定义好
	                float3 lightVec = _LightPos.xyz - worldPos;
                    light.dir = normalize(lightVec);

                    //乘以光源随中心距离的衰减值,衰减纹理在_LightTextureB0中,必须用距离(_LightPos.w)平方采样
	                //应该使用哪个纹理通道,因平台而异,由UNITY_ATTEN_CHANNEL宏进行定义
	                attenuation *= tex2D(_LightTextureB0,(dot(lightVec, lightVec) * _LightPos.w).rr).UNITY_ATTEN_CHANNEL;

                    #if defined(SPOT)
                        float4 uvCookie = mul(unity_WorldToLight, float4(worldPos, 1));
                        uvCookie.xy /= uvCookie.w;//透视
                        attenuation *= tex2Dbias(_LightTexture0, float4(uvCookie.xy, 0, -8)).w;
                        //只要向前的光锥,因为存在xy相同,z互为正负的两边,只有其中一侧才是光源范围,虽然模板缓冲会帮我们筛掉,但还是多个判断保险
                        attenuation *= uvCookie.w < 0;
                        #if defined(SHADOWS_DEPTH)
                        //聚光灯阴影
                        shadowed = true;
                        shadowAttenuation = UnitySampleShadowmap(mul(unity_WorldToShadow[0], float4(worldPos, 1)));
                    #endif
                #else

                    #if defined(POINT_COOKIE)
                        //点光源cookie
                        float3 uvCookie =mul(unity_WorldToLight, float4(worldPos, 1)).xyz;
                        attenuation *=texCUBEbias(_LightTexture0, float4(uvCookie, -8)).w;
                    #endif
                    #if defined(SHADOWS_CUBE)
                        //点光源阴影
                        shadowed = true;
                        shadowAttenuation = UnitySampleShadowmap(-lightVec);
                    #endif

                #endif


	            #endif
	            //阴影渐变是通用的所以把它提出来
	            if(shadowed){
	                //阴影距离渐变 (Shadow Distance)
                    float shadowFadeDistance =UnityComputeShadowFadeDistance(worldPos, viewZ);
                    float shadowFade = UnityComputeShadowFade(shadowFadeDistance);
                    shadowAttenuation=saturate(shadowAttenuation+shadowFade);
                    #if defined(UNITY_FAST_COHERENT_DYNAMIC_BRANCHING) && defined(SHADOWS_SOFT)
                        UNITY_BRANCH
                        if (shadowFade > 0.99) {
                        shadowAttenuation = 1;
                        }
                    #endif
	            }
	            light.color =_LightColor.rgb*(attenuation*shadowAttenuation);
	            return light;
            }

            UnityIndirect NullIndirectLight(){
                UnityIndirect indirectLight;
	            indirectLight.diffuse = 0;
	            indirectLight.specular = 0;
	            return indirectLight;
            }
            #define NULLINDIRECTLIGHT(indirect){UnityIndirect indirect;ndirect.diffuse = 0;indirect.specular = 0;}

            float4 frag(v2f i):SV_Target{
                float2 uv=i.uv.xy/i.uv.w;//得到屏幕uv坐标
                //通过深度和方向,重构每个像素的世界坐标
                float depth = SAMPLE_DEPTH_TEXTURE(_CameraDepthTexture, uv);
	            depth = Linear01Depth(depth);
	            //rayToFarPlane表示从该点到远平面的向量,ray只能表示方向,但长度不一定
	            //_ProjectionParams.z是远平面的距离。
	            //因为xyz都是等比的,所以_ProjectionParams.z / i.ray.z就是rayToFarPlane向量和ray向量的比值
	            float3 rayToFarPlane = i.ray * _ProjectionParams.z / i.ray.z;
	            float3 viewPos = rayToFarPlane * depth;
	            float3 worldPos = mul(unity_CameraToWorld, float4(viewPos, 1)).xyz;

	            //从Gbuffer中提取集合信息
	            float3 albedo = tex2D(_CameraGBufferTexture0, uv).rgb;
                float3 specularTint = tex2D(_CameraGBufferTexture1, uv).rgb;
                float3 smoothness = tex2D(_CameraGBufferTexture1, uv).a;
                float3 normal = tex2D(_CameraGBufferTexture2, uv).rgb * 2 - 1;
                //计算PBR BRDF需要的信息,返回值
                float3 viewDir = normalize(_WorldSpaceCameraPos - worldPos);
                float oneMinusReflectivity = 1 - SpecularStrength(specularTint);
	            //间接光已经算在Gbuffer的RT3里了,所以这里用值都为0的间接光
	            float4 color = UNITY_BRDF_PBS(
    	            albedo, specularTint, oneMinusReflectivity, smoothness,
    	            normal, viewDir, CreateLight(uv,worldPos,viewPos.z), NullIndirectLight()
                );
                #if !defined(UNITY_HDR_ON)
		        color = exp2(-color);
	            #endif
                return color;
            }

			ENDCG
		}

		//转换颜色
		Pass{
            Cull Off
            ZTest Always
            ZWrite Off

            //修改模板缓冲区,避免影响颜色覆盖天空盒
            Stencil {
                Ref [_StencilNonBackground]
                ReadMask [_StencilNonBackground]
                CompBack Equal
                CompFront Equal
            }

            CGPROGRAM

            #pragma target 3.0
            #pragma vertex vert
            #pragma fragment frag

            #pragma exclude_renderers nomrt

            #include "UnityCG.cginc"

            sampler2D _LightBuffer;

            struct a2v {
                float4 vertex : POSITION;
                float2 uv : TEXCOORD0;
            };

            struct v2f {
                float4 pos : SV_POSITION;
                float2 uv : TEXCOORD0;
            };

            v2f vert (a2v v) {
                v2f i;
                i.pos = UnityObjectToClipPos(v.vertex);
                i.uv = v.uv;
                return i;
            }

            float4 frag (v2f i) : SV_Target {
                //解码颜色
                return -log2(tex2D(_LightBuffer, i.uv));
            }

            ENDCG
        }
	}
}
原文:https://catlikecoding.com/unity/tutorials/rendering/part-13/
https://catlikecoding.com/unity/tutorials/rendering/part-15/
翻译:http://gad.qq.com/program/translateview/7200862
http://gad.qq.com/program/translateview/7200864