深度学习目标检测——anchor锚框
目录
一:回顾
二:生成锚框
生成多个锚框:每个像素点生成不同的框
所有项目代码+UI界面
一:回顾
上一节课我们了解了迁移学习中的微调(Fine-tuning)是指在已经预训练好的模型基础上,对部分或全部模型参数进行调整以适应新任务。微调是在预训练模型的基础上进一步训练模型,使其适应新的任务或数据集。
下来分为五个小章节,分别讲解:1、制定锚框,2、计算锚框的iou,3、给锚框分配真实边界框,以及分配真实标签,4、计算偏移量,5、nms非极大抑制
二:生成锚框
目标检测算法通常会在输入图像中采样大量的区域,然后判断这些区域中是否包含我们感兴趣的目标,并调整区域边界从而更准确地预测目标的真实边界框(ground-truth bounding box)。 不同的模型使用的区域采样方法可能不同。 这里我们介绍其中的一种方法:以每个像素为中心,生成多个缩放比和宽高比(aspect ratio)不同的边界框。 这些边界框被称为锚框(anchor box)我们将在中第6个小节设计一个基于锚框的目标检测模型(SSD)。
生成多个锚框:每个像素点生成不同的框
假设输入图像的高度为ℎ,宽度为w。 我们以图像的每个像素为中心生成不同形状的锚框:缩放比为s是(0,1),宽高比为r > 0。那么锚框的宽度和高度分别是,看公式推导。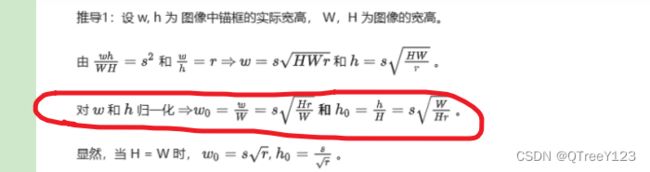
请注意,当中心位置给定时,已知宽和高的锚框是确定的。
先看公式在写代码

要生成多个不同形状的锚框,让我们设置许多缩放比(scale)取值s1.......sn和许多宽高比(aspect ratio)取值r1......rn。 当使用这些比例和长宽比的所有组合以每个像素为中心时,输入图像将总共有whmn(假设特征图的高宽是m*n)个锚框。 尽管这些锚框可能会覆盖所有真实边界框,但计算复杂性很容易过高。 在实践中,我们只考虑包含s1或r1的组合:
![]()
也就是说,以同一像素为中心的锚框的数量是n*m−1。 对于整个输入图像,将共生成wℎ(n+m−1)个锚框。
import torch
import matplotlib.pyplot as plt
from d2l import torch as d2l
#faster RCNN是锚九个框  2*9是一个像素点形成的矩-阵,标记为0或者1
#@save
def show_bboxes(axes, bboxes, labels=None, colors=None):
"""显示所有边界框"""
def _make_list(obj, default_values=None):
if obj is None:
obj = default_values
elif not isinstance(obj, (list, tuple)):
obj = [obj]
return obj
labels = _make_list(labels)
colors = _make_list(colors, ['b', 'g', 'r', 'm', 'c'])
for i, bbox in enumerate(bboxes):
color = colors[i % len(colors)]
rect = d2l.bbox_to_rect(bbox.detach().numpy(), color)
axes.add_patch(rect)
if labels and len(labels) > i:
text_color = 'k' if color == 'w' else 'w'
axes.text(rect.xy[0], rect.xy[1], labels[i],
va='center', ha='center', fontsize=9, color=text_color,
bbox=dict(facecolor=color, lw=0))实现:利用左上右下的顶点坐标点转换成高宽和中心坐标点和高宽和中心坐标点转换成左上右下的顶点坐标点
def corner_to_center(anchor):
    num_anchor = anchor.shape[0]
    centers = [] #存放num_anchor个centers
    for i in range(num_anchor):
#        取出一个像素点的所有锚框的四个坐标,这里定义一个像素点有五个锚框
        x1, x2, y1, y2 = anchor[i, :, 0], anchor[i, :, 1], anchor[i, :, 2], anchor[i, :, 3]
        # 获取中心点
        cx = (x1 + x2) / 2
        cy = (y1 + y2) / 2
        # 获取高宽
        h = y2 - y1
        w = x2 - x1
        #如果单单torch.stack((cx, cy, h, w)的话,默认dim是0。四个坐标一行一行叠起来变成四行五列,
#         print(torch.stack((cx, cy, h, w)))
        center = torch.stack((cx, cy, h, w), dim=1)#batch是像素点的个数,anchor的第二个参数是锚框个数,第三个是坐标
        print('center is:',center)
        centers.append(center)#把每一个batch也就是每一个像素点的所有锚框stack起来之后,再append,最后用cat,cat起来
    centers = torch.cat([*centers], dim=0).reshape(num_anchor, -1, 4)#把每一个像素点的锚框数,叠起来
    return centers


# 中点高宽转为左上右下坐标
def center_to_corner(anchor):
    num_anchor = anchor.shape[0]
    corners = []
    print('center_to_corner的锚框anchor是:',anchor)
    for i in range(num_anchor):
        cx, cy, h, w = anchor[i, :, 0], anchor[i, :, 1], anchor[i, :, 2], anchor[i, :, 3]
        x1 = cx - w / 2
        x2 = cx + w / 2
        y1 = cy - h / 2
        y2 = cy + h / 2
        corner = torch.stack((x1, x2, y1, y2), dim=1)
        corners.append(corner)
    corners = torch.cat([*corners], dim=0).reshape(num_anchor, -1, 4)
    return corners
anchor = torch.rand((2,5,4))
# corner_to_center(anchor);#分号是不输出结果
corner_to_center(anchor);
center is: tensor([[ 0.6113, 0.0710, 0.0454, 0.3957],
[ 0.5045, 0.7190, -0.3462, -0.9381],
[ 0.5873, 0.2783, 0.0748, 0.7528],
[ 0.7113, 0.7756, 0.2659, -0.0952],
[ 0.3349, 0.6313, -0.4325, 0.4079]])
center is: tensor([[ 0.7230, 0.1393, 0.0646, 0.2941],
[ 0.5827, 0.6706, -0.1049, -0.7963],
[ 0.2765, 0.4997, 0.7972, 0.4744],
[ 0.5791, 0.6374, -0.2007, 0.1234],
[ 0.5609, 0.1895, 0.1065, 0.3634]]) 上述生成锚框的方法在下面的build_anchors函数中实现。 我们指定输入图像、尺寸列表和宽高比列表,然后此函数将返回所有的锚框。每一句都进行了详细的注释了,保证你们看得懂。
#锚框创建轮数(针对不同尺寸的图片的featuremap增加泛化性)
def build_anchors(feature_map, sizes, ratios, device, resize_w=1, resize_h=1):
    fmap_height, fmap_weight = feature_map.shape[-2:] # 获取高宽
    # feature_map也不是原始图片,是已经通过backbone后的图片了
    feature_map = feature_map.to(device)
    size_tensor, ratio_tensor = torch.tensor(sizes, device=device), torch.tensor(ratios, device=device)
    anchors = []  # 存储锚框

    num_batch, num_sizes, num_ratios= feature_map.shape[0], len(sizes),len(ratios)
    boxes_per_pixel = (num_sizes + num_ratios - 1)


    off_h, off_w = 0.5, 0.5#偏移量

    for _ in range(num_batch):#生成像素点
         # 每个像素点中点,进行了归一化
        center_h = (torch.arange(fmap_height, device=device) + off_h) / fmap_height
        center_w = (torch.arange(fmap_weight, device=device) + off_w) / fmap_weight
        shift_y, shift_x = torch.meshgrid(center_h,center_w)
        print('shift_y.shape and shift_x.shape',shift_y.shape,shift_x.shape)
        shift_y, shift_x = shift_y.reshape(-1), shift_x.reshape(-1)#shift_y.reshape(-1)是430*561个,torch.Size([241230])
        print('reshape 后 shift_y.shape and shift_x.shape',shift_y.shape,shift_x.shape)

        #归一化后的w和b,没有归一化的是乘以math.sqrt(fmap_height * fmap_weight),看公式推导就知道了
        anchor_w = torch.cat((size_tensor * torch.sqrt(ratio_tensor[0]), sizes[0] * torch.sqrt(ratio_tensor[1:])))\
                   *math.sqrt(fmap_height / fmap_weight)
        anchor_h = torch.cat((size_tensor / torch.sqrt(ratio_tensor[0]), sizes[0] / torch.sqrt(ratio_tensor[1:])))\
                   *math.sqrt(fmap_weight / fmap_height)

        #torch.stack((-anchor_w, -anchor_h, anchor_w, anchor_h)).T是一个像素点的五个锚框,fmap_height * fmap_weight是图片的总像素点
        anchor_manipulations = torch.stack((-anchor_w, -anchor_h, anchor_w, anchor_h)).T.repeat(fmap_height * fmap_weight, 1) / 2
#         print(anchor_manipulations.shape)#torch.Size([1206150, 4])是241230*5,一个像素点五个锚框


#       print(torch.stack([shift_x, shift_y, shift_x, shift_y], dim=1).shape)#torch.Size([241230, 4])
        #dim=0在第一维度乘以boxes_per_pixel个数
        out_grid = torch.stack([shift_x, shift_y, shift_x, shift_y], dim=1).repeat_interleave(boxes_per_pixel,dim=0)
        print('out_grid',out_grid.shape)
        output = out_grid + anchor_manipulations  # 这里对应的x1,y1,x2,y2的计算,
        print('output.shape',output.shape)
        anchors.append(output.unsqueeze(0))
    anchors = torch.cat([*anchors], dim=0).reshape(num_batch, -1, 4) * torch.tensor([resize_w, resize_h] * 2,
                                                                                    device=device)
    #resize_w =1,resize_h=1,所以[resize_w, resize_h] * 2=[1,1,1,1]
    #     torch.tensor([resize_w, resize_h] * 2, device=device) 的目的是将锚框坐标缩放回原始图像尺寸,其中 resize_w 和 resize_h 是
    #     图像经过缩放后的尺寸,* 2 表示复制一份 resize_w 和 resize_h。这样做是为了将 x1、x2、y1 和 y2 四个坐标值都进行缩放。
    # print(anchor.shape) # 3,675,672 = 408408 * 9 = 728 * 561 * 9
return anchors可以看到返回的锚框变量Y的形状是(批量大小,锚框的数量,4)。
import math
img = plt.imread('catdog.jpg')
print('img the shape:',img.shape)
h, w = img.shape[:2]
print(h, w)

#1 代表批次大小,3 代表图像的通道数(通常为 RGB).rand()其元素为在区间[0, 1)上的均匀分布随机数
X = torch.rand(size=(1, 3, h, w)) #自定义应该图片
#所有锚框都已经计算出来并且还原成了原图大小,可以直接显示了
Y = build_anchors(X, sizes=[0.75, 0.5, 0.25], ratios=[1, 2, 0.5],device='cpu')
print('这个图片的anchor的有多少个 is:',Y.shape)#返回的是所有锚框(每一个有4个坐标)的信息一共有torch.Size([1, 1206150, 4])

#boxes 是每个像素点的锚框数字
boxes = Y.reshape(h, w, 5, 4)
#随便访问第几个中心的的第几个锚框,这里一第一个点的第一个锚框为例子,0.5的偏移量上面代码已经帮你加上去了,所以这里只写整数的坐标
bbox_scale = torch.tensor((w, h, w, h))
print(boxes[170,170,:,:]*bbox_scale)#bbox_scale恢复原图大小
img the shape: (430, 561, 4)
430 561
shift_y.shape and shift_x.shape torch.Size([430, 561]) torch.Size([430, 561])
reshape 后 shift_y.shape and shift_x.shape torch.Size([241230]) torch.Size([241230])
out_grid torch.Size([1206150, 4])
output.shape torch.Size([1206150, 4])
这个图片的anchor的有多少个 is: torch.Size([1, 1206150, 4])
tensor([[-13.6819, -13.6819, 354.6819, 354.6819],
[ 47.7121, 47.7121, 293.2879, 293.2879],
[109.1060, 109.1060, 231.8940, 231.8940],
[-89.9725, 40.2637, 430.9725, 300.7362],
[ 40.2638, -89.9725, 300.7363, 430.9725]]) 将锚框变量Y的形状更改为(图像高度,图像宽度,以同一像素为中心的锚框的数量,4)后,我们可以获得以指定像素的位置为中心的所有锚框。 在接下来的内容中,我们访问以(150,150)为中心的第一个锚框。
d2l.set_figsize()
bbox_scale = torch.tensor((w, h, w, h))
fig = d2l.plt.imshow(img)
show_bboxes(fig.axes, boxes[150, 150, 1:2, :] * bbox_scale,
            ['s=0.75, r=1', 's=0.5, r=1', 's=0.25, r=1', 's=0.75, r=2',
             's=0.75, r=0.5'])
print(boxes[150, 150, 1:2, :] * bbox_scale)
d2l.plt.show()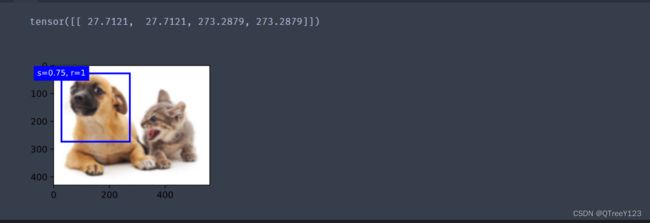
所有项目代码+UI界面
视频,笔记和代码,以及注释都已经上传网盘,放在主页置顶文章