使用socket.io实现强制踢出其他在线账号
文章目录
-
- 使用socket.io实现强制踢出其他在线账号
-
- Node使用`socket.io`
- Vue使用`vue-socket.io`
- 参考
使用socket.io实现强制踢出其他在线账号
因为自己学习写的node项目需要这么一个功能,就是同一个账号只能在一个浏览器登录,如果有多个浏览器登录了同一个账号,那么在登陆的时候就会提示是否踢出其他在线用户,如果点击确认就会强制踢出其他在线账号。这里后端使用到了node.js, 前端使用到了vue。当然我这里只是给出了我自己的一个简单实现,其实无外乎都是推送给前台客户端告诉他们账户被踢出了,所以这里就会使用到 socket.io
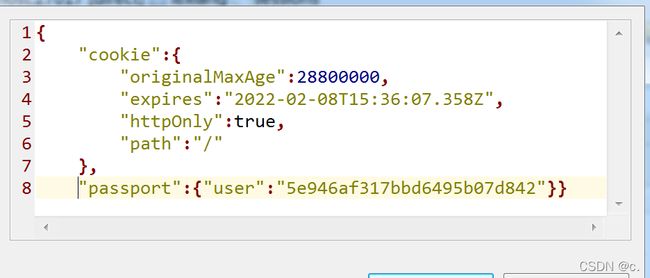
至于登出账户这个功能就看你具体是怎么实现项目的登录登出功能了,这里使用的是权限认证中间件passport,来实现用户的登录的。会有一个sessions表来记录用户的session。如下:
对应的_id是用户的session id,然后session字段里面就会存储用户的id.
所以我们可以根据用户的id找到所有登录的session,然后排除掉当前登录的session,把其他的session删掉就可以踢出其他账户了,剩下的就是通知其他账户了。
我这里就分前后端来讲吧,只是讲讲具体思路,和部分代码。
先从后端部分开始讲吧。
Node使用socket.io
首先就是中间件passport会给我们自动建一张表,所以我们现在需要自己手动的去维护这个表,所以我们Mongoose需要添加一个新的model。
'use strict';

const mongoose = require('mongoose');
const Schema = mongoose.Schema;

const SessionSchema = new Schema(
  {
    _id: String,
    session: {
      type: String
    },
    expires: {
      type: Date
    },
    lastModified: {
      type: Date
    }
  },
  {
    timestamps: true
  },
  { _id: false }
);


mongoose.model('Session', SessionSchema);
然后我们写两个方法,第一个是用来查询现在是否有其他在线用户,如果有就要提示给用户,询问他是否需要踢出其他在线用户。第二个方法就是用来移除其他在线用户了。
'use strict';
const mongoose = require('mongoose');
const Session = mongoose.model('Session');


exports.getOtherLoginUserSession = async function(userId,currentSessionId) {
  const sessions = await Session.find({ "session": { $regex: `.*"user":"${userId}".*`, $options: 'i' }}).lean();
  const otherSessions = sessions.filter(session => session._id !== currentSessionId)
  return otherSessions
};


exports.removeOtherLoginUserSession = async function(userId,currentSessionId){
  const otherSession = await this.getOtherLoginUserSession(userId,currentSessionId)
  const otherSessionIds = otherSession.map(session => session._id.toString())
  await Session.deleteMany({_id:{$in:otherSessionIds}})
}
然后我们来看controller层怎么操作
'use strict';
const SessionService = require('../services/sessions.server.service');
const { isEmpty } = require('lodash');

exports.hasOtherLoginUserSession = async function(req, res) {
  const sessionId = req.session.id;
  const otherSessions = await SessionService.getOtherLoginUserSession(req.user.id.toString(),sessionId);
  const hasOtherSessions = !isEmpty(otherSessions);
  res.json({ result: 'success', hasOtherLoginUser: hasOtherSessions})
};


exports.removeOtherLoginUserSession = async function(req,res){
  const sessionId = req.session.id;
  await SessionService.removeOtherLoginUserSession(req.user.id,sessionId);
  res.json({result:"success"})
};
controller层的代码就是判断是否有其他用户,还有移除其他用户。
前面这些都不是我们的重点,都是一些普通的业务操作罢了。
接下来我们开始来使用socket.io了。
首先就是npm install socket.io 了 这个不用多说了。然后就是开始配置sokcet.io了。对socket.io没有什么基础了解的同学建议去官网先看看例子,很快就能掌握的了。这里要注意的就是一些socket.io的跨域设置了。
const { Server } = require("socket.io");
module.exports = server => {
  const io = new Server(server,{
    allowEIO3: true,
    cors: {
      origin: ['http://localhost:3030', 'http://localhost:3020'],
      methods: ["GET", "POST"],
      credentials: true
    }
  });

  io.on('connection', (socket) => {
    console.log('connection..',socket.id)
    socket.on('disconnect', (reason) => {
      console.log('disconnect...',socket.id,reason)
    });
  });
}
我们把socket.io exports出去了,然后我们在server.js中去引用。下面代码我省略了很多,只是留下了跟本博文有关的部分。
const express = require('express');
const { Server } = require("socket.io");

let server;

const startApp = async function() {
  var app = express();
  server = app.listen(port);
  console.log(`> Listening at port: ${port}\n`);
  require('./utils/sokcwt.io.uitl')(server);

};

startApp();
接下来我们来理一下业务流程,首先肯定用户要登录完之后才能踢出其他账号,所以我们需要在登陆完之后,通过用户的id还有sessionId,找到除了自身登陆的session之后,还有没有同一登陆账号的session,用到的就是上面的其中一个API了,如果存在,这个时候就要返回告诉给客户端了。让客户端去确认。
然后我们现在看前端vue怎么处理了。
Vue使用vue-socket.io
前端用到了vue-socket.io,一样的,首先npm install vue-socket.io
然后开始配置socket.io,首先在main.js中配置
Vue.use(new VueSocketIO({
  debug: true,
  connection: 'http://localhost:3030',
  extraHeaders: {"Access-Control-Allow-Origin": '*'},
}))
之后在App.vue中我们使用socket.io
<template>
  <div id="app">
    <router-view></router-view>
  </div>
</template>

<script>
import UserGw from '@/api/user.client.gw';

export default {
  async created() {
  },
  mounted: async function() {

  },
  computed: {

  },
  methods: {

  },
  watch: {

  },
  sockets:{
    connect(){
      console.log('connect..')
    },
    disconnect(){
      console.log("disconnect..")
    },
    noticeOtherUser(user){
      UserGw.signout();
      this.$alert('您已经被强制登出该账号!', '提示', {
        confirmButtonText: '确定',
        callback: action => {
          this.$router.push('login')
        }
      });
    }
  },
};
</script>

<style lang="less">

</style>
我们在上面首先添加了一个提示用户被踢出账号的方法,用于后端推送给前端用户,告知他们账号已经被强制登出了。并且这里手动执行了一下注销方法,然后跳转到登录页面。这部分逻辑我们后面会在详细讲一下。
接下来我们继续将登陆那部分。在用户登录之后,我们首先需要查看一下是否有其他账号登录了。如果有就需要询问用户是否需要踢出其他账号。
我们直接来看登陆成功之后的操作代码
this.$message({
        type: 'success',
        message: '登录成功'
      });
        // 注册到用户组里面
      this.$socket.emit('userLogin',{id: res.data.id});
      //查看是否有其他登录用户
      const hasOtherLoginUser = await UserGw.hasOtherLoginUser();
      if(hasOtherLoginUser.data.hasOtherLoginUser){
      this.$confirm('存在其他异地登陆的账号,是否登出其他账号?', '提示', {
          confirmButtonText: '确定',
          cancelButtonText: '取消',
          type: 'warning'
        }).then(async () => {
        // 如果用户选择确认,就移除其他用户
          await UserGw.removeOtherLoginUser();
     // 通知其他用户
     this.$socket.emit('kickOutOtherUser',{id:res.data.id})
          this.$message({
            type: 'success',
            message: '已登出其他账号!'
          });
        }).catch(() => {
          this.$message({
            type: 'info',
            message: '已取消'
          });
        });
      }
      this.saveUserInfo(res.data);
      this.$router.push('/');
首先登录成功之后,我们会加入到用户组中,这个功能是为了之后提示其他用户用到的。我们稍后讲解。之后就是判断是否有其他在线用户,如果有的话,就提示用户,用户如果确认踢出其他账户就会调用我们移除在线用户的方法,最后就是通知其他用户。
这个通知其他用户是怎么实现的呢?我们来看看后台部分。
const { Server } = require("socket.io");
module.exports = server => {
  const io = new Server(server,{
    allowEIO3: true,
    cors: {
      origin: ['http://localhost:3030', 'http://localhost:3020'],
      methods: ["GET", "POST"],
      credentials: true
    }
  });

  io.on('connection', (socket) => {
    console.log('connection..',socket.id)
    socket.on('userLogin',async (user)=>{
      socket.join(user.id)
    })
    socket.on('kickOutOtherUser', async (user) => {
      socket.broadcast.to(user.id).emit('noticeOtherUser', {id:user.id});
    });
    socket.on('disconnect', (reason) => {
      console.log('disconnect...',socket.id,reason)
    });
  });


}
首先我们来看后台这个userLogin的实现,可以看到他里面就只有一个步骤,就是把前台给过来的userId 使用socket.join(user.id) 加入到组里面。这个方法就好像加入一个聊天室一样,userId相同的都加入在一个组里面。为什么要这么做呢?因为我们踢出其他用户的基础是都是同一个userId的其他账户我们才需要踢出,所以我们踢出完毕之后,我们需要通知这些相同userId的其他用户。所以我们把他们加到同一个组里面就很好处理,就相当于拉了一个群,群里面都是登录的用户,然后我们只需要在这个群里发送一条消息,这样其他人就可以看到了。这个是socket.io的一个功能啦,在聊天室这种场景就可以使用到啦,当然我们现在这个场景也一样适用的。
然后我们再来看这个kickOutOtherUser做了什么,他做的就是就是给这个群发送一条信息,也就是在组里面发送一条信息,但是这条信息除了发送者其他群里的人都能收到。
对于上面部分还是有不了解的同学,可以好好看看socket.io如何使用广播消息的。这里我可以简单介绍一下。
- 广播消息
//给除了自己以外的客户端广播消息
socket.broadcast.emit("msg",{data:"hello,everyone"});
//给所有客户端广播消息
io.sockets.emit("msg",{data:"hello,all"});
- 分组广播消息
//不包括自己
socket.broadcast.to('group1').emit('event_name', data);
//包括自己
io.sockets.in('group1').emit('event_name', data);
我们使用到的就是分组广播消息啦。然后使用的就是不包括自身的广播消息,这样就除了自己,其他人都能收到被强制登出的信息了。
接下来就是截图展示一下了。
参考
vue项目连接socket.io跨域及400异常处理
Socket.IO
socket.io简单总结
_id为String类型时出现 Mongoose: Cast to ObjectId failed解决方案
vue-socket.io使用教程与踩坑记录
Vue.js 如何使用 Socket.IO ?


