Android开发笔记(三)—Activity篇
活动组件Activity
- 启动和结束
- 生命周期
- 启动模式
- 信息传递
-
- Intent
-
- 显式Intent
- 隐式Intent
- 向下一个Activity发送数据
- 向上一个Activity返回数据
- 附加信息
-
- 利用资源文件配置字符串
- 利用元数据传递配置信息
- 给应用页面注册快捷方式
启动和结束
(1)从当前页面跳到新页面:startActivity(new Intent(源页面.this,目标页面.class))
(2)从当前页面回到上一个页面,相当于关闭当前页面:finish()
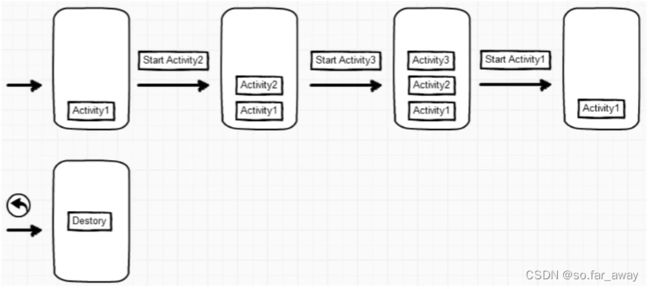
生命周期

onCreate:创建活动。把页面布局加载到内存,进入了初始状态。
onStart:开始活动。把活动页面显示在屏幕上,进入了就绪状态。
onResume:恢复活动。活动页面进入活跃状态,能够与用户正常交互,例如允许响应用户的点击动作、允许用户输入文字等等。
onPause:暂停活动。页面进入暂停状态,无法与用户正常交互。
onStop:停止互动。页面将不在屏幕上显示。
onDestroy:销毁活动。回收活动占用的系统资源,把页面从内存中清除。
onRestart:重启活动。重新加载内存中的页面数据。
onNewIntent:重用已有的活动实例。
注:如果一个Activity已经启动过了,并且存在当前应用的Activity任务栈中,启动模式为singleTask,singleInstance或singleTop(此时已在任务栈顶端),那么在此启动或回到这个Activity的时候,不会创建新的实例,也就是不会执行onCreate方法,而是执行onNewIntent方法。
下图为活动的状态变迁过程:

打开新页面的方法调用顺序为:
onCreate->onStart->onResume
关闭旧页面的方法调用顺序为:
onPause->onStop->onDestroy
启动模式
(一)启动模式类型
(1)默认启动模式standard
- 在该模式下,每启动一个Activity就会在栈顶创建一个新的实例,即启动的Activity会依照启动顺序被依次压入Task栈中。
- 实际开发中,闹钟程序通常使用这种模式。

(2)栈顶复用模式singleTop
- 该模式会判断要启动的Activity实例是否位于栈顶,如果位于栈顶则直接复用,否则创建新的实例。
- 实际开发中,浏览器的书签、应用支付跳转通常采用这种模式。
- 适合开启渠道多、多应用开启调用的Activity,通过这种设置在一定条件下可以避免已经创建过的Activity被重复创建,多数通过动态设置使用。

(3)栈内复用模式singleTask
- 与singleTop模式类似,只不过singleTop模式只是针对栈顶的元素,而singleTask下,如果task栈内存在目标Activity实例,则将task内的对应Activity实例之上的所有Activity弹出栈,并将对应Activity置于栈顶,获得焦点。
- 应用场景:
程序/浏览器主界面:不希望主界面被创建多次,而且在主界面退出的时候整个App是最好的效果。
耗费系统资源的Activity:对于那些极其消耗系统资源的Activity,我们可以考虑将其设为singleTask模式,减少资源耗费。
(4)全局唯一模式singleInstance
- 在该模式下,我们会为目标Activity创建一个新的Task栈,将目标Activity放入新的Task,并让目标Activity获得焦点。新的Task有且只有这一个Activity实例。如果已经创建过目标Activity实例,则不会创建新的Task,而是将以前创建过的Activity唤醒。无论从哪个任务栈中启动该Activity,该实例在整个系统中只有一个。
- 实际开发中,来电界面通常使用这种模式。

(二)设置Activity的启动模式
(1)静态设置启动模式
打开配置文件AndroidManifest.xml,给activity节点添加属性android:launchMode,属性值填入standard表示采取标准模式,当然不添加属性的话默认就是标准模式standard。
(2)动态设置启动模式
动态设置是通过Java代码设置的,通过Intent动态设置Activity启动模式。
| Intent类的启动标志 | 说明 |
|---|---|
| Intent.FLAG_ACTIVITY_NEW_TASK | 开辟一个新的任务栈,该值类似于launchMode=“standard”;不同之处在于,如果原来不存在活动栈,则FLAG_ACTIVITY_NEW_TASK会创建一个新栈 |
| Intent.FLAG_ACTIVITY_SINGLE_TOP | 当栈顶为待跳转的活动实例之时,则重用栈顶的实例。该值等同于launchMode=“singleTop” |
| Intent.FLAG_ACTIVITY_CLEAR_TOP | 当栈中存在待跳转的活动实例时,则重新创建一个实例,并清除原实例上方的所有实例。该值与launchMode="singleTask"类似,但singleTask采取onNewIntent方法启动原任务,而FLAG_ACTIVITY_CLEAR_TOP采取先调用onDestroy再调用onCreate来创建新任务 |
| Intent.FLAG_ACTIVITY_NO_HISTORY | 该标志与launchMode=“standard”情况类似,但栈中不保存新启动的活动实例,这样下次无论以何种方式再启动该实例,也要走standard模式的完整流程,即栈中不保存新启动的活动实例 |
| Intent.FLAG_ACTIVITY_CLEAR_TASK | 该标志非常暴力,跳转到新页面时,栈中的原有实例都被清空。注意该标志需要结合FLAG_ACTIVITY_NEW_TASK使用,即setFlags方法的参数为“Intent.FLAG_ACTIVITY_CLEAR_TASK | Intent.FLAG_ACTIVITY_NEW_TASK” |
(三)启动模式的实际应用
(1)在两个活动之间交替跳转
背景介绍:假设活动A有个按钮,点击该按钮会跳到活动B;同时活动B也有个按钮,点击按钮会跳到活动A;从首页打开活动A之后,就点击按钮在活动A与活动B之间轮流跳转。此时活动页面的跳转流程为:首页->活动A->活动B->活动A->活动B->活动A->活动B->…多次跳转之后想回到首页,正常的话返回流程是这样的:…活动B->活动A->活动B->活动A->活动B->活动A->首页,每个箭头都代表按一次返回键,可见要按下许多次返回键才能返回首页。其实在活动A和活动B之间本不应该重复返回,因为回来回去总是这两个页面是没有意义的。照理说每个活动返回一次足矣,同一个地方返回两次已经是多余的了,再返回应当回到首页才是。也就是说,不管过去的时候怎么跳转,回来的时候应该按照这个流程:…活动B->活动A->首页,或者:…活动A->活动B->首页,总之已经返回了的页面,决不再返回第二次。
设计思想:
对于不允许重复返回的情况,可以设置启动标志FLAG_ACTIVITY_CLEAR_TOP,即使活动栈里面存在待跳转的活动实例,也回重建该活动的实例,并清除原实例上方的所有实例,保证栈中最多只有该活动的唯一实例,从而避免了无谓的重复返回。于是活动A内部的跳转代码就改成了:
Intent intent=new Intent(ActStartActivity.this, ActFinishActivity.class);
intent.setFlags(Intent.FLAG_ACTIVITY_CLEAR_TOP);
startActivity(intent);
当然活动B内部的跳转代码也要设置同样的启动标志:
Intent intent=new Intent(ActFinishActivity.this, ActStartActivity.class);
intent.setFlags(Intent.FLAG_ACTIVITY_CLEAR_TOP);
startActivity(intent);
(2)登录成功后不再返回登录页面
背景介绍:很多App第一次打开都要求用户登录,登录成功再进入App首页,如果这时按下返回键,发现并没有回到上一个登录页面,而是直接退出App了,这又是什么缘故呢?原来用户登录成功后,App便记下用户的登录信息,接下来默认该用户是登录状态,自然不必重新输入用户名和密码。既然默认用户已经登录,哪里还需要回到登录页面?不光登录页面,登录之前的其他页面包括获取验证码、找回密码等页面都不应回去,每次登录成功后,整个App就焕然一新仿佛忘记有登录页面这回事。
设计思想:对于回不去的登录页面情况,可以设置启动标志FLAG_ACTIVITY_CLEAR_TASK,该标志会清空当前活动栈里的所有实例。不过全部清空之后,意味着当前栈没法用了,必须另外找个活动栈才行,也就是同时设置启动标志FLAG_ACTIVITY_NEW_TASK,该标志用于开辟新任务的活动栈,这也就是为什么FLAG_ACTIVITY_CLEAR_TASK要配合着FLAG_ACTIVITY_NEW_TASK使用的原因,如果没有设置FLAG_ACTIVITY_NEW_TASK,则栈内对应的Activity销毁重新创建。
于是离开登录页面的跳转代码变成下面这样:
Intent intent=new Intent(ActStartActivity.this,ActFinishActivity.class);
intent.setFlags(Intent.FLAG_ACTIVITY_CLEAR_TASK|Intent.FLAG_ACTIVITY_NEW_TASK);
startActivity(intent);
信息传递
Intent
Intent是各个组件之间信息沟通的桥梁,它用于Android组件之间的通信,主要完成下面工作:
- 标明本次通信请求从哪里来、到哪里去、要怎么走。
- 发起方携带本次通信需要的数据内容,接收方从收到的意图中解析数据。
- 发起方若想判断接收方的处理结果,意图就要负责让接收方传回应答的数据内容。
Intent的组成部分
| 元素名称 | 设置方法 | 说明与用途 |
|---|---|---|
| Component | setComponent | 组件,它指定意图的来源与目标 |
| Action | setAction | 动作,它指定意图的动作行为 |
| Data | setData | 即Uri,它指定动作要操纵的数据路径 |
| Category | addCategory | 类别,它指定意图的操作类别 |
| Type | setType | 数据类型,它指定消息的数据类型 |
| Extras | putExtras | 扩展信息,它指定装载的包裹信息 |
| Flags | setFlags | 标志位,它指定活动的启动标志 |
显式Intent
显式意图直接指定来源活动与目标活动,属于精确匹配。
在构建一个意图对象时,需要指定两个参数,第一个参数表示跳转的来源页面,即“来源Activity.this”;第二个参数表示待跳转的页面,即“目标Activity.class”,具体的意图构建方式有如下3种:
(1)在Intent的构造函数中指定
Intent intent=new Intent(this,ActNextActivity.class);
(2)调用意图对象的setClass方法指定
Intent intent=new Intent();
intent.setClass(this,ActNextActivity.class);
(3)调用意图的setComponent方法指定
Intent intent=new Intent();
ComponentName component=new ComponentName(this,ActNextActivity.class);
intent.setComponent(component);
隐式Intent
没有明确指定要跳转的目标活动,只给出一个动作字符让系统自动匹配,属于模糊匹配。
动作名称既可以通过setAction方法指定,也可以通过构造函数Intent(String action)直接生成意图对象。
常见的系统动作如下:
| Intent类的系统动作变量名 | 系统动作的常量值 | 说明 |
|---|---|---|
| ACTION_MAIN | android.intent.action.MAIN | App启动时的入口 |
| ACTION_VIEW | android.intent.action.VIEW | 向用户显示数据 |
| ACTION_SEND | android.intent.action.SEND | 分享内容 |
| ACTION_CALL | android.intent.action.CALL | 直接拨号 |
| ACTION_DIAL | android.intent.action.DIAL | 准备拨号 |
| ACTION_SENDTO | android.intent.action.SENDTO | 发送短信 |
| ACTION_ANSWER | android.intent.action.ANSWER | 接听电话 |
1)跳转到自己开发的APP
如果想要跳转到同一项目的不同模块(module),需要在目标模块的清单文件中做如下操作:
<activity
     android:name=".CalculatorActivity"
     android:exported="true">
     <intent-filter>
           <action android:name="android.intent.action.MAIN" />
           <category android:name="android.intent.category.LAUNCHER" />
     intent-filter>
     <intent-filter>
           <action android:name="android.intent.action.WMY" />
           <category android:name="android.intent.category.DEFAULT" />
     intent-filter>
activity>
两个intent-filter表示CalculatorActivity有两种启动方式,第一种是直接在桌面点图标来启动,第二种是通过其他应用来启动。
以及需要在源模块的交互代码中做以下操作:
if(v.getId()==R.id.btn_my){
	Intent intent=new Intent();
    intent.setAction("android.intent.action.WMY");
    intent.addCategory(Intent.CATEGORY_DEFAULT);
    startActivity(intent);
}
注:系统应用因为没有对应的
Activity.class,所以只能通过隐式Intent跳转。系统应用就是找不到对应Activity的应用。
2)跳转到手机自带的系统应用
如上面常见的Intent类的系统动作所示,以准备拨号和发短信为例:
String phoneNo="12345";
        Intent intent=new Intent();
        if(v.getId()==R.id.btn_dial){
            //设置意图动作为准备拨号
            intent.setAction(Intent.ACTION_DIAL);
            //声明一个拨号的Uri
            Uri uri= Uri.parse("tel:"+phoneNo);
            intent.setData(uri);
            startActivity(intent);
        }
        else if(v.getId()==R.id.btn_sms){
            intent.setAction(Intent.ACTION_SENDTO);
            Uri uri2=Uri.parse("smsto:"+phoneNo);
            intent.setData(uri2);
            startActivity(intent);
        }
整体代码如下:
ActionUriActivity.java
package com.example.myapplicationtwo;
import androidx.appcompat.app.AppCompatActivity;
import android.content.Intent;
import android.net.Uri;
import android.os.Bundle;
import android.view.View;
public class ActionUriActivity extends AppCompatActivity implements View.OnClickListener {
    @Override
    protected void onCreate(Bundle savedInstanceState) {
        super.onCreate(savedInstanceState);
        setContentView(R.layout.activity_action_uri);
        findViewById(R.id.btn_dial).setOnClickListener(this);
        findViewById(R.id.btn_sms).setOnClickListener(this);
        findViewById(R.id.btn_my).setOnClickListener(this);
    }
    @Override
    public void onClick(View v) {
        String phoneNo="12345";
        Intent intent=new Intent();
        if(v.getId()==R.id.btn_dial){
            //设置意图动作为准备拨号
            intent.setAction(Intent.ACTION_DIAL);
            //声明一个拨号的Uri
            Uri uri= Uri.parse("tel:"+phoneNo);
            intent.setData(uri);
            startActivity(intent);
        }
        else if(v.getId()==R.id.btn_sms){
            intent.setAction(Intent.ACTION_SENDTO);
            Uri uri2=Uri.parse("smsto:"+phoneNo);
            intent.setData(uri2);
            startActivity(intent);
        }
        else if(v.getId()==R.id.btn_my){
            intent.setAction("android.intent.action.WMY");
            intent.addCategory(Intent.CATEGORY_DEFAULT);
            startActivity(intent);
        }
    }
}
activity_action_uri.xml
<LinearLayout xmlns:android="http://schemas.android.com/apk/res/android"
    xmlns:app="http://schemas.android.com/apk/res-auto"
    xmlns:tools="http://schemas.android.com/tools"
    android:layout_width="match_parent"
    android:layout_height="match_parent"
    android:orientation="vertical">
    <TextView
        android:layout_width="match_parent"
        android:layout_height="wrap_content"
        android:padding="5dp"
        android:text="点击以下按钮将向号码12345发起请求"/>
    <Button
        android:id="@+id/btn_dial"
        android:layout_width="match_parent"
        android:layout_height="wrap_content"
        android:text="跳到拨号页面"/>
    <Button
        android:id="@+id/btn_sms"
        android:layout_width="match_parent"
        android:layout_height="wrap_content"
        android:text="跳到短信页面"/>
    <Button
        android:id="@+id/btn_my"
        android:layout_width="match_parent"
        android:layout_height="wrap_content"
        android:text="跳到我的页面"/>
LinearLayout>
目标APP清单文件AndroidManifest.xml
<manifest xmlns:android="http://schemas.android.com/apk/res/android">
    <application
        android:allowBackup="true"
        android:icon="@mipmap/ic_launcher"
        android:label="@string/app_name"
        android:roundIcon="@mipmap/ic_launcher_round"
        android:supportsRtl="true"
        android:theme="@style/Theme.Experiment01">
        <activity
            android:name=".CalculatorActivity"
            android:exported="true">
            <intent-filter>
                <action android:name="android.intent.action.MAIN" />
                <category android:name="android.intent.category.LAUNCHER" />
            intent-filter>
            <intent-filter>
                <action android:name="android.intent.action.WMY" />
                <category android:name="android.intent.category.DEFAULT" />
            intent-filter>
        activity>
    application>
manifest>
向下一个Activity发送数据
Intent使用Bundle对象存放待传递的数据信息。
Bundle对象操作各类型数据的读写方法说明如下:
| 数据类型 | 读方法 | 写方法 |
|---|---|---|
| 整型数 | getInt | putInt |
| 浮点数 | getFloat | putFloat |
| 双精度数 | getDouble | putDouble |
| 布尔值 | getBoolean | putBoolean |
| 字符串 | getString | putString |
| 字符串数组 | getStringArray | putStringArray |
| 字符串列表 | getStringArrayList | putStringArrayList |
| 可序列化序列 | getSerializable | putSerializable |
在代码中发送消息包裹,调用意图对象的putExtras方法,即可存入消息包裹:
//ActSendActivity.java
Intent intent=new Intent();
Bundle bundle=new Bundle();
bundle.putString("request_time",DateUtil.getNowTime());//getNowTime是编写好的utils工具包中DateUtil工具库中用于获取当前事件的函数
bundle.putInt("request_count",1);
intent.putExtras(bundle);
startActivity(intent)
在代码中接收消息包裹,调用意图对象的getExtras方法,即可取出消息包裹:
//ActReceiveActivity.java
Bundle bundle=getIntent().getExtras();
String request_time=bundle.getString("request_time");
Int request_count=bundle.getInt("request_count");
向上一个Activity返回数据
处理下一个页面的应答数据,详细步骤如下:
①上一个页面打包好请求数据,调用ActivityResultLauncher方法执行跳转动作。
②下一个页面接收并解析请求数据,进行相应处理。
③下一个页面在返回上一个页面时,打包应答数据并调用setResult方法返回数据包裹。
④上一个页面重写方法onActivityResult ,解析获得下一个页面的返回数据。
注:
startActivityForResult方法已经过时。
以请求方Activity与应答方Activity之间的数据传递为例详细描述该过程:
请求方
①ActRequestActivity.java
package com.example.myapplicationtwo;
import androidx.activity.result.ActivityResult;
import androidx.activity.result.ActivityResultCallback;
import androidx.activity.result.ActivityResultLauncher;
import androidx.activity.result.contract.ActivityResultContracts;
import androidx.appcompat.app.AppCompatActivity;
import android.content.Intent;
import android.os.Bundle;
import android.view.View;
import android.widget.TextView;
import com.example.myapplicationtwo.utils.DateUtil;
public class ActRequestActivity extends AppCompatActivity implements View.OnClickListener {
    private static final String mRequest="你直接给我坐下";
    private ActivityResultLauncher<Intent> register;
    private TextView tv_request,tv_response;
    @Override
    protected void onCreate(Bundle savedInstanceState) {
        super.onCreate(savedInstanceState);
        setContentView(R.layout.activity_act_request);
        tv_request=findViewById(R.id.tv_request);
        tv_request.setText("待发送的信息是:" +mRequest);
        tv_response=findViewById(R.id.tv_response);
        findViewById(R.id.btn_request).setOnClickListener(this);
        register = registerForActivityResult(new ActivityResultContracts.StartActivityForResult(), result -> {
            if (result!=null){
                Intent data = result.getData();
                if(data!=null && result.getResultCode()==RESULT_OK){
                    Bundle bundle=data.getExtras();
                    String response_time=bundle.getString("response_time");
                    String response_content=bundle.getString("response_content");
                    String desc=String.format("收到返回信息:\n应答时间为%s\n应答内容为%s",response_time,response_content);
                    //把返回信息的详情显示在文本视图上
                    tv_response.setText(desc);
                }
            }
        });
    }
    @Override
    public void onClick(View v) {
        Intent intent=new Intent(ActRequestActivity.this,ActResponseActivity.class);
        Bundle bundle=new Bundle();
        bundle.putString("request_time", DateUtil.getNowTime());
        bundle.putString("request_content",mRequest);
        intent.putExtras(bundle);
        register.launch(intent);

    }
}
②activity_act_request.xml
<LinearLayout xmlns:android="http://schemas.android.com/apk/res/android"
    xmlns:tools="http://schemas.android.com/tools"
    android:layout_width="match_parent"
    android:layout_height="match_parent"
    tools:context=".ActRequestActivity"
    android:orientation="vertical">
    上一个页面发送的内容<-->
    <TextView
        android:id="@+id/tv_request"
        android:layout_width="match_parent"
        android:layout_height="wrap_content"/>
    <Button
        android:id="@+id/btn_request"
        android:layout_width="match_parent"
        android:layout_height="wrap_content"
        android:gravity="center"
        android:text="传送请求数据"/>
    下一个页面应答的内容<-->
    <TextView
        android:id="@+id/tv_response"
        android:layout_width="match_parent"
        android:layout_height="wrap_content"/>
LinearLayout>
应答方
①ActResponseActivity.java
package com.example.myapplicationtwo;
import androidx.appcompat.app.AppCompatActivity;
import android.app.Activity;
import android.content.Intent;
import android.os.Bundle;
import android.view.View;
import android.widget.TextView;
import com.example.myapplicationtwo.utils.DateUtil;

public class ActResponseActivity extends AppCompatActivity implements View.OnClickListener {
    private static final String mResponse="真的太没实力了";
    @Override
    protected void onCreate(Bundle savedInstanceState) {
        super.onCreate(savedInstanceState);
        setContentView(R.layout.activity_act_response);
        TextView tv_request=findViewById(R.id.tv_request);
        //获取从上一个页面传来的数据
        Bundle bundle=getIntent().getExtras();
        String request_time=bundle.getString("request_time");
        String request_content=bundle.getString("request_content");
        String desc=String.format("收到请求信息:\n请求时间为%s\n请求内容为%s",request_time,request_content);
        //把请求的信息显示在文本视图上面
        tv_request.setText(desc);
        findViewById(R.id.btn_response).setOnClickListener(this);

        TextView tv_response=findViewById(R.id.tv_response);
        tv_response.setText("待返回的消息为:"+mResponse);

    }
    @Override
    public void onClick(View v) {
        //携带应答数据
        Intent intent=new Intent();
        Bundle bundle=new Bundle();
        bundle.putString("response_time",DateUtil.getNowTime());
        bundle.putString("response_content",mResponse);
        intent.putExtras(bundle);
        //携带意图返回上一个页面 RESULT_OK表示处理成功
        setResult(Activity.RESULT_OK,intent);
        //强行结束当前页面 携带数据返回上一个页面
        finish();
    }
}
②activity_act_response.xml
<LinearLayout xmlns:android="http://schemas.android.com/apk/res/android"
    xmlns:tools="http://schemas.android.com/tools"
    android:layout_width="match_parent"
    android:layout_height="match_parent"
    tools:context=".ActResponseActivity"
    android:orientation="vertical">
    上一个页面发送的内容<-->
    <TextView
        android:id="@+id/tv_request"
        android:layout_width="match_parent"
        android:layout_height="wrap_content"/>
    <Button
        android:id="@+id/btn_response"
        android:layout_width="match_parent"
        android:layout_height="wrap_content"
        android:gravity="center"
        android:text="传送请求数据"/>
    下一个页面应答的内容<-->
    <TextView
        android:id="@+id/tv_response"
        android:layout_width="match_parent"
        android:layout_height="wrap_content"/>
LinearLayout>
运行效果

附加信息
利用资源文件配置字符串
values/string.xml<-->
<string name="idea">真的是太没实力了string>
//MainActivity.java
String idea=getString(R.string.idea);
利用元数据传递配置信息
在Java代码中,获取元数据信息的步骤分为下列三步:
- 调用
getPackageManager方法获得当前应用的包管理器; - 调用包管理器的
getActivityInfo方法获得当前活动的信息对象; - 活动信息对象的metaData是Bundle包裹类型,调用包裹对象的
getString即可获得指定名称的参数值;
AndroidManifest.xml<-->
<activity
    android:name=".MainActivity"
    android:exported="true">
    <intent-filter>
        <action android:name="android.intent.action.MAIN" />
            <category android:name="android.intent.category.LAUNCHER" />
    intent-filter>
    <meta-data android:name="idea" android:value="真的是太没实力了"/>
activity>
//MainActivity.java
//获取应用包管理器
        PackageManager pm = getPackageManager();
        try {
            //从应用包管理器中获取当前的活动信息
            ActivityInfo info = pm.getActivityInfo(getComponentName(),PackageManager.GET_META_DATA);
            //获取活动附加的元数据信息
            Bundle bundle=info.metaData;
            String idea_meta = bundle.getString("idea");
        } catch (PackageManager.NameNotFoundException e) {
            throw new RuntimeException(e);
        }
给应用页面注册快捷方式
元数据不仅能传递简单的字符串参数,还能传送更加复杂的资源数据,比如说支付宝的快捷方式菜单。
①首先在Project视图下的res目录下新建文件夹xml,在xml文件夹中新建一个values xml file,其名为shortcuts.xml,意为“捷径”。
②在AndroidManifest.xml文件下的主活动中添加元数据,使得长按会弹出之前xml文件下的shortcuts.xml菜单。
<activity
    android:name=".MainActivity"
    android:exported="true">
    <intent-filter>
        <action android:name="android.intent.action.MAIN" />
         <category android:name="android.intent.category.LAUNCHER" />
    intent-filter>
    <meta-data android:name="android.app.shortcuts" android:resource="@xml/shortcuts"/>
activity>
③在shortcuts.xml文件中编写菜单列表内容。
其中shortcutShortLabel和shortcutLongtLabel中的内容通过string.xml字符串资源文件定义。
targetPackage为java文件下的文件名,targetClass为捷径跳转的Activity名称,这些待跳转的Activity因为是通过其他Activity启动的,所以需要在清单文件中将它们的enabled属性设置为true。
<shortcuts xmlns:android="http://schemas.android.com/apk/res/android">
    <shortcut
        android:shortcutId="first"
        android:enabled="true"
        android:icon="@mipmap/ic_launcher"
        android:shortcutShortLabel="@string/first_short"
        android:shortcutLongLabel="@string/first_long">
        <intent
            android:action="android.intent.action.VIEW"
            android:targetPackage="com.example.myapplicationtwo"
            android:targetClass="com.example.myapplicationtwo.ActStartActivity"/>
        <categories android:name="android.shortcut.conversation"/>
    shortcut>

    <shortcut
        android:shortcutId="second"
        android:enabled="true"
        android:icon="@mipmap/ic_launcher"
        android:shortcutShortLabel="@string/second_short"
        android:shortcutLongLabel="@string/second_long">
        <intent
            android:action="android.intent.action.VIEW"
            android:targetPackage="com.example.myapplicationtwo"
            android:targetClass="com.example.myapplicationtwo.ActRequestActivity"/>
        <categories android:name="android.shortcut.conversation"/>
    shortcut>

    <shortcut
        android:shortcutId="third"
        android:enabled="true"
        android:icon="@mipmap/ic_launcher"
        android:shortcutShortLabel="@string/third_short"
        android:shortcutLongLabel="@string/third_long">
        <intent
            android:action="android.intent.action.VIEW"
            android:targetPackage="com.example.myapplicationtwo"
            android:targetClass="com.example.myapplicationtwo.ActionUriActivity"/>
        <categories android:name="android.shortcut.conversation"/>
    shortcut>
shortcuts>
④效果展示。
