opencv 滤波与blob检测总结
参考:https://learnopencv.com/contour-detection-using-opencv-python-c/
import cv2
impory numpy as np
image = cv2.imread(r'xxx.jpg')
# Sobel Edge Detection
sobelx = cv2.Sobel(src=img_blur, ddepth=cv2.CV_64F, dx=1, dy=0, ksize=21)  # Sobel Edge Detection on the X axis
sobely = cv2.Sobel(src=img_blur, ddepth=cv2.CV_64F, dx=0, dy=1, ksize=5)  # Sobel Edge Detection on the Y axis
sobelxy = cv2.Sobel(src=img_blur, ddepth=cv2.CV_64F, dx=1, dy=1, ksize=5)  # Combined X and Y Sobel Edge Detection
# 不同大小的Sobel核在边缘检测中会有一些区别。下面是关于不同核大小应用的一些观察和解释:
# 小核(如3x3):
# 小核适用于检测较粗的边缘,对于一般的边缘检测任务已经足够。
# 小核计算速度较快,适用于实时应用和资源受限的环境。
# 由于小核只考虑了局部像素,可能会对细小的边缘或噪声比较敏感。

# 大核(如5x5、7x7、11x11等):
# 大核可以更好地捕捉到细小的边缘和细节,对于需要更精细边缘检测的任务可能更合适。
# 大核能够平滑和连接较长的边缘线段,提供更连续的边缘信息。
# 由于大核涉及更多的像素,计算量相对较大,可能会导致运行时间增加。
# 大核可能会对噪声更敏感,可能会导致误检测。
"""
Apply identity kernel
"""
kernel1 = np.array([[0, 0, 0],
                    [0, 1, 0],
                    [0, 0, 0]])
# filter2D() function can be used to apply kernel to an image.
# Where ddepth is the desired depth of final image. ddepth is -1 if...
# ... depth is same as original or source image.
identity = cv2.filter2D(src=image, ddepth=-1, kernel=kernel1)
"""
Apply blurring kernel
"""
kernel2 = np.ones((5, 5), np.float32) / 25

img = cv2.filter2D(src=image, ddepth=-1, kernel=kernel2)
cv_show(img)
"""
Apply Gaussian blur
"""
# sigmaX is Gaussian Kernel standard deviation
# ksize is kernel size
gaussian_blur = cv2.GaussianBlur(src=image, ksize=(5, 5), \
        sigmaX = 0, sigmaY = 0)

"""
Apply sharpening using kernel
"""
kernel3 = np.array([[0, -1, 0],
                    [-1, 5, -1],
                    [0, -1, 0]])
sharp_img = cv2.filter2D(src=image, ddepth=-1, kernel=kernel3)

cv_show(sharp_img)
'''
双边滤波
与高斯滤波相比,平滑像素值相近的区域,可以有效保留边缘信息
'''
"""
Apply Bilateral Filtering
"""
# Using the function bilateralFilter() where d is diameter of each...
# ...pixel neighborhood that is used during filtering.
# sigmaColor is used to filter sigma in the color space.
# sigmaSpace is used to filter sigma in the coordinate space.
bilateral_filter = cv2.bilateralFilter(src=image, d=9, sigmaColor=75, sigmaSpace=75)
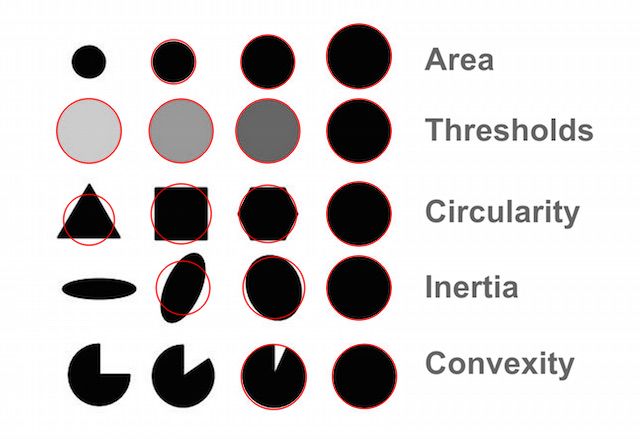
Blob detection 是一种在图像中检测和识别连通区域(blob)的方法。OpenCV 是一个常用的计算机视觉库,提供了用于实现 blob detection 的函数和工具。
 # Read image
im = cv2.imread(r'E:\BlobTest.jpg', cv2.IMREAD_GRAYSCALE)
# Setup SimpleBlobDetector parameters.
params = cv2.SimpleBlobDetector_Params()

# Change thresholds
params.minThreshold = 10
params.maxThreshold = 255

# Filter by Area.
params.filterByArea = True
params.minArea = 1500

# Filter by Circularity 与⚪相近 比如八边形
params.filterByCircularity = True
params.minCircularity = 0.1

# Filter by Convexity 有缺口的圆
params.filterByConvexity = True
params.minConvexity = 0.87

# Filter by Inertia 检测到椭圆
# params.filterByInertia = True
# params.minInertiaRatio = 0.01

# Create a detector with the parameters
ver = (cv2.__version__).split('.')
if int(ver[0]) < 3:
    detector = cv2.SimpleBlobDetector(params)
else:
    detector = cv2.SimpleBlobDetector_create(params)
keypoints = detector.detect(im)

# Draw detected blobs as red circles.
# cv2.DRAW_MATCHES_FLAGS_DRAW_RICH_KEYPOINTS ensures the size of the circle corresponds to the size of blob
im_with_keypoints = cv2.drawKeypoints(im, keypoints, np.array([]), (0, 0, 255),
                                      cv2.DRAW_MATCHES_FLAGS_DRAW_RICH_KEYPOINTS)

cv_show(im_with_keypoints)

# 输出关键点位置
if len(keypoints) > 0:
    for kp in keypoints:
        print(kp.pt)
al_filter = cv2.bilateralFilter(src=image, d=9, sigmaColor=75, sigmaSpace=75)

# Read image
src = cv2.imread("E://threshold.png", cv2.IMREAD_GRAYSCALE)

# Basic threhold example
th, dst = cv2.threshold(src, 0, 255, cv2.THRESH_BINARY)
cv2.imwrite("opencv-threshold-example.jpg", dst)

# Thresholding with maxValue set to 128
th, dst = cv2.threshold(src, 0, 128, cv2.THRESH_BINARY)
cv2.imwrite("opencv-thresh-binary-maxval.jpg", dst)

# Thresholding with threshold value set 127
th, dst = cv2.threshold(src, 127, 255, cv2.THRESH_BINARY)
cv2.imwrite("opencv-thresh-binary.jpg", dst)

# Thresholding using THRESH_BINARY_INV
th, dst = cv2.threshold(src, 127, 255, cv2.THRESH_BINARY_INV)
cv2.imwrite("opencv-thresh-binary-inv.jpg", dst)

# Thresholding using THRESH_TRUNC
th, dst = cv2.threshold(src, 127, 255, cv2.THRESH_TRUNC)
cv2.imwrite("opencv-thresh-trunc.jpg", dst)

# Thresholding using THRESH_TOZERO
th, dst = cv2.threshold(src, 127, 255, cv2.THRESH_TOZERO)
cv2.imwrite("opencv-thresh-tozero.jpg", dst)

# Thresholding using THRESH_TOZERO_INV
th, dst = cv2.threshold(src, 127, 255, cv2.THRESH_TOZERO_INV)
cv2.imwrite("opencv-thresh-to-zero-inv.jpg", dst)

# Set up the detector with default parameters.
detector = cv2.SimpleBlobDetector()

# Read image
im = cv2.imread(r'E:\BlobTest.jpg', cv2.IMREAD_GRAYSCALE)
# Setup SimpleBlobDetector parameters.
params = cv2.SimpleBlobDetector_Params()

# Change thresholds
params.minThreshold = 10
params.maxThreshold = 255

# Filter by Area.
params.filterByArea = True
params.minArea = 1500

# Filter by Circularity 与⚪相近 比如八边形
params.filterByCircularity = True
params.minCircularity = 0.1

# Filter by Convexity 有缺口的圆
params.filterByConvexity = True
params.minConvexity = 0.87

# Filter by Inertia 检测到椭圆
# params.filterByInertia = True
# params.minInertiaRatio = 0.01

# Create a detector with the parameters
ver = (cv2.__version__).split('.')
if int(ver[0]) < 3:
    detector = cv2.SimpleBlobDetector(params)
else:
    detector = cv2.SimpleBlobDetector_create(params)
keypoints = detector.detect(im)

# Draw detected blobs as red circles.
# cv2.DRAW_MATCHES_FLAGS_DRAW_RICH_KEYPOINTS ensures the size of the circle corresponds to the size of blob
im_with_keypoints = cv2.drawKeypoints(im, keypoints, np.array([]), (0, 0, 255),
                                      cv2.DRAW_MATCHES_FLAGS_DRAW_RICH_KEYPOINTS)

cv_show(im_with_keypoints)

# 输出关键点位置
if len(keypoints) > 0:
    for kp in keypoints:
        print(kp.pt)