手把手教你搭建android项目框架(十)——美好的项目从Splash开始
我们的app开发时,都会有一个splash页面,用于提升用户体验。
原因是android app在启动时,由于application初始化等原因会有一个短暂的延迟,导致点击launcher后不能马上启动activity并渲染。通常我们使用的方案是添加SplashActivity,并且将windowbackground设置成app品牌图标等方式能够让用户点击launcher后快速相应并展示,提升用户体验。
但是在android 12版本以后,我们发现点击launcher后,会显示一个应用Icon的图标一闪而过,然后才显示我们的Splash页面,没错,官方Splash,他来了~那么我们今天就适配官方splash吧。
官方适配文档,我们看到,这个splash其实是无法避免的,也就是说我们只能接受。
官方给出的建议是,取消原来的splash,直接使用MainActivity作为程序入口,适配SplashScreen充当原来的SplashActivity页面。但是由于种种原因,原有的Splash可能有一定功能并不能很好的移植到MainActivity中,例如:deeplink的路由功能、程序初始化配置入口、通知栏路由等。
所以今天我们就来适配老项目的Splash吧~
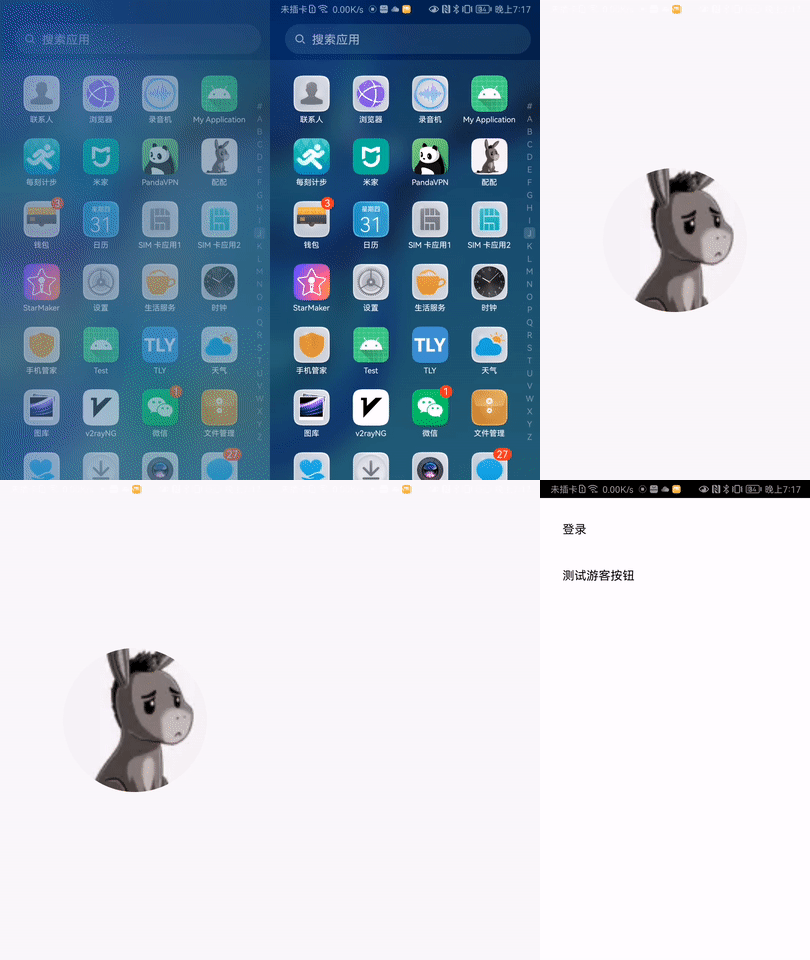
老规矩~先看效果
android12以上版本:
android12以下版本:
首先接入SplashCompat库,这是为了兼容android 12以下的版本。
implementation "androidx.core:core-splashscreen:1.0.0"
然后配置Splash的样式,这里要注意~android 12以下和android 12以上要分开配置,android 12以下的splash并不支持动画效果,而android 12及以上是支持动画效果的,并且支持gif动画播放及splash结束的消失动画。
因此我们的通用style配置如下:
<style name="SplashTheme" parent="Theme.AppCompat.Light.DarkActionBar">
- "windowNoTitle"
>true
- "windowActionBar"
>false
- "android:windowTranslucentStatus">false
- "android:windowTranslucentNavigation">false
- "android:statusBarColor">@android:color/transparent
- "android:navigationBarColor">@android:color/transparent
- "android:windowAnimationStyle">@null
style>
<style name="Theme.App.Launcher" parent="Theme.SplashScreen">
- "windowSplashScreenAnimatedIcon"
>@mipmap/ic_launcher_round 显示的图片资源,android 12以下不支持动画
- "postSplashScreenTheme"
>@style/SplashTheme
style>
而values-31中配置android 12的主题如下。
<style name="Theme.App.Launcher" parent="Theme.MaterialComponents.NoActionBar">
- "windowNoTitle"
>true
- "android:windowFullscreen"
>true
- "android:windowBackground">@color/black
- "android:windowSplashScreenAnimatedIcon">@drawable/gif_splash
显示的图片资源,android 12以上支持vector或gif资源
- "android:windowSplashScreenAnimationDuration">1000
- "android:windowSplashScreenBackground">@color/black
- "android:windowTranslucentStatus">false
- "android:windowTranslucentNavigation">false
- "android:statusBarColor">@android:color/transparent
- "android:navigationBarColor">@android:color/transparent
- "android:windowAnimationStyle">@null
style>
接下来我们看SplashAct中如何兼容版本
首先是初始化显示:
    override fun onCreate(savedInstanceState: Bundle?) {
         注意,这里的初始化要放到super.onCreate之前。
       val splashScreen = installSplashScreen()
        super.onCreate(savedInstanceState)
        保证android 12以下版本能够不直接销毁splashScreen
        splashScreen.setKeepOnScreenCondition { true }
        保证android 12以上版本能够不直接销毁splashScreen
        setupSplashScreen(splashScreen)
        setupExitSplashScreenAnim(splashScreen)
        mViewModel.init()
    }

 这段代码在android 12以下其实是不生效的,12以上会让splash一直显示,直到Splash中我们的自定义操作执行完成,准备跳转。
 原因是splashScreen组件会在当前Activity渲染第一帧时自动移除,而我们为了不显示两个Splash,就让系统的Splash多显示一会吧~
  private fun setupSplashScreen(splashScreen: SplashScreen) {
        val contentView: View = findViewById(android.R.id.content)
        contentView.viewTreeObserver.addOnPreDrawListener(object :
            ViewTreeObserver.OnPreDrawListener {
            override fun onPreDraw(): Boolean {
                if (mViewModel.isReady) {
                     这里是适配12以下系统,让其销毁。
                    splashScreen.setKeepOnScreenCondition { false }
                    contentView.viewTreeObserver.removeOnPreDrawListener(this)
                }
                这个return值如果使true,则12以上系统销毁splashScreen
                return mViewModel.isReady
            }
        })
    }

  splashScreen销毁时的动画,这里支持任何多种动画,我随便写了一个晃动。
  private fun exitSplashScreen(splashScreen: SplashScreen) {
        splashScreen.setOnExitAnimationListener { provider ->
            val splashScreenView = provider.view
            val springAnim = SpringAnimation(
                splashScreenView,
                SpringAnimation.TRANSLATION_X,
                splashScreenView.x
            )
            springAnim.spring.stiffness = SpringForce.STIFFNESS_MEDIUM
            springAnim.setStartVelocity(-2000f)
            springAnim.setStartValue(splashScreenView.x)
            springAnim.spring.dampingRatio = SpringForce.DAMPING_RATIO_HIGH_BOUNCY
            springAnim.start()
            springAnim.addEndListener { _, _, _, _ ->
                动画结束后,跳转页面
                jumpToMain()
                provider.remove()
            }
        }
    }
之后,我们调用我们自己的初始化方法~这里我delay了5秒,模拟初始化耗时操作。 代码如下:
 var isReady = false

  fun init() {
        viewModelScope.launch {
            //do something init
            //模拟初始化
            delay(5000)
            isReady = true
        }
    }
至此,我们已经完成了官方的splash适配效果~
完整项目地址:传送门
