Inception V2/Inception V3:Rethinking the Inception Architecture for Computer Vision
Rethinking the Inception Architecture for Computer Vision
对计算机视觉的Inception架构的重新思考
本文继承Inception V1架构,提出Inception V2和Inception V3架构;
Inception V3非常重要,上承Inception-V1,下启Inception-V4和Xception;
说法一:
BN-Inception就是Inception-V2,本文为Inception-V3;
说法二:
Inception-V2为本文提出的架构,Inception-V3如本文表3最后一行所示;
google团队;
发表时间:[Submitted on 2 Dec 2015 (v1), last revised 11 Dec 2015 (this version, v3)];
发表期刊/会议:Computer Vision and Pattern Recognition;
论文地址:https://arxiv.org/abs/1512.00567;
Inception发展演变:
- GoogLeNet/Inception V1:2014年9月 《Going deeper with convolutions》;
- BN-Inception 2015年2月 《Batch Normalization: Accelerating Deep Network Training by Reducing Internal Covariate Shift》;
- Inception V2/V3 2015年12月《Rethinking the Inception Architecture for Computer Vision》;
- Inception V4、Inception-ResNet 2016年2月 《Inception-v4, Inception-ResNet and the Impact of Residual Connections on Learning》;
- Xception 2016年10月 《Xception: Deep Learning with Depthwise Separable Convolutions》;
0 摘要
CNN是各种CV任务解决方案的核心;2014年以来,非常深的网络(如VGG)开始成为主流;
增大模型的深度(VGG)或宽度(GoogLeNet)可以提升模型的性能,但需要足够多的标签数据用于训练,而且同时要考虑性能——不能只一味的增大模型;
本文探索如何通过适当的卷积分解和正则化来尽可能有效地利用增加的计算来扩大网络;
卷积分解:
- 大卷积分解为小卷积(一个55分解为两个33 对应3.1节);
- 不对称卷积(一个33分解成一个13和一个3*1 对应3.2节);
正则化:
- 辅助分类器(对应第4节);
- Label Smoothing(对应第7节);
在ILSVRC 2012分类挑战验证集上对本文的方法进行了基准测试;
1 简介
一个好的分类模型可以迁移到各种各样的视觉任务中使用,好的分类性能意味着CNN底层提取到的特征非常好,而视觉任务就非常依赖于这些高质量、学习到的视觉特征;
网络质量的提高为卷积网络带来了新的应用领域,例如检测中的提案生成;
VGG模型虽然性能高,但是非常臃肿,参数量非常大;
GoogLeNet的Inception架构是专门为提升计算效率设计的,非常适合计算资源受限的设备,GoogLeNet的参数量是AlexNet的1/12,VGG的参数量是AlexNet的3倍;
但我不能一味的去堆叠Inception模块,这会导致大部分计算增益可能会立即丢失;
本文提出一些通用的设计原则和优化想法;
2 一般设计原则
这里基于大量实验结果,描述基于CNN的一些设计原则:
- 1.避免过度降维或收缩特征bottleneck,特别是在网络的底层:过度降维——信息丢失;
- 2.相互独立的特征越多,网络收敛越快(赫布原理);
- 3.在低维嵌入上进行大核卷积(spatial aggregation),不会损失太多或任何特征表示能力:相邻感受野的卷积结果是高度相关的,在传入大卷积核聚合感受野之前可以先进行降维(比如3 ×3卷积之前可以先用1 × 1 卷积降维,信息不会丢失特别多,甚至可以促进更快的学习);
- 4.平衡网络的深度和宽度,兼顾两者,既可以提高网络性能,也可以提升计算效率;
3 分解大核卷积
Inception成功的重要原因在于使用了很多降维,降维可以减少参数量、加速训练、节约内存,使用更多的卷积组;
3.1 分解成更小的卷积
一个5×5卷积可以分解成两个3×3卷积,第二个3×3卷积相当于一个全连接层(如图1所示,感受野一样大,但是计算量降低);
例如,在具有m个滤波器的网格上,具有n个滤波器的5×5卷积比具有相同数量滤波器的3×3卷积的计算成本高25/9=2.78倍;
5×5卷积覆盖了更大的感受野,因此降维后的信息丢失也会更严重,3×3的则不会;
通过共享相邻平铺之间的权重,明显减少了参数计数:
假设:C个卷积核,输入C个通道,feature map大小为H × W × C 乘法运算量:
- 5×5:(H × W × C) × (5 × 5 × C) = 25 H W C 2 25HWC^2 25HWC2
- 两个3×3:2 × (H × W × C) × (3 × 3 × C) = 18 H W C 2 18HWC^2 18HWC2
参数量减少了:(25 - 18) / 25 = 28%

导致两个问题:
- 分解卷积是否会导致表达能力的丧失?
- 是否需要保留第一层的非线性激活函数?
本文进行了几组实验来说明,实验结果如图2所示;
横轴:迭代次数;
纵轴:Top-1 acc;
蓝线:保留第一层的非线性ReLU激活函数;
红线:去除第一层的非线性激活,改为线性激活;
从图上可以看出,蓝线高于红线,说明:分解卷积时保留非线性激活可以提升模型的表示能力(回答上面提出的两个问题:1.不会丧失表达能力;2.保留第一层的线性激活);

分解结果见图5:
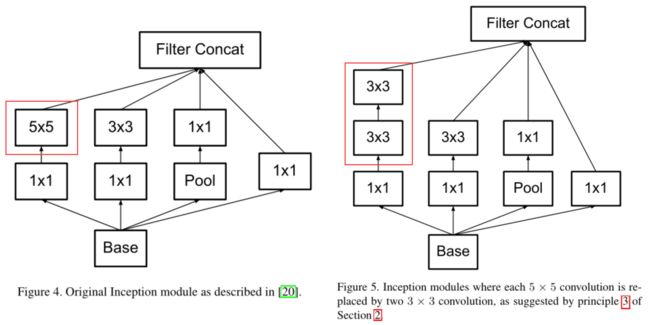
同理,一个7×7卷积可以分解成三个3×3卷积;
图5模块对应Pytorh代码实现:
def Conv(in_channel,out_channel,kernel_size):
    return nn.Sequential(nn.Conv2d(in_channel,out_channel,kernel_size,padding=kernel_size//2),
                         nn.BatchNorm2d(out_channel),
                         nn.LeakyReLU())

# 图5
class InceptionV3_1(nn.Module):
    def __init__(self,in_channel,out_channel_list,middle_channel_list):
        super(InceptionV3_1, self).__init__()
        # 1 * 1 卷积
        self.branch1_1=Conv(in_channel=in_channel,out_channel=middle_channel_list[0],kernel_size=1)
        # 3 * 3 卷积
        self.branch1_2=Conv(in_channel=middle_channel_list[0],out_channel=middle_channel_list[1],kernel_size=3)
        # 3 * 3 卷积
        self.branch1_3=Conv(in_channel=middle_channel_list[1],out_channel=out_channel_list[0],kernel_size=3)
        # 1 * 1 卷积
        self.branch2_1=Conv(in_channel=in_channel,out_channel=middle_channel_list[2],kernel_size=1)
        # 3 * 3 卷积
        self.branch2_2=Conv(in_channel=middle_channel_list[2],out_channel=out_channel_list[1],kernel_size=3)
        # 池化
        self.branch3_1=nn.MaxPool2d(kernel_size=3,stride=1,padding=1)
        # 1 * 1 卷积
        self.branch3_2=Conv(in_channel=in_channel,out_channel=out_channel_list[2],kernel_size=1)
        # 1 * 1 卷积
        self.branch4_1=Conv(in_channel=in_channel,out_channel=out_channel_list[3],kernel_size=1)

    def forward(self,x):
        output1=self.branch1_3(self.branch1_2(self.branch1_1(x)))
        output2=self.branch2_2(self.branch2_1(x))
        output3=self.branch3_2(self.branch3_1(x))
        output4=self.branch4_1(x)
        # concat4个分支
        return torch.cat((output1,output2,output3,output4),dim=1)
3.2 分解成不对称卷积(空间可分离卷积)
将3×3卷积分解成一个1×3卷积和一个3×1卷积,如图3所示,目的也是减少参数量;
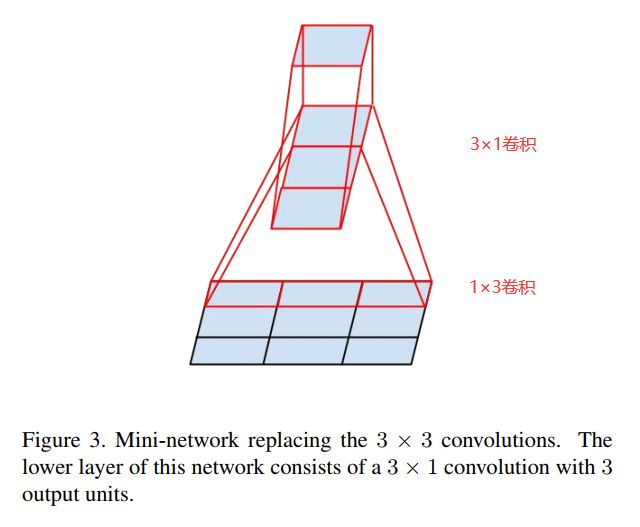
事实上,3×3卷积也可以分为两个2×2的卷积,但只能减少11%的参数量,分解成1×3和3×1的卷积可以减少33%的参数量;
同等条件下:
两个2×2卷积: 2 * (2 * 2)/ (3 * 3) = 89%,1 - 89% = 11%;1×3 + 3×1卷积:[ (1 * 3) + (3 * 1)] / (3 * 3) = 6/9 = 67%, 1 - 67% = 33%;
理论上认为,一个n×n卷积可以分解为一个1×n和一个n×1卷积,分解结果见图6所示;
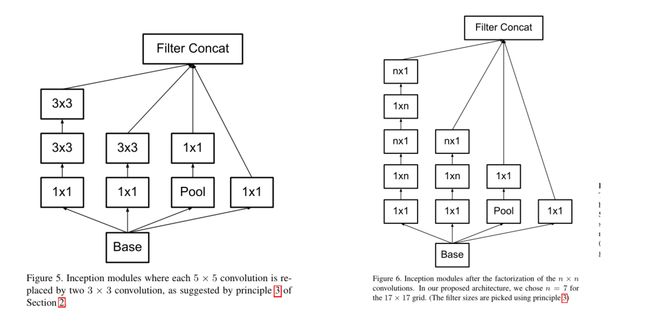
实际中,不对称卷积分解在靠网络前层的效果不好,feature map的尺寸在12~20之间比较合适;
图6模块对应pytorch代码:
# 和Conv的区别:没有padding
def Conv1(in_channel,out_channel,kernel_size,**kwargs):
    return nn.Sequential(nn.Conv2d(in_channel,out_channel,kernel_size,**kwargs),
                         nn.BatchNorm2d(out_channel),
                         nn.LeakyReLU())

# 图6
class Inception3_2(nn.Module):
    def __init__(self,in_channel,out_channel_list,middle_channel_list):
        super(Inception3_2, self).__init__()
        # 1 * 1 卷积
        self.branch1_1=Conv1(in_channel=in_channel,out_channel=middle_channel_list[0],kernel_size=1)
        # 1 * 3 卷积(1 * n 卷积)
        self.branch1_2=Conv1(in_channel=middle_channel_list[0],out_channel=middle_channel_list[1],kernel_size=(1,3),padding=(0,1))
        # 3 * 1 卷积(n * 1 卷积)
        self.branch1_3=Conv1(in_channel=middle_channel_list[1],out_channel=middle_channel_list[2],kernel_size=(3,1),padding=(1,0))
        self.branch1_4=Conv1(in_channel=middle_channel_list[2],out_channel=middle_channel_list[3],kernel_size=(1,3),padding=(0,1))
        self.branch1_5=Conv1(in_channel=middle_channel_list[3],out_channel=out_channel_list[0],kernel_size=(3,1),padding=(1,0))
        # 分支2
        self.branch2_1=Conv1(in_channel=in_channel,out_channel=middle_channel_list[4],kernel_size=1)
        self.branch2_2=Conv1(in_channel=middle_channel_list[4],out_channel=middle_channel_list[5],kernel_size=(1,3),padding=(0,1))
        self.branch2_3=Conv1(in_channel=middle_channel_list[5],out_channel=out_channel_list[2],kernel_size=(3,1),padding=(1,0))
        # 分支3
        self.branch3_1=nn.MaxPool2d(kernel_size=3,stride=1,padding=1)
        self.branch3_2=Conv1(in_channel=in_channel,out_channel=out_channel_list[2],kernel_size=1)
        # 分支4
        self.branch4_1=Conv1(in_channel=in_channel,out_channel=out_channel_list[3],kernel_size=1)

    def forward(self,x):
        output1=self.branch1_5(self.branch1_4(self.branch1_3(self.branch1_2(self.branch1_1(x)))))
        output2=self.branch2_3(self.branch2_2(self.branch2_1(x)))
        output3=self.branch3_2(self.branch3_1(x))
        output4=self.branch4_1(x)
        # concat 4个分支结果
        return torch.cat((output1,output2,output3,output4),dim=1)
图7为扩展滤波器组,起到加宽网络、升维的作用,在grid size较小时使用;
图6为在深度方向分解卷积;图7为在宽度方向分解卷积;
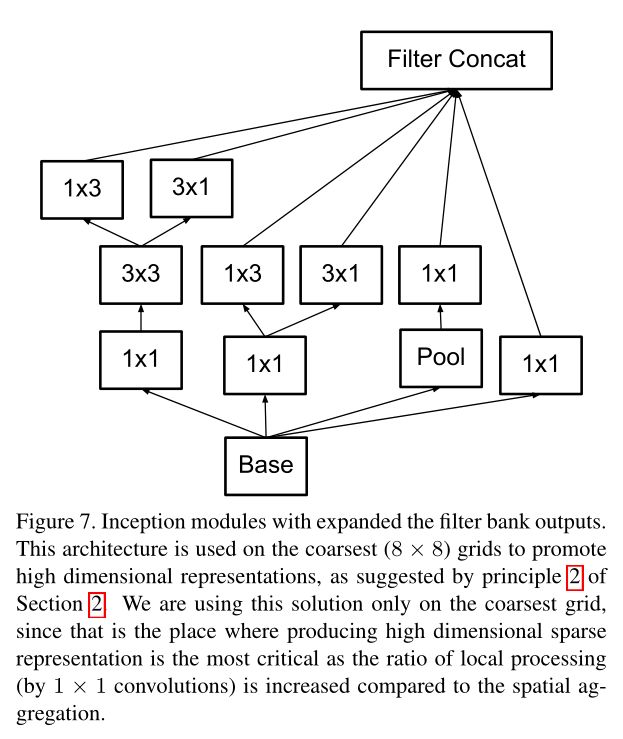
图7模块对应pytorch代码:
# 图7
class Inception3_3(nn.Module):
    def __init__(self,in_channel,out_channel_list,middle_channel_list):
        super(Inception3_3, self).__init__()
        self.branch1_1=Conv1(in_channel=in_channel,out_channel=middle_channel_list[0],kernel_size=1)
        self.branch1_2=Conv1(in_channel=middle_channel_list[0],out_channel=middle_channel_list[1],kernel_size=3,padding=1)
        self.branch1_3a=Conv1(in_channel=middle_channel_list[1],out_channel=out_channel_list[0],kernel_size=(1,3),padding=(0,1))
        self.branch1_3b=Conv1(in_channel=middle_channel_list[1],out_channel=out_channel_list[0],kernel_size=(3,1),padding=(1,0))
        self.branch2_1=Conv1(in_channel=in_channel,out_channel=middle_channel_list[2],kernel_size=1)
        self.branch2_2a=Conv1(in_channel=middle_channel_list[2],out_channel=out_channel_list[1],kernel_size=(1,3),padding=(0,1))
        self.branch2_2b=Conv1(in_channel=middle_channel_list[2],out_channel=out_channel_list[1],kernel_size=(3,1),padding=(1,0))
        self.branch3_1=nn.MaxPool2d(kernel_size=3,stride=1,padding=1)
        self.branch3_2=Conv1(in_channel=in_channel,out_channel=out_channel_list[2],kernel_size=1)
        self.branch4_1=Conv1(in_channel=in_channel,out_channel=out_channel_list[3],kernel_size=1)

    def forward(self,x):
        # 分支1: 1 * 1 卷积->3 * 3 卷积->1 * 3 卷积
        output1_1=self.branch1_3a(self.branch1_2(self.branch1_1(x)))
        # 分支1: 1 * 1 卷积->3 * 3 卷积->3 * 1 卷积
        output1_2=self.branch1_3b(self.branch1_2(self.branch1_1(x)))
        # 分支1的两个结果concat
        output1=torch.cat((output1_1,output1_2),dim=1)
        output2_1=self.branch2_2a(self.branch2_1(x))
        output2_2=self.branch2_2b(self.branch2_1(x))
        # 分支2的两个结果concat
        output2=torch.cat((output2_1,output2_2),dim=1)
        output3=self.branch3_2(self.branch3_1(x))
        output4=self.branch4_1(x)
        # 4个分支结果concat
        return torch.cat((output1,output2,output3,output4),dim=1)
4 辅助分类器
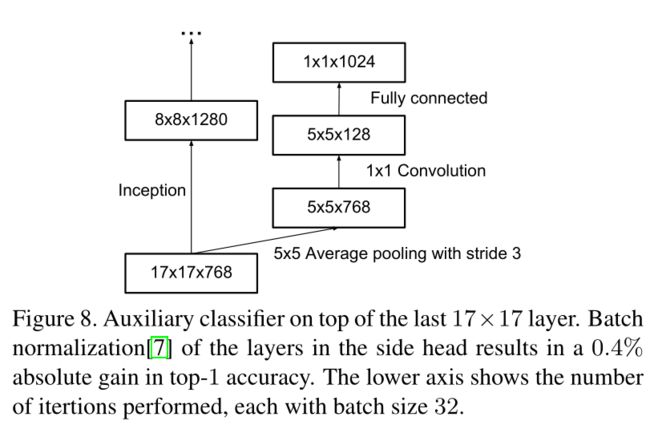
在GoogLeNet中引入两个辅助分类器,目的是起到正则化的作用,让网络的浅层也能快速的学习到有效的特征来进行分类,同时防止梯度消失现象;
但是,本文发现辅助分类器不能帮助模型快速收敛:
- 在两个模型达到高精度之前,具有和不具有辅助分类器的网络的训练进程看起来几乎相同;
- 在训练接近结束时,具有辅助分类器的网络精度超过没有辅助分类器网络的精度,但也不能证明有辅助分类器的网络收敛快;
本文还发现,去掉GoogLeNet的浅层分类器对模型精度没有影响;
但是,辅助分类器可以充当正则化器,辅助分类器加了BN和dropout后效果更好,本文推断,辅助分类器有正则化的作用;
5 高效下采样技巧
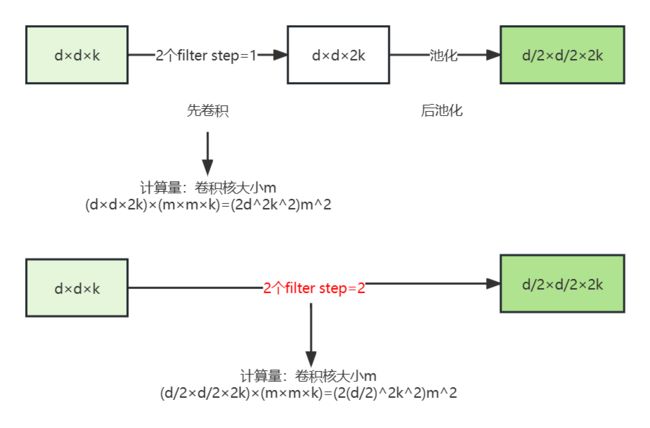
传统网络使用池化(pooling)来减小feature map的大小;
为了避免表示瓶颈,在池化(最大池化/平均池化)之前,应该先升维来保留更多信息;
举个例子,下图表示下采样(降维)的两种方法和对应计算量:

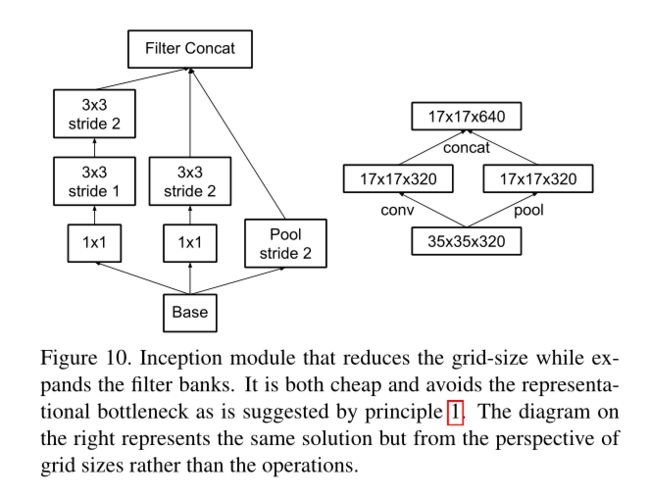
改进方法:引进Inception的并行模块,如图10所示;
6 Inception-V2
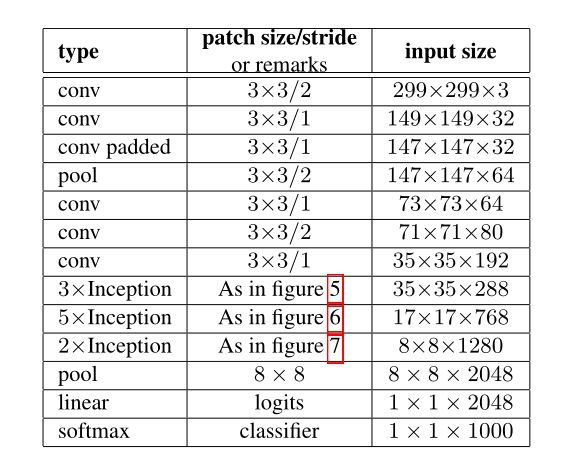
综合以上改进提出Inception-V2架构如表1所示:
Pytorch实现:
class InceptionV2V3(nn.Module):
    def __init__(self):
        super(InceptionV2V3, self).__init__()
        self.conv1=nn.Sequential(
            nn.Conv2d(in_channels=3,out_channels=32,kernel_size=3,stride=2,padding=0),
            nn.BatchNorm2d(32),
            nn.LeakyReLU()
        )
        self.conv2=nn.Sequential(
            nn.Conv2d(in_channels=32,out_channels=32,kernel_size=3,stride=1,padding=0),
            nn.BatchNorm2d(32),
            nn.LeakyReLU()
        )
        # 有padding
        self.conv3=nn.Sequential(
            nn.Conv2d(in_channels=32,out_channels=64,kernel_size=3,stride=1,padding=1),
            nn.BatchNorm2d(64),
            nn.LeakyReLU()
        )
        self.pool1=nn.Sequential(
            nn.MaxPool2d(kernel_size=3,stride=2,padding=0)
        )
        self.conv4=nn.Sequential(
            nn.Conv2d(in_channels=64,out_channels=80,kernel_size=3,stride=1,padding=0),
            nn.BatchNorm2d(80),
            nn.LeakyReLU()
        )
        self.conv5=nn.Sequential(
            nn.Conv2d(in_channels=80,out_channels=192,kernel_size=3,stride=2,padding=0),
            nn.BatchNorm2d(192),
            nn.LeakyReLU()
        )
        self.conv6=nn.Sequential(
            nn.Conv2d(in_channels=192,out_channels=288,kernel_size=3,stride=1,padding=1),
            nn.BatchNorm2d(288),
            nn.LeakyReLU()
        )
        self.inception1a=InceptionV3_1(in_channel=288,out_channel_list=[96,96,96,96],
                                       middle_channel_list=[32,64,64])
        self.inception1b = InceptionV3_1(in_channel=384, out_channel_list=[96,96,96,96],
                                       middle_channel_list=[32,64,64])
        self.inception1c = InceptionV3_1(in_channel=384, out_channel_list=[96,96,96,96],
                                       middle_channel_list=[32,64,64])
        # ! 从图中可以看出3xInception到5xInception到2xInception之间,特征图的大小是一次减小的,必须通过一定的操作
        # 这里补充InsertA模块使得特征图按照要求缩小
        self.insert1=InsertA(in_channel=384,out_channel_list=[192,192],middle_channel_list=[128,128])

        self.inception2a=Inception3_2(in_channel=768,out_channel_list=[192,192,192,192],
                                      middle_channel_list=[64,96,128,256,128,256])
        self.inception2b = Inception3_2(in_channel=768, out_channel_list=[192,192,192,192],
                                        middle_channel_list=[64, 96, 128, 256, 128, 256])
        self.inception2c = Inception3_2(in_channel=768, out_channel_list=[192,192,192,192],
                                        middle_channel_list=[64, 96, 128, 256, 128, 256])
        self.inception2d = Inception3_2(in_channel=768, out_channel_list=[192,192,192,192],
                                        middle_channel_list=[64, 96, 128, 256, 128, 256])
        self.inception2e = Inception3_2(in_channel=768, out_channel_list=[192,192,192,192],
                                        middle_channel_list=[64, 96, 128, 256, 128, 256])
        # !
        self.insert2=InsertB(in_channel=768,out_channel_list=[256,256],middle_channel_list=[384,192,256,384])
        self.inception3a=Inception3_3(in_channel=1280,out_channel_list=[256,256,512,512],
                                      middle_channel_list=[128,192,192])
        self.inception3b = Inception3_3(in_channel=2048, out_channel_list=[256, 256, 512, 512],
                                        middle_channel_list=[128, 192, 192])
        self.inception3c = Inception3_3(in_channel=2048, out_channel_list=[256, 256, 512, 512],
                                        middle_channel_list=[128, 192, 192])
        self.pool2=nn.MaxPool2d(kernel_size=8,stride=1,padding=0)
        self.linear=nn.Linear(2048,1000)
        self.softmax=nn.Softmax(dim=1)

    def forward(self,x):
        out=self.conv1(x)
        out=self.conv2(out)
        out=self.conv3(out)
        out=self.pool1(out)
        out=self.conv4(out)
        out=self.conv5(out)
        out=self.conv6(out)
        out=self.inception1a(out)
        out=self.inception1b(out)
        out=self.inception1c(out)
        out=self.insert1(out)
        out = self.inception2a(out)
        out = self.inception2b(out)
        out = self.inception2c(out)
        out = self.inception2d(out)
        out = self.inception2e(out)
        out = self.insert2(out)
        out=self.inception3a(out)
        out = self.inception3b(out)
        # out = self.inception3c(out)
        out=self.pool2(out)
        out=self.linear(out.view(out.size(0),-1))
        out=self.softmax(out)

        return out
7 通过Label Smoothing实现模型正则化
相关论文:《When Does Label Smoothing Help?》
论文地址:https://arxiv.org/abs/1906.02629;
标签平滑(Label smoothing),像L1、L2和dropout一样,是机器学习领域的一种正则化方法,通常用于分类问题,目的是防止模型在训练时过于自信地预测标签,改善泛化能力差的问题。
具体细节见:
https://blog.csdn.net/COINVK/article/details/129122437
8 训练策略
使用TensorFlow 分布式机器学习系统;
50个Nvidia Kepler GPU;
batch-size=32,epoch=100;
早期模型:SGD with momentum 0.9;
后期模型:RMSProp优化器;
9 小分辨率图像上的性能
常见任务:目标检测,图像识别;
在保持计算量不变的情况下,只提高输入图像的分辨率有多大的提高?
对照实验:
- 1.输入 299*299,stride = 2,第一层后进行max pool;
- 2.输入151*151,stride=1,第一层后进行max pool;
- 3.输入79*79,stride=1,没有max pool;
结果如表2所示:Top-1准确率差不多;

然而,若只是根据输入分辨率天真地减小网络大小,那个么网络的性能就会差得多。然而,这将是一个不公平的比较,因为我们将在一个更困难的任务上比较16倍便宜的模型。
10 Inception与其他模型比较
如表3所示,图像不进行裁剪(single crop):

表4,进行multi-crop的结果:
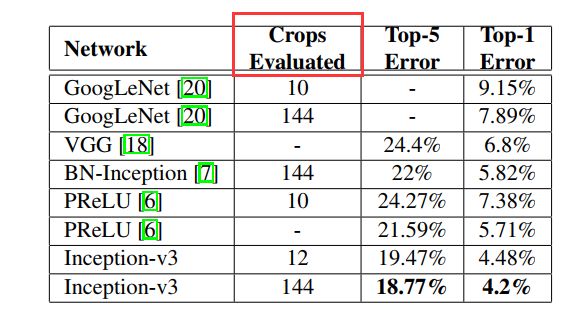
144怎么计算? 首先将图像resize到4个尺度(比如256xN,320xN,384xN,480xN)
每个尺度上去取(最左,正中,最右)3个位置的正方形区域
对每个正方形区域,取上述的10个224x224的crops,则得到4x3x10=120个crops
对上述正方形区域直接resize到224x224,以及做水平翻转,则又得到4x3x2=24个crops
总共加起来得到120+24=144个crops,所有crops的预测输出的平均作为整个模型对当前测试图像的输出
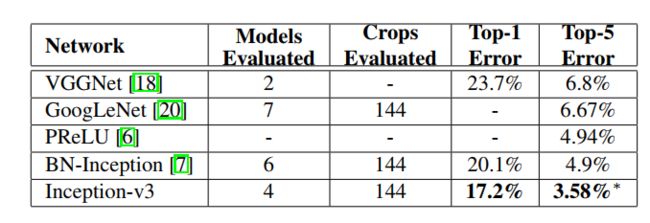
表5,多模型集成结果:
11 代码补充
Insert-A模块

pytorch实现:
class InsertA(nn.Module):
    def __init__(self,in_channel,out_channel_list,middle_channel_list):
        super(InsertA, self).__init__()
        self.branch1_1=Conv1(in_channel=in_channel,out_channel=out_channel_list[0],kernel_size=3,stride=2,padding=0)
        self.branch2_1=Conv1(in_channel=in_channel,out_channel=middle_channel_list[0],kernel_size=1,stride=1,padding=0)
        self.branch2_2=Conv1(in_channel=middle_channel_list[0],out_channel=middle_channel_list[1],kernel_size=3,stride=1,padding=1)
        self.branch2_3=Conv1(in_channel=middle_channel_list[1],out_channel=out_channel_list[1],kernel_size=3,stride=2,padding=0)
        self.branch3_1=nn.MaxPool2d(kernel_size=3,stride=2,padding=0)

    def forward(self,x):
        output1=self.branch1_1(x)
        output2=self.branch2_3(self.branch2_2(self.branch2_1(x)))
        output3=self.branch3_1(x)
        return torch.cat((output1,output2,output3),dim=1)
Insert-B模块
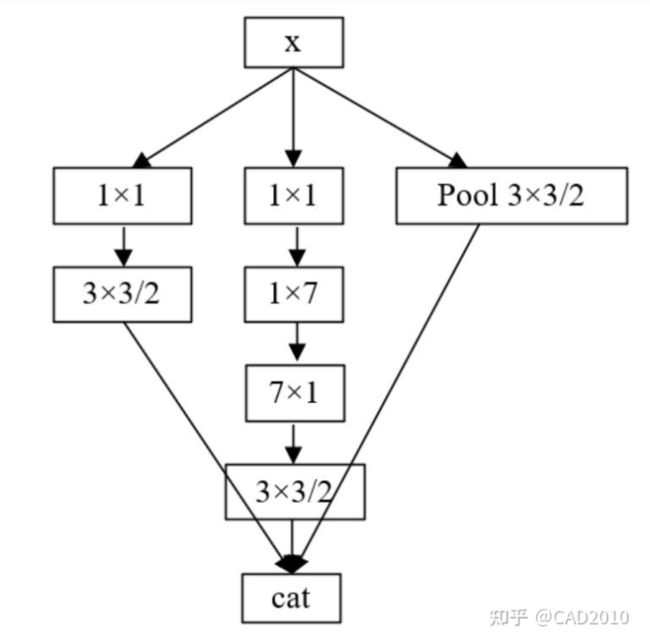
pytorch实现:
class InsertB(nn.Module):
    def __init__(self,in_channel,out_channel_list,middle_channel_list):
        super(InsertB, self).__init__()
        self.branch1_1=Conv1(in_channel=in_channel,out_channel=middle_channel_list[0],kernel_size=1,stride=1,padding=0)
        self.branch1_2=Conv1(in_channel=middle_channel_list[0],out_channel=out_channel_list[0],kernel_size=3,stride=2,padding=0)
        self.branch2_1=Conv1(in_channel=in_channel,out_channel=middle_channel_list[1],kernel_size=1,stride=1,padding=0)
        self.branch2_2=Conv1(in_channel=middle_channel_list[1],out_channel=middle_channel_list[2],kernel_size=(1,7),stride=1,padding=(0,3))
        self.branch2_3=Conv1(in_channel=middle_channel_list[2],out_channel=middle_channel_list[3],kernel_size=(7,1),stride=1,padding=(3,0))
        self.branch2_4=Conv1(in_channel=middle_channel_list[3],out_channel=out_channel_list[1],kernel_size=3,stride=2,padding=0)
        self.branch3_1=nn.MaxPool2d(kernel_size=3,stride=2,padding=0)

    def forward(self,x):
        output1=self.branch1_2(self.branch1_1(x))
        output2=self.branch2_4(self.branch2_3(self.branch2_2(self.branch2_1(x))))
        output3=self.branch3_1(x)
        return torch.cat((output1,output2,output3),dim=1)