利用gradio快速搭建AI应用
引言
Gradio 是一个用于快速创建交互式界面的Python库,这些界面可以用于演示和测试机器学习模型。使用Gradio,开发者可以非常轻松地为他们的模型构建一个前端界面,而不需要任何Web开发经验。

与类似产品的对比
- TensorBoard:主要用于TensorFlow的训练可视化。而Gradio则更注重模型的交互式演示。
- Streamlit:也是一个快速创建交互式应用的工具,但Gradio更注重于机器学习模型的界面。
Gradio三大特点
-
设置快速、简单
Gradio 可以通过 pip 安装。创建一个Gradio界面只需要添加几行代码 到您的项目。无缝使用计算机上的任何 Python 库。如果你能写一个 python函数,gradio可以运行它。 -
呈现并分享
Gradio 可以嵌入到Python Notebookks 或呈现为 网页。Gradio 界面可以自动生成您可以共享的公共链接 与同事一起,让他们与您计算机上的模型进行交互 从他们自己的设备远程。 -
永久托管
创建界面后,您可以将其永久托管在 Hugging Face 上。Hugging Face Spaces 将在其服务器上托管该界面,并为您提供一个链接,您可以分享。
快速应用示例
安装
Gradio 最显著的优势之一是它支持各种机器学习框架,包括 PyTorch。这意味着无论您使用哪个框架来训练模型,您都可以使用 Gradio 轻松部署它。要开始使用 Gradio,您需要安装所需的库。您可以使用 pip 安装它们:
pip install gradio torch torchvision
针对 MNIST 数据训练深度学习模型
在本节中,我们将建立模型。我们使用 CNN 模型并使用 MNIST 数据集对其进行训练。让我们一起建设吧!
第一步,我们需要为模型设置 MNIST 数据集。幸运的是,我们可以使用torchvision库来帮助轻松下载和准备我们的数据集。
from torchvision import datasets, transforms
import torch

transform=transforms.Compose([
        transforms.ToTensor(),
        transforms.Resize(28),
        transforms.Normalize((0.1307,), (0.3081,)),
        ])


dataset1 = datasets.MNIST('../data',
                          train=True,
                          download=True,
                          transform=transform)

dataset2 = datasets.MNIST('../data',
                          train=False,
                          transform=transform)

train_loader = torch.utils.data.DataLoader(dataset1, batch_size=10000, shuffle=True)
test_loader = torch.utils.data.DataLoader(dataset2, batch_size=1000)
现在,我们将使用卷积层设计模型,如下所示:
import torch.nn as nn
import torch.nn.functional as F

class CNNModel(nn.Module):
    def __init__(self):
        super(CNNModel, self).__init__()
        self.conv1 = nn.Conv2d(1, 16, kernel_size=3, stride=1, padding=1)
        self.conv2 = nn.Conv2d(16, 32, kernel_size=3, stride=1, padding=1)
        self.fc1 = nn.Linear(32 * 7 * 7, 128)
        self.fc2 = nn.Linear(128, 10)

    def forward(self, x):
        x = F.relu(self.conv1(x))
        x = F.max_pool2d(x, 2)
        x = F.relu(self.conv2(x))
        x = F.max_pool2d(x, 2)
        x = x.view(-1, 32 * 7 * 7)
        x = F.relu(self.fc1(x))
        x = self.fc2(x)
        return x

# Make device agnostic code
device = "cuda" if torch.cuda.is_available() else "cpu"
# Create an instance of the CNN model
model = CNNModel().to(device)
该 CNN 模型由两个具有 ReLU 激活的卷积层组成,后面是用于下采样的最大池化层。在卷积层之后,有两个带有 ReLU 激活的全连接层,用于最终分类。
下面是训练部分:
# Setup loss function and optimizer
loss_fn = nn.CrossEntropyLoss()
optimizer = torch.optim.SGD(params=model.parameters(), lr=0.1)
# Set the number of epochs
epochs = 15

for epoch in tqdm(range(epochs)):
    for batch, (X, y) in enumerate(train_loader):
        model.train()

        # Put data on the target device
        X, y = X.to(device), y.to(device)

        #1. Forward pass
        y_pred = model(X)

        # 2. Calculate loss (per batch)
        loss = loss_fn(y_pred, y)

        # 3. Optimizer zero grad
        optimizer.zero_grad()

        # 4. Loss backward
        loss.backward()

        # 5. Optimizer step
        optimizer.step()
然后,我们评估模型在测试数据集上的性能。
# Define the accuracy function
def accuracy_fn(y_true, y_pred):

    correct = torch.eq(y_true, y_pred).sum().item()
    acc = (correct / len(y_pred)) * 100
    return acc

# Load and test the model on test data
for X, y in test_loader:

    X, y = X.to(device), y.to(device)
    y_pred = model(X)
    print(accuracy_fn(y_true = y, y_pred = y_pred.argmax(dim = 1)))
94.54
这看起来准确度分数非常高(但不要相信它们;我将在部署部分进行解释)。最后,我们保存模型以便使用 Gradio 进行部署。
torch.save(obj=model.state_dict(),
           f='./mnist_model.pt')
开始使用 Gradio
现在,确保您已准备好经过训练的 PyTorch 模型。对于此示例,我们假设您有一个在自定义数据集上训练的草图识别模型。
接下来,让我们深入研究一些代码并使用 Gradio 部署模型:
首先,我们需要一段代码来存储我们在上一节中制作的模型结构和transformer函数。
### loaded_model.py
import torch.nn as nn
import torch.nn.functional as F
from torchvision import transforms

class CNNModel(nn.Module):
    def __init__(self):
        super(CNNModel, self).__init__()
        self.conv1 = nn.Conv2d(1, 16, kernel_size=3, stride=1, padding=1)
        self.conv2 = nn.Conv2d(16, 32, kernel_size=3, stride=1, padding=1)
        self.fc1 = nn.Linear(32 * 7 * 7, 128)
        self.fc2 = nn.Linear(128, 10)

    def forward(self, x):
        x = F.relu(self.conv1(x))
        x = F.max_pool2d(x, 2)
        x = F.relu(self.conv2(x))
        x = F.max_pool2d(x, 2)
        x = x.view(-1, 32 * 7 * 7)
        x = F.relu(self.fc1(x))
        x = self.fc2(x)
        return x

def create_transformer():
    transform=transforms.Compose([
            transforms.ToTensor(),
            transforms.Resize(28),
            transforms.Normalize((0.1307,), (0.3081,)),
            ])
    return transform
然后,下面的代码向您展示了如何使用 Gradio 部署经过训练的模型:
### app.py
import gradio as gr
import torch
from loaded_model import CNNModel
import loaded_model

model = CNNModel()
model.load_state_dict(torch.load(f="./mnist_model.pt"))


# Define a function to make predictions with your model
def classify_image(image):
    # Preprocess the image
    preprocess = loaded_model.create_transformer()

    image_tensor = preprocess(image)
    image_tensor = image_tensor.unsqueeze(0)

    # Make prediction
    with torch.no_grad():
        output = model(image_tensor)
    _, predicted_class = torch.max(output, 1)

    return f"Predicted class: {predicted_class.item()}"


gr.Interface(fn=classify_image, inputs="sketchpad", outputs="label").launch()
最后,在您的网络浏览器上运行 Gradio:
python app.py
恭喜!你可以部署它:
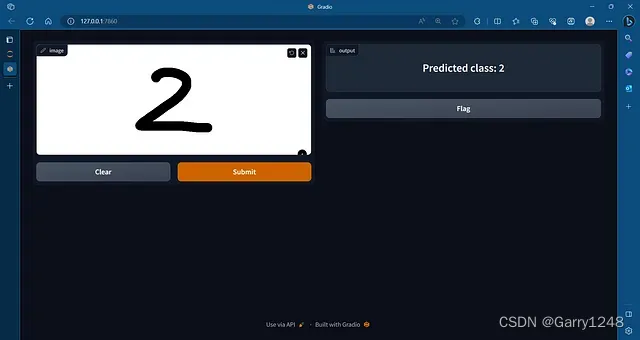
然而,有时这个模型会做出错误的预测。此错误可能是由于 MNIST 数据不适合从 Gradio 输入接口输入造成的。因此,如果您在现实世界中需要一个良好的性能模型,您应该使用原始数据(来自 Graido 输入接口的数字图像)来训练模型。
结论
部署机器学习模型可能是一项艰巨的任务,但 Gradio 通过提供用户友好且直观的界面简化了该过程。只需几行代码,您就可以将 PyTorch 模型转变为交互式 Web 应用程序并与世界分享。无论您是经验丰富的数据科学家还是刚刚开始学习机器学习,Gradio 都是一个有价值的工具,可以帮助您展示模型并与更广泛的受众互动。
那么,为什么还要等呢?尝试一下 Gradio 和 PyTorch,立即开始分享您的机器学习模型。