第一个SpringMVC程序以及出现404问题的解决
害!弄了整整一天,这个SpringMVC 的helloWorld程序终于能跑起来了,遇到了头疼的404问题始终无法解决,非常的蛋疼,代码也没有错误就是运行不起来!

现在我已解决这个问题,顺便做个记录
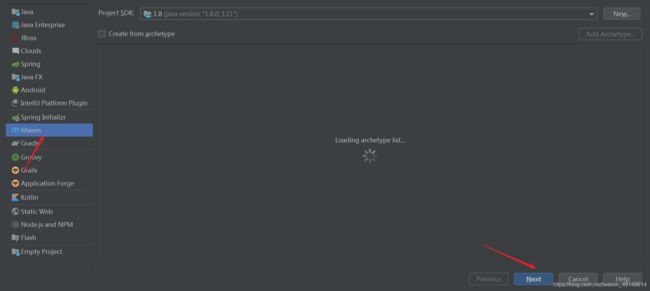
首先搭建好项目环境,创建maven工程,引入依赖


这样建立web工程可以保证web.xml的版本为最新,不会导致版本过低而出现404的问题。
我出现的主要问题在于依赖有问题,换个依赖就好了,总的来说这个问题也相当隐蔽了,还好解决了!依赖用下面这些!
 <properties>
        <spring.version>5.0.2.RELEASEspring.version>
    properties>
    <dependencies>
        <dependency>
            <groupId>org.springframeworkgroupId>
            <artifactId>spring-contextartifactId>
            <version>${spring.version}version>
        dependency>
        <dependency>
            <groupId>org.springframeworkgroupId>
            <artifactId>spring-webartifactId>
            <version>${spring.version}version>
        dependency>
        <dependency>
            <groupId>org.springframeworkgroupId>
            <artifactId>spring-webmvcartifactId>
            <version>${spring.version}version>
        dependency>
        <dependency>
            <groupId>javax.servletgroupId>
            <artifactId>servlet-apiartifactId>
            <version>2.5version>
            <scope>providedscope>
        dependency>
        <dependency>
            <groupId>javax.servlet.jspgroupId>
            <artifactId>jsp-apiartifactId>
            <version>2.0version>
            <scope>providedscope>
        dependency>
    dependencies>
总结下程序的写入步骤,有两个版本,网上大都是直接上注解版,那我就先从配置版入手吧:
配置版
一. 确定导入了SpringMVC的依赖后,配置web.xml
- 先引入命名空间
   <web-app xmlns="http://xmlns.jcp.org/xml/ns/javaee"
            xmlns:xsi="http://www.w3.org/2001/XMLSchema-instance"
            xsi:schemaLocation="http://xmlns.jcp.org/xml/ns/javaee http://xmlns.jcp.org/xml/ns/javaee/web-app_4_0.xsd"
            version="4.0">
   web-app>
-
注册DispatcherServlet,并关联SpringMVC的配置文件
DispatcherServlet表示前置控制器,是整个SpringMVC的控制中心,用来接收或拦截用户发起的请求
<servlet>
     <servlet-name>SpringMVCservlet-name>
     <servlet-class>org.springframework.web.servlet.DispatcherServletservlet-class>


    <init-param>
         <param-name>contextConfigLocationparam-name>
         <param-value>classpath:SpringMVC-servlet.xmlparam-value>
    init-param>

    <load-on-startup>1load-on-startup>
 servlet>


 <servlet-mapping>
    <servlet-name>SpringMVCservlet-name>
    <url-pattern>/url-pattern>
 servlet-mapping>
二.编写SpringMVC的配置文件
配置文件名字可以随便起,但是官方要求我们最好是用 【servlet-name】-servlet.xml 来给配置文件起名字,
例如我起的名字叫SpringMVC-servlet.xml,这名字也要和上面在web.xml中写过的的param-value对应!
- 引入命名空间
<beans xmlns="http://www.springframework.org/schema/beans"
       xmlns:xsi="http://www.w3.org/2001/XMLSchema-instance"
       xsi:schemaLocation="http://www.springframework.org/schema/beans
       http://www.springframework.org/schema/beans/spring-beans.xsd">
beans>
- 添加处理映射器,处理适配器,视图解析器
试题解析器中要把所有视图都存放在WEB-INF目录中,这个目录客户端不能直接访问,进而保证视图安全
<beans>
    <bean class="org.springframework.web.servlet.handler.BeanNameUrlHandlerMapping"/>


    <bean class="org.springframework.web.servlet.mvc.SimpleControllerHandlerAdapter"/>


    <bean class="org.springframework.web.servlet.view.InternalResourceViewResolver" id="internalResourceViewResolver">

        <property name="prefix" value="/WEB-INF/jsp/"/>

        <property name="suffix" value=".jsp"/>
    bean>
beans>
处理器映射器,处理器适配器,视图解析器可以称之为SpringMVC三大件!
三.编写操作业务controller
一种是使用注解,另一种是使用实现controller接口的方法,这里我们使用实现controller接口的方法,
更有助于我们理解SpringMVC的执行过程
public class HelloController implements Controller {
    public ModelAndView handleRequest(HttpServletRequest httpServletRequest, HttpServletResponse httpServletResponse) throws Exception {
//       创建一个模型和视图
        ModelAndView modelAndView = new ModelAndView();
//        封装对象,放在ModelAndView中
        modelAndView.addObject("msg","HelloSpringMVC");

//        封装要跳转的视图,放在ModelAndView中
        modelAndView.setViewName("hello");    //: /WEB-INF/jsp/hello.jsp
        return modelAndView;
    }
}
将自己写的业务类交给SpringIOC进行管理,在SpringMVC-servlet.xml中注册bean
<bean id="/hello" class="com.zlq.controller.HelloController"/>
四.编写要跳转的jsp页面,显示ModelAndView存放的对象
<%@ page contentType="text/html;charset=UTF-8" language="java" %>
<html>
<head>
    <title>Hello~~~title>
head>
<body>
    ${msg}
body>
html>
接下来就可以配置并启动tomcat进行测试了
访问地址为 http://localhost:8080/工程名/hello
五.可能遇到的问题:访问出现404,排查步骤:
- 查看控制台输出,看一下是不是缺少了什么jar包。
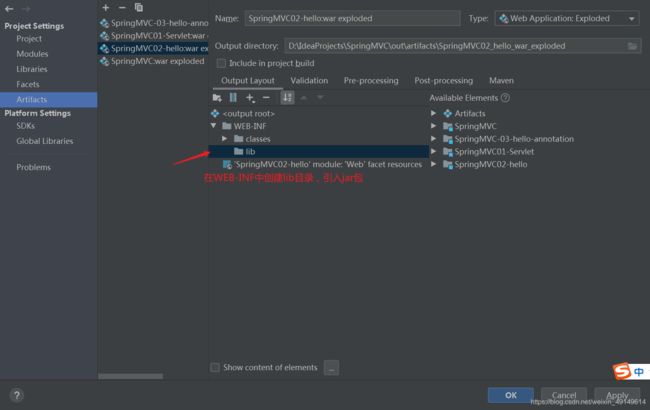
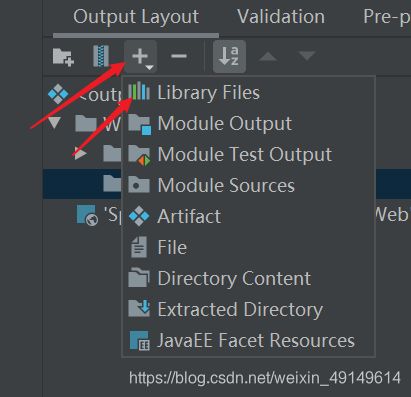
- 如果jar包存在,显示无法输出,就在IDEA的项目发布中,添加lib依赖!


将之前导入的dependencies依赖全部复制到lib目录下

- 重启Tomcat 即可解决!
注解版
写过配置版才能更加深刻的理解注解版,如果还不理解,那就写十遍,没有笨人,只有懒人!
一.由于maven可能出现资源过滤问题,在pom文件中完善配置
 <build>
        <properties>
              <spring.version>5.0.2.RELEASEspring.version>
         properties>
        <resources>
            <resource>
                <directory>src/main/javadirectory>
                <includes>
                    <include>**/*.propertiesinclude>
                    <include>**/*.xmlinclude>
                includes>
                <filtering>falsefiltering>
            resource>
            <resource>
                <directory>src/main/resourcesdirectory>
                <includes>
                    <include>**/*.propertiesinclude>
                    <include>**/*.xmlinclude>
                includes>
                <filtering>falsefiltering>
            resource>
        resources>
    build>
二.确定导入SpringMVC的依赖后配置web.xml,注册DispatcherServlet(和配置版相同)
<web-app xmlns="http://xmlns.jcp.org/xml/ns/javaee"
         xmlns:xsi="http://www.w3.org/2001/XMLSchema-instance"
         xsi:schemaLocation="http://xmlns.jcp.org/xml/ns/javaee http://xmlns.jcp.org/xml/ns/javaee/web-app_4_0.xsd"
         version="4.0">

    <servlet>
        <servlet-name>SpringMVCservlet-name>
        <servlet-class>org.springframework.web.servlet.DispatcherServletservlet-class>

        <init-param>
            <param-name>contextConfigLocationparam-name>
            <param-value>classpath:SpringMVC-servlet.xmlparam-value>
        init-param>

        <load-on-startup>1load-on-startup>
    servlet>
    <servlet-mapping>
        <servlet-name>SpringMVCservlet-name>


        <url-pattern>/url-pattern>
    servlet-mapping>

web-app>
三.编写SpringMVC的配置文件
- 让IOC的注解生效
- 静态资源过滤 :HTML . JS . CSS . 图片 , 视频 …
- MVC的注解驱动
- 配置视图解析器
- 引入命名空间
<beans xmlns="http://www.springframework.org/schema/beans" xmlns:mvc="http://www.springframework.org/schema/mvc"
       xmlns:context="http://www.springframework.org/schema/context"
       xmlns:xsi="http://www.w3.org/2001/XMLSchema-instance"
       xsi:schemaLocation=" http://www.springframework.org/schema/beans
       http://www.springframework.org/schema/beans/spring-beans.xsd
       http://www.springframework.org/schema/mvc
       http://www.springframework.org/schema/mvc/spring-mvc.xsd
       http://www.springframework.org/schema/context
       http://www.springframework.org/schema/context/spring-context.xsd">
beans>
- 设置自动扫描包,让包下的注解生效,由ioc容器统一管理
<context:component-scan base-package="com.zlq.controller"/>
- 让Spring MVC不处理静态资源
<mvc:default-servlet-handler />
- 配置支持MVC注解驱动
<mvc:annotation-driven />
annotation-driven的作用:用来支持mvc注解驱动 。
在spring中我们采用@RequestMapping注解来完成映射关系 ,要想使@RequestMapping注解生效, 必须向上下文中注册处理映射器(DefaultAnnotationHandlerMapping )和处理适配器(AnnotationMethodHandlerAdapter), 而annotation-driven配置帮助我们自动完成处理映射器和处理适配器两个实例的注入。
5. 配置视图解析器
 <bean class="org.springframework.web.servlet.view.InternalResourceViewResolver "  id="internalResourceViewResolver">

        <property name="prefix" value="/WEB-INF/jsp/"/>

        <property name="suffix" value=".jsp"/>
 bean>
通常处理器映射器和处理器适配器不需要我们配置,它们两个已经被注解驱动替代,而我们只需要手动开启视图解析器即可
四.编写操作业务controller
有了注解,编写操作业务就变得简单多了
@RequestMapping:该注解可以写在类上也可以写在方法上,如果想要多级路径就可以在类上写一个,在方法上写一个。
@Controller   //为了让Spring IOC容器初始化时自动扫描
@RequestMapping("/HelloController")    //为了映射请求路径,这里因为类与方法上都有映射所以访问时应该是/HelloController/hello;
public class HelloController {
    @RequestMapping("/hello")   //此时真实访问地址为 : 项目名/HelloController/hello
    public String sayHello(Model model) { //向模型中添加属性msg与值,可以在JSP页面中取出并渲染
        model.addAttribute("msg", "hello,SpringMVC"); //web-inf/jsp/hello.jsp
        return "hello";       //会被视图解析器处理,返回的字符串就是视图的名字
    }
}
五.编写视图层
<%@ page contentType="text/html;charset=UTF-8" language="java" %>
<html>
<head>
    <title>Hello~~~title>
head>
<body>
    ${msg}
body>
html>
接下来运行tomcat,
访问地址为 http://localhost:8080/工程名/HelloController/hello
注解版如果出现404问题和上面的解决办法一样!
总结:实现的步骤
- 新建一个web的maven项目
- 导入相关依赖jar包
- 编写web.xml,注册DispatcherServlet
- 编写SpringMVC的配置文件(配置版和注解版稍有不同)
- 创建业务类controller
- 完善前端视图
- 测试运行
以上步骤1,2,3,4都是写死的,我们按照规定来写就好了,只有5,6步需要我们自己手动编写,我们不需要像学习javaWeb的时候写一个类就配置一个Servlet,那多麻烦啊~
文章也是精心整理的,方便后期的查阅也方便大家更好的理解,相信按照我的步骤来不会有错,如果有哪里不对的地方也恳请大家指点~~~