HarmonyOS应用开发学习笔记 UI布局学习 List(){}创建列表 列表形式显示 简单使用
List 创建列表 列表形式显示
官方文档:创建列表(List)
关键代码
- List(){} 列表控件
- ListItem() {} 子元素
1、简单使用代码 List(){}
List() {
  ListItem() {
    Row() {
      Image($r('app.media.iconE'))
        .width(40)
        .height(40)
        .margin(10)

      Text('小明')
        .fontSize(20)
    }
  }

  ListItem() {
    Row() {
      Image($r('app.media.iconF'))
        .width(40)
        .height(40)
        .margin(10)

      Text('小红')
        .fontSize(20)
    }
  }
}
2、迭代列表内容 ForEach
import util from '@ohos.util';

class Contact {
  key: string = util.generateRandomUUID(true);
  name: string;
  icon: Resource;

  constructor(name: string, icon: Resource) {
    this.name = name;
    this.icon = icon;
  }
}

@Entry
@Component
struct SimpleContacts {
  private contacts = [
    new Contact('小明', $r("app.media.iconA")),
    new Contact('小红', $r("app.media.iconB")),
    ...
  ]

  build() {
    List() {
      ForEach(this.contacts, (item: Contact) => {
        ListItem() {
          Row() {
            Image(item.icon)
              .width(40)
              .height(40)
              .margin(10)
            Text(item.name).fontSize(20)
          }
          .width('100%')
          .justifyContent(FlexAlign.Start)
        }
      }, item => item.key)
    }
    .width('100%')
  }
}
3、列表方向 listDirection
关键代码:listDirection(Axis.Horizontal)
- 默认竖直方向 Axis.Vertical
List() {
  ...
}
.listDirection(Axis.Horizontal) //列表水平方向
4、设置内容间距 space
List({ space: 10 }) {
  ...
}
5、分隔符的设置 divider
List() {
  ...
}
.divider({
  strokeWidth: 1,
  startMargin: 60,
  endMargin: 10,
  color: '#ffe9f0f0'
})
-
- 分隔线的宽度会使ListItem之间存在一定间隔,当List设置的内容间距小于分隔线宽度时,ListItem之间的间隔会使用分隔线的宽度。
-
- 当List存在多列时,分割线的startMargin和endMargin作用于每一列上。
-
- List组件的分隔线画在两个ListItem之间,第一个ListItem上方和最后一个ListItem下方不会绘制分隔线。
6、滚动条的设置 scrollBar()
- BarState.on 打开
- BarState.Off 关闭
- BarState.Auto 自动 (滚动时显示,2秒后隐藏)
List() {
  ...
}
.scrollBar(BarState.Auto)
7、支持分组列表 itemHead
@Component
struct ContactsList {
  ...

  @Builder itemHead(text: string) {
    // 列表分组的头部组件,对应联系人分组A、B等位置的组件
    Text(text)
      .fontSize(20)
      .backgroundColor('#fff1f3f5')
      .width('100%')
      .padding(5)
  }

  build() {
    List() {
      ListItemGroup({ header: this.itemHead('A') }) {
        // 循环渲染分组A的ListItem
        ...
      }
      ...

      ListItemGroup({ header: this.itemHead('B') }) {
        // 循环渲染分组B的ListItem
        ...
      }
      ...
    }
  }
}
8、添加粘性标题 .sticky(StickyStyle.Header)
- 如果需要支持吸底效果,可以通过footer参数初始化ListItemGroup的底部组件,并将sticky属性设置为StickyStyle.Footer
@Component
struct ContactsList {
  // 定义分组联系人数据集合contactsGroups数组
  ...

  @Builder itemHead(text: string) {
    // 列表分组的头部组件,对应联系人分组A、B等位置的组件
    Text(text)
      .fontSize(20)
      .backgroundColor('#fff1f3f5')
      .width('100%')
      .padding(5)
  }

  build() {
    List() {
      // 循环渲染ListItemGroup,contactsGroups为多个分组联系人contacts和标题title的数据集合
      ForEach(this.contactsGroups, item => {
        ListItemGroup({ header: this.itemHead(item.title) }) {
          // 循环渲染ListItem
          ForEach(item.contacts, (contact) => {
            ListItem() {
              ...
            }
          }, item => item.key)
        }
        ...
      })
    }
    .sticky(StickyStyle.Header)  // 设置吸顶,实现粘性标题效果
  }
}
9、list快速返回列表顶部
1) 首先,需要创建一个Scroller的对象listScroller
private listScroller: Scroller = new Scroller();
2)然后,通过将listScroller用于初始化List组件的scroller参数,完成listScroller与列表的绑定。在需要跳转的位置指定scrollToIndex的参数为0,表示返回列表顶部。
Stack({ alignContent: Alignment.BottomEnd }) {
  // 将listScroller用于初始化List组件的scroller参数,完成listScroller与列表的绑定。
  List({ space: 20, scroller: this.listScroller }) {
    ...
  }
  ...

  Button() {
    ...
  }
  .onClick(() => {
    // 点击按钮时,指定跳转位置,返回列表顶部
    this.listScroller.scrollToIndex(0)
  })
  ...
}
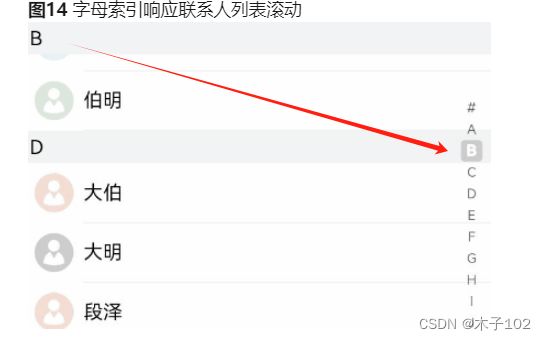
10、响应滚动位置 AlphabetIndexer
...
const alphabets = ['#', 'A', 'B', 'C', 'D', 'E', 'F', 'G', 'H', 'I', 'J', 'K',
  'L', 'M', 'N', 'O', 'P', 'Q', 'R', 'S', 'T', 'U', 'V', 'W', 'X', 'Y', 'Z'];

@Entry
@Component
struct ContactsList {
  @State selectedIndex: number = 0;
  private listScroller: Scroller = new Scroller();
  ...

  build() {
    Stack({ alignContent: Alignment.End }) {
      List({ scroller: this.listScroller }) {
        ...
      }
      .onScrollIndex((firstIndex: number) => {
          this.selectedIndex = firstIndex
        // 根据列表滚动到的索引值,重新计算对应联系人索引栏的位置this.selectedIndex
        ...
      })
      ...
      // 字母表索引组件
      AlphabetIndexer({ arrayValue: alphabets, selected: 0 })
        .selected(this.selectedIndex)
      ...
    }
  }
}
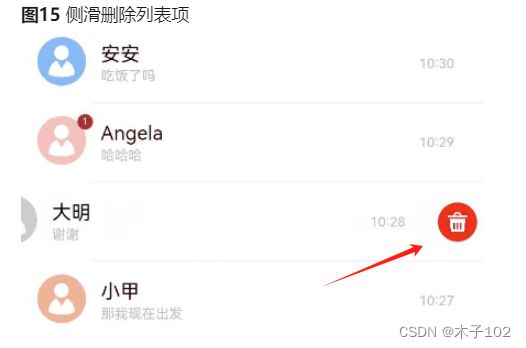
11、list 响应列表项侧滑
@Entry
@Component
struct MessageList {
  @State messages: object[] = [
    // 初始化消息列表数据
    ...
  ];

  @Builder itemEnd(index: number) {
    // 侧滑后尾端出现的组件
    Button({ type: ButtonType.Circle }) {
      Image($r('app.media.ic_public_delete_filled'))
        .width(20)
        .height(20)
    }
    .onClick(() => {
      this.messages.splice(index, 1);
    })
    ...
  }
  build() {
    ...
      List() {
        ForEach(this.messages, (item, index) => {
          ListItem() {
            ...
          }
          .swipeAction({ end: this.itemEnd.bind(this, index) }) // 设置侧滑属性
        }, item => item.id.toString())
      }
    ...
  }
}
12、list 懒加载 LazyForEach cachedCount
原因:
当数据量多的时候,为了减少内存,一般用懒加载缓存,显示屏幕内容,和渲染一定数量的缓存,当滑动的时候再加载没有渲染的内容,释放缓存外的内容,达到释放缓存的目的
目的:
- cachedCount的增加会增大UI的CPU、内存开销。使用时需要根据实际情况,综合性能和用户体验进行调整。
- 列表使用数据懒加载时,除了显示区域的列表项和前后缓存的列表项,其他列表项会被销毁。
关键代码:
- LazyForEach
- .cachedCount(3)
List() {
  LazyForEach(this.dataSource, item => {
    ListItem() {
      ...
    }
  })
}.cachedCount(3)


