MySQL数据库主从架构
数据库层的几种模式
在系统架构中,数据库层主要由如下几种模式,分别是单点模式、主备模式、主从模式。

单点模式
单点模式是最简单的模式,只有一台数据库服务器,部署最简单。但是存在单点风险,一旦这台服务器挂掉,整个系统也就挂掉了。
主备模式
为了解决单点模式的风险,主备模式产生。目前,主备模式应该是各个线上服务系统的最低配置了,比如你在各个云平台购买的数据库服务一般都会开启备份功能。一旦主节点出现问题,还可以切换到备份节点,不至于整个系统瘫痪。
主备又分为一主一备、一主多备。多个备份是为了保证更高的安全性,万一主节点出现问题的时候,碰巧备份节点也出问题呢。
当主节点出现问题的时候要切换到备份节点,切换方式又分为手动切换和自动切换。手动切换具有一定的延时,当主节点出现问题时,只能等运维人员发现或者收到系统通知。
主从模式
主从配置一般都是和读写分离相结合,主服务器负责写数据,从服务器负责读数据,并保证主服务器的数据及时同步到从服务器。
主从模式又分为一主一从、一主多从和多主多从,越往后部署越复杂,同时,系统稳定性更高。主从模式可以更好的分担数据库压力,将插入更新操作和查询操作分开,提高系统整体性能。
本文的目的就是介绍一下简单的一主一从架构的配置和原理。
主从原理
主节点
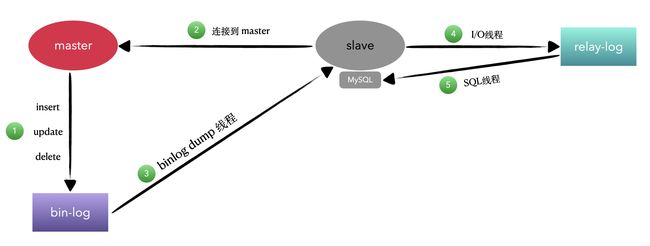
1、当主节点上进行 insert、update、delete 操作时,会按照时间先后顺序写入到 binlog 中;
2、当从节点连接到主节点时,主节点会创建一个叫做 binlog dump 的线程;
3、一个主节点有多少个从节点,就会创建多少个 binlog dump 线程;
4、当主节点的 binlog 发生变化的时候,也就是进行了更改操作,binlog dump 线程就会通知从节点 (Push模式),并将相应的 binlog 内容发送给从节点;
从节点
当开启主从同步的时候,从节点会创建两个线程用来完成数据同步的工作。
I/O线程: 此线程连接到主节点,主节点上的 binlog dump 线程会将 binlog 的内容发送给此线程。此线程接收到 binlog 内容后,再将内容写入到本地的 relay log。
SQL线程: 该线程读取 I/O 线程写入的 relay log,并且根据 relay log 的内容对从数据库做对应的操作。
主从配置一般都是和读写分离相结合,主服务器负责写数据,从服务器负责读数据,并保证主服务器的数据及时同步到从服务器。
基础环境
systemctl disable firewalld --now && setenforce 0
sed -i 's/SELINUX=enforcing/SELINUX=disabled/g' /etc/selinux/config
mv /etc/yum.repos.d/CentOS-* /tmp/
curl -o /etc/yum.repos.d/centos.repo http://mirrors.aliyun.com/repo/Centos-7.repo
yum install -y vim net-tools wget
mariadb安装
修改配置文件
[root@master ~]# cat /etc/my.cnf
[mysqld]
datadir=/var/lib/mysql
socket=/var/lib/mysql/mysql.sock

### 添加一下两行
log_bin = master
server_id = 210

# Disabling symbolic-links is recommended to prevent assorted security risks
symbolic-links=0
# Settings user and group are ignored when systemd is used.
# If you need to run mysqld under a different user or group,
# customize your systemd unit file for mariadb according to the
# instructions in http://fedoraproject.org/wiki/Systemd

[mysqld_safe]
log-error=/var/log/mariadb/mariadb.log
pid-file=/var/run/mariadb/mariadb.pid

#
# include all files from the config directory
#
!includedir /etc/my.cnf.d
重启服务
[root@master ~]# systemctl restart mariadb
[root@master ~]# ll /var/lib/mysql/
total 28708
-rw-rw----. 1 mysql mysql    16384 Dec 26 00:05 aria_log.00000001
-rw-rw----. 1 mysql mysql       52 Dec 26 00:05 aria_log_control
-rw-rw----. 1 mysql mysql 18874368 Dec 26 00:05 ibdata1
-rw-rw----. 1 mysql mysql  5242880 Dec 26 00:05 ib_logfile0
-rw-rw----. 1 mysql mysql  5242880 Dec 25 23:18 ib_logfile1
### 重启生成两个文件
-rw-rw----. 1 mysql mysql      245 Dec 26 00:05 master.000001	### binlog存放文件
-rw-rw----. 1 mysql mysql       16 Dec 26 00:05 master.index	### 索引
drwx------. 2 mysql mysql     4096 Dec 25 23:18 mysql
srwxrwxrwx. 1 mysql mysql        0 Dec 26 00:05 mysql.sock
drwx------. 2 mysql mysql     4096 Dec 25 23:18 performance_schema
drwx------. 2 mysql mysql        6 Dec 25 23:18 test
master导出数据
[root@master ~]# mysqldump -uroot mysql > /tmp/mysql.sql
[root@master ~]# ll /tmp/mysql.sql
-rw-r--r--. 1 root root 514625 Dec 26 00:16 /tmp/mysql.sql
[root@master ~]# scp /tmp/mysql.sql 192.168.169.211:/tmp/
The authenticity of host '192.168.169.211 (192.168.169.211)' can't be established.
ECDSA key fingerprint is SHA256:jWbYAeYZECozbGRUXJEvyjkDwdMTv3ubC8onVmMNiFE.
ECDSA key fingerprint is MD5:09:60:c5:b6:a5:92:59:d5:82:5d:53:c9:08:6c:44:11.
Are you sure you want to continue connecting (yes/no)? yes
Warning: Permanently added '192.168.169.211' (ECDSA) to the list of known hosts.
[email protected]'s password:
mysql.sql
slave导入数据
[root@slave ~]# ll /var/lib/mysql/
total 28708
-rw-rw----. 1 mysql mysql    16384 Dec 26 00:15 aria_log.00000001
-rw-rw----. 1 mysql mysql       52 Dec 26 00:15 aria_log_control
-rw-rw----. 1 mysql mysql 18874368 Dec 26 00:15 ibdata1
-rw-rw----. 1 mysql mysql  5242880 Dec 26 00:15 ib_logfile0
-rw-rw----. 1 mysql mysql  5242880 Dec 25 23:18 ib_logfile1
drwx------. 2 mysql mysql     4096 Dec 25 23:18 mysql
srwxrwxrwx. 1 mysql mysql        0 Dec 26 00:15 mysql.sock
drwx------. 2 mysql mysql     4096 Dec 25 23:18 performance_schema
-rw-rw----. 1 mysql mysql      245 Dec 26 00:15 slave.000001
-rw-rw----. 1 mysql mysql       15 Dec 26 00:15 slave.index
drwx------. 2 mysql mysql        6 Dec 25 23:18 test

[root@slave ~]# mysql -uroot cloud < /tmp/mysql.sql
[root@slave ~]# mysql -uroot
Welcome to the MariaDB monitor.  Commands end with ; or \g.
Your MariaDB connection id is 6
Server version: 5.5.68-MariaDB MariaDB Server

Copyright (c) 2000, 2018, Oracle, MariaDB Corporation Ab and others.

Type 'help;' or '\h' for help. Type '\c' to clear the current input statement.

MariaDB [(none)]> use cloud;
Reading table information for completion of table and column names
You can turn off this feature to get a quicker startup with -A

Database changed
MariaDB [cloud]> show tables;
+---------------------------+
| Tables_in_cloud           |
+---------------------------+
| columns_priv              |
| db                        |
| event                     |
| func                      |
| general_log               |
| help_category             |
| help_keyword              |
| help_relation             |
| help_topic                |
| host                      |
| ndb_binlog_index          |
| plugin                    |
| proc                      |
| procs_priv                |
| proxies_priv              |
| servers                   |
| slow_log                  |
| tables_priv               |
| time_zone                 |
| time_zone_leap_second     |
| time_zone_name            |
| time_zone_transition      |
| time_zone_transition_type |
| user                      |
+---------------------------+
24 rows in set (0.00 sec)


[root@slave ~]# ll /var/lib/mysql/
total 29668
-rw-rw----. 1 mysql mysql    16384 Dec 26 00:15 aria_log.00000001
-rw-rw----. 1 mysql mysql       52 Dec 26 00:15 aria_log_control
drwx------. 2 mysql mysql     4096 Dec 26 00:19 cloud
-rw-rw----. 1 mysql mysql 18874368 Dec 26 00:15 ibdata1
-rw-rw----. 1 mysql mysql  5242880 Dec 26 00:15 ib_logfile0
-rw-rw----. 1 mysql mysql  5242880 Dec 25 23:18 ib_logfile1
drwx------. 2 mysql mysql     4096 Dec 25 23:18 mysql
srwxrwxrwx. 1 mysql mysql        0 Dec 26 00:15 mysql.sock
drwx------. 2 mysql mysql     4096 Dec 25 23:18 performance_schema
-rw-rw----. 1 mysql mysql   513967 Dec 26 00:19 slave.000001	### 发生改变
-rw-rw----. 1 mysql mysql       15 Dec 26 00:15 slave.index
drwx------. 2 mysql mysql        6 Dec 25 23:18 test
[root@master ~]# mysql -uroot
Welcome to the MariaDB monitor.  Commands end with ; or \g.
Your MariaDB connection id is 228
Server version: 5.5.68-MariaDB MariaDB Server

Copyright (c) 2000, 2018, Oracle, MariaDB Corporation Ab and others.

Type 'help;' or '\h' for help. Type '\c' to clear the current input statement.

MariaDB [(none)]> grant replication slave on *.* to 'repl'@192.168.169.211 identified by '000000';
Query OK, 0 rows affected (0.00 sec)

MariaDB [(none)]> flush tables with read lock;
Query OK, 0 rows affected (0.00 sec)
[root@slave ~]# mysql -uroot
Welcome to the MariaDB monitor.  Commands end with ; or \g.
Your MariaDB connection id is 981
Server version: 5.5.68-MariaDB MariaDB Server

Copyright (c) 2000, 2018, Oracle, MariaDB Corporation Ab and others.

Type 'help;' or '\h' for help. Type '\c' to clear the current input statement.

MariaDB [(none)]> change master to master_host='192.168.169.210',master_user='repl',master_password='000000';
Query OK, 0 rows affected (0.01 sec)

MariaDB [(none)]> start slave;
Query OK, 0 rows affected (0.00 sec)

MariaDB [(none)]> show slave status\G
*************************** 1. row ***************************
               Slave_IO_State: Waiting for master to send event
                  Master_Host: 192.168.169.210
                  Master_User: repl
                  Master_Port: 3306
                Connect_Retry: 60
              Master_Log_File: master.000001
          Read_Master_Log_Pos: 399
               Relay_Log_File: mariadb-relay-bin.000002
                Relay_Log_Pos: 680
        Relay_Master_Log_File: master.000001
             Slave_IO_Running: Yes
            Slave_SQL_Running: Yes
              Replicate_Do_DB:
          Replicate_Ignore_DB:
           Replicate_Do_Table:
       Replicate_Ignore_Table:
      Replicate_Wild_Do_Table:
  Replicate_Wild_Ignore_Table:
                   Last_Errno: 0
                   Last_Error:
                 Skip_Counter: 0
          Exec_Master_Log_Pos: 399
              Relay_Log_Space: 976
              Until_Condition: None
               Until_Log_File:
                Until_Log_Pos: 0
           Master_SSL_Allowed: No
           Master_SSL_CA_File:
           Master_SSL_CA_Path:
              Master_SSL_Cert:
            Master_SSL_Cipher:
               Master_SSL_Key:
        Seconds_Behind_Master: 0
Master_SSL_Verify_Server_Cert: No
                Last_IO_Errno: 0
                Last_IO_Error:
               Last_SQL_Errno: 0
               Last_SQL_Error:
  Replicate_Ignore_Server_Ids:
             Master_Server_Id: 210
1 row in set (0.00 sec)
masterPort 为主库 mysql 端口(需要确保外网可访问)
masterUser 为刚创建的用于向从库同步数据的用户
masterPassword 为刚创建的用于向从库同步数据的用户密码
masterLogFile 为主库的日志文件名,对应字段 File
masterPosition 为主库指针位置,对应字段 Position
有两种方式,1.在"主库"上指定主库二进制日志记录的库或忽略的库:

vim  /etc/my.cnf
    ...
    binlog-do-db=xxxx   	# 二进制日志记录的数据库
    binlog-ignore-db=xxxx 	# 二进制日志中忽略数据库
    以上任意指定其中一行参数就行,如果需要忽略多个库,则添加多行
    ...
重启mysql
 2.在"从库"上指定复制哪些库或者不负责哪些库

# 编辑my.cnf,在mysqld字段添加如下内容:

replicate-do-db    				# 设定需要复制的数据库
replicate-ignore-db 			# 设定需要忽略的复制数据库
replicate-do-table  			# 设定需要复制的表
replicate-ignore-table 			# 设定需要忽略的复制表
replicate-wild-do-table 		# 同replication-do-table功能一样,但是可以通配符
replicate-wild-ignore-table 	# 同replication-ignore-table功能一样,但是可以加通配符

# 修改后重启mysql
| 参数名称 | 释义 |
|---|---|
| server-id | ID值唯一的标识了复制群集中的主从服务器,因此它们必须各不相同。master_id必须为1到232-1之间的一个正整数值,slave_id值必须为2到232-1之间的一个正整数值 |
| log-bin | 表示打开binlog,打开该选项才可以通过I/O写到Slave的relay-log,也是可以进行replication的前提 |
| binlog-do-db | 表示需要记录二进制日志的数据库。如果有多个数据可以用逗号分隔,或者使用多个binlog-do-dg选项 |
| binlog-ingore-db | 表示不需要记录二进制日志的数据库,如果有多个数据库可用逗号分隔,或者使用多binlog-ignore-db选项 |
| replicate-do-db | 表示需要同步的数据库,如果有多个数据可用逗号分隔,或者使用多个replicate-do-db选项 |
| replicate-ignore-db | 表示不需要同步的数据库,如果有多个数据库可用逗号分隔,或者使用多个replicate-ignore-db选项 |
| log-slave-updates | 配置从库上的更新操作是否写入二进制文件,如果这台从库,还要做其他从库的主库,那么就需要打这个参数,以便从库的从库能够进行日志同步 |
| slave-skip-errors | 在复制过程,由于各种原因导致binglo中的sql出错,默认情况下,从库会停止复制,要用户介入。可以设置slave-skip-errors来定义错误号,如果复制过程中遇到的错误是定义的错误号,便可以跳过 |
| auto_increment_offset和auto_increment_increment | Auto_increment_increment和auto_increment_offset用于主-主服务器(master-to-master)复制,并可以用来控制AUTO_INCREMENT列的操作 |
测试
[root@master ~]# mysql
Welcome to the MariaDB monitor.  Commands end with ; or \g.
Your MariaDB connection id is 5
Server version: 5.5.68-MariaDB MariaDB Server

Copyright (c) 2000, 2018, Oracle, MariaDB Corporation Ab and others.

Type 'help;' or '\h' for help. Type '\c' to clear the current input statement.

MariaDB [(none)]> use mysql
Reading table information for completion of table and column names
You can turn off this feature to get a quicker startup with -A

Database changed
MariaDB [mysql]> select count(*) from db;
+----------+
| count(*) |
+----------+
|        2 |
+----------+
1 row in set (0.00 sec)

MariaDB [mysql]> truncate table db;
Query OK, 0 rows affected (0.00 sec)

MariaDB [mysql]> select count(*) from db;
+----------+
| count(*) |
+----------+
|        0 |
+----------+
1 row in set (0.00 sec)
mysql 5.7(yum源)安装
安装服务
[root@master ~]# yum remove -y mariadb-libs

[root@master ~]# wget http://dev.mysql.com/get/mysql57-community-release-el7-8.noarch.rpm

[root@master ~]# yum localinstall -y http://dev.mysql.com/get/mysql57-community-release-el7-8.noarch.rpm

### 安装会报错缺少秘钥
[root@master ~]# yum install -y mysql-community-server

==============================================================================================
Public key for mysql-community-server-5.7.44-1.el7.x86_64.rpm is not installed


 Failing package is: mysql-community-server-5.7.44-1.el7.x86_64
 GPG Keys are configured as: file:///etc/pki/rpm-gpg/RPM-GPG-KEY-mysql
==============================================================================================
### 导入秘钥
[root@master ~]# rpm --import https://repo.mysql.com/RPM-GPG-KEY-mysql-2022
启动服务
[root@master ~]# systemctl enable mysqld --now

### 获取初始密码
[root@master ~]# grep 'password' /var/log/mysqld.log
2023-12-26T17:11:53.709964Z 1 [Note] A temporary password is generated for root@localhost: 0rn>.m*Nt&d.
修改密码
### 修改my.cnf文件
mysql> SHOW VARIABLES LIKE 'validate_password%';
+-------------------------------------------------+--------+
| Variable_name                                   | Value  |
+-------------------------------------------------+--------+
| validate_password.changed_characters_percentage | 0      |
| validate_password.check_user_name               | ON     |
| validate_password.dictionary_file               |        |
| validate_password.length                        | 8      |
| validate_password.mixed_case_count              | 1      |
| validate_password.number_count                  | 1      |
| validate_password.policy                        | MEDIUM |
| validate_password.special_char_count            | 1      |
+-------------------------------------------------+--------+
[root@master ~]# mysql -uroot -p
Enter password:
Welcome to the MySQL monitor.  Commands end with ; or \g.
Your MySQL connection id is 4
Server version: 5.7.44

Copyright (c) 2000, 2023, Oracle and/or its affiliates.

Oracle is a registered trademark of Oracle Corporation and/or its
affiliates. Other names may be trademarks of their respective
owners.

Type 'help;' or '\h' for help. Type '\c' to clear the current input statement.

### 修改密码策略
mysql> set global validate_password_policy=LOW;
Query OK, 0 rows affected (0.00 sec)

### 修改密码最少长度
mysql> set global validate_password_length=6;
Query OK, 0 rows affected (0.00 sec)

mysql> alter user 'root'@'localhost' identified by '000000';
Query OK, 0 rows affected (0.00 sec)
报错
mysql> alter user 'root'@'localhost' identified by '000000';
ERROR 1819 (HY000): Your password does not satisfy the current policy requirements

mysql> SHOW VARIABLES LIKE 'validate_password%';
ERROR 1820 (HY000): You must reset your password using ALTER USER statement before executing this statement.
mysql> show variables like '%password%';
+----------------------------------------+-----------------+
| Variable_name                          | Value           |
+----------------------------------------+-----------------+
| default_password_lifetime              | 0               |
| disconnect_on_expired_password         | ON              |
| log_builtin_as_identified_by_password  | OFF             |
| mysql_native_password_proxy_users      | OFF             |
| old_passwords                          | 0               |
| report_password                        |                 |
| sha256_password_auto_generate_rsa_keys | ON              |
| sha256_password_private_key_path       | private_key.pem |
| sha256_password_proxy_users            | OFF             |
| sha256_password_public_key_path        | public_key.pem  |
| validate_password_check_user_name      | OFF             |
| validate_password_dictionary_file      |                 |
| validate_password_length               | 6               |
| validate_password_mixed_case_count     | 1               |
| validate_password_number_count         | 1               |
| validate_password_policy               | LOW             |
| validate_password_special_char_count   | 1               |
+----------------------------------------+-----------------+
17 rows in set (0.01 sec)

### 详解
# validate_password_policy:密码策略,默认为MEDIUM策略

# validate_password_dictionary_file:密码策略文件,策略为STRONG才需要

# validate_password_length:密码最少长度

# validate_password_mixed_case_count:大小写字符长度,至少1个

# validate_password_number_count :数字至少1个

# validate_password_special_char_count:特殊字符至少1个

### 修改密码策略

在/etc/my.cnf文件添加validate_password_policy配置,指定密码策略

# 选择0(LOW),1(MEDIUM),2(STRONG)其中一种,选择2需要提供密码字典文件

validate_password_policy=0

如果不需要密码策略,添加my.cnf文件中添加如下配置禁用即可:

validate_password = off
MySQL官网密码策略详细说明:http://dev.mysql.com/doc/refman/5.7/en/validate-password-options-variables.html#sysvar_validate_password_policy
| 政策 | 执行的测试 |
|---|---|
0或LOW |
长度 |
1或MEDIUM |
长度;数字、小写/大写和特殊字符 |
2或STRONG |
长度;数字、小写/大写和特殊字符;字典 文件 |
修改默认字符节编码
mysql> show variables like '%character%';
+--------------------------+----------------------------+
| Variable_name            | Value                      |
+--------------------------+----------------------------+
| character_set_client     | utf8                       |
| character_set_connection | utf8                       |
| character_set_database   | latin1                     |
| character_set_filesystem | binary                     |
| character_set_results    | utf8                       |
| character_set_server     | latin1                     |
| character_set_system     | utf8                       |
| character_sets_dir       | /usr/share/mysql/charsets/ |
+--------------------------+----------------------------+
8 rows in set (0.00 sec)

### 配置默认编码为utf8

### 修改/etc/my.cnf配置文件,在[mysqld]下添加编码配置,如下所示:

[mysqld]

character_set_server=utf8

init_connect='SET NAMES utf8'

### 重启服务
[root@master ~]# systemctl restart mysqld

[root@master ~]# mysql -uroot -p000000
mysql: [Warning] Using a password on the command line interface can be insecure.
Welcome to the MySQL monitor.  Commands end with ; or \g.
Your MySQL connection id is 2
Server version: 5.7.44 MySQL Community Server (GPL)

Copyright (c) 2000, 2023, Oracle and/or its affiliates.

Oracle is a registered trademark of Oracle Corporation and/or its
affiliates. Other names may be trademarks of their respective
owners.

Type 'help;' or '\h' for help. Type '\c' to clear the current input statement.

mysql> show variables like '%character%';
+--------------------------+----------------------------+
| Variable_name            | Value                      |
+--------------------------+----------------------------+
| character_set_client     | utf8                       |
| character_set_connection | utf8                       |
| character_set_database   | utf8                       |
| character_set_filesystem | binary                     |
| character_set_results    | utf8                       |
| character_set_server     | utf8                       |
| character_set_system     | utf8                       |
| character_sets_dir       | /usr/share/mysql/charsets/ |
+--------------------------+----------------------------+
8 rows in set (0.01 sec)
主库配置
[root@master ~]# vim /etc/my.cnf

# 在[mysqld]下配置

log-bin = mysql-bin  		#[必须]启用二进制日志
server-id = 209         #[必须]服务器唯一ID,默认是1,最好取ip的后3位
expire-logs-days = 7    #只保留7天的二进制日志,以防磁盘被日志占满

# 注意如下两个参数,按需求配置:

binlog-ignore-db  = mysql       #不备份的数据库,默认的4个数据库可以添加上去,此环境不做配置

binlog-do-db=mybatis    #标明需要做复制的数据库名,此环境不做配置,同步所有
重启服务
[root@master ~]# systemctl restart mysqld

### log_bin为ON则表示开启成功,OFF表示开启失败

mysql> show variables like '%log_bin%';
+---------------------------------+--------------------------------+
| Variable_name                   | Value                          |
+---------------------------------+--------------------------------+
| log_bin                         | ON                             |
| log_bin_basename                | /var/lib/mysql/mysql-bin       |
| log_bin_index                   | /var/lib/mysql/mysql-bin.index |
| log_bin_trust_function_creators | OFF                            |
| log_bin_use_v1_row_events       | OFF                            |
| sql_log_bin                     | ON                             |
+---------------------------------+--------------------------------+
6 rows in set (0.01 sec)
从库配置
[root@slave ~]# vim /etc/my.cnf

# 在[mysqld]下配置

log-bin = mysql-bin  		#从库可不启用二进制日志
server-id = 210         #[必须]服务器唯一ID,默认是1,最好取ip的后3位
expire-logs-days = 7    #只保留7天的二进制日志,以防磁盘被日志占满
同步配置
主库
### 主库中创建同步账号:
### replication即可满足同步需求,如果不行,可以给all权限

mysql> grant replication slave on *.* to 'backup'@'%' identified by '111111';
Query OK, 0 rows affected, 1 warning (0.00 sec)

### 查询数据库账号
mysql> select user,authentication_string,host from mysql.user;
+---------------+-------------------------------------------+-----------+
| user          | authentication_string                     | host      |
+---------------+-------------------------------------------+-----------+
| root          | *032197AE5731D4664921A6CCAC7CFCE6A0698693 | localhost |
| mysql.session | *THISISNOTAVALIDPASSWORDTHATCANBEUSEDHERE | localhost |
| mysql.sys     | *THISISNOTAVALIDPASSWORDTHATCANBEUSEDHERE | localhost |
| backup        | *FD571203974BA9AFE270FE62151AE967ECA5E0AA | %         |
+---------------+-------------------------------------------+-----------+
4 rows in set (0.00 sec)

### 查看主服务器上当前的二进制日志名和偏移量值
mysql> show master status\G
*************************** 1. row ***************************
             File: mysql-bin.000001
         Position: 439
     Binlog_Do_DB:
 Binlog_Ignore_DB:
Executed_Gtid_Set:
1 row in set (0.01 sec)
从库
mysql> stop slave;
Query OK, 0 rows affected, 1 warning (0.01 sec)

mysql> reset slave;
Query OK, 0 rows affected (0.00 sec)

mysql> change master to master_host='192.168.169.209',master_user='backup',master_password='111111',master_log_file='mysql-bin.000001',master_log_pos=439;
Query OK, 0 rows affected, 2 warnings (0.00 sec)

mysql> start slave;
Query OK, 0 rows affected (0.01 sec)

mysql> show slave status\G
*************************** 1. row ***************************
               Slave_IO_State: Waiting for master to send event
                  Master_Host: 192.168.169.209
                  Master_User: backup
                  Master_Port: 3306
                Connect_Retry: 60
              Master_Log_File: mysql-bin.000001
          Read_Master_Log_Pos: 439
               Relay_Log_File: slave-relay-bin.000002
                Relay_Log_Pos: 320
        Relay_Master_Log_File: mysql-bin.000001
             Slave_IO_Running: Yes
            Slave_SQL_Running: Yes
              Replicate_Do_DB:
          Replicate_Ignore_DB:
           Replicate_Do_Table:
       Replicate_Ignore_Table:
      Replicate_Wild_Do_Table:
  Replicate_Wild_Ignore_Table:
                   Last_Errno: 0
                   Last_Error:
                 Skip_Counter: 0
          Exec_Master_Log_Pos: 439
              Relay_Log_Space: 527
              Until_Condition: None
               Until_Log_File:
                Until_Log_Pos: 0
           Master_SSL_Allowed: No
           Master_SSL_CA_File:
           Master_SSL_CA_Path:
              Master_SSL_Cert:
            Master_SSL_Cipher:
               Master_SSL_Key:
        Seconds_Behind_Master: 0
Master_SSL_Verify_Server_Cert: No
                Last_IO_Errno: 0
                Last_IO_Error:
               Last_SQL_Errno: 0
               Last_SQL_Error:
  Replicate_Ignore_Server_Ids:
             Master_Server_Id: 209
                  Master_UUID: dd8b3f6a-a411-11ee-b847-000c29016433
             Master_Info_File: /var/lib/mysql/master.info
                    SQL_Delay: 0
          SQL_Remaining_Delay: NULL
      Slave_SQL_Running_State: Slave has read all relay log; waiting for more updates
           Master_Retry_Count: 86400
                  Master_Bind:
      Last_IO_Error_Timestamp:
     Last_SQL_Error_Timestamp:
               Master_SSL_Crl:
           Master_SSL_Crlpath:
           Retrieved_Gtid_Set:
            Executed_Gtid_Set:
                Auto_Position: 0
         Replicate_Rewrite_DB:
                 Channel_Name:
           Master_TLS_Version:
1 row in set (0.00 sec)

# master_host 主库主机的IP地址

# master_port 主库的端口,默认为3306

# master_user 实现复制的远程登录master的mysql的用户

# master_password 实现复制的远程登录master的mysql的面

# master_log_file 实现复制的binlog日志文件(主库的文件名)

# master_log_pos 实现复制的binlog日志文件的偏移量(主库的偏移量)