Java多线程 -线程池详解
熟悉Java多线程编程的同学都知道,当我们线程创建过多时,容易引发内存溢出,因此我们就有必要使用线程池的技术了。
目录
1 线程池的优势
2 线程池的使用
3 线程池的工作原理
4 线程池的参数
4.1 任务队列(workQueue)
4.2 线程工厂(threadFactory)
4.3 拒绝策略(handler)
5 功能线程池
5.1 定长线程池(FixedThreadPool)
5.2 定时线程池(ScheduledThreadPool )
5.3 可缓存线程池(CachedThreadPool)
5.4 单线程化线程池(SingleThreadExecutor)
5.5 对比
6 总结
参考
1 线程池的优势
总体来说,线程池有如下的优势:
(1)降低资源消耗。通过重复利用已创建的线程降低线程创建和销毁造成的消耗。
(2)提高响应速度。当任务到达时,任务可以不需要等到线程创建就能立即执行。
(3)提高线程的可管理性。线程是稀缺资源,如果无限制的创建,不仅会消耗系统资源,还会降低系统的稳定性,使用线程池可以进行统一的分配,调优和监控。
2 线程池的使用
线程池的真正实现类是ThreadPoolExecutor,其构造方法有如下4种:
-
public ThreadPoolExecutor(int corePoolSize,
-
int maximumPoolSize,
-
long keepAliveTime,
-
TimeUnit unit,
-
BlockingQueue
workQueue) {
-
this(corePoolSize, maximumPoolSize, keepAliveTime, unit, workQueue,
-
Executors.defaultThreadFactory(), defaultHandler);
-
}
-
-
public ThreadPoolExecutor(int corePoolSize,
-
int maximumPoolSize,
-
long keepAliveTime,
-
TimeUnit unit,
-
BlockingQueue
workQueue,
-
ThreadFactory threadFactory) {
-
this(corePoolSize, maximumPoolSize, keepAliveTime, unit, workQueue,
-
threadFactory, defaultHandler);
-
}
-
-
public ThreadPoolExecutor(int corePoolSize,
-
int maximumPoolSize,
-
long keepAliveTime,
-
TimeUnit unit,
-
BlockingQueue
workQueue,
-
RejectedExecutionHandler handler) {
-
this(corePoolSize, maximumPoolSize, keepAliveTime, unit, workQueue,
-
Executors.defaultThreadFactory(), handler);
-
}
-
-
public ThreadPoolExecutor(int corePoolSize,
-
int maximumPoolSize,
-
long keepAliveTime,
-
TimeUnit unit,
-
BlockingQueue
workQueue,
-
ThreadFactory threadFactory,
-
RejectedExecutionHandler handler) {
-
if (corePoolSize <
0 ||
-
maximumPoolSize <=
0 ||
-
maximumPoolSize < corePoolSize ||
-
keepAliveTime <
0)
-
throw
new IllegalArgumentException();
-
if (workQueue ==
null || threadFactory ==
null || handler ==
null)
-
throw
new NullPointerException();
-
this.corePoolSize = corePoolSize;
-
this.maximumPoolSize = maximumPoolSize;
-
this.workQueue = workQueue;
-
this.keepAliveTime = unit.toNanos(keepAliveTime);
-
this.threadFactory = threadFactory;
-
this.handler = handler;
-
}
可以看到,其需要如下几个参数:
- corePoolSize(必需):核心线程数。默认情况下,核心线程会一直存活,但是当将allowCoreThreadTimeout设置为true时,核心线程也会超时回收。
- maximumPoolSize(必需):线程池所能容纳的最大线程数。当活跃线程数达到该数值后,后续的新任务将会阻塞。
- keepAliveTime(必需):线程闲置超时时长。如果超过该时长,非核心线程就会被回收。如果将allowCoreThreadTimeout设置为true时,核心线程也会超时回收。
- unit(必需):指定keepAliveTime参数的时间单位。常用的有:TimeUnit.MILLISECONDS(毫秒)、TimeUnit.SECONDS(秒)、TimeUnit.MINUTES(分)。
- workQueue(必需):任务队列。通过线程池的execute()方法提交的Runnable对象将存储在该参数中。其采用阻塞队列实现。
- threadFactory(可选):线程工厂。用于指定为线程池创建新线程的方式。
- handler(可选):拒绝策略。当达到最大线程数时需要执行的饱和策略。
线程池的使用流程如下:
-
// 创建线程池
-
Executor threadPool =
new ThreadPoolExecutor(CORE_POOL_SIZE,
-
MAXIMUM_POOL_SIZE,
-
KEEP_ALIVE,
-
TimeUnit.SECONDS,
-
sPoolWorkQueue,
-
sThreadFactory);
-
// 向线程池提交任务
-
threadPool.execute(
new Runnable() {
-
@Override
-
public void run() {
-
...
// 线程执行的任务
-
}
-
});
-
// 关闭线程池
-
threadPool.shutdown();
// 设置线程池的状态为SHUTDOWN,然后中断所有没有正在执行任务的线程
-
threadPool.shutdownNow();
// 设置线程池的状态为 STOP,然后尝试停止所有的正在执行或暂停任务的线程,并返回等待执行任务的列表
3 线程池的工作原理
下面来描述一下线程池工作的原理,同时对上面的参数有一个更深的了解。其工作原理流程图如下:
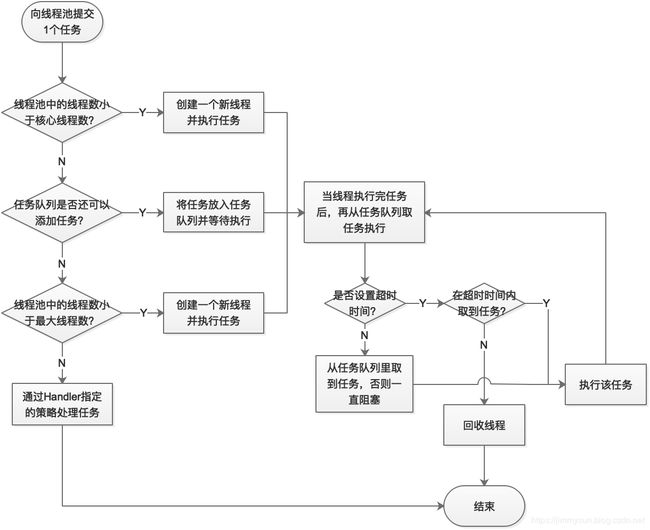
通过上图,相信大家已经对所有参数有个了解了。下面再对任务队列、线程工厂和拒绝策略做更多的说明。
4 线程池的参数
4.1 任务队列(workQueue)
任务队列是基于阻塞队列实现的,即采用生产者消费者模式,在Java中需要实现BlockingQueue接口。但Java已经为我们提供了7种阻塞队列的实现:
- ArrayBlockingQueue:一个由数组结构组成的有界阻塞队列(数组结构可配合指针实现一个环形队列)。
- LinkedBlockingQueue: 一个由链表结构组成的有界阻塞队列,在未指明容量时,容量默认为Integer.MAX_VALUE。
- PriorityBlockingQueue: 一个支持优先级排序的无界阻塞队列,对元素没有要求,可以实现Comparable接口也可以提供Comparator来对队列中的元素进行比较。跟时间没有任何关系,仅仅是按照优先级取任务。
- DelayQueue:类似于PriorityBlockingQueue,是二叉堆实现的无界优先级阻塞队列。要求元素都实现Delayed接口,通过执行时延从队列中提取任务,时间没到任务取不出来。
- SynchronousQueue: 一个不存储元素的阻塞队列,消费者线程调用take()方法的时候就会发生阻塞,直到有一个生产者线程生产了一个元素,消费者线程就可以拿到这个元素并返回;生产者线程调用put()方法的时候也会发生阻塞,直到有一个消费者线程消费了一个元素,生产者才会返回。
- LinkedBlockingDeque: 使用双向队列实现的有界双端阻塞队列。双端意味着可以像普通队列一样FIFO(先进先出),也可以像栈一样FILO(先进后出)。
- LinkedTransferQueue: 它是ConcurrentLinkedQueue、LinkedBlockingQueue和SynchronousQueue的结合体,但是把它用在ThreadPoolExecutor中,和LinkedBlockingQueue行为一致,但是是无界的阻塞队列。
注意有界队列和无界队列的区别:如果使用有界队列,当队列饱和时并超过最大线程数时就会执行拒绝策略;而如果使用无界队列,因为任务队列永远都可以添加任务,所以设置maximumPoolSize没有任何意义。
4.2 线程工厂(threadFactory)
线程工厂指定创建线程的方式,需要实现ThreadFactory接口,并实现newThread(Runnable r)方法。该参数可以不用指定,Executors框架已经为我们实现了一个默认的线程工厂:
-
/**
-
* The default thread factory.
-
*/
-
private
static
class DefaultThreadFactory implements ThreadFactory {
-
private
static
final AtomicInteger poolNumber =
new AtomicInteger(
1);
-
private
final ThreadGroup group;
-
private
final AtomicInteger threadNumber =
new AtomicInteger(
1);
-
private
final String namePrefix;
-
-
DefaultThreadFactory() {
-
SecurityManager s = System.getSecurityManager();
-
group = (s !=
null) ? s.getThreadGroup() :
-
Thread.currentThread().getThreadGroup();
-
namePrefix =
"pool-" +
-
poolNumber.getAndIncrement() +
-
"-thread-";
-
}
-
-
public Thread newThread(Runnable r) {
-
Thread t =
new Thread(group, r,
-
namePrefix + threadNumber.getAndIncrement(),
-
0);
-
if (t.isDaemon())
-
t.setDaemon(
false);
-
if (t.getPriority() != Thread.NORM_PRIORITY)
-
t.setPriority(Thread.NORM_PRIORITY);
-
return t;
-
}
-
}
4.3 拒绝策略(handler)
当线程池的线程数达到最大线程数时,需要执行拒绝策略。拒绝策略需要实现RejectedExecutionHandler接口,并实现rejectedExecution(Runnable r, ThreadPoolExecutor executor)方法。不过Executors框架已经为我们实现了4种拒绝策略:
- AbortPolicy(默认):丢弃任务并抛出RejectedExecutionException异常。
- CallerRunsPolicy:由调用线程处理该任务。
- DiscardPolicy:丢弃任务,但是不抛出异常。可以配合这种模式进行自定义的处理方式。
- DiscardOldestPolicy:丢弃队列最早的未处理任务,然后重新尝试执行任务。
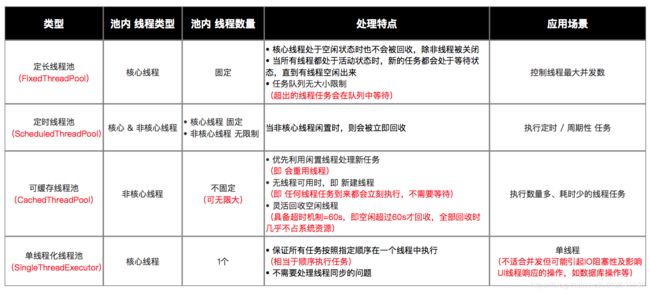
5 功能线程池
嫌上面使用线程池的方法太麻烦?其实Executors已经为我们封装好了4种常见的功能线程池,如下:
- 定长线程池(FixedThreadPool)
- 定时线程池(ScheduledThreadPool )
- 可缓存线程池(CachedThreadPool)
- 单线程化线程池(SingleThreadExecutor)
5.1 定长线程池(FixedThreadPool)
创建方法的源码:
-
public static ExecutorService newFixedThreadPool(int nThreads) {
-
return
new ThreadPoolExecutor(nThreads, nThreads,
-
0L, TimeUnit.MILLISECONDS,
-
new LinkedBlockingQueue
());
-
}
-
public static ExecutorService newFixedThreadPool(int nThreads, ThreadFactory threadFactory) {
-
return
new ThreadPoolExecutor(nThreads, nThreads,
-
0L, TimeUnit.MILLISECONDS,
-
new LinkedBlockingQueue
(),
-
threadFactory);
-
}
- 特点:只有核心线程,线程数量固定,执行完立即回收,任务队列为链表结构的有界队列。
- 应用场景:控制线程最大并发数。
使用示例:
-
// 1. 创建定长线程池对象 & 设置线程池线程数量固定为3
-
ExecutorService fixedThreadPool = Executors.newFixedThreadPool(
3);
-
// 2. 创建好Runnable类线程对象 & 需执行的任务
-
Runnable task =
new Runnable(){
-
public void run() {
-
System.
out.println(
"执行任务啦");
-
}
-
};
-
// 3. 向线程池提交任务
-
fixedThreadPool.execute(task);
5.2 定时线程池(ScheduledThreadPool )
创建方法的源码:
-
private
static
final
long DEFAULT_KEEPALIVE_MILLIS =
10L;
-
-
public static ScheduledExecutorService newScheduledThreadPool(int corePoolSize) {
-
return
new ScheduledThreadPoolExecutor(corePoolSize);
-
}
-
public ScheduledThreadPoolExecutor(int corePoolSize) {
-
super(corePoolSize, Integer.MAX_VALUE,
-
DEFAULT_KEEPALIVE_MILLIS, MILLISECONDS,
-
new DelayedWorkQueue());
-
}
-
-
public static ScheduledExecutorService newScheduledThreadPool(
-
int corePoolSize, ThreadFactory threadFactory) {
-
return
new ScheduledThreadPoolExecutor(corePoolSize, threadFactory);
-
}
-
public ScheduledThreadPoolExecutor(int corePoolSize,
-
ThreadFactory threadFactory) {
-
super(corePoolSize, Integer.MAX_VALUE,
-
DEFAULT_KEEPALIVE_MILLIS, MILLISECONDS,
-
new DelayedWorkQueue(), threadFactory);
-
}
- 特点:核心线程数量固定,非核心线程数量无限,执行完闲置10ms后回收,任务队列为延时阻塞队列。
- 应用场景:执行定时或周期性的任务。
使用示例:
-
// 1. 创建 定时线程池对象 & 设置线程池线程数量固定为5
-
ScheduledExecutorService scheduledThreadPool = Executors.newScheduledThreadPool(
5);
-
// 2. 创建好Runnable类线程对象 & 需执行的任务
-
Runnable task =
new Runnable(){
-
public void run() {
-
System.
out.println(
"执行任务啦");
-
}
-
};
-
// 3. 向线程池提交任务
-
scheduledThreadPool.schedule(task,
1, TimeUnit.SECONDS);
// 延迟1s后执行任务
-
scheduledThreadPool.scheduleAtFixedRate(task,
10,
1000,TimeUnit.MILLISECONDS);
// 延迟10ms后、每隔1000ms执行任务
5.3 可缓存线程池(CachedThreadPool)
创建方法的源码:
-
public static ExecutorService newCachedThreadPool() {
-
return
new ThreadPoolExecutor(
0, Integer.MAX_VALUE,
-
60L, TimeUnit.SECONDS,
-
new SynchronousQueue
());
-
}
-
public static ExecutorService newCachedThreadPool(ThreadFactory threadFactory) {
-
return
new ThreadPoolExecutor(
0, Integer.MAX_VALUE,
-
60L, TimeUnit.SECONDS,
-
new SynchronousQueue
(),
-
threadFactory);
-
}
- 特点:无核心线程,非核心线程数量无限,执行完闲置60s后回收,任务队列为不存储元素的阻塞队列。
- 应用场景:执行大量、耗时少的任务。
使用示例:
-
// 1. 创建可缓存线程池对象
-
ExecutorService cachedThreadPool = Executors.newCachedThreadPool();
-
// 2. 创建好Runnable类线程对象 & 需执行的任务
-
Runnable task =
new Runnable(){
-
public void run() {
-
System.
out.println(
"执行任务啦");
-
}
-
};
-
// 3. 向线程池提交任务
-
cachedThreadPool.execute(task);
5.4 单线程化线程池(SingleThreadExecutor)
创建方法的源码:
-
public static ExecutorService newSingleThreadExecutor() {
-
return
new FinalizableDelegatedExecutorService
-
(
new ThreadPoolExecutor(
1,
1,
-
0L, TimeUnit.MILLISECONDS,
-
new LinkedBlockingQueue
()));
-
}
-
public static ExecutorService newSingleThreadExecutor(ThreadFactory threadFactory) {
-
return
new FinalizableDelegatedExecutorService
-
(
new ThreadPoolExecutor(
1,
1,
-
0L, TimeUnit.MILLISECONDS,
-
new LinkedBlockingQueue
(),
-
threadFactory));
-
}
- 特点:只有1个核心线程,无非核心线程,执行完立即回收,任务队列为链表结构的有界队列。
- 应用场景:不适合并发但可能引起IO阻塞性及影响UI线程响应的操作,如数据库操作、文件操作等。
使用示例:
-
// 1. 创建单线程化线程池
-
ExecutorService singleThreadExecutor = Executors.newSingleThreadExecutor();
-
// 2. 创建好Runnable类线程对象 & 需执行的任务
-
Runnable task =
new Runnable(){
-
public void run() {
-
System.
out.println(
"执行任务啦");
-
}
-
};
-
// 3. 向线程池提交任务
-
singleThreadExecutor.execute(task);
5.5 对比
6 总结
Executors的4个功能线程池虽然方便,但现在已经不建议使用了,而是建议直接通过使用ThreadPoolExecutor的方式,这样的处理方式让写的同学更加明确线程池的运行规则,规避资源耗尽的风险。
其实Executors的4个功能线程有如下弊端:
- FixedThreadPool和SingleThreadExecutor:主要问题是堆积的请求处理队列均采用LinkedBlockingQueue,可能会耗费非常大的内存,甚至OOM。
- CachedThreadPool和ScheduledThreadPool:主要问题是线程数最大数是Integer.MAX_VALUE,可能会创建数量非常多的线程,甚至OOM。
参考
- Android多线程:线程池ThreadPool 全面解析
- 还在用Executors创建线程池?小心内存溢出
- 《阿里巴巴java开发手册》