【C++】vector部分API及其用法
一、vector的介绍
1. vector是表示可变大小数组的序列容器。
2. 就像数组一样,vector也采用连续存储空间来存储元素。也就是意味着可以采用下标对vector的元素进行访问,和数组一样高效。但是又不像数组,它的大小是可以动态改变的,而且它的大小会被容器自动处理。
3. 本质上讲,vector使用动态分配数组来存储它的元素。当新元素插入时候,为了增加存储空间,这个数组需要被重新分配大小。其做法是,先分配一个新的空间,然后将全部元素移到这个空间。就时间而言,这是一个相对来说代价较高的任务,因为每当一个新的元素加入到容器的时候,vector都有可能都重新分配大小。
4. vector分配空间策略:vector会分配一些额外的空间以适应可能的增长,因此存储空间比实际需要的存储空间更大。不同的库采用不同的策略权衡空间的使用和重新分配。但是无论如何,重新分配都应该是对数增长的间隔大小,以至于在末尾插入一个元素的时候是在常数时间的复杂度完成的。
5. 因此,为了获得管理存储空间的能力,vector占用了更多的存储空间,并且以一种有效的方式动态增长。
6. 与其它动态序列容器相比(deque,list 和 forward_list), vector在访问元素的时候更加高效,在末尾添加和删除元素相对高效。对于其它不在末尾的删除和插入操作,效率较低。
总结:
① vector是可以动态增长的数组,即顺序表。
② vector的扩容操作并不是在原空间之后续接新空间,而是找更大的内存空间,然后将原数据拷贝到新空间,再释放原空间。
vector是一个类模板,可以根据不同的数据类型来实例化存储不同类型数据的vector。
//例如:

//存储数据类型为int的顺序表
vector vi;

//存储数据类型为double的顺序表
vector vd;

//存储数据类型为char的顺序表
vector vc;

//存储数据类型为string的顺序表
vector vs;

//存储数据类型为vector的顺序表
//类似于二维数组
//但不同的是vector>的容量是可以动态增长的,而二维数组的容量是固定的
vector> vvi; 注:类模板的实例化与普通类的实例化不同,类模板的实例化要标明实例化对象的数据类型,并把数据类型标明在类模板后的<>内。并且实例化对象的数据类型不是类模板而是类模板<类模板存储的数据类型>。
//vi的数据类型不是vector而是vector
vector vi;

//vs的数据类型不是vector而是vector
vector vs; 看到这里你可能会想,既然vector是是一个动态数组,string也是一个动态数组,那么能不能用vector
很遗憾这是不可以的。因为为了更好的兼容C类型字符串,string在实现时就规定了会在字符串的后面自行追加一个'\0';而vector
所以vector
二、构造函数
2.1 默认构造函数
【函数原型】
//默认构造函数
//构造一个空顺序表 这个顺序表的size和capacity都为0
//T为vector存储的数据类型
vector vT;
2.2 填充构造
【函数原型】
//n为填充数据的个数 element为数据的值
//即用n个element为vector进行初始化
vector vT(n, element);
【代码演示】
#include
#include
#include

using namespace std;

int main()
{
	//用4个16个vi进行初始化
	vector vi(4, 16);

	//用4个16个vi进行初始化
	vector vd(2, 520.1314);

	//用3个'x'给vc进行初始化
	vector vc(3, 'x');

	//输出vi
	for (auto& K : vi)
	{
		cout << K << " ";
	}
	cout << endl;

	//输出vd
	for (auto& K : vd)
	{
		//默认情况下,cout显⽰数据的最⼤位数(包括⼩数点之前和⼩数点之后)是6位
		//我们可以通过库中的setprecision(n)来控制cout输出的精度
		//若指定的位数大于自身位数,则按自身位数全部输出(注意小数末尾的0不输出)
		//注:设置的setprecision(n)会⼀直存在,直到更改设置
		cout << setprecision(8) <
【输出结果】
注:vector
//short、int、long等整形会初始化为0
//float、double等浮点型会初始化为0.0
//char会初始化为'\0'
//bool会初始化为false

//不指定element
vector vT(n);
2.3 拷贝构造
【函数原型】
【代码演示】
#include
#include

using namespace std;

int main()
{
	//构造存储了两个10的vi
	vector vi(2, 10);

	//拷贝构造
	vector vi_copy(vi);

	cout << "vi: ";
	for (auto k : vi)
	{
		cout << k << " ";
	}
	cout << endl;

	cout << "vi_copy: ";
	for (auto k : vi_copy)
	{
		cout << k << " ";
	}
	cout << endl;

	return 0;
}
【输出结果】
注:赋值操作符重载(operator=)后效果与拷贝构造相同。
【函数原型】
【代码演示】
#include
#include

using namespace std;

int main()
{
	vector vi(10, 3);
	vector vii = vi;

	for (auto& k : vii)
	{
		cout << k << " ";
	}
	cout << endl;

	return 0;
}
【输出结果】
2.4 迭代器构造
【函数原型】
//迭代器构造
template
vector vT(InputIterator first, InputIterator last);
【代码演示】
#include
#include

using namespace std;

int main()
{
	vector vi;

	//对vi进行尾插
	vi.push_back(5);
	vi.push_back(2);
	vi.push_back(0);
	vi.push_back(1);
	vi.push_back(4);

	//截取vi的前3个数据来构造vii
	vector vii(vi.begin(), vi.begin() + 3);

	for (auto& k : vii)
	{
		cout << k << " ";
	}

	cout << endl;
	return 0;
}
【输出结果】
注:迭代器构造也可以用于用数组来构造vector。
【代码演示】
#include
#include

using namespace std;

int main()
{
	int array[] = { 1,1,4,5,1,4 };

	//array为数组名,是数组首元素的地址
	//sizeof(array) / sizeof(array[0]用于求数组的长度
	vector vi(array, array + sizeof(array) / sizeof(array[0]));

	for (auto& k : vi)
	{
		cout << k << " ";
	}
	cout << endl;

	return 0;
}
【输出结果】
2.5 用数组构造
【代码演示】
#include
#include
#include

using namespace std;

int main()
{
	vector vi{ 1, 2, 3, 4, 5, 6 };
	vector vd{ 1.1, 2.2, 3.3 };
	vector vs{ "Hello", "vector", "!" };

	cout << "vi: ";
	for (auto& k : vi)
	{
		cout << k << " ";
	}
	cout << endl;

	cout << "vd: ";
	for (auto& k : vd)
	{
		cout << k << " ";
	}
	cout << endl;

	cout << "vs: ";
	for (auto& k : vs)
	{
		cout << k << " ";
	}
	cout << endl;
	return 0;
}
【输出结果】
三、迭代器
迭代器的使用非常像指针,但迭代器并不一定是指针,在vector中迭代器是指针。
3.1 正向迭代器
【函数原型】
【代码演示】
#include
#include

using namespace std;

int main()
{
	vector vi{ 1,2,3,4,5,6,7,8,9 };

	//vi的类型是vector 而不是vector
	//所以是vector::iterator 而不是vector::iterator
	vector::iterator bit = vi.begin();
	vector::iterator eit = vi.end();

	cout << "vi的第一个元素为:" << *bit << endl;
	cout << "vi的最后一个元素为:" << *(eit - 1) << endl;

	return 0;
}
【输出结果】
3.2 反向迭代器
【函数原型】
【代码演示】
#include
#include

using namespace std;

int main()
{
	vector vi{ 1,2,3,4,5,6,7,8,9 };
	vector::reverse_iterator rbit = vi.rbegin();
	vector::reverse_iterator reit = vi.rend();

	//倒着打印vi
	while (rbit != reit)
	{
		cout << *rbit << " ";

		//虽然rbit在reit的后面
		//但是rbegin到rend任然是++而不是--
		++rbit;
	}

	cout << endl;
	return 0;
}
【输出结果】
四、容量相关
4.1 获取vector的有效长度 —— size
【函数原型】
【代码演示】
#include
#include
#include

using namespace std;

int main()
{
	vector vi{ 1, 2, 3, 4, 5, 6 };

	//vs中有2个字符串,所以vs的有效长度为2
	vector vs{ "Hello", "vector" };

	cout << vi.size() << endl;
	cout << vs.size() << endl;
	return 0;
}
【输出结果】
4.2 获取vector当前的容量 —— capacity
【函数原型】
【代码演示】
#include
#include

using namespace std;

int main()
{
	vector vi{ 1,2,3,4,5 };
	cout << vi.capacity() << endl;

	return 0;
}
【输出结果】
4.3 判断vector是否为空 —— empty
【函数原型】
【代码演示】
#include
#include

using namespace std;

int main()
{
	vector vi;
	cout << vi.empty() << endl;

	vi.push_back(1);
	cout << vi.empty() << endl;

	return 0;
}
【输出结果】
4.4 修改vector的有效长度 —— resize
【函数原型】
resize的使用有两种情况:
① 如果指定的长度n小于vector原本的有效长度size,那么就只会保留vector的前n个元素,其他删除。
② 如果指定的长度n大于vector原本的有效长度size,那么就会用val将有效长度延长到n,如果不指定val,那么val就为默认值。
//short、int、long等整形会初始化为0
//float、double等浮点型会初始化为0.0
//char会初始化为'\0'
//bool会初始化为false
【文档描述】
【代码演示】
#include
#include

using namespace std;

int main()
{
	//情况一: n < size
	vector vi1{ 1,2,3,4,5,6,7,8,9 };
	cout << "vi1 resize前的长度为 " << vi1.size() << endl;
	cout << "vi1 resize前的容量为 " << vi1.capacity() << endl;
	vi1.resize(4);
	cout << "vi1 resize后的长度为 " << vi1.size() << endl;
	cout << "vi1 resize后的容量为 " << vi1.capacity() << endl;

	cout << "vi1: " << endl;
	for (auto& k : vi1)
	{
		cout << k << " ";
	}
	cout << endl;


	//情况二: n > size
	vector vi2{ 1,2,3,4,5 };
	vector vi3(vi2);
	cout << "vi2 resize前的长度为 " << vi2.size() << endl;
	cout << "vi2 resize前的容量为 " << vi2.capacity() << endl;
	cout << "vi3 resize前的长度为 " << vi3.size() << endl;
	cout << "vi3 resize前的容量为 " << vi3.capacity() << endl;

	//指定val
	vi2.resize(11, 11);

	//不指定val
	vi3.resize(11);

	cout << "vi2 resize后的长度为 " << vi2.size() << endl;
	cout << "vi2 resize后的容量为 " << vi2.capacity() << endl;
	cout << "vi3 resize后的长度为 " << vi3.size() << endl;
	cout << "vi3 resize后的容量为 " << vi3.capacity() << endl;

	cout << "vi2: " << endl;
	for (auto& k : vi2)
	{
		cout << k << " ";
	}
	cout << endl;

	cout << "vi3: " << endl;
	for (auto& k : vi3)
	{
		cout << k << " ";
	}
	cout << endl;

	return 0;
}
【输出结果】
4.5 申请扩容 —— reserve
【函数原型】
reserve只能申请扩容而不能申请缩容。
【代码演示】
#include
#include

using namespace std;

int main()
{
	vector vi;
	//记录vi的capacity
	size_t capacityRecord = vi.capacity();
	cout << "容量为:" << capacityRecord << endl;
	//尾插100个数据
	for (int i = 0; i < 100; ++i)
	{
		vi.push_back(i);

		//如果容量发生了改变 就把新容量的值打印出来
		if (capacityRecord != vi.capacity())
		{
			capacityRecord = vi.capacity();
			cout << "容量改变为:" << capacityRecord << endl;
		}

	}

	return 0;
}
【输出结果】
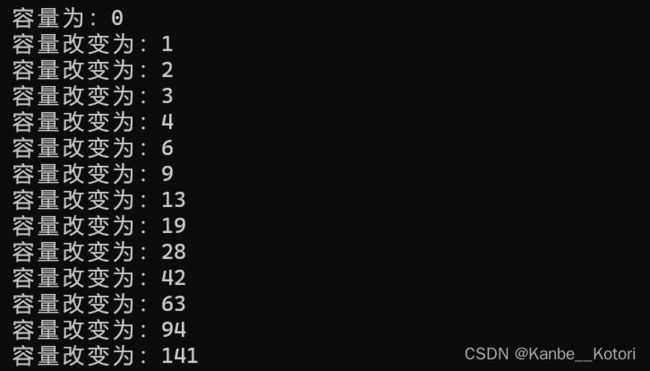
通过输出结果我们可以发现,在visual studio2022中,vector每次扩容都是按原来容量的1.5倍来扩容的(0 -> 1除外),接下来我们用g++编译器来测试同一份代码。
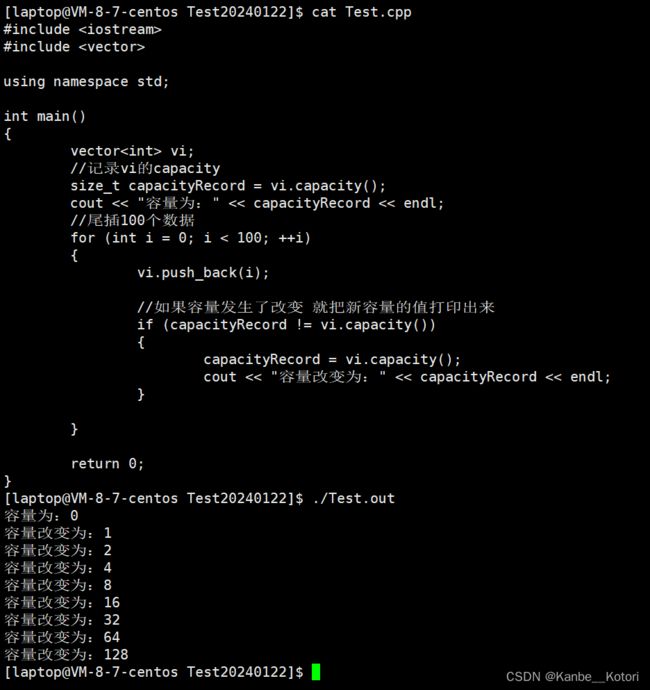
我们可以看出来,g++下的vector每次扩容都是原容量的2倍。
不同的编译器vector的扩容规则是不同的,所以不要认为vector的扩容规则是固定的。并且不同的扩容规则都有自己的好处,vs的1.5倍扩容使空间浪费更少,g++的2倍扩容使效率更高,选择不同的扩容规则就是在空间和效率间做权衡。
如果已经大概确定vector中要存储元素个数,可以提前将空间设置足够,这样就可以避免边插入边扩容导致效率低下的问题了。
【代码演示】
#include
#include

using namespace std;

int main()
{
	//用100个0来构建一个vector
	vector vi;
	vi.reserve(100);
	size_t capacityRecord = vi.capacity();
	cout << "容量为:" << capacityRecord << endl;

	//尾插150个数据
	for (int i = 0; i < 150; ++i)
	{
		vi.push_back(i);

		//如果容量发生了改变 就把新容量的值打印出来
		if (capacityRecord != vi.capacity())
		{
			capacityRecord = vi.capacity();
			cout << "容量改变为:" << capacityRecord << endl;
		}
	}

	return 0;
}
【输出结果】
五、元素访问
5.1 用下标访问vector —— operator[]
【函数原型】
【代码演示】
#include
#include

using namespace std;

int main()
{
	vector vi(3, 10);

	for (int i = 0; i < vi.size(); ++i)
	{
		cout << vi[i] << " ";
	}

	cout << endl;
	return 0;
}
【输出结果】
六、修改相关
6.1 尾插数据 —— push_back
【函数原型】
【代码演示】
#include
#include

using namespace std;

int main()
{
	vector vi;
	vi.push_back(1);
	vi.push_back(2);
	vi.push_back(3);
	vi.push_back(4);
	vi.push_back(5);

	for (auto& k : vi)
	{
		cout << k << " ";
	}

	cout << endl;
	return 0;
}
【输出结果】
6.2 尾删数据 —— pop_back
【函数原型】
【代码演示】
#include
#include

using namespace std;

int main()
{
	vector vi(3, 100);
	vi.pop_back();
	vi.pop_back();

	for (auto& k : vi)
	{
		cout << k << " ";
	}
	cout << endl;

	return 0;
}
【输出结果】
6.3 在任意位置插入数据 —— insert
【函数原型】
注:vector的insert是要搭配迭代器使用的。
【代码演示1】—— 插入单个数据
#include
#include

using namespace std;

//插入单个数据
int main()
{
	vector vi{ 1,2,3,4,5,6,7,8,9 };

	//头插
	vi.insert(vi.begin(), 0);

	for (auto& k : vi)
	{
		cout << k << " ";
	}
	cout << endl;

	return 0;
}
【输出结果】
【代码演示2】—— 插入多个相同数据
#include
#include

using namespace std;

//填充插入 插入多个相同数据
int main()
{
	vector vi{ 0,1,2,3,4,5,7,8,9 };

	//在5的后面插入10个6
	vi.insert(vi.begin() + 6, 10, 6);

	for (auto& k : vi)
	{
		cout << k << " ";
	}

	cout << endl;
	return 0;
}
【输出结果】
【代码演示3】 —— 插入一个范围的数据
#include
#include

using namespace std;

//插入一个范围的数据
int main()
{
	vector vi{ 1,5,6,7,8,9 };
	int array[] = { 1,2,3,4,5,6,7,8,9 };

	//vi.begin() + 1 为插入位置
	//array + 1为要插入数据的开头
	//array + 4为要插入数据的结尾再后面一个位置 -》左闭右开
	vi.insert(vi.begin() + 1, array + 1, array + 4);
	for (auto& k : vi)
	{
		cout << k << " ";
	 }

	cout << endl;
	return 0;
}
【输出结果】
6.4 删除特定位置的数据 —— erase
【函数原型】
注:vector的erase也需要与迭代器搭配使用。
【代码演示1】—— 删除单个数据
#include
#include

using namespace std;

//删除单个数据
int main()
{
	vector vi{ 1,2,3,4,4,5,6 };
	vi.erase(vi.begin() + 3);

	for (auto& k : vi)
	{
		cout << k << " ";
	}
	cout << endl;

	return 0;
}
【输出结果】
【代码演示2】—— 删除一个范围的数据
#include
#include

using namespace std;

int main()
{
	vector vi{ 1,2,3,4,5,6,7,8,9 };
	vi.erase(vi.begin() + 1, vi.end() - 1);

	for (auto& k : vi)
	{
		cout << k << " ";
	}
	cout << endl;

	return 0;
}
【输出结果】
6.5 交换两个vector对象 —— swap
【函数原型】
【代码演示】
#include
#include

using namespace std;

int main()
{
	vector vi1{ 1,2,3,4,5 };
	vector vi2{ 6,7,8,9,10 };
	vi1.reserve(100);

	cout << "交换前vi1的数据为:";
	for (auto& k : vi1)
	{
		cout << k << " ";
	}
	cout << endl;
	cout << "交换前vi1的长度为:" << vi1.size() << endl;
	cout << "交换前vi1的容量为:" << vi1.capacity() << endl << endl;

	cout << "交换前vi2的数据为:";
	for (auto& k : vi2)
	{
		cout << k << " ";
	}
	cout << endl;
	cout << "交换前vi2的长度为:" << vi2.size() << endl;
	cout << "交换前vi2的容量为:" << vi2.capacity() << endl << endl;

	vi1.swap(vi2);

	cout << "交换后vi1的数据为:";
	for (auto& k : vi1)
	{
		cout << k << " ";
	}
	cout << endl;
	cout << "交换后vi1的长度为:" << vi1.size() << endl;
	cout << "交换后vi1的容量为:" << vi1.capacity() << endl << endl;

	cout << "交换前vi2的数据为:";
	for (auto& k : vi2)
	{
		cout << k << " ";
	}
	cout << endl;
	cout << "交换后vi2的长度为:" << vi2.size() << endl;
	cout << "交换后vi2的容量为:" << vi2.capacity() << endl << endl;

	return 0;
}
【输出结果】
6.6 清空vector —— clear
【函数原型】
【代码演示】
#include
#include

using namespace std;

int main()
{
	vector vi{ 1,2,3,4,5 };

	cout << "clear前vi的数据为:";
	for (auto& k : vi)
	{
		cout << k << " ";
	}
	cout << endl;
	cout << "clear前vi的长度为:" << vi.size() << endl;
	cout << "clear前vi的容量为:" << vi.capacity() << endl << endl;

	vi.clear();

	cout << "clear后vi的数据为:";
	for (auto& k : vi)
	{
		cout << k << " ";
	}
	cout << endl;
	cout << "clear后vi的长度为:" << vi.size() << endl;
	cout << "clear后vi的容量为:" << vi.capacity() << endl << endl;
	return 0;
}
【输出结果】
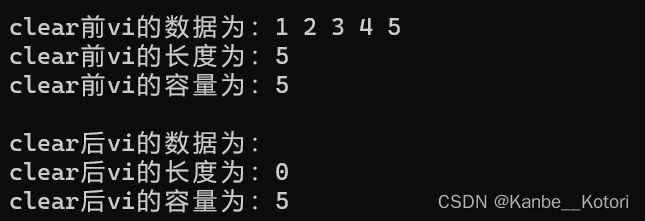
clear只会清空vector中的数据和有效长度,容量并不会被影响。
七、一些能与vector搭配使用的算法
vector没有许多它应该有的对数据进行处理的接口,如find。但是algorithm算法库为我们提供了一些函数来完成对容器数据的操作。
下面介绍的算法都包含在algorithm算法库中,并在std命名空间中。
#include
using namespace std;
7.1 查找数据 —— find
【函数原型】
【代码演示】
#include
#include
#include

using namespace std;

int main()
{
	vector vi{ 1,2,3,4,5,6 };

	//vi.begin() 为查找的起始点
	//vi.end() 为查找的终止点 -》 左闭右开
	//2为要查找到值
	vector::iterator pos = find(vi.begin(), vi.end(), 2);

	//如果找到了就会返回对应位置的迭代器
	//如果没找到就会返回会find的第二个参数 这里为vi.end()
	if (pos != vi.end())
	{
		cout << *pos << endl;
	}

	return 0;
}
【输出结果】
7.2 给数据排序 —— sort
【函数原型】
【代码演示】
#include
#include
#include

using namespace std;

int main()
{
	vector vi{ 1,4,6,2,4,7,9,44,62,24,11 };

	//排升序用正向迭代器
	sort(vi.begin(), vi.end());
	for (auto& k : vi)
	{
		cout << k << " ";
	}
	cout << endl;

	//排降序用反向迭代器
	sort(vi.rbegin(), vi.rend());
	for (auto& k : vi)
	{
		cout << k << " ";
	}
	cout << endl;

	return 0;
}
【输出结果】
7.3 数据反转 —— reverse
【函数原型】
【代码演示】
#include
#include
#include

using namespace std;

int main()
{
	vector vi{ 1,2,3,4,5,6,7,8,9 };

	reverse(vi.begin(), vi.end());
	for (auto& k : vi)
	{
		cout << k << " ";
	}
	cout << endl;

	return 0;
}
【输出结果】
八、迭代器失效
迭代器的主要作用就是让算法能够不用关心底层数据结构,其底层实际就是一个指针,或者是对指针进行了封装,比如:vector的迭代器就是原生态指针T* 。因此迭代器失效,实际就是迭代器底层对应指针所指向的空间被销毁了,而使用一块已经被释放的空间,造成的后果是程序崩溃(即如果继续使用已经失效的迭代器, 程序可能会崩溃。如果实在不好理解,可以把迭代器失效类比为野指针,都是非法访问已经失效空间)。
对于vector可能会导致其迭代器失效的操作有:
1. 会引起其底层空间改变(改变capacity)的操作,都有可能是迭代器失效,比如:resize、reserve、insert、assign、 push_back等。
#include
#include
using namespace std;

int main()
{
     vector v{1,2,3,4,5,6};

     vector::iterator it = v.begin();

     // 将有效元素个数增加到100个,多出的位置使用8填充,操作期间底层会扩容
     // v.resize(100, 8);

     // reserve的作用就是改变扩容大小但不改变有效元素个数,操作期间可能会引起底层容量改变
     // v.reserve(100);

     // 插入元素期间,可能会引起扩容,而导致原空间被释放
     v.insert(v.begin(), 0);
     v.push_back(8);

     while(it != v.end())
     {
         cout<< *it << " " ;
         ++it;
     }
     cout<
2. 指定位置元素的删除操作 —— erase
#include
#include
using namespace std;

int main()
{
    int a[] = { 1, 2, 3, 4 };
    vector vi(a, a + sizeof(a) / sizeof(int));

    // 使用find查找3所在位置的iterator
    vector::iterator pos = find(vi.begin(), vi.end(), 3);

    // 删除pos位置的数据,导致pos迭代器失效。
    v.erase(pos);

    // 此处会导致非法访问
    cout << *pos << endl;
    return 0;
} erase删除pos位置元素后,pos位置之后的元素会往前搬移,没有导致底层空间的改变,理论上讲迭代器不应该会失效,但是,如果pos刚好是最后一个元素,删完之后pos刚好是end的位置,而end位置是没有元素的,那么pos就失效了。因此删除vector中任意位置上元素时,vs就认为该位置迭代器失效了。
与vector类似,string在扩容操作或erase操作之后,迭代器也会失效。
#include
#include
using namespace std;

int main()
{
    string s("hello");
    string::iterator it = s.begin();

    //放开代码之后程序会崩溃,因为resize到20会string会进行扩容
    //扩容之后,it指向之前旧空间已经被释放了,该迭代器就失效了
    //后序打印时,再访问it指向的空间程序就会崩溃
    //s.resize(20, '!');

    while (it != s.end())
    {
        cout << *it;
        ++it;
    }
    cout << endl;

    it = s.begin();
    while (it != s.end())
    {
        //erase会返回已删除位置的下一个位置的迭代器
        it = s.erase(it);

        //如果按照下面方式写,运行时程序会崩溃,因为erase(it)之后
        //it位置的迭代器就失效了
        //s.erase(it);
        //++it;
    }
}
迭代器失效解决办法:在使用前,对迭代器重新赋值即可。


