Qt第十七章 多线程
文章目录
- 多线程
-
- 1. 线程概念的起源
- 2. 三种方式创建线程
- 3. 启动线程前的准备工作
- 4. 启动线程/退出线程
- 5. 操作运行中的线程
- 6. 为每个线程提供独立数据
- 7.子线程不能操作ui
-
- 解决方案
多线程
1. 线程概念的起源
- 单核CPU
早期还没有线程的概念,如何保证2个进程同时进行呢?时间片轮转调度
每次被CPU选中来执行当前进程所用的时间,时间一到,无论进程是否运行结束,操作系统都会强制将CPU这个资源转到另一个进程去执行。 - 多核CPU
随着运行的进程越来越多,人们发现进程的创建、撤销与切换存在着较大的时空开销,因此业界急需一种轻型的进程技术来减少开销。于是上世纪80年代出现了一种叫SMP的对称多处理技术,就是我们所知的线程概念。
线程切换的开销要小很多,这是因为每个进程都有属于自己的一个完整虚拟地址空间,而线程隶属于某一个进程,与进程内的其他线程一起共享这片地址空间,基本上就可以利用进程所拥有的资源而无需调用新的资源,故对它的调度所付出的开销就会小很多。
2. 三种方式创建线程
- 线程入口函数
- 全局函数
#include void helloThread(QString s)
{
for (int i = 0; i < 99999999; ++i) {
qDebug() << "hello" << s;
}
}
int main(int argc, char* argv[])
{
QApplication a(argc, argv);
QThread* th1 = QThread::create(helloThread, "thread1");
th1->start();
return a.exec();
}
- 静态成员函数
class A {
public:
    A() { }
    static void print()
    {
        for (int i = 0; i < 10; i++)
            qDebug() << __FUNCTION__;
    }
};

int main(int argc, char* argv[])
{
    QApplication a(argc, argv);
    QThread* th1 = QThread::create(A::print);
    th1->start();
    return a.exec();
}
- 成员函数
class A {
public:
    A() { }
    void print()
    {
        for (int i = 0; i < 10; i++)
            qDebug() << __FUNCTION__;
    }
};

int main(int argc, char* argv[])
{
    QApplication a(argc, argv);
    A aFunc;
    QThread* th1 = QThread::create(&A::print, &aFunc);
    th1->start();
    return a.exec();
}
- lamda表达式
    QThread* th2 = QThread::create([=] { qDebug() << "lamda"; });
    th2->start();
- 连接信号与槽
    QObject::connect(th2, &QThread::started, [=] { qDebug() << "th2线程启动"; });
    QObject::connect(th1, &QThread::finished, [=] { qDebug() << "th1线程执行完毕";
    th1->deleteLater(); });
- 继承QThread重写run
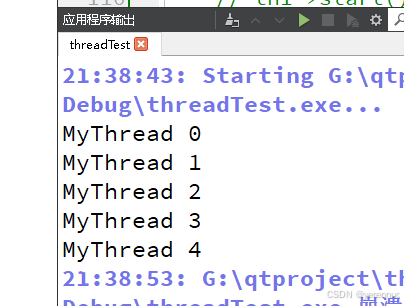
class MyThread : public QThread {
public:
    void run() override
    {
        for (int i = 0; i < 10; i++) {
            qDebug() << "MyThread" << i;
            if (i == 5)
                quit(); // 只能在线程中调用,但是要等事件结束才结束
        }
    }
};
int main(int argc, char* argv[])
{
    QApplication a(argc, argv);
    MyThread th3;
    th3.start();
    th3.exit(); // 结束线程,也要等事件结束才结束
    return a.exec();
}
- QObject::moveToThread
class Download : public QObject {
    Q_OBJECT
public:
    Download(QObject* parent = nullptr)
        : QObject(parent)
    {
    }
public slots:
    void downloadFile()
    {
        for (int i = 0; i < 100; i++)
            qDebug() << "下载进度=====" << i << "%";
        emit finished();
    }
signals:
    void finished();
};

class APP : public QObject {
    Q_OBJECT
public:
    APP(QObject* parent = nullptr)
        : QObject(parent)
    {
        d = new Download;
        th = new QThread;
        connect(this, &APP::startDownload, d, &Download::downloadFile);
        connect(d, &Download::finished, [=] { qDebug() << "下载完成"; });
        d->moveToThread(th);
        connect(th, &QThread::finished, th, &QThread::deleteLater);
        th->start();
    }
signals:
    void startDownload();

private:
    Download* d;
    QThread* th;
};
int main(int argc, char* argv[])
{
    QApplication a(argc, argv);
    APP ap;
    emit ap.startDownload();
    return a.exec();
}

#include "main.moc"
3. 启动线程前的准备工作
    // 建议最多同时开多少线程数
    qDebug() << QThread::idealThreadCount();
    // 改变栈空间,如果线程运行所占空间很大,那就会崩溃,需要改变
    qDebug() << "原始栈空间" << th3.stackSize(); // 原始栈空间 0
    th3.setStackSize(1024 * 1024 * 3);
    qDebug() << "现在栈空间" << th3.stackSize();//现在栈空间 3145728
4. 启动线程/退出线程
- 启动线程
调用start()函数后,新线程会优先执行run()中的代码,再执行其他的
默认run()会调用exec()函数,即启动一个局部的不占CPU的事件循环
5. 操作运行中的线程
- 休眠函数
void helloThread(QString s)
{
    for (int i = 0; i < 9; ++i) {
        qDebug() << "hello" << s;
        QThread::sleep(1); // 睡眠1秒
        QThread::msleep(100); // 睡眠100毫秒
        QThread::usleep(1000); // 睡眠1000微秒
    }
}
- 中断标志
class MyThread : public QThread {
public:
    void run() override
    {
        for (int i = 0; i < 10; i++) {
            qDebug() << "MyThread" << i;
            // 中断标志
            if (this->isInterruptionRequested())
                break;
            // 请求中断
            if (i == 3)
                this->requestInterruption();
        }
    }
};
6. 为每个线程提供独立数据
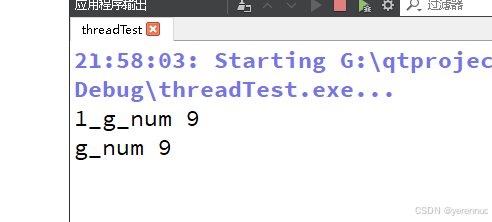
关于全局变量,在2个线程里修改会相互影响
int g_num = 5;
void fun()
{
    g_num = 8;
    qInfo() << "g_num" << g_num;
}
void fun1()
{
    g_num = 9;
    qInfo() << "1_g_num" << g_num;
}
int main(int argc, char* argv[])
{
    QApplication a(argc, argv);
    QThread* th = QThread::create(fun);
    QThread* th1 = QThread::create(fun1);
    th->start();
    th1->start();
    return a.exec();
}
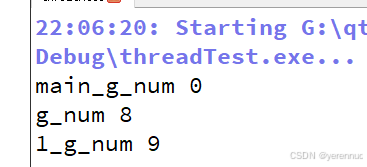
可以通过QThreadStorage类把全局变量设置成线程独立的变量
QThreadStorage<int> g_num;
void fun()
{
    g_num.setLocalData(8);
    qInfo() << "g_num" << g_num.localData();
}
void fun1()
{
    g_num.setLocalData(9);
    qInfo() << "1_g_num" << g_num.localData();
}
int main(int argc, char* argv[])
{
    QApplication a(argc, argv);
    QThread* th = QThread::create(fun);
    QThread* th1 = QThread::create(fun1);
    th->start();
    th1->start();
    qDebug() << "main_g_num" << g_num.localData();
    return a.exec();
}
7.子线程不能操作ui
Gui框架一般只允许ui线程操作界面组件,Qt也是如此,否则会出现崩溃
解决方案
-
通过信号与槽
参考之前的moveToThread -
通过QMetaObject::invokeMethod
#include "Widget.h"
#include "./ui_Widget.h"
#include - 通过QApplication::postEvent
#include "Widget.h"
#include "./ui_Widget.h"
#include