Hands-on Lab of Azure
Microsoft Azure是微软基于云计算的操作系统,和Azure Services Platform一样,是微软“软件和服务”技术的名称。Windows Azure的主要目标是为开发者提供一个平台,帮助开发可运行在云服务器、数据中心、Web和PC上的应用程序。云计算的开发者能使用微软全球数据中心的储存、计算能力和网络基础服务。
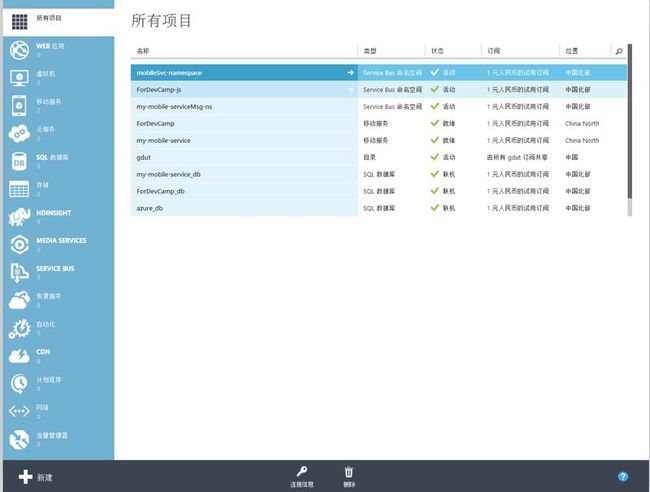
透过管理界面可以看到其丰富的功能。
而这些Azure模型中最容易上手的便是移动服务(Mobile Service)
移动服务可以看作是借助web api,为前端应用提供各种网络资源(包括数据存储,通知推送,身份验证等)。Azure支持JavaScript和.Net两种后端语言,以JavaScript后端为例,如下几部操作便可以看到样例效果。
1. 环境搭建:VS2013update4以上版本以及Azure SDK;
2. 试用或者付费Azure帐号;
3. 管理页面(https://manage.windowsazure.cn/)新建移动服务,下载样例。
4. 本地运行即可以看到对远程数据库操作的效果。
# 具体步骤(JS后端)
Exercise 1: 创建Mobile Service
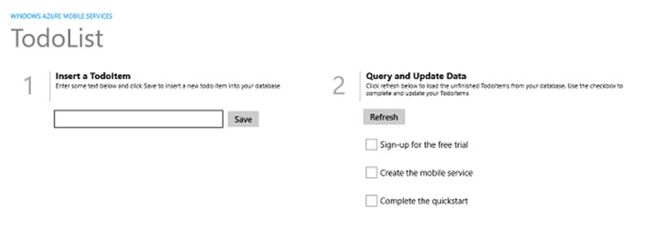
这个练习显示如何为Windows 8应用添加一个基于Azure Mobile Service的后端服务。需要创建新的mobile service和一个简单的To do list app.
应用截图如下:
Task 1 – 创建mobile service
步骤如下:
1.登录 Microsoft Azure Management Portal,打开Mobile Services.
2.点击新建按钮.
3.打开 计算 | Mobile Service, 点击创建.
4.在创建移动服务页面, 在URL框内输入子域名,选择链接的Azure SQL Database,选择服务所在区域以及后端的语言,并选择配置高级推送,到下一页面.
5.创建新的Service Bus命名空间和推送中心,或者选择已有的。
6.输入新数据库的名称、服务器管理员登录名和密码,或者选择已有的数据库,经过用户名和密码的验证,点击完成。
Task 2 – 创建应用
1.管理门户里,点击Mobile Services, 选择刚创建的mobile service.
2.在快速开始栏,选择Windows Store平台,扩展创建一个新的Windows Store app.
1)配置好VS环境
2)点击绿色按钮,在SQL Database里创建TodoItem表
3)选择C#语言,下载示例Todolist应用代码
Task 3 – 运行应用
1.打开下载的压缩工程.
2.首先Build应用,通过nuget安装所有缺失的References.
3.在App.xaml.cs里去除注释,保留创建的Mobile Service的URL和密钥,而连接local host的语句注释掉{!没看到连接local host的语句呀}
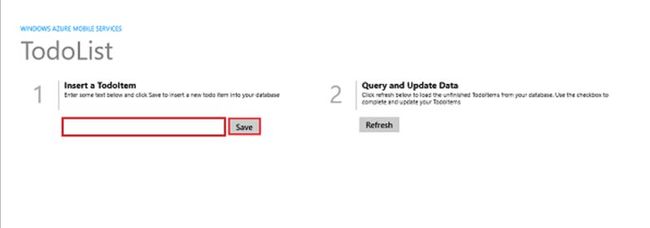
4.运行应用,点击Save按钮,将发送POST 请求到Azure mobile service,请求的数据被插入TodoItem表中,表中存储的项目被返回到应用,显示在界面上。
Note: 数据插入和查询函数在MainPage.xaml.cs .
5.管理门户中,点击数据,然后点击TodoItems表格,观察到数据被成功存储入表格中.
Task 4 – 查看代码
1.在solution explorer展开References文件夹,看到 Microsoft.WindowsAzure.Mobile, 是Azure mobile Services Client SDK.
2.打开App.xaml.cs a, 看到MobileServiceClient class. 这是Mobile Services client SDK 提供的主要类,用来提供应用和Azure Mobile Services的交互. 第一个参数是Mobile Service endpoint,第二个参数Mobile Service 的Application Key.
public static MobileServiceClient MobileService
= new MobileServiceClient(
"https://todolist.azure-mobile.net/"
,"vIWepmcOXGPsYCJQDDcFBKsnOVxzLG52" );
3.打开MainPage.xaml.cs, 看mobile service client如何用来插入更新删除数据:
创建一个handle用来操作table:
private IMobileServiceTable<TodoItem> todoTable = App.MobileService.GetTable<TodoItem>();
插入:
private async void InsertTodoItem(TodoItem todoItem)
{
await todoTable.InsertAsync(todoItem);
items.Add(todoItem);
}
更新:
private async void UpdateCheckedTodoItem(TodoItem item)
{
await todoTable.UpdateAsync(item);
items.Remove(item);
}
读取:
private void RefreshTodoItems()
{
items = todoTable
.Where(todoItem => todoItem.Complete == false)
.ToCollectionView();
ListItems.ItemsSource = items;
}
Exercise 2: 添加自定义API
Task 1 – 创建自定义API
1.在Azure Management Portal, 选择Mobile Service, 点击API.
2.点击创建 按钮创建一个新的自定义API.
3.在创建new custom API 目录里, 完成API 名称,设置访问权限.
4.创建好后,可以在门户里编辑脚本.
5.添加下列代码到脚本中.
exports.post = function(request, response) {var mssql = request.service.mssql;var sql = "UPDATE todoitem SET complete = 1 " +"WHERE complete = 0; SELECT @@ROWCOUNT as count";mssql.query(sql, {success: function(results) {if(results.length == 1)response.send(200, results[0]);}})};
6.保存脚本.
Note: Mobile Services不会在脚本执行期间保存状。每次脚本执行,一个新的全局context会被创建,不要在脚本中定义任何状态变量。如果需要保存状态,可以创建一个table保存状态。
Task 2 – 更新应用调用自定义API
1.Visual Studio里, 打开MainPage.xaml file, 在
ButtonRefresh这个Button element 里, 用下列XAML code 代替它{!在xaml编辑界面不好看}:<StackPanel Orientation="Horizontal"><Button Margin="72,0,0,0" Name="ButtonRefresh"Click="ButtonRefresh_Click">Refresh</Button><Button Margin="12,0,0,0" Name="ButtonCompleteAll"Click="ButtonCompleteAll_Click">Complete All</Button></StackPanel>2.打开MainPage.xaml.cs code file, 添加下列class定义
public class MarkAllResult{public int Count { get; set; }}3.在 MainPage class 的RefreshTodoItems 方法, 确保
query通过下列Where 方法被定义:.Where(todoItem => todoItem.Complete == false)这一item过滤使得已完成的项目不会被query返回.
4.在MainPage class, 添加下列方法:
private async void ButtonCompleteAll_Click(object sender, RoutedEventArgs e){string message;try{// Asynchronously call the custom API using the POST method.var result = await App.MobileService.InvokeApiAsync<MarkAllResult>("completeAll",System.Net.Http.HttpMethod.Post, null);message = result.Count + " item(s) marked as complete.";RefreshTodoItems();}catch (MobileServiceInvalidOperationException ex){message = ex.Message;}var dialog = new MessageDialog(message);dialog.Commands.Add(new UICommand("OK"));await dialog.ShowAsync();}这个方法处理Click 事件,InvokeApiAsync 方法在端上被调用,会想自定义API发送POST请求,结果通过自定义API返回给端,展示成为一个消息对话。
5.运行查看结果
ref:官方教程下载()
作者为微软-刘士君老师
貌似图都挂了,囧。。。
# 拾遗
打开下载的样例:
按照前述教程创建表之后数据库页面如下
点击下方“使用VS打开”,本地VS会自动打开连接远程数据库,输入Azure帐号和设置的数据库密码即可,登录之后如下图:
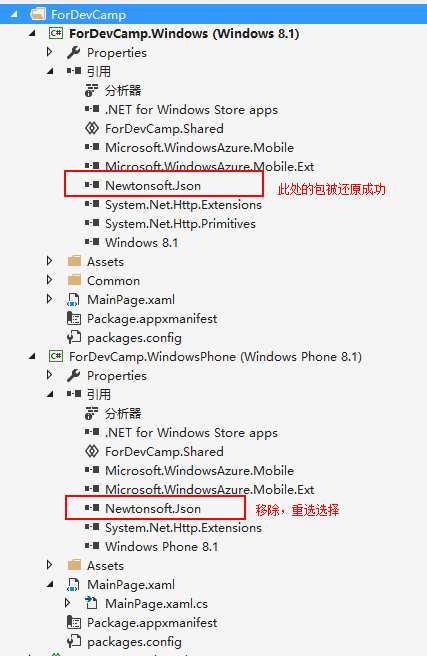
按照教程F5运行样例,NuGet并没有顺利还原所有需要的包:
可以看到Windows8.1的都还原成功了,只是缺少WP的NewtonSoft包,那就用前者替换之:
顺利运行之后,按照教程继续做也非难事了
BTW,.Net后端的样例始终无法用NuGet还原所有包,一直是这个鸟样一 一+


