使用Gradle构建一个SpringMVC的应用
In this example, we will create a simple Spring MVC application and build it with Gradle. The gradle script will use Tomcat as container and deploy the Spring MVC project with cargo plugin.
All the files and directories are listed here
F:\tmp\testgradle>ls /s src
F:\tmp\testgradle\src\main
F:\tmp\testgradle\src\main\java
F:\tmp\testgradle\src\main\webapp
F:\tmp\testgradle\src\main\java\com
F:\tmp\testgradle\src\main\java\com\example
F:\tmp\testgradle\src\main\java\com\example\springcontext
F:\tmp\testgradle\src\main\java\com\example\controller
F:\tmp\testgradle\src\main\java\com\example\controller\IndexController.java
F:\tmp\testgradle\src\main\java\com\example\springcontext\WebConfig.java
F:\tmp\testgradle\src\main\java\com\example\springcontext\ExampleWebApplicationInitializer.java
F:\tmp\testgradle\src\main\webapp\WEB-INF
F:\tmp\testgradle\src\main\webapp\view
F:\tmp\testgradle\src\main\webapp\view\index.jsp
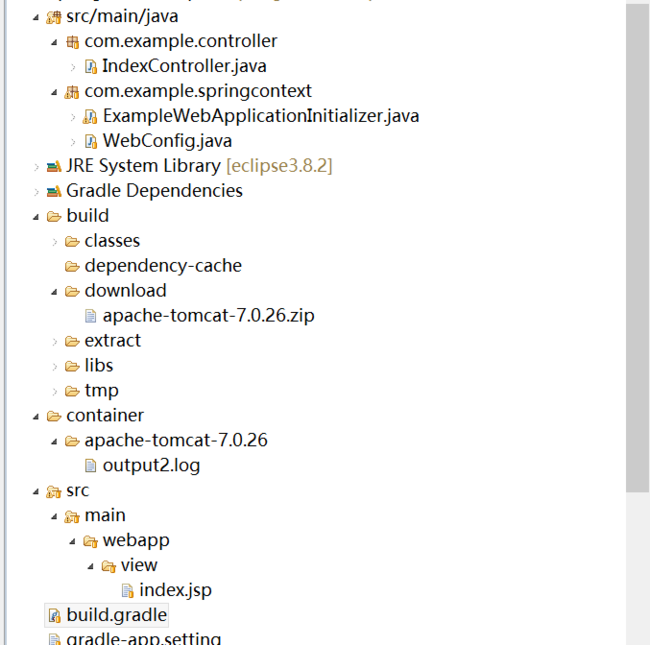
Here is how it looks like in Eclipse project
We have a controller , a jsp view, a spring config file and spring initializer for configuring DipatcherServlet.
The controller
  package com.example.controller;   import org.springframework.stereotype.Controller; import org.springframework.ui.Model; import org.springframework.web.bind.annotation.RequestMapping;
@Controller public class IndexController {
    @RequestMapping("/") public String showHomePage(Model m) { m.addAttribute("name", "Hello"); return "index"; } }
The only thing the controller do is to load the view file. The returned value "index" is the name of view, Spring will resolve it to actual view file according to the configuration, we will see it in the WebConfig.java , Spring provided various ways to resolve view file.
WebConfig
Configure view resolver, in real world application, you will add resource handler, or locale resolver at here.
  package com.example.springcontext;   import org.springframework.context.annotation.Bean; import org.springframework.context.annotation.ComponentScan; import org.springframework.context.annotation.Configuration; import org.springframework.web.servlet.config.annotation.EnableWebMvc; import org.springframework.web.servlet.view.InternalResourceViewResolver;
@Configuration
@EnableWebMvc
@ComponentScan(basePackages="com.example.controller") public class WebConfig {
    @Bean public InternalResourceViewResolver viewResolver() { InternalResourceViewResolver resolver = new InternalResourceViewResolver(); resolver.setPrefix("/view/"); resolver.setSuffix(".jsp"); return resolver; }   }
We set the view file path prefix as /view and extension name as jsp, when you return a view name like "index", Spring will generate the full path as "/view/index.jsp". See details about view resolvers.
The @EnableWebMvc annotation support using @Controller to define controller classes and use@RequestMapping to bind a method to request URL as we see in Controller.java.
To let Spring find our controller classes, we need to tell it where it should look for, the annotation@ComponentScan with the property basePacakges will do this.
Initializer
In Servlet 3.0 , you can configure Spring without any XML file.
  package com.example.springcontext;   import javax.servlet.ServletContext; import javax.servlet.ServletException; import javax.servlet.ServletRegistration;   import org.springframework.context.annotation.Configuration; import org.springframework.web.WebApplicationInitializer; import org.springframework.web.context.ContextLoaderListener; import org.springframework.web.context.support.AnnotationConfigWebApplicationContext; import org.springframework.web.servlet.DispatcherServlet;   public class ExampleWebApplicationInitializer implements WebApplicationInitializer {   private static final String DISPATCHER_SERVLET_NAME = "dispatcher";
    @Override public void onStartup(ServletContext servletContext) throws ServletException {
        registerDispatcherServlet(servletContext); }   private void registerDispatcherServlet(ServletContext servletContext) {
        AnnotationConfigWebApplicationContext dispatcherContext = createContext(WebConfig.class); ServletRegistration.Dynamic dispatcher;
        dispatcher = servletContext.addServlet(DISPATCHER_SERVLET_NAME, new DispatcherServlet(dispatcherContext)); dispatcher.setLoadOnStartup(1); dispatcher.addMapping("/"); }   private AnnotationConfigWebApplicationContext createContext(final Class<?>... annotatedClasses) { AnnotationConfigWebApplicationContext context = new AnnotationConfigWebApplicationContext(); context.register(annotatedClasses); return context; }   }
This the annotation version of web.xml configuration, it equivalent to
<servlet> <servlet-name>Spring MVC Dispatcher Servlet</servlet-name> <servlet-class>org.springframework.web.servlet.DispatcherServlet</servlet-class> <init-param> <param-name>contextConfigLocation</param-name> <param-value>/WEB-INF/applicationContext.xml</param-value> </init-param> <load-on-startup>1</load-on-startup> </servlet> <servlet-mapping> <servlet-name>Spring MVC Dispatcher Servlet</servlet-name> <url-pattern>/*</url-pattern> </servlet-mapping>
View file
The view file is a simple JSP file
  <%@ page language="java" import="java.util.*" pageEncoding="ISO-8859-1"%>
  <!DOCTYPE HTML PUBLIC "-//W3C//DTD HTML 4.01 Transitional//EN"> <html> <head>
  <title>Hello</title>   <meta http-equiv="keywords" content="keyword1,keyword2,keyword3"> <meta http-equiv="description" content="This is my page"> <!--  <link rel="stylesheet" type="text/css" href="styles.css">  --> </head>   <body> ${name} </body> </html>
We almost get everything we need , the next step is to build it. Create a build.gradle under the root directory, in this case is the testgradle directory.
apply plugin: 'base' apply plugin: 'java' apply plugin: 'war' apply plugin: 'jetty' apply plugin: 'tomcat' apply plugin: 'cargo'
ext.tomcatVersion = '7.0.29' ext.cargoVersion = '1.1.3'


buildscript { repositories { add(new org.apache.ivy.plugins.resolver.URLResolver()) { name = 'GitHub' addArtifactPattern 'http://cloud.github.com/downloads/[organisation]/[module]/[module]-[revision].[ext]' } }
    dependencies { classpath 'bmuschko:gradle-tomcat-plugin:0.9.3' classpath 'bmuschko:gradle-cargo-plugin:0.5.4' } }


repositories {
    mavenCentral()
    mavenRepo url: 'http://maven.springframework.org/release' mavenRepo url: 'http://maven.springframework.org/snapshot' mavenRepo url: 'http://maven.springframework.org/milestone' mavenRepo url: 'https://repository.jboss.org/nexus/content/repositories/releases/' mavenRepo url: 'http://download.java.net/maven/glassfish/org/glassfish/'   }
dependencies {

   providedCompile 'javax.servlet:javax.servlet-api:3.0.1' compile 'org.springframework:spring-webmvc:3.2.2.RELEASE' runtime "jstl:jstl:1.2"
   tomcat "org.apache.tomcat.embed:tomcat-embed-core:${tomcatVersion}", "org.apache.tomcat.embed:tomcat-embed-logging-juli:${tomcatVersion}" tomcat("org.apache.tomcat.embed:tomcat-embed-jasper:${tomcatVersion}") { exclude group: 'org.eclipse.jdt.core.compiler', module: 'ecj' cargo "org.codehaus.cargo:cargo-core-uberjar:${cargoVersion}", "org.codehaus.cargo:cargo-ant:${cargoVersion}" }
  }
cargo { containerId = 'tomcat7x' port = 8080
    local { homeDir = file('D:/Java/apache-tomcat-7.0.26') output = file('D:/Java/apache-tomcat-7.0.26/output.log') } }
war { version = '' }
Update: The cargo and tomcat plugin dependencies has changed since the publication of this tutorial, if you get the error of can not resolving dependencies, try this solution
Change the apply plugin of tomcat and cargo to this
apply plugin: 'com.bmuschko.tomcat' apply plugin: 'com.bmuschko.cargo'
And buildscript block should be
buildscript { repositories { jcenter() }
    dependencies { classpath 'com.bmuschko:gradle-tomcat-plugin:2.2.2' classpath 'com.bmuschko:gradle-cargo-plugin:2.1.1' }   }
In the cargo block, the property output has beed deprecated, now is outputFile
outputFile = file('D:/Java/apache-tomcat-7.0.26/output.log')
There are also an alternative version of the cargo block, if you don't have Tomcat installed on your machine, you can let cargo download it for you and automatically extract Tomcat to specified place and use that container.
cargo { containerId = 'tomcat7x' port = 8080
    local { installer { installUrl = "http://archive.apache.org/dist/tomcat/tomcat-7/v7.0.26/bin/apache-tomcat-7.0.26.zip" downloadDir = file("$buildDir/download") extractDir = file("$buildDir/extract") } outputFile = file('container/apache-tomcat-7.0.26/output2.log') } }
Also notice that JDK 1.8 only support Tomcat start from version 7.0.50, if you are building this project with JDK 1.8, change the installUrl to
installUrl = "http://archive.apache.org/dist/tomcat/tomcat-7/v7.0.50/bin/apache-tomcat-7.0.50.zip"
And then run
gradle build
gradle cargoRunLocal
Now open your browser and visit localhost:8080/testgradle

