部署Cloudstack环境(cloudstack manager+kvm,适合RHEL/CentOS)
系统:CentOS 6.3 x86_64
版本:Cloudstack 4.2.1

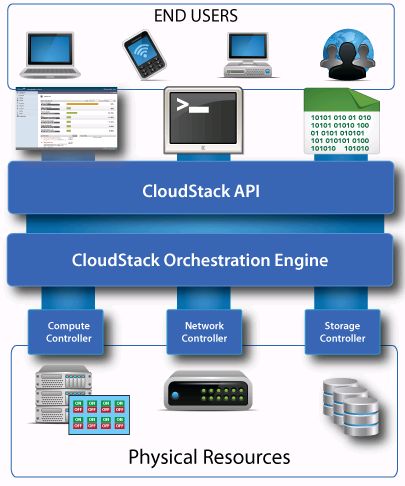
CloudStack是一个开源的具有高可用性及扩展性的云计算平台。支持管理大部分主流的hypervisors,如KVM,XenServer,VMware,Oracle VM,Xen等。
同时CloudStack是一个开源云计算解决方案。可以加速高伸缩性的公共和私有云(IaaS)的部署、管理、配置。使用CloudStack作为基础,数据中心操作者可以快速方便的通过现存基础架构创建云服务。
CloudStack可以通过组织和协调用户的虚拟化资源,构建一个和谐的环境。CloudStack具有许多强大的功能,可以让用户构建一个安全的多租户云计算环境。
CloudStack的前身是Cloud.com,后被思杰收购。英特尔、阿尔卡特-朗迅、瞻博网络、博科等都已宣布支持CloudStack。2011年7月,Citrix收购Cloud.com,并将CloudStack 100%开源。2012年4月5日,Citrix又宣布将其拥有的CloudStack开源软件交给Apache软件基金会管理。CloudStack已经有了许多商用客户,包括GoDaddy、英国电信、日本电报电话公司、塔塔集团、韩国电信等。
当前最新版本为4.2.1
官网:http://cloudstack.apache.org/
下载地址:http://cloudstack.apt-get.eu/rhel/4.2/
中国用户组:http://www.cloudstack-china.org/
思杰:http://www.citrix.com.cn/products/CloudStack/index.aspx
环境情况:
Cloudstack Manager、Mysql:10.1.6.30
KVM Hypervisor、Cloudstack Agent:10.1.6.20
NFS:
主存储:10.1.6.20:/export/primary
二级存储:10.1.6.20:/export/secondary
网络(使用简单网络,公有网络和私有网络都是一个网段):
cloudstack管理网络:10.1.6.200-10.1.6.205
来宾网络:10.1.6.206-10.1.6.215
存储网络:10.1.6.216-10.1.6.220
一、Apache Cloudstack Manager部署
通过UI或API的方式,使用Management服务进行云资源管理。
1、Yum源配置
# vim /etc/yum.repos.d/cloudstack.repo
[cloudstack]
name=cloudstack
baseurl=http://cloudstack.apt-get.eu/rhel/4.2/
enabled=1
gpgcheck=0
因网络慢问题,可以先下载所有安装包,然后创建本地源:
yum -y install httpd createrepo
wget -c -r -nd -A rpm http://cloudstack.apt-get.eu/rhel/4.2/ -P /var/www/html/4.2
createrepo /var/www/html/4.2/
service httpd start
-c 断点续传
-nd 递归下载时不创建一层一层的目录,把所有的文件下载到当前目录
-A 指定分号分隔的被接受扩展名的列表
yum配置改为:
[cloudstack]
name=cloudstack
baseurl=http://<http_server_ip>/4.2  #修改成自己服务器的IP地址
enabled=1
gpgcheck=0
2、安装管理服务
2.1 操作系统准备
a、检查主机名是否符合FQDN格式:
hostname --fqdn
cloudstack.yaukb.com
如不是,修改配置文件
# vim /etc/sysconfig/network
HOSTNAME=yau620.yaukb.com
# hostname cloudstack.yaukb.com
# vim /etc/hosts
10.1.6.30   cloudstack.yaukb.com
b、配置NTP
yum -y install ntp
service ntpd start
chkconfig ntpd on
2.2 安装管理服务
yum -y install cloudstack-management
当使用xenserver做Hypervisor时,需下载vhd-util工具:
wget http://download.cloud.com.s3.amazonaws.com/tools/vhd-util
cp vhd-util /usr/share/cloudstackcommon/scripts/vm/hypervisor/xenserver
二、安装mysql
1、Mysql跟Management服务安装在一起,使用yum安装:
yum -y install mysql-server
2、修改配置文件(在[mysqld]下面添加):
# vim /etc/my.cnf
innodb_rollback_on_timeout=1
innodb_lock_wait_timeout=600
max_connections=350
log-bin=mysql-bin
binlog-format = 'ROW'
3、启动服务:
service mysqld start
chkconfig mysqld on
4、查看服务是否启动:
netstat -ntlp|grep mysql
tcp 0 0 0.0.0.0:3306 0.0.0.0:* LISTEN 32310/mysqld
5、mysql密码设置:
修改密码的方式很多
方法一:
mysql_secure_installation
....
Set root password? [Y/n] y #设置root用户密码
New password:
Re-enter new password:
Password updated successfully!
Reloading privilege tables..
... Success!
By default, a MySQL installation has an anonymous user, allowing anyone
to log into MySQL without having to have a user account created for
them. This is intended only for testing, and to make the installation
go a bit smoother. You should remove them before moving into a
production environment.
Remove anonymous users? [Y/n] Y #删除匿名用户
... skipping.
Normally, root should only be allowed to connect from 'localhost'. This
ensures that someone cannot guess at the root password from the network.
Disallow root login remotely? [Y/n] y #关闭root用户远程访问
... Success!
By default, MySQL comes with a database named 'test' that anyone can
access. This is also intended only for testing, and should be removed
before moving into a production environment.
Remove test database and access to it? [Y/n] y #删除test库
- Dropping test database...
... Success!
- Removing privileges on test database...
... Success!
Reloading the privilege tables will ensure that all changes made so far
will take effect immediately.
Reload privilege tables now? [Y/n] y #刷新权限表
... Success!
Cleaning up...
All done! If you've completed all of the above steps, your MySQL
installation should now be secure.
Thanks for using MySQL!
方法二:
mysql -uroot
mysql>delete from mysql.user where user='';
mysql>update mysql.user set password=password('密码') where user='root';
mysql>drop database test;
6、关闭selinux:
setenforce 0
sed -i 's/SELINUX=enforcing/SELINUX=disabled/' /etc/sysconfig/selinux
三、配置Cloudstack Manager
1、设置cloudstack数据库
查看命令帮助:
cloudstack-setup-databases -h
cloudstack-setup-databases cloud:cloud@localhost \ #设置cloud账号的密码
 --deploy-as=root:<root_password> \ #输入root账号的密码
 -e file \
 -m password \
 -k password \
 -i 10.1.6.30     #指定manager的服务器IP地址
输出信息:
Mysql user name:cloud [ OK ]
Mysql user password:cloud [ OK ]
Mysql server ip:localhost [ OK ]
Mysql server port:3306 [ OK ]
Mysql root user name:root [ OK ]
Mysql root user password:yau,.2012mn [ OK ]
Using specified cluster management server node IP 10.1.6.20 [ OK ]
Checking Cloud database files ... [ OK ]
Checking local machine hostname ... [ OK ]
Checking SELinux setup ... [ OK ]
Preparing /etc/cloudstack/management/db.properties [ OK ]
Applying /usr/share/cloudstack-management/setup/create-database.sql [ OK ]
Applying /usr/share/cloudstack-management/setup/create-schema.sql [ OK ]
Applying /usr/share/cloudstack-management/setup/create-database-premium.sql [ OK ]
Applying /usr/share/cloudstack-management/setup/create-schema-premium.sql [ OK ]
Applying /usr/share/cloudstack-management/setup/server-setup.sql [ OK ]
Applying /usr/share/cloudstack-management/setup/templates.sql [ OK ]
Applying /usr/share/cloudstack-bridge/setup/cloudbridge_db.sql [ OK ]
Applying /usr/share/cloudstack-bridge/setup/cloudbridge_schema.sql [ OK ]
Applying /usr/share/cloudstack-bridge/setup/cloudbridge_multipart.sql [ OK ]
Applying /usr/share/cloudstack-bridge/setup/cloudbridge_index.sql [ OK ]
Applying /usr/share/cloudstack-bridge/setup/cloudbridge_multipart_alter.sql [ OK ]
Applying /usr/share/cloudstack-bridge/setup/cloudbridge_bucketpolicy.sql [ OK ]
Applying /usr/share/cloudstack-bridge/setup/cloudbridge_policy_alter.sql [ OK ]
Applying /usr/share/cloudstack-bridge/setup/cloudbridge_offering.sql [ OK ]
Applying /usr/share/cloudstack-bridge/setup/cloudbridge_offering_alter.sql [ OK ]
Processing encryption ... [ OK ]
Finalizing setup ... [ OK ]
CloudStack has successfully initialized database, you can check your database configuration in /etc/cloudstack/management/db.properties
2、启动manager服务
cloudstack-setup-management
Starting to configure CloudStack Management Server:
Configure sudoers ... [OK]
Configure Firewall ... [OK]
Configure CloudStack Management Server ...[OK]
CloudStack Management Server setup is Done!
四、配置存储(这里使用NFS)
使用NFS保存primary和secondary storage,也可以使用Ceph RBD, GlusterFS,iSCSI, and others.
1、在管理服务器上安装NFS
yum -y install nfs-utils
2、创建导出目录:(可以每个目录单独进行卷挂载)
mkdir -p /export/primary
mkdir -p /export/secondary
3、配置nfs(使用rw,async,no_root_squash,no_subtree_check)
# vim /etc/exports
/export *(rw,async,no_root_squash,no_subtree_check)
4、导出共享
exportfs -a
5、固定NFS服务端口:
# vim /etc/sysconfig/nfs
LOCKD_TCPPORT=32803
LOCKD_UDPPORT=32769
MOUNTD_PORT=892
RQUOTAD_PORT=875
STATD_PORT=662
STATD_OUTGOING_PORT=2020
如开启iptables,针对nfs需要开放端口:
# vi /etc/sysconfig/iptables
-A INPUT -s <NETWORK> -m state --state NEW -p udp --dport 111 -j ACCEPT
-A INPUT -s <NETWORK> -m state --state NEW -p tcp --dport 111 -j ACCEPT
-A INPUT -s <NETWORK> -m state --state NEW -p tcp --dport 2049 -j ACCEPT
-A INPUT -s <NETWORK> -m state --state NEW -p tcp --dport 32803 -j ACCEPT
-A INPUT -s <NETWORK> -m state --state NEW -p udp --dport 32769 -j ACCEPT
-A INPUT -s <NETWORK> -m state --state NEW -p tcp --dport 892 -j ACCEPT
-A INPUT -s <NETWORK> -m state --state NEW -p udp --dport 892 -j ACCEPT
-A INPUT -s <NETWORK> -m state --state NEW -p tcp --dport 875 -j ACCEPT
-A INPUT -s <NETWORK> -m state --state NEW -p udp --dport 875 -j ACCEPT
-A INPUT -s <NETWORK> -m state --state NEW -p tcp --dport 662 -j ACCEPT
-A INPUT -s <NETWORK> -m state --state NEW -p udp --dport 662 -j ACCEPT
启动iptables:
service iptables restart
service iptables save
6、在hypervisor host and Management Server上修改idmapd.conf,指定搜索域
# vim /etc/idmapd.conf
Domain = yaukb.com
7、重启管理服务主机:
检查NFS服务rpcbind服务运行
service rpcbind start
service nfs start
chkconfig nfs on
chkconfig rpcbind on
8、测试是否成功
a、登录到hypervisor host
b、挂载测试
mkdir /mnt/secondary
mount -t nfs 10.1.6.20:/export/secondary /mnt/secondary
五、准备System VM模板(在Cloudstack Manager服务器上操作)
模板放在Secondary storage上:
使用命令cloud-install-sys-tmplt检索和解压模板文件,针对不同的hypervisor下载相应的vm模板
For XenServer:
/usr/share/cloudstack-common/scripts/storage/secondary/cloud-install-sys-tmplt -m /mnt/secondary -u http://d21ifhcun6b1t2.cloudfront.net/templates/4.2/systemvmtemplate-2013-07-12-master-xen.vhd.bz2 -h xenserver -F
For vSphere:
/usr/share/cloudstack-common/scripts/storage/secondary/cloud-install-sys-tmplt -m /mnt/secondary -u http://d21ifhcun6b1t2.cloudfront.net/templates/4.2/systemvmtemplate-4.2-vh7.ova -h vmware -F
For KVM:
/usr/share/cloudstack-common/scripts/storage/secondary/cloud-install-sys-tmplt -m /mnt/secondary -u http://d21ifhcun6b1t2.cloudfront.net/templates/4.2/systemvmtemplate-2013-06-12-master-kvm.qcow2.bz2 -h kvm -F
For LXC:
/usr/share/cloudstack-common/scripts/storage/secondary/cloud-install-sys-tmplt -m /mnt/secondary -u http://d21ifhcun6b1t2.cloudfront.net/templates/acton/actonsystemvm-02062012.qcow2.bz2 -h lxc -F
因下载网速慢,可以先提前下载到本地web服务器,然后同步到二级存储:
如下载kvm模板:
cd /var/www/html/ && wget -c http://d21ifhcun6b1t2.cloudfront.net/templates/4.2/systemvmtemplate-2013-06-12-master-kvm.qcow2.bz2
然后使用命令cloud-install-sys-tmplt进行模板下载:
/usr/share/cloudstack-common/scripts/storage/secondary/cloud-install-sys-tmplt -m /mnt/secondary -u http://<http_server_ip>/systemvmtemplate-2013-06-12-master-kvm.qcow2.bz2 -h kvm -F
六、KVM Hypervisor配置
安装步骤:
1、准备操作系统
2、安装和配置libvirt
3、配置安全性策略(AppArmor and SELinux)
4、安装和配置Agent
1、准备操作系统
要求在操作系统上运行Cloudstack Agent和KVM实例。
a、使用root用户部署服务,检查主机名是否符合FQDN格式:
hostname --fqdn
b、时间同步服务:
yum -y install ntp
service ntpd start
chkconfig ntpd on
2、安装和配置Cloudstack Agent
Agent与Cloudstack管理服务通信,管理主机上的实例
Yum源配置:
# vim /etc/yum.repos.d/cloudstack.repo
[cloudstack]
name=cloudstack
baseurl=http://cloudstack.apt-get.eu/rhel/4.2/
enabled=1
gpgcheck=0
安装agent:
yum install cloudstack-agent
3、配置KVM客户机的CPU Model:
默认为QEMU Virtual CPU
# vim /etc/cloudstack/agent/agent.properties
guest.cpu.model=host-model #推荐模式
可以配置参数如下:host-model适合不同主机之间迁移,有较好的性能
guest.cpu.mode=custom|host-model|host-passthrough
guest.cpu.model=from /usr/share/libvirt/cpu_map.xml(only valid when guest.cpu.mode=custom)
4、安装和配置libvirt
Cloudstack使用libvirt管理虚拟机
# vim /etc/libvirt/libvirtd.conf
listen_tls = 0
listen_tcp = 1 #监听TCP
tcp_port = "16509"
auth_tcp = "none"
mdns_adv = 0 #关闭DNS广播
# vim /etc/sysconfig/libvirtd
LIBVIRTD_ARGS="--listen"
修改VNC监听到所有网卡:
# vim /etc/libvirt/qemu.conf
vnc_listen = "0.0.0.0"
重启libvirtd服务:
service libvirtd restart
chkconfig libvirtd on
5、配置安全策略
临时关闭selinux:
setenforce 0
修改/etc/selinux/config永久生效:
sed -i 's/SELINUX=enforcing/SELINUX=disabled/' /etc/sysconfig/selinux
6、配置网络桥接
为了转发流量到实例,将至少需要两个桥接:public和private,默认cloudstack使用cloudbr0和cloudbr1
这里物理网卡名称为em1,使用linux桥接进行配置,将em1桥接到cloudbr0,创建一个无桥接的cloudbr1。
配置如下:
cd /etc/sysconfig/network-scripts/
cp ifcfg-em1 ifcfg-cloudbr0
cp ifcfg-em1 ifcfg-cloudbr1
#物理网卡配置,桥接到cloudbr0
#vim  ifcfg-em1
DEVICE="em1"
BOOTPROTO="none"
DHCP_HOSTNAME="yau620.yaukb.com"
HWADDR="D4:BE:D9:93:D4:0E"
IPV6INIT="no"
NM_CONTROLLED="no"
ONBOOT="yes"
TYPE="Ethernet"
UUID="b159e8c8-9915-4647-8c61-32ee83b066e0"
BRIDGE="cloudbr0"
公有网络cloudbr0:
# cat ifcfg-cloudbr0
DEVICE=cloudbr0
TYPE=Bridge
ONBOOT=yes
BOOTPROTO=none
IPV6INIT=no
IPV6_AUTOCONF=no
IPADDR=10.1.6.20
NETMASK=255.255.255.0
GATEWAY=10.1.6.1
私有网络cloudbr1:
# cat ifcfg-cloudbr1
DEVICE=cloudbr1
TYPE=Bridge
ONBOOT=yes
BOOTPROTO=none
IPV6INIT=no
IPV6_AUTOCONF=no
来自为知笔记(Wiz)