Cloudify云启动过程分析及Cloudify Driver开发
Introduction
Cloud driver是一个开放的接口,用户可实现该接口开发自己的cloud diver,以支持特定的私有云,或者对公共云环境创建更多细粒度的配置。在创建自己的cloud driver 时,需要考虑或调整已有cloud driver配置中的一些项,如下。
加载自定义类文件——cloud driver 的实现类必须相对启动云的客户端和Cloudify ESM 管理组件是可用的。当前,对于cloud driver开发者的工作是,保证组件需要的类在相应的类路径中。例如,添加包含相应类的jar包到Cloudify distribution( <cloudifyRoot>/lib/required),这些jar文件会自动地添加到所有组件的类路径下。并且添加到distribution之后,在启动新的machines时,这些类都是可用的。典型地,distribution从本地网络文件存储中下载(e.g. Amazon S3 in the case of Amazon)。
加载自定义启动脚本——一旦bootstrap或横向展成功的启动一个新的machine,启动脚本就会通过SSH在远程machine上执行。这个脚本负责下载和安装Cloudify,并启动Cloudify agent。在一些实施中,可能需要调整这个过程来适应特定环境的需求(比如系统代理 、挂载点、和paths)。可以使用默认的启动脚本(bootstrap-management.sh),适用于内置的cloud driver,也可作为自定义cloud driver的基本启动脚本。简单的将修改后的脚本放置到upload文件夹,它将会自动上传到每一个新的machine中。
How does the Cloud Driver Work? (A Technical Overview)
为了解释cloud driver的情景,我们使用Openstack cloud driver(OpenstackCloudDriver)继承CloudDriverSupport基类,并且实现ProvisioningDriver接口。
1)Cloudify cloud driver(接口名:ProvisioningDriver)是一个Java POJO,使用一个配置文件来定义cloud特定的属性,和在以下主要场景有相对应的方法。
2)启动云——分配machines,安装Cloudify controller。
安装应用——为应用服务分配machines,安装应用程序的服务(包括Cloudify agent)。在这种场景下,在management machine上的cloud driver作为Cloudify controller的一部分。
注: Cluster healing的场景会被Cloudify当作与安装应用的场景一样。
3)卸载应用——关闭应用服务,并通过服务命令cloud driver关闭相应的machines。
4)关闭云——卸载所有Cloudify的machine和组件。
Bootstrapping a Cloud
这种情况下,cloud driver在client machine上,并不在 Cloudify controller的management machines上存在。在Cloudify shell提示符,用户运行bootstrap命令以指定cloud driver的实现。Cloud driver被shell实例化,同时she通过调用setConfig方法传递Driver中的引用配置对象(org.cloudifysource.dsl.cloud.Cloud)
| @Override public void setConfig(final Cloud cloud, final String templateName, final boolean management) { super.setConfig( cloud, templateName, management); if (this.management) { this.serverNamePrefix = this.cloud.getProvider().getManagementGroup(); } else { this.serverNamePrefix = this.cloud.getProvider().getMachineNamePrefix(); } this.tenant = (String) this.cloud.getCustom().get( OPENSTACK_TENANT); if (tenant == null) { throw new IllegalArgumentException("Custom field '" + OPENSTACK_TENANT + "' must be set"); } this.pathPrefix = "v1.1/" + tenant + "/"; this.endpoint = (String) this.cloud.getCustom().get(OPENSTACK_OPENSTACK_ENDPOINT); if (this.endpoint == null) { throw new IllegalArgumentException("Custom field '" + OPENSTACK_OPENSTACK_ENDPOINT + "' must be set"); } this.service = client.resource(this.endpoint); this.identityEndpoint = (String) this.cloud.getCustom().get(OPENSTACK_OPENSTACK_IDENTITY_ENDPOINT); if (this.identityEndpoint == null) { throw new IllegalArgumentException("Custom field '" + OPENSTACK_OPENSTACK_IDENTITY_ENDPOINT + "' must be set"); } final String wireLog = (String) this.cloud.getCustom().get( OPENSTACK_WIRE_LOG); if (wireLog != null) { if (Boolean.parseBoolean(wireLog)) { this.client.addFilter(new LoggingFilter(logger)); } } } |
view rawsetConfig.javaThis Gist brought to you by GitHub.
下一步,shell调用cloud driver的startManagementMachines方法,该方法会调用IaaS API(使用API安全设置)来获取management machines。然后Cloud API会返回一个Machime明细数组对象(org.cloudifysource.esc.driver.provisioning.MachineDetails),这个对象是新分配的每一个management machines细节。这些细节将被shell用于连接到这些machines,安装Cloudify management 组件。最后,Cloudify启动以下Cloudify controller组件:ESM、GSM、LUS各Management Space。它也会启动web management container和REST API container。
| private String createServer(final String token, final CloudTemplate serverTemplate) throws OpenstackException { final String serverName = this.serverNamePrefix + System.currentTimeMillis(); final String securityGroup = getCustomTemplateValue( serverTemplate, OPENSTACK_SECURITYGROUP, null, false); final String keyPairName = getCustomTemplateValue( serverTemplate, OPENSTACK_KEY_PAIR, null, false); // Start the machine! final String json = "{\"server\":{ \"name\":\"" + serverName + "\",\"imageRef\":\"" + serverTemplate.getImageId() + "\",\"flavorRef\":\"" + serverTemplate.getHardwareId() + "\",\"key_name\":\"" + keyPairName + "\",\"security_groups\":[{\"name\":\"" + securityGroup + "\"}]}}"; String serverBootResponse = null; try { serverBootResponse = service.path( this.pathPrefix + "servers").header( "Content-Type", "application/json").header( "X-Auth-Token", token).accept( MediaType.APPLICATION_XML).post( String.class, json); } catch (final UniformInterfaceException e) { throw new OpenstackException(e); } try { // if we are here, the machine started! final Document doc = documentBuilder.parse(new InputSource(new StringReader(serverBootResponse))); final String status = xpath.evaluate( "/server/@status", doc); if (!status.startsWith("BUILD")) { throw new IllegalStateException("Expected server status of BUILD(*), got: " + status); } final String serverId = xpath.evaluate( "/server/@id", doc); return serverId; } catch (XPathExpressionException e) { throw new OpenstackException("Failed to parse XML Response from server. Response was: " + serverBootResponse + ", Error was: " + e.getMessage(), e); } catch (SAXException e) { throw new OpenstackException("Failed to parse XML Response from server. Response was: " + serverBootResponse + ", Error was: " + e.getMessage(), e); } catch (IOException e) { throw new OpenstackException("Failed to send request to server. Response was: " + serverBootResponse + ", Error was: " + e.getMessage(), e); } } |
Installing an Application
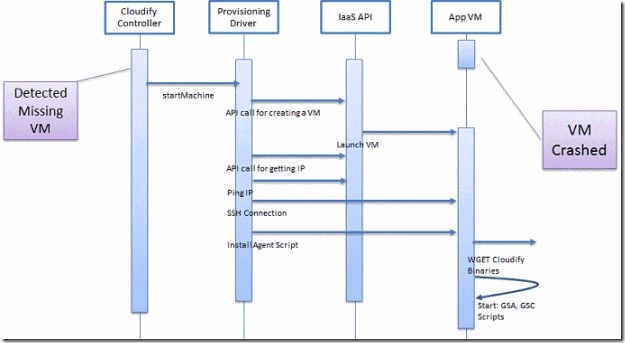
在这个情节,cloud driver存在于server machine。当controller得到安装一个应用的指示时,它将指示cloud driver按recipe描述启动相应数量的machine。为了达到此目的,cloud driver首先获取Admin对象来报告分配应用的machines的公共IP地址和其它详细信息。Admin对象是通过controller调用setAdmin方法来设置的。
然后,只要有machime需要供应,controller调用cloud driver的startMachine方法,直到所有请求的machines开启并运行通过LUS注册的Cloudify agent,或者直到请求超时。
startMachine操作步骤如下:
- 调用IaaS API
- 为machine细节投票出API 。
- Pings相应的machine确定它是可用的。
- 通过SSH连接到machine
- 安装和开启Cloudify agent组件: GSA 和 GSC
Driver从configuration Object中定义的的template 的属性获取machine信息。
宕机过程
在controller进行宕机补尝时,或重新平衡服务时,相同的情景会产生,如下图。
Customizing the Agent Installation
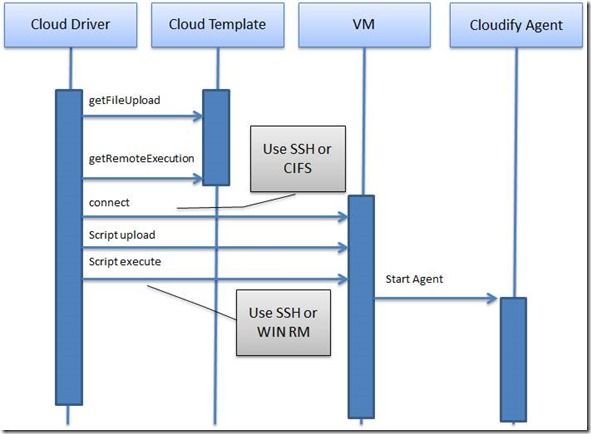
初始化执行命令
可以直接插入操作命令,也可指向一个上传的脚本。
| /* example #1 */ SMALL_LINUX : template{ ... /* The following command will be executed after Java and Cloudify are installed, but before Cloudify is started. */ initializationCommand "echo this is an init command" } /* example #2 */ SMALL_LINUX : template{ ... /* The following command will be executed after Java and Cloudify are installed, but before Cloudify is started. In the following example, myscript.sh should be placed in the same folder as the bootstrap-management.sh - (usually the upload folder). */ initializationCommand "chmod +x myscript.sh; ./myscript.sh" } |
view rawinline.groovyThis Gist brought to you by GitHub.
文件传输工具
可以指定如何传输文件到远程机器上: SCP, SFTP or Windows protocol.
| SMALL_LINUX : template{ ... /* File transfer mode. Optional, defaults to SCP. */ fileTransfer org.cloudifysource.dsl.cloud.FileTransferModes.CIFS ... } |
view rawfileTransfer.groovyThis Gist brought to you by GitHub.
远程执行命令
可以指定好何执行远程脚本: SSH or WinRM
| SMALL_LINUX : template{ ... /* Remote execution mode. Options, defaults to SSH. */ remoteExecution org.cloudifysource.dsl.cloud.RemoteExecutionModes.WINRM ... } |
view rawremoteExec.groovyThis Gist brought to you by GitHub.
参数化Cloud Driver
为了将配置信息传递到Cloud Driver,在Cloudify shell提示符中,输入 :
install-application -cloudConfiguration PATH_TO_CONF PATH_TO_APPLICATION
cloudConfiguration 包括一个路径(相对或绝对)指向一个文件或目录,里面包含用于该应用的cloud driver的配置信息。如以下代码块所示:
| public void setCustomDataFile(File file) { try { //read text/property file with the service-id (a.k.a deployment-id) Properties props = new Properties(); props.load(new FileInputStream(file)); // Do stuff ... } catch (Exception e) { //log exception } } |
view rawsetCustomDataFile.javaThis Gist brought to you by GitHub.
Uninstalling an Application
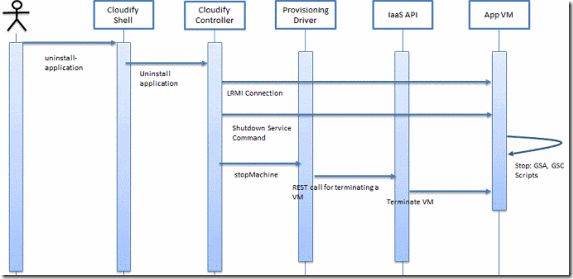
在此景情下,cloud driver存在于server machine。当controller接收到卸载一个已部署的应用的指示时,它会停掉这个应用的服务,并指示cloud driver卸载掉运行该服务的machines。这是通过调用cloud driver的stopMachine方法实现的,此方法会调用cloud的IaaS API,以指示相应的Cloud停止相关machines。
| @Override public boolean stopMachine(final String ip, final long duration, final TimeUnit unit) throws InterruptedException, TimeoutException, CloudProvisioningException { final long endTime = calcEndTimeInMillis( duration, unit); if (isStopRequestRecent(ip)) { return false; } final String token = createAuthenticationToken(); try { terminateServerByIp(ip, token, endTime); return true; } catch (final Exception e) { throw new CloudProvisioningException(e); } } |
view rawstopMachine.javaThis Gist brought to you by GitHub.
以下代码段为调用cloud’s IaaS API:
| try { service.path( this.pathPrefix + "servers/" + serverId).header( "X-Auth-Token", token).accept( MediaType.APPLICATION_XML).delete(); } catch (final UniformInterfaceException e) { throw new IllegalArgumentException(e); } |
Tearing Down a Cloud
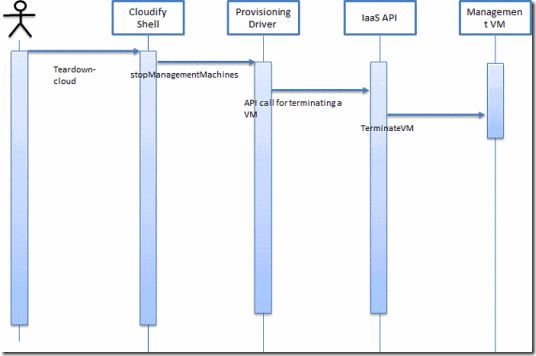
在该情景,cloud driver存在于Client machine。在Cloudify shell 提示符中,用户运行tear down命令,指定一个cloud driver的实现来卸载management machines。这是通是controller调用cloud driver的stopManagementMachies方法实现的。该方法调用cloud的IaaS API,并指示它停止相关的machines。
| @Override public void stopManagementMachines() throws TimeoutException, CloudProvisioningException { final String token = createAuthenticationToken(); final long endTime = calcEndTimeInMillis( DEFAULT_SHUTDOWN_TIMEOUT_MILLIS, TimeUnit.MILLISECONDS); List<Node> nodes; try { nodes = listServers(token); } catch (final OpenstackException e) { throw new CloudProvisioningException(e); } final List<String> ids = new LinkedList<String>(); for (final Node node : nodes) { if (node.getName().startsWith( this.serverNamePrefix)) { try { ids.add(node.getId()); } catch (final Exception e) { throw new CloudProvisioningException(e); } } } try { terminateServers( ids, token, endTime); } catch (final TimeoutException e) { throw e; } catch (final Exception e) { throw new CloudProvisioningException("Failed to shut down managememnt machines", e); } } |


