Fragment构建程序的框架
通过Api可以发现原来使用用于构建普通应用程序的框架的一些类,比如TabActivity,ActivityGroup都已经不推荐使用了,转而替换成Fragment。今天我们就来看看如何使用Fragment来构建应用程序。
底部的BottomBar结合的是之前发出的一篇博客
常用的底部分段控件BottomBar(带有小图标)
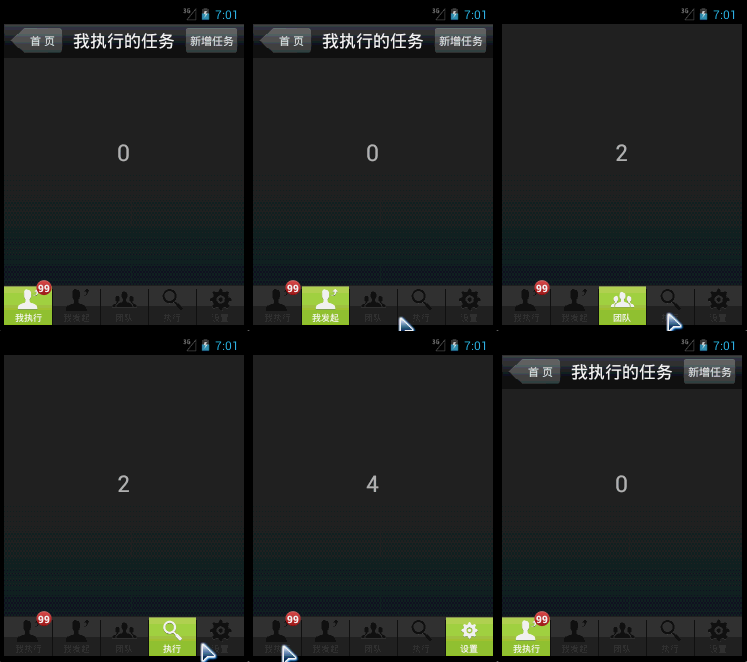
下面是效果图:
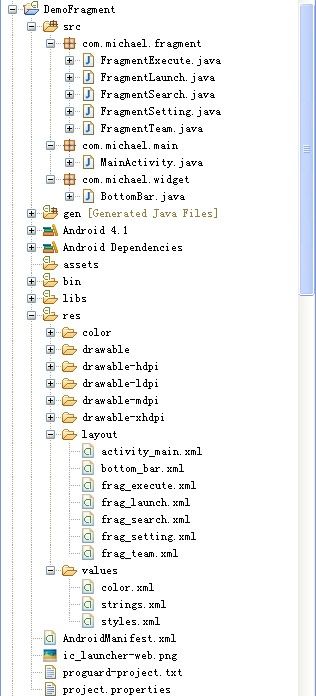
我们再看下工程的目录:
这里对BottomBar就不解释了,主要讲下Fragment相关的。
首先你的界面需要继承自FragmentActivity,在它的布局文件中需要两个控件:
1. 屏幕底部的BottomBar
2. BottomBar上方的RelativeLayout(用来切换显示各个Fragment)。
接下去你就可以针对每个界面分开写布局和代码了。
注释代码中都有,下面直接上代码:
MainActivity.java
/**
 * This demo shows how to use FragmentActivity to build the frame of a common application.
 * To replace the deprecated class such as TabActivity, ActivityGroup,and so on.
 *
 * 这个demo展示了如何使用FragmentActivity来构建应用程序的框架
 * 可以使用这个来替代原来的TabActivity,ActivityGroup等等
 *
 * @author MichaelYe
 * @since 2012-9-6
 * @see http://developer.android.com/reference/android/app/Fragment.html
 * @see http://developer.android.com/training/basics/fragments/index.html
 * @see http://developer.android.com/guide/components/fragments.html
 * */
public class MainActivity extends FragmentActivity
{

	@Override
    public void onCreate(Bundle savedInstanceState)
    {
        super.onCreate(savedInstanceState);
        setContentView(R.layout.activity_main);
        final BottomBar bottomBar = (BottomBar)findViewById(R.id.ll_bottom_bar);
        bottomBar.setOnItemChangedListener(new OnItemChangedListener()
        {

			@Override
			public void onItemChanged(int index)
			{

				showDetails(index);
			}
		});
        bottomBar.setSelectedState(0);

//        bottomBar.hideIndicate();//这个代码原来控制红色小图标的可见性
//        bottomBar.showIndicate(12);

    }

	private void showDetails(int index)
	{
		Fragment details = (Fragment)
	            getSupportFragmentManager().findFragmentById(R.id.details);
		switch(index)
		{
		case 0:
			details = new FragmentExecute();
			break;
		case 1:
			details = new FragmentLaunch();
			break;
		case 2:
			details = new FragmentTeam();
			break;
		case 3:
			details = new FragmentSearch();
			break;
		case 4:
			details = new FragmentSetting();
			break;
		}
		// Execute a transaction, replacing any existing
        // fragment with this one inside the frame.
        FragmentTransaction ft = getSupportFragmentManager().beginTransaction();
        ft.replace(R.id.details, details);
        ft.setTransition(FragmentTransaction.TRANSIT_FRAGMENT_FADE);
//        ft.addToBackStack(null);//这行代码可以返回之前的操作(横屏的情况下,即两边都显示的情况下)
        ft.commit();
	}
}
activity_main.xml
<?xml version="1.0" encoding="utf-8"?>
<RelativeLayout xmlns:android="http://schemas.android.com/apk/res/android"
    android:layout_width="fill_parent"
    android:layout_height="fill_parent"
    android:background="@drawable/bg_login"
    android:orientation="vertical" >

    <RelativeLayout
        android:id="@+id/details"
        android:layout_width="fill_parent"
        android:layout_height="fill_parent"
        android:layout_above="@+id/ll_bottom_bar" />

    <com.michael.widget.BottomBar
        android:id="@+id/ll_bottom_bar"
        android:layout_width="fill_parent"
        android:layout_height="60dip"
        android:layout_alignParentBottom="true" />

</RelativeLayout>
/**
 * 需要使用不带参数的构造器,可以使用getActivity()替换context参数
 * 否则屏幕在旋转的时候会抛出异常:
 * Caused by: java.lang.InstantiationException:
 * can't instantiate class com.michael.fragment.FragmentExecute; no empty constructor
 *
 * @see http://stackoverflow.com/questions/7016632/unable-to-instantiate-fragment
 * */
public class FragmentExecute extends Fragment
{

	public FragmentExecute()
	{
	}

	@Override
	public View onCreateView(LayoutInflater inflater, ViewGroup container,
			Bundle savedInstanceState)
	{
		if (container == null)
		{
            // Currently in a layout without a container, so no
            // reason to create our view.
            return null;
        }
		LayoutInflater myInflater = (LayoutInflater)getActivity().getSystemService(Context.LAYOUT_INFLATER_SERVICE);
	    View layout = myInflater.inflate(R.layout.frag_execute, container, false);

		return layout;
	}
}
frag_execute.xml
<?xml version="1.0" encoding="utf-8"?>
<RelativeLayout xmlns:android="http://schemas.android.com/apk/res/android"
    android:layout_width="fill_parent"
    android:layout_height="fill_parent"
    >

    <RelativeLayout
        android:id="@+id/rl_title"
        android:layout_width="fill_parent"
        android:layout_height="45dip"
        android:layout_alignParentTop="true"
        android:layout_centerVertical="true"
        android:background="@drawable/bg_title_bar"
        android:gravity="center" >

        <Button
            android:id="@+id/btn_back"
            android:layout_width="70dip"
            android:layout_height="fill_parent"
            android:layout_alignParentLeft="true"
            android:layout_marginBottom="5dip"
            android:layout_marginLeft="8dip"
            android:layout_marginTop="5dip"
            android:background="@drawable/title_btn_back_selector"
            android:text="@string/workbench_home_page"
            android:textColor="@color/title_button_color_gray" />

        <Button
            android:id="@+id/btn_add"
            android:layout_width="70dip"
            android:layout_height="fill_parent"
            android:layout_alignParentRight="true"
            android:layout_marginBottom="5dip"
            android:layout_marginRight="8dip"
            android:layout_marginTop="5dip"
            android:background="@drawable/title_btn_rect_selector"
            android:text="@string/workbench_add_task"
            android:textColor="@color/title_button_color_gray" />

        <TextView
            android:layout_width="wrap_content"
            android:layout_height="fill_parent"
            android:layout_centerInParent="true"
            android:gravity="center"
            android:text="@string/workbench_title"
            android:textColor="@color/title_color_white"
            android:textSize="22sp" />
    </RelativeLayout>

    <TextView
        android:layout_width="wrap_content"
        android:layout_height="wrap_content"
        android:layout_centerInParent="true"
        android:textSize="30sp"
        android:text="@string/num_0"
        />

</RelativeLayout>
其它的Fragment也可以这样写。
使用Fragment有两个好处:
让手机和平板之间更好的显示,这个你可以参考API;
再就是有回退功能,addToBackStack(null); 加入这个方法,当你按返回键的时候,就可以实现界面的回退了(回到之前的Fragment)。
项目下载地址:
https://github.com/michaelye/DemoFragment

