手游开发攻防——二、基础篇(持续更新)
不好意思,最近公司成员扩招,然后技术培训,项目事宜原因,因此这篇文章等到现在才出。
好了,不多说其它。
文章适合人群:对Unity基础组件有一些了解的,想知道怎么在项目中具体应用各种组件。
这篇文章以一个Asset Store上面的例子“Unity Projects Stealth”来讲解Unity的一些知识。所以可能你要对Unity一些概念有个了解。另外,这个例子"Unity Projects Stealth.unitypackage"我已经分享到http://pan.baidu.com/s/1gd6A0L1了,大家也可以去下载下来参照着文章看。
这篇项目会大概分成以下部分来讲(这个目录在后续文章编写中可能会根据需要稍作修改):
1、项目大致了解
2、碰撞器基础
3、控制角色
4、碰撞器及其使用
5、怪物AI
6、事件通知
7、渲染特效
OK。
在此之前先说下本文运行项目时的环境:
系统 :Window 7 X64
Unity:4.3.3f1
1、项目大致了解:
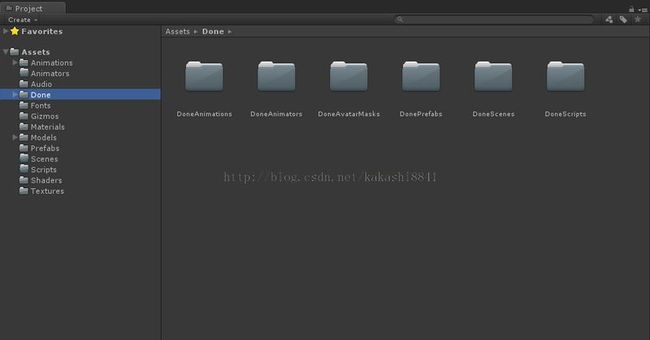
我们打开unity,新建项目,然后导入上面下载的"Unity Projects Stealth.unitypackage"。等导入完毕后就可以看到“Project”视图(如果你没打开,可以从菜单栏“Window”-“Project”打开)里面的结构如下:
里面每个目录大家都可以随便打开看看:
| Animations | 一些角色动画 |
| Animator | 动画控制器,实际里面啥都没有-_- |
| Audio | 音频文件 |
| Fonts | 字体 |
| Gizmos | 在scene视图用于调试的一些图标 |
| Materials | 材质 |
| Models | 模型 |
| Prefabs | 预设 |
| Scenes | 场景文件,实际里面啥都没有-_- |
| Scripts | 脚本,实际里面啥都没有-_- |
| Shaders | 着色器 |
| Textures | 一些贴图纹理 |
| Done | 这里面才包含了上面缺少的动画控制器、场景文件和脚本~· |
大家平常做项目也可以参考上面的做法,对不同的资源放不同目录进行归类整理,而且大家一看到这些文件夹就都知道里面有什么资源。可以减少很多沟通成本,也为自己查找资源带来便利。
好了,如果没什么问题,点击播放按钮,应该就能运行项目了。
使用键盘的WASD或上下左右箭头就可以控制人物走动了。屏幕左下方也有文本给出其它操作的按键。比如"Z"可以打开开关等。
2、碰撞器基础
一般情况下,你想让物体直接有体积,能产生碰撞,那么你需要给这个物体增加一个碰撞器“Collider”。在Unity中,你只需要选择一个对象,然后点击菜单栏的”Component“-“Physics”,里面就有各种各样的碰撞器,你根据自己模型选择一个比较接近的就OK了。Unity里面的碰撞器区分为两种,一种为静态的,另一种动态的。
静态的意思是这个碰撞器在游戏过程中不会发生位移、旋转、缩放。
动态的意思则是说这个碰撞器可能会在游戏过程中发生位移、旋转、缩放。动态碰撞器需要增加刚体组件。不然可能会导致碰撞失效、性能开销增加。(比如Unity一个UI组件NGUI,它新版本的Panel会检测当前对象是否带了Rigibody,如果没有则自动增加一个。就是为了防止开发者做一些界面动画,忘记修改添加Rigibody,导致UI按钮点击失效。)
3、控制角色
控制一个角色在场景中运动,最简单的做法是把一个对象拖到场景中,然后根据按键。设置这个对象transform的position值。这样对象就可以在场景中运动起来。
获取按键可以用Input.GetAxis方法。获取X和Z轴的按键分别可以使用:Input.GetAxis("Horizontal") 和Input.GetAxis("Vertical")方法。“Horizontal”和“Vertical”其实是在“Edit”-“Project Settings”-“Input”里面配置的。
那么我们这个例子是使用什么方法来让玩家角色运动的呢?
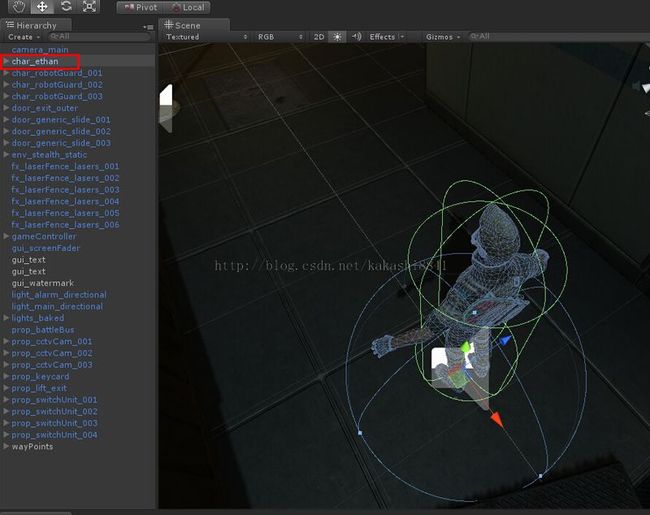
先在“Hierarchy”视图(如果没有这个视图,可以在“Window”-“Hierarchy”打开它)中找到“char_ethan”对象,选中它。
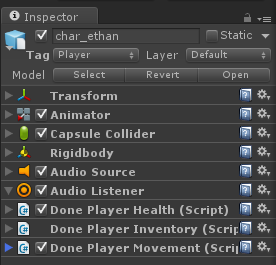
我们先看看它的“Inspector”视图(如果没有可以在“Window”-“Inspector”打开它)。
注意这里除了有基本的Transform组件外,还有“Animator”,“Capsule Collider”,“Rigidbody”组件。这三个组件其实用于做可移动物体其实是黄金组合(当然也有用“Character Controller”的)。
还有“Audio Source”、“Audio Listener”两个分别是播放声音和监听声音的组件。
然后"Done Player Health (Script)","Done Player Inventory (Script)","Done Player Movement (Script)"分别是对角色做控制的脚本。下面我们简单说说每个组件的用途:
A、Animator
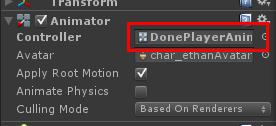
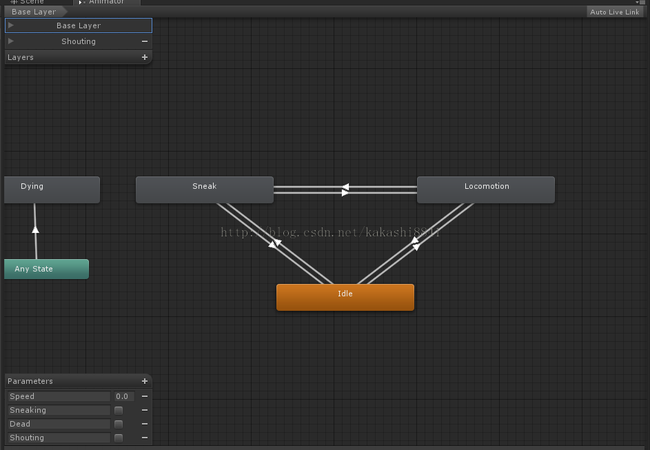
其实是Unity内置的一个动画控制器,原理是状态机。比如双击上面的“Animator”面板里面的“Controller”属性
就会出现状态机的编辑窗口
B、Capsule Collider
胶囊体碰撞器。比较简单,没什么好说的。
C、Rigidbody
刚刚上面也说了,动态碰撞器的需要。
关于A、B、C这几个组件上面就只简单介绍到这里,这里不展开讨论。如果有需要,我后面会再单独写文章介绍。
下面开始看看控制代码部分。
D、DonePlayerMovement
这里有个“DonePlayerMovement(Script)”组件,从名字上看就知道应该是控制移动的(所以说命名很重要)。我们打开这个组件的源码,看看。
using UnityEngine;
using System.Collections;

public class DonePlayerMovement : MonoBehaviour
{
	public AudioClip shoutingClip;		// 玩家大喊的声音
	public float turnSmoothing = 15f;	// 用于玩家平滑转向的值
	public float speedDampTime = 0.1f;	// 用于控制从一个值变化到另一个的时间限制


	private Animator anim;
	private DoneHashIDs hash;			// 保存各种动画状态的hash


	void Awake ()
	{
		anim = GetComponent<Animator>();
		hash = GameObject.FindGameObjectWithTag(DoneTags.gameController).GetComponent<DoneHashIDs>();

		// Set the weight of the shouting layer to 1.
		anim.SetLayerWeight(1, 1f);
	}


	void FixedUpdate ()
	{
		// Cache the inputs.
		float h = Input.GetAxis("Horizontal");
		float v = Input.GetAxis("Vertical");
		bool sneak = Input.GetButton("Sneak");

		MovementManagement(h, v, sneak);
	}


	void Update ()
	{
		// Cache the attention attracting input.
		bool shout = Input.GetButtonDown("Attract");

		// Set the animator shouting parameter.
		anim.SetBool(hash.shoutingBool, shout);

		AudioManagement(shout);
	}


	void MovementManagement (float horizontal, float vertical, bool sneaking)
	{
		// Set the sneaking parameter to the sneak input.
		anim.SetBool(hash.sneakingBool, sneaking);

		// If there is some axis input...
		if(horizontal != 0f || vertical != 0f)
		{
			// ... set the players rotation and set the speed parameter to 5.5f.
			Rotating(horizontal, vertical);
			anim.SetFloat(hash.speedFloat, 5.5f, speedDampTime, Time.deltaTime);
		}
		else
			// Otherwise set the speed parameter to 0.
			anim.SetFloat(hash.speedFloat, 0);
	}


	void Rotating (float horizontal, float vertical)
	{
		// Create a new vector of the horizontal and vertical inputs.
		Vector3 targetDirection = new Vector3(horizontal, 0f, vertical);

		// Create a rotation based on this new vector assuming that up is the global y axis.
		Quaternion targetRotation = Quaternion.LookRotation(targetDirection, Vector3.up);

		// Create a rotation that is an increment closer to the target rotation from the player's rotation.
		Quaternion newRotation = Quaternion.Lerp(rigidbody.rotation, targetRotation, turnSmoothing * Time.deltaTime);

		// Change the players rotation to this new rotation.
		rigidbody.MoveRotation(newRotation);
	}


	void AudioManagement (bool shout)
	{
		// If the player is currently in the run state...
		if(anim.GetCurrentAnimatorStateInfo(0).nameHash == hash.locomotionState)
		{
			// ... and if the footsteps are not playing...
			if(!audio.isPlaying)
				// ... play them.
				audio.Play();
		}
		else
			// Otherwise stop the footsteps.
			audio.Stop();

		// If the shout input has been pressed...
		if(shout)
			// ... play the shouting clip where we are.
			AudioSource.PlayClipAtPoint(shoutingClip, transform.position);
	}
}
这个脚本整体来说:
在Awake的时候,先找到脚本需要用到的Animator组件和DoneHashIds组件,然后缓存它们(在后面用到就不需要频繁查找了,节省CPU)。
在FixedUpdate的时候,获取玩家按下的移动键,并处理移动、角色朝向问题。
在Update的时候,获取玩家是否按下“Attract”键,并确定是否播放动画以及声音。
OK,我们主要来看看MovementManagement这个方法:
	void MovementManagement (float horizontal, float vertical, bool sneaking)
	{
		// Set the sneaking parameter to the sneak input.
		anim.SetBool(hash.sneakingBool, sneaking);

		// If there is some axis input...
		if(horizontal != 0f || vertical != 0f)
		{
			// ... set the players rotation and set the speed parameter to 5.5f.
			Rotating(horizontal, vertical);
			anim.SetFloat(hash.speedFloat, 5.5f, speedDampTime, Time.deltaTime);
		}
		else
			// Otherwise set the speed parameter to 0.
			anim.SetFloat(hash.speedFloat, 0);
	}
我们可以发现,除了Rotating方法,基本都是对anim做一些状态设置的方法。那么Rotating方法里面是什么呢?
	void Rotating (float horizontal, float vertical)
	{
		// 创建一个Vector3用于保存输入的水平位移方向
		Vector3 targetDirection = new Vector3(horizontal, 0f, vertical);

		// 根据上面的方向计算这个方向指向的角度
		Quaternion targetRotation = Quaternion.LookRotation(targetDirection, Vector3.up);

		// 创建一个从玩家当前方向旋转到目标方向的旋转增量
		Quaternion newRotation = Quaternion.Lerp(rigidbody.rotation, targetRotation, turnSmoothing * Time.deltaTime);

		// 修改玩家的方向
		rigidbody.MoveRotation(newRotation);
	}
上面代码其实看出,他也没有实现玩家的位置移动。那是在其它组件里面实现的还是什么其它方式处理的呢?且听下回分解。
