Internet Explorer – Web程序员的毒药。在IE上开发时间中有超过60%的时间是花在和IE的bug进行搏斗,让你的开发生产率严重下降。下面是一个教程,告诉你9个IE上最常见的BUG以及如何解决它们。
1. DIV居中布局创建一个CSS定义把一个元素放到中间的位置,可能是每一个Web开发人员都会做的事情。最简单的做法是为你的元素增加一个margin: auto; ,然而 IE 6.0 会出现很多奇怪的行为。让我们来看一个例子。
<!DOCTYPE html>
<html>
<head>
<meta charset="utf-8" />
<title>CSS z-index Property</title>
<style>
#container
{
	border: solid 1px #000;
	background: #777;
	width: 400px;
	height: 160px;
	margin: 30px 0 0 30px;
}
#element{
	background: #95CFEF;
	border: solid 1px #36F;
	width: 300px;
	height: 100px;
	margin: 0px auto;
}
</style>
</head>
<body>
<div id="container" >The container
	<div id="element" >The element</div>
</div>
</body>
</html>
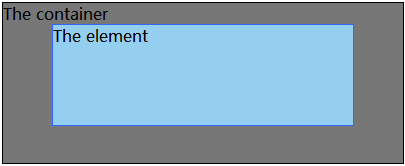
下面是我们所期望的输出:
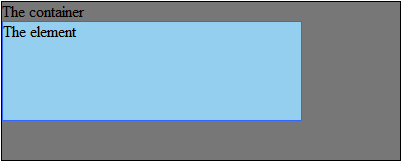
但IE却给我们这样的输出:
这应该是IE 6对margin的 auto 并没有正确的设置。但幸运的是,这是很容易被修正的。
解决方法
最简单的方法是在父元件中使用 text-align: center 属性,而在元件中使用 text-align: left 。
<!DOCTYPE html>
<html>
<head>
<meta charset="utf-8" />
<title>CSS z-index Property</title>
<style>
#container
{
	border: solid 1px #000;
	background: #777;
	width: 400px;
	height: 160px;
	margin: 30px 0 0 30px;
	text-align: center;
}
#element{
	background: #95CFEF;
	border: solid 1px #36F;
	width: 300px;
	height: 100px;
	margin: 0px auto;
	text-align: left;
}
</style>
</head>
<body>
<div id="container">The container
	<div id="element" >The element</div>
</div>
</body>
</html>
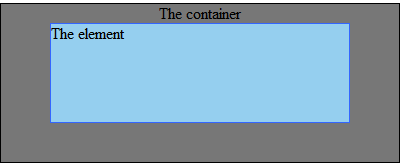
IE却给我们这样的输出:
2. float的浮动双边距
什么是浮动双边距
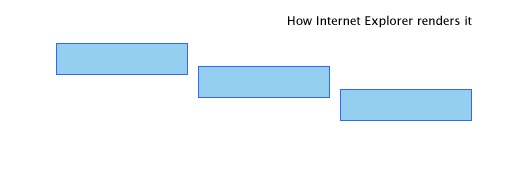
当一个盒子(块级元素)像左浮动的同时有一个向左的margin-left的时候,IE6解析这段代码时就会把margin-left解析为原来的2倍,这个就是所谓的浮动双边距BUG。同理当一个盒子右浮动的同时有一个向右的margin-right的时候,IE6也会把margin-right解析为原来的2倍。但是如果浮动的方向和margin方向是相反的话是不会出现双边距BUG的。
浮动双边距产生环境
IE6的双边距BUG并不是所有的margin边距方向都会产生双边距,出现双边距的条件是当浮动元素的浮动方向和margin的方向一致时才会出现。例如,元素向左浮动,那么只有左边距才会产生浮动双边距。此外,如果同一行中有多个浮动元素,且都有与浮动方向相同的margin,那么并不是所以的元素都出现浮动双边距,只有第一个浮动元素会出现双边距BUG,其它的浮动元素则不会。
<!DOCTYPE html>
<html>
<head>
<meta charset="utf-8" />
<title>CSS z-index Property</title>
<style>
*{
	margin:0;
	padding:0;
}
.floatbox {
	background: #95CFEF;
	border: solid 1px #36F;
	float: left;
	width: 150px;
	height: 50px;
	margin:10px 0px 0px 20px;
	border:1px solid #000;
}
</style>
</head>
<body>
<div class="floatbox"></div>
<div class="floatbox"></div>
<div class="floatbox"></div>
</body>
</html>
常用的两种能够解决浮动双边距的方法
1、给浮动盒子添加属性display:inline;将浮动盒子属性改为内联,就可以了。
2、使用IE6特有的选择符下划线(_),将现在的margin值改为原来的一半。
<!DOCTYPE html>
<html>
<head>
<meta charset="utf-8" />
<title>CSS z-index Property</title>
<style>
*{
	margin:0;
	padding:0;
}
.floatbox {
	background: #95CFEF;
	border: solid 1px #36F;
	float: left;
	width: 150px;
	height: 50px;
	margin:10px 0px 0px 20px;
	border:1px solid #000;
	display:inline;/*解决方法*/
}
</style>
</head>
<body>
<div class="floatbox"></div>
<div class="floatbox"></div>
<div class="floatbox"></div>
</body>
</html>
3. 楼梯式的效果几乎所有的Web开发者都会使用list来创建导航条
<!DOCTYPE html>
<html>
<head>
<meta charset="utf-8" />
<title>CSS z-index Property</title>
<style>
ul
{
	list-style: none;
}
ul li a {
	display: block;
	width: 130px;
	height: 30px;
	text-align: center;
	color: #fff;
	background: #95CFEF;
	border: solid 1px #36F;
	margin: 30px 5px;
	float:left;
}
</style>
</head>
<body>
<ul>
<li><a href="#"></a></li>
<li><a href="#"></a></li>
<li><a href="#"></a></li>
</ul>
</body>
</html>
一个符合标准的浏览器会是下面这样:
但IE却是这样的:
下面是两个解决方法
解决方法一:设置li元件的float属性。
<!DOCTYPE html>
<html>
<head>
<meta charset="utf-8" />
<title>CSS z-index Property</title>
<style>
*{
	margin:0;
	padding:0;
}
ul
{
	list-style: none;
}
ul li a {
	display: block;
	width: 130px;
	height: 30px;
	text-align: center;
	color: #fff;
	background: #95CFEF;
	border: solid 1px #36F;
	margin: 30px 0px 30px 10px;/*去掉了float:left;否则IE6出现浮动双边距*/
}
ul li{
	float:left;
}
</style>
</head>
<body>
<ul>
<li><a href="#"></a></li>
<li><a href="#"></a></li>
<li><a href="#"></a></li>
</ul>
</body>
</html>
解决方法二:设置li display: inline 属性。
<!DOCTYPE html>
<html>
<head>
<meta charset="utf-8" />
<title>CSS z-index Property</title>
<style>
*{
	margin:0;
	padding:0;
}
ul
{
	list-style: none;
}
ul li a {
	display: block;
	width: 130px;
	height: 30px;
	text-align: center;
	color: #fff;
	background: #95CFEF;
	border: solid 1px #36F;
	margin: 30px 0px 30px 10px;
	/*在同一行所以用float,并且得解决浮动双边距的问题*/
	float:left;
	display:inline;
}
ul li{
	display:inline;
}
</style>
</head>
<body>
<ul>
<li><a href="#"></a></li>
<li><a href="#"></a></li>
<li><a href="#"></a></li>
</ul>
</body>
</html>
4. 无法设置微型高度我们发现在IE中使用 height: XXpx 这样的属性无法设置比较小的高度。
下面是个例子(注意高度是2px):
.element{
	background: #95CFEF;
	width: 300px;
	height: 2px;
	border: solid 1px #36F;
	margin: 30px 0;
}
期望结果: 2px的元件加1px的边框。
IE的结果:
解决方案一
这个BUG的产生原因很简单,IE不允许元件的高度小于字体的高度,所以,下面的fix是设置上字体大小。
.element{
	background: #95CFEF;
	width: 300px;
	height: 2px;
	border: solid 1px #36F;
	margin: 30px 0;
	font-size:0px;
}
解决方案二
但是最佳的解决方法是使用 overflow: hidden
.element{
	background: #95CFEF;
	width: 300px;
	height: 2px;
	border: solid 1px #36F;
	margin: 30px 0;
	overflow: hidden;
}
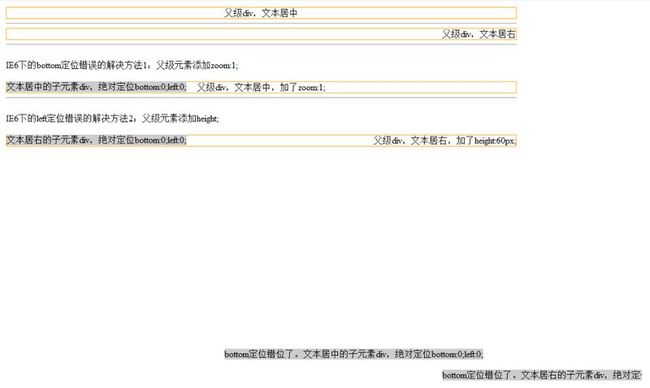
5.IE6下position:absolute的定位BUG
原因:IE6及更低版本中,相对定位的元素没有获得IE/Win的内部hasLayout属性。因此,它们不创建新的定位上下文,所有绝对定位元素相对于视口(body)进行定位。
<!doctype html>
<html>
	<head>
		<meta charset="utf-8" />
		<title>测试模型</title>
	</head>
	<body style="width:900px;margin:0 auto 800px auto;">
		<p>
			IE6下的left定位错误
		</p>
		<div style="position:relative; border:1px solid orange; text-align:center;">
			<span>父级div,文本居中</span>
			<!-- 注意:position:absolute受text-align:center影响-->
			<div style="position:absolute;top:0;left:0;background:#CCC;">
				文本居中的子元素div,绝对定位top:0;left:0;
			</div>
		</div>
		<hr />

		<div style="position:relative; border:1px solid orange; text-align:right;">
			<span>父级div,文本居右</span>
			<div style="position:absolute;top:0;left:0;background:#CCC;">
				文本居右的子元素div,绝对定位top:0;left:0;
			</div>
		</div>
		<hr/>
		<p>
			IE6下的left定位错误的解决方法1:父级元素添加zoom:1;
		</p>
		<div style="position:relative; border:1px solid orange; text-align:center;zoom:1;">
			<span>父级div,文本居中,加了zoom:1;</span>
			<div style="position:absolute;top:0;left:0;background:#CCC;">
				文本居中的子元素div,绝对定位top:0;left:0;
			</div>
		</div>
		<hr/>
		<p>
			IE6下的left定位错误的解决方法2:父级元素添加width;
		</p>
		<div style="position:relative;border:1px solid orange;text-align:right;width:99%;">
			<span>父级div,文本居右,加了width:99%;</span>
			<div style="position:absolute;bottom:0;left:0;background:#CCC;">
				文本居右的子元素div,绝对定位top:0;left:0;
			</div>
		</div>
		<hr/>
		<p>
			IE6下的bottom定位错误
		</p>
		<div style="position:relative;border:1px solid orange;text-align:center;">
			<span>父级div,文本居中</span>
			<div style="position:absolute;bottom:0;left:0;background:#CCC;">
				bottom定位错位了。文本居中的子元素div,绝对定位bottom:0;left:0;
			</div>
		</div>
		<hr/>
		<div style="position:relative;border:1px solid orange;text-align:right;">
			<span>父级div,文本居右</span>
			<div style="position:absolute;bottom:0;left:0;background:#CCC;">
				bottom定位错位了。文本居右的子元素div,绝对定位bottom:0;left:0;
			</div>
		</div>
		<hr/>
		<p>
			IE6下的bottom定位错误的解决方法1:父级元素添加zoom:1;
		</p>
		<div style="position:relative;border:1px solid orange;text-align:center;zoom:1;">
			<span>父级div,文本居中,加了zoom:1;</span>
			<div style="position:absolute;bottom:0;left:0;background:#CCC;">
				文本居中的子元素div,绝对定位bottom:0;left:0;
			</div>
		</div>
		<hr/>
		<p>
			IE6下的left定位错误的解决方法2:父级元素添加height;
		</p>
		<div style="position:relative;border:1px solid orange;text-align:right;height:1%;">
			<span>父级div,文本居右,加了height:60px;</span>
			<div style="position:absolute;bottom:0;left:0;background:#CCC;">
				文本居右的子元素div,绝对定位bottom:0;left:0;
			</div>
		</div>
		<br/>
	</body>
</html>
解决方法:IE6中很多Bug都可以通过触发layout得到解决,以上的解决方法无论是设置zoom:1还是设置width和height其实都是为了触发layout。其实不管left还是bottom错位,只要触发layout,就能正常定位了。例如:
1、设置height:1%;//小的高度不会对实际高度找出影响
2、相对定位的祖先元素设置过高度和宽度。
3、相对定位的祖先元素设置_zoom:1,用于触发元素的layout属性。
效果图:
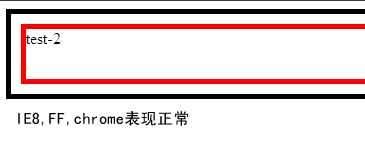
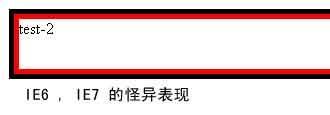
6.IE6、IE7浏览器下margin无效的解决方法(引用自:http://www.jb51.net/css/28144.html)。
<style type="text/css">
.test-1,.test-2{border:5px solid #F00;}
.test-1{border-color:#000;}
       /*width:100%; height:auto !important;height:1%; zoom:1;*/
.test-2{margin:10px;height:50px;width:500px;}
</style>
<div class="test-1">
<div class="test-2">
test-2
</div>
</div>
.test-1{border-color:#000;width:100%; height:auto !important;height:1%; zoom:1;}
在InternetExplorer中,一个元素要么自己对自身的内容进行计算大小和组织,要么依赖于父元素来计算尺寸和组织内容。上面的例子 test-1 没有触发haslayout 他不能负责对自己和可能的子孙元素进行尺寸计算和定位;所以子元素的margin失效。
7.div嵌套时y轴上padding和margin的问题。
怪异模式下(包括IE6、IE7的标准模式)的IE:y轴上子div到父div的距离为父padding和子margin里大的一个
其他浏览器(标准模式下的IE8和IE9、Firefox Chrome Safari):y轴上子div到父div的距离为父padding+子margin
<!DOCTYPE HTML PUBLIC "-//W3C//DTD HTML 4.01//EN" "http://www.w3.org/TR/html4/strict.dtd">
<html>
	<head>
		<title>父子块的margin</title>
		<style type="text/css">
			* {
				padding: 0;
				margin: 0;
			}
			div.father {						/* 父div */
				background-color: #fffebb;
				font-family: Arial, Helvetica, sans-serif;
				font-size: 12px;
				padding: 10px;
				border: 1px solid #000000;
				width:100%; height:auto !important;height:1%; zoom:1;
			}
			div.son {						/* 子div */
				background-color: #a2d2ff;
				margin-top: 30px;
				margin-bottom: 0px;
				padding: 15px;
				border: 1px dashed #004993;
				width: 100px;
			}
		</style>
	</head>
	<body>
		<div class="father">
			<div class="son">
				子div
			</div>
		</div>
	</body>
</html>
8.怪异模式下(包括IE6、IE7的标准模式)的IE:正常
其他浏览器(标准模式下的IE8和IE9、Firefox Chrome Safari):y轴上父padding=0且border=0时,子div到父div的距离为0
<!DOCTYPE HTML PUBLIC "-//W3C//DTD HTML 4.01//EN" "http://www.w3.org/TR/html4/strict.dtd">
<html>
	<head>
		<title>父子块的margin</title>
		<style type="text/css">
			* {
				padding: 0;
				margin: 0;
			}
			div.father {						/* 父div */
				background-color: #fffebb;
				font-family: Arial, Helvetica, sans-serif;
				font-size: 12px;
				width:100%; height:auto !important;height:1%; zoom:1;
			}
			div.son {						/* 子div */
				background-color: #a2d2ff;
				margin-top: 30px;
				margin-bottom: 0px;
				padding: 15px;
				border: 1px dashed #004993;
				width: 100px;
			}
		</style>
	</head>
	<body>
		<div class="father">
			<div class="son">
				子div
			</div>
		</div>
	</body>
</html>
9.3像素偏移bug
它是IE6的一个著名的bug,当浮动元素与非浮动元素相邻时,这个3px的Bug就会出现。
body { margin:0; padding:0; }
#side { float: left; background:#99FF99; height: 300px; width: 120px;  }
#main { background: #99FFFF; height: 300px; }

<div id="side">此处显示 id "side" 的内容</div>
<div id="main">此处显示 id "main" 的内容</div>
解决方法:
1、所有的层都浮动 把右边那个层也设置成浮动层就可以消除这可恶的3px间隔
2、给左边的层,应用margin-right:-3px;,同样可解决IE 3px bug
10.IE6和IE7overflow:hidden;失效
1)设置body{overflow:hidden;}失效
原因:此项其实不是bug,而是个浏览器默认值不同造成的。
明智的浏览器(ex. chrome and firefox)会初始付值给html{overflow:visible;}
IE6 初始付值html{overflow-x:auto;overflow-y:scroll;}
IE7 初始付值html{overflow-x:visible;overflow-y:scroll;}
只有dom根结点(也就是html根节点)设置html{overflow:visible;}的时候,浏览器才会将body元素中的overflow值应用到视图区。
举个例子说:
设置了body{overflow:hidden},还会出现滚动条,不过这个滚动条不是body的,是html的只有你设置html{overflow:visible;} body{overflow的值}才能传递到html{}中去这样html的值就变成了{overflow:hidden},ok没有滚动条了
<!DOCTYPE html PUBLIC "-//W3C//DTD XHTML 1.0 Transitional//EN" "http://www.w3.org/TR/xhtml1/DTD/xhtml1-transitional.dtd">
<html xmlns="http://www.w3.org/1999/xhtml">
	<head>
		<meta http-equiv="Content-Type" content="text/html; charset=utf-8" />
		<title>无标题文档</title>
		<style type="text/css">
			html, body, p {
			    margin: 0;
			    padding: 0;
			}
			body {
			    overflow: hidden;
			}
			p {
			    width: 5000px;
			    height: 5000px;
			}
		</style>
	</head>
	<body>
		<p>There are no scrollbars on this page in sane browsers</p>
	</body>
</html>
2)当父元素的直接子元素或者下级子元素的样式拥有position:relative属性时,父元素的overflow:hidden属性就会失效。
解决方法:在父元素中使用position:relative;
<!DOCTYPE html PUBLIC "-//W3C//DTD XHTML 1.0 Transitional//EN" "http://www.w3.org/TR/xhtml1/DTD/xhtml1-transitional.dtd">
<html xmlns="http://www.w3.org/1999/xhtml">
	<head>
		<meta http-equiv="Content-Type" content="text/html; charset=utf-8" />
		<title>无标题文档</title>
		<style type="text/css">
			html, body, p {
			    margin: 0;
			    padding: 0;
			}
			.father{
				overflow:hidden; width:200px;height:200px;background: yellow;
			}
			.child{
				position:relative; width:300px;height:150px;background: blue;
			}
		</style>
	</head>
	<body>
		<div class="father">
			afjsifjei
			<div class="child">
				child
			</div>
		</div>
	</body>
</html>
建议的解决方案:zoom:1;height:100%;background:#fff
12.IE6下border不显示的bug(我没有遇到)
分析:对一个div定义border,但是却不显示。
建议解决方法:定义宽度;定义高度;清除浮动。
13. IE(6 7 8)的z-index bug
<div id="container">
<div id="box1">这个box应该在上面</div>
</div>
<div id="box2">
这个box应该在下面,IE浏览器会对定位元素产生一个新的stacking
context ,甚至当元素 z-index的为“auto”。
</div>
css:
container { position: relative; }
#box1 { position: absolute; top: 100px; left: 210px; width: 200px; height: 200px; background-color: yellow; z-index: 20; }
#box2 { position: absolute; top: 50px; left: 160px; width: 200px; height: 200px; background-color: green; z-index: 10; }
结果:ff/chrome显示为box1在box2上,而IE确实box2显示在了box1上
原因:IE浏览器会对定位的元素产生一个新的stacking context,并且从z-index:0开始
引用自:http://kb.cnblogs.com/page/51673/
:http://www.qinychun.com/2012/07/ie6-bug/129.html?replytocom=175
:http://developer.51cto.com/art/201008/220829.htm
:http://www.cnblogs.com/tom-zhu/archive/2012/07/15/2592379.html
:http://www.cnblogs.com/svage/archive/2011/02/12/1952704.html
