apache反向代理用户请求至后端Tomcat 集群以及session绑定,session共享
实验环境如下:1台Apache2台tomcat  我用window8.1自带的hyper-v。
Apache2块网卡 IP:10.0.0.1 模拟内网
IP:192.168.1.101 模拟外网
TOMCAT1 IP:10.0.0.2
TOMCAT2 IP:10.0.0.3
TOP:
在2台TOMCAT上安装java和tomcat 之前文章已经介绍过
10.0.0.2 tomcat 在server.xml里面修改如下 10.0.0.3也是如此.
先在tomcat端的hosts做解析
10.0.0.2 tomcat1
10.0.0.3 tomcat2
<?xml version='1.0' encoding='utf-8'?> <!-- Licensed to the Apache Software Foundation (ASF) under one or more contributor license agreements. See the NOTICE file distributed with this work for additional information regarding copyright ownership. The ASF licenses this file to You under the Apache License, Version 2.0 (the "License"); you may not use this file except in compliance with the License. You may obtain a copy of the License at http://www.apache.org/licenses/LICENSE-2.0 Unless required by applicable law or agreed to in writing, software distributed under the License is distributed on an "AS IS" BASIS, WITHOUT WARRANTIES OR CONDITIONS OF ANY KIND, either express or implied. See the License for the specific language governing permissions and limitations under the License. --> <!-- Note: A "Server" is not itself a "Container", so you may not define subcomponents such as "Valves" at this level. Documentation at /docs/config/server.html --> <Server port="8005" shutdown="SHUTDOWN"> <!-- Security listener. Documentation at /docs/config/listeners.html <Listener className="org.apache.catalina.security.SecurityListener" /> --> <!--APR library loader. Documentation at /docs/apr.html --> <Listener className="org.apache.catalina.core.AprLifecycleListener" SSLEngine="on" /> <!--Initialize Jasper prior to webapps are loaded. Documentation at /docs/jasper-howto.html --> <Listener className="org.apache.catalina.core.JasperListener" /> <!-- Prevent memory leaks due to use of particular java/javax APIs--> <Listener className="org.apache.catalina.core.JreMemoryLeakPreventionListener" /> <Listener className="org.apache.catalina.mbeans.GlobalResourcesLifecycleListener" /> <Listener className="org.apache.catalina.core.ThreadLocalLeakPreventionListener" /> <!-- Global JNDI resources Documentation at /docs/jndi-resources-howto.html --> <GlobalNamingResources> <!-- Editable user database that can also be used by UserDatabaseRealm to authenticate users --> <Resource name="UserDatabase" auth="Container" type="org.apache.catalina.UserDatabase" description="User database that can be updated and saved" factory="org.apache.catalina.users.MemoryUserDatabaseFactory" pathname="conf/tomcat-users.xml" /> </GlobalNamingResources> <!-- A "Service" is a collection of one or more "Connectors" that share a single "Container" Note: A "Service" is not itself a "Container", so you may not define subcomponents such as "Valves" at this level. Documentation at /docs/config/service.html --> <Service name="Catalina"> <!--The connectors can use a shared executor, you can define one or more named thread pools--> <!-- <Executor name="tomcatThreadPool" namePrefix="catalina-exec-" maxThreads="150" minSpareThreads="4"/> --> <!-- A "Connector" represents an endpoint by which requests are received and responses are returned. Documentation at : Java HTTP Connector: /docs/config/http.html (blocking & non-blocking) Java AJP Connector: /docs/config/ajp.html APR (HTTP/AJP) Connector: /docs/apr.html Define a non-SSL HTTP/1.1 Connector on port 8080 --> <Connector port="8080" protocol="HTTP/1.1" connectionTimeout="20000" redirectPort="8443" /> <!-- A "Connector" using the shared thread pool--> <!-- <Connector executor="tomcatThreadPool" port="8080" protocol="HTTP/1.1" connectionTimeout="20000" redirectPort="8443" /> --> <!-- Define a SSL HTTP/1.1 Connector on port 8443 This connector uses the BIO implementation that requires the JSSE style configuration. When using the APR/native implementation, the OpenSSL style configuration is required as described in the APR/native documentation --> <!-- <Connector port="8443" protocol="org.apache.coyote.http11.Http11Protocol" maxThreads="150" SSLEnabled="true" scheme="https" secure="true" clientAuth="false" sslProtocol="TLS" /> --> <!-- Define an AJP 1.3 Connector on port 8009 --> <Connector port="8009" protocol="AJP/1.3" redirectPort="8443" /> <!-- An Engine represents the entry point (within Catalina) that processes every request. The Engine implementation for Tomcat stand alone analyzes the HTTP headers included with the request, and passes them on to the appropriate Host (virtual host). Documentation at /docs/config/engine.html --> <!-- You should set jvmRoute to support load-balancing via AJP ie : <Engine name="Catalina" defaultHost="localhost" jvmRoute="jvm1"> --> <Engine name="Catalina" defaultHost="tomcat1" jvmRouter="tomcat1"> <!--For clustering, please take a look at documentation at: /docs/cluster-howto.html (simple how to) /docs/config/cluster.html (reference documentation) --> <!-- <Cluster className="org.apache.catalina.ha.tcp.SimpleTcpCluster"/> --> <!-- Use the LockOutRealm to prevent attempts to guess user passwords via a brute-force attack --> <Realm className="org.apache.catalina.realm.LockOutRealm"> <!-- This Realm uses the UserDatabase configured in the global JNDI resources under the key "UserDatabase". Any edits that are performed against this UserDatabase are immediately available for use by the Realm. --> <Realm className="org.apache.catalina.realm.UserDatabaseRealm" resourceName="UserDatabase"/> </Realm> <Host name="localhost" appBase="webapps" unpackWARs="true" autoDeploy="true"> <!-- SingleSignOn valve, share authentication between web applications Documentation at: /docs/config/valve.html --> <!-- <Valve className="org.apache.catalina.authenticator.SingleSignOn" /> --> <!-- Access log processes all example. Documentation at: /docs/config/valve.html Note: The pattern used is equivalent to using pattern="common" --> <Valve className="org.apache.catalina.valves.AccessLogValve" directory="logs" prefix="localhost_access_log." suffix=".txt" pattern="%h %l %u %t "%r" %s %b" /> </Host> <Host name="tomcat1" appBase="/web" unpackWARs="true" autoDeploy="true"> <Context path="" docBase="webapps" reloadable="true" /> </Host> </Engine> </Service> </Server>
然后创建目录添加测试页面
 mkdir /web/webapps -pv
 cd /web/webapps/
 ls
 vim index.jsp
这里只需要添加测试页面即可index.jsp
<%@ page language="java" %>
<html>
  <head><title>Tomcat1_10.0.0.2</title></head>
  <body>
    <h1><font color="red">Tomcat1 10.0.0.2 </font></h1>
    <table align="centre" border="1">
      <tr>
        <td>Session ID</td>
    <% session.setAttribute("abc","abc"); %>
        <td><%= session.getId() %></td>
      </tr>
      <tr>
        <td>Created on</td>
        <td><%= session.getCreationTime() %></td>
     </tr>
    </table>
  </body>
</html>
~
安装apache服务器 我这里源码编译安装httpd-2.4.9.tar.bz2依赖于高版本的apr和apr-utils
编译之前先安装开发包组Development tools 、Desktop Platform
tar xf apr-1.5.1.tar.gz
cd  apr-1.5.1
./configure --prefix=/usr/local/apr
make
make install

tar xf apr-util-1.5.3.tar.gz
cd apr-util-1.5.3
 ./configure --with-apr=/usr/local/apr --prefix=/usr/local/apr-utils
make
make install
安装httpd
yum install pcre-devel
yum install openssl-devel
tar xf httpd-2.4.9.tar.bz2
./configure --prefix=/usr/local/apache --sysconfdir=/etc/httpd --enable-so \
--enable-ssl --enable-cgi --enable-rewrite --with-zlib --with-pcre \
--with-apr=/usr/local/apr --with-apr-util=/usr/local/apr-utils \
--enable-mpms-shared=all --with-mpm=event --enable-proxy --enable-proxy-http \  #主要是这一项
--enable-proxy-ajp --enable-proxy-balancer  --enable-lbmethod-heartbeat  \
--enable-heartbeat --enable-slotmem-shm  --enable-slotmem-plain --enable-watchdog
make
make install
查看是否启用对应的模块
[root@apache_server httpd]# /usr/local/apache/bin/httpd  -D DUMP_MODULES |grep proxy
 proxy_module (shared)
 proxy_connect_module (shared)
 proxy_ftp_module (shared)
 proxy_http_module (shared)
 proxy_fcgi_module (shared)
 proxy_scgi_module (shared)
 proxy_wstunnel_module (shared)
 proxy_ajp_module (shared)
 proxy_balancer_module (shared)
 proxy_express_module (shared)
提供启动脚本:
#!/bin/bash
#
# httpd        Startup script for the Apache HTTP Server
#
# chkconfig: - 85 15
# description: Apache is a World Wide Web server.  It is used to serve \
#          HTML files and CGI.
# processname: httpd
# config: /etc/httpd/conf/httpd.conf
# config: /etc/sysconfig/httpd
# pidfile: /var/run/httpd.pid

# Source function library.
. /etc/rc.d/init.d/functions

if [ -f /etc/sysconfig/httpd ]; then
        . /etc/sysconfig/httpd
fi

# Start httpd in the C locale by default.
HTTPD_LANG=${HTTPD_LANG-"C"}

# This will prevent initlog from swallowing up a pass-phrase prompt if
# mod_ssl needs a pass-phrase from the user.
INITLOG_ARGS=""

# Set HTTPD=/usr/sbin/httpd.worker in /etc/sysconfig/httpd to use a server
# with the thread-based "worker" MPM; BE WARNED that some modules may not
# work correctly with a thread-based MPM; notably PHP will refuse to start.

# Path to the apachectl script, server binary, and short-form for messages.
apachectl=/usr/local/apache/bin/apachectl
httpd=${HTTPD-/usr/local/apache/bin/httpd}
prog=httpd
pidfile=${PIDFILE-/var/run/httpd.pid}
lockfile=${LOCKFILE-/var/lock/subsys/httpd}
RETVAL=0

start() {
        echo -n $"Starting $prog: "
        LANG=$HTTPD_LANG daemon --pidfile=${pidfile} $httpd $OPTIONS
        RETVAL=$?
        echo
        [ $RETVAL = 0 ] && touch ${lockfile}
        return $RETVAL
}

stop() {
    echo -n $"Stopping $prog: "
    killproc -p ${pidfile} -d 10 $httpd
    RETVAL=$?
    echo
    [ $RETVAL = 0 ] && rm -f ${lockfile} ${pidfile}
}
reload() {
    echo -n $"Reloading $prog: "
    if ! LANG=$HTTPD_LANG $httpd $OPTIONS -t >&/dev/null; then
        RETVAL=$?
        echo $"not reloading due to configuration syntax error"
        failure $"not reloading $httpd due to configuration syntax error"
    else
        killproc -p ${pidfile} $httpd -HUP
        RETVAL=$?
    fi
    echo
}

# See how we were called.
case "$1" in
  start)
    start
    ;;
  stop)
    stop
    ;;
  status)
        status -p ${pidfile} $httpd
    RETVAL=$?
    ;;
  restart)
    stop
    start
    ;;
  condrestart)
    if [ -f ${pidfile} ] ; then
        stop
        start
    fi
    ;;
  reload)
        reload
    ;;
  graceful|help|configtest|fullstatus)
    $apachectl $@
    RETVAL=$?
    ;;
  *)
    echo $"Usage: $prog {start|stop|restart|condrestart|reload|status|fullstatus|graceful|help|configtest}"
    exit 1
esac

exit $RETVAL
启动并设置问开机自动启动
编辑/etc/httpd/httpd.conf添加
PidFile "/var/run/httpd.pid"
[root@apache_server httpd]# vim /etc/init.d/httpd
[root@apache_server httpd]# chmod +x /etc/init.d/httpd
[root@apache_server httpd]# chkconfig httpd on
[root@apache_server httpd]# chkconfig --list httpd
httpd          	0:off	1:off	2:on	3:on	4:on	5:on	6:off
启动报错了
[Wed Sep 10 14:14:12.025599 2014] [proxy_balancer:emerg] [pid 1859:tid 139788221331200] AH01177: Failed to lookup provider 'shm' for 'slotmem': is mod_slotmem_shm loaded??
[Wed Sep 10 14:14:12.025687 2014] [:emerg] [pid 1859:tid 139788221331200] AH00020: Configuration Failed, exiting
在apache主配置文件开启这一行
LoadModule slotmem_shm_module modules/mod_slotmem_shm.so
在重启OK了
[root@localhost modules]# /etc/init.d/httpd restart
Stopping httpd:                                            [  OK  ]
Starting httpd:                                            [  OK  ]
[root@localhost logs]# netstat -antlp |grep httpd
tcp        0      0 :::80                       :::*                        LISTEN      2532/httpd
[root@localhost logs]# /etc/init.d/httpd status
httpd (pid  2532) is running...
注释中心主机启用虚拟主机
#DocumentRoot "/usr/local/apache/htdocs"
#Include /etc/httpd/extra/httpd-vhosts.conf
Include /etc/httpd/extra/httpd-proxy.conf
编辑虚拟主机
apache通过mod_proxy连接tomcat
[root@localhost extra]# vim httpd-proxy.conf

<VirtualHost *:80>
 ProxyVia On
 ProxyRequests Off
 ProxyPass / http://10.0.0.2:8080/
 ProxyPassReverse / http://10.0.0.2:8080/
 <Proxy *>
        Require all granted
 </Proxy>
 <Location />
   Require all granted
 </Location>
</VirtualHost>
关于如上apache指令的说明:
ProxyPreserveHost {On|Off}:如果启用此功能,代理会将用户请求报文中的Host:行发送给后端的服务器,而不再使用ProxyPass指定的服务器地址。如果想在反向代理中支持虚拟主机,则需要开启此项,否则就无需打开此功能。
ProxyVia {On|Off|Full|Block}:用于控制在http首部是否使用Via:,主要用于在多级代理中控制代理请求的流向。默认为Off,即不启用此功能;On表示每个请求和响应报文均添加Via:;Full表示每个Via:行都会添加当前apache服务器的版本号信息;Block表示每个代理请求报文中的Via:都会被移除。
ProxyRequests {On|Off}:是否开启apache正向代理的功能;启用此项时为了代理http协议必须启用mod_proxy_http模块。同时,如果为apache设置了ProxyPass,则必须将ProxyRequests设置为Off。
ProxyPass [path] !|url [key=value key=value ...]]:将后端服务器某URL与当前服务器的某虚拟路径关联起来作为提供服务的路径,path为当前服务器上的某虚拟路径,url为后端服务器上某URL路径。使用此指令时必须将ProxyRequests的值设置为Off。需要注意的是,如果path以“/”结尾,则对应的url也必须以“/”结尾,反之亦然。
保存退出
测试访问看能否代理后端10.0.0.2:8080
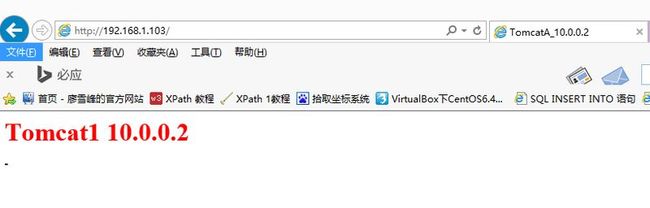
这样表示可以代理到后端的tomcat。
通过mod_jk来代理后端的tomcat
在apache服务端安装组件tomcat-connectors-1.2.40-src.tar.gz
编译安装
tomcat负载均衡详解http://www.cnblogs.com/leader_89/archive/2011/08/01/2109181.html
基于mod_proxy来实现apache到tomcat负载均衡和session绑定
#虚拟机配置,负载均衡配置
<VirtualHost *:80>
    ServerAdmin [email protected]
    ServerName localhost
    ServerAlias localhost
    #小心,有些地方要有空格,要不然会出错
    ProxyPass / balancer://cluster/ stickysession=JSESSIONID|jsessionid nofailover=On
    ProxyPassReverse / balancer://cluster/
    #ErrorLog "logs/error.log"
    #CustomLog "logs/access.log" common
</VirtualHost>

#The ProxyRequests directive should usually be set off when using ProxyPass.
ProxyRequests Off
<proxy balancer://cluster>
    BalancerMember ajp://10.0.0.2:8009 loadfactor=1 route=tomcat1  smax=5 max=20 ttl=120 retry=300 timeout=15
    BalancerMember ajp://10.0.0.3:9009 loadfactor=1 route=tomcat2  smax=5 max=20 ttl=120 retry=300 timeout=15
    # status=+H为配置热备,当所有机器都over时,才会请求该机器
    #BalancerMember http://192.168.1.218:8009 status=+H
    ProxySet lbmethod=bytraffic
</proxy>
测试一个页面的seeeion会保存下来不会刷新一次页面一个sessionID。
基于mod_jk负载均衡和session绑定和session复制
tar xf tomcat-connectors-1.2.40-src.tar.gz
cd tomcat-connectors-1.2.40-src/native/
./configure --with-apxs=/usr/local/apache/bin/apxs
make
make install
会在apache的模块目录下生成mod_jk
注释httpd开启mod_jk
在httpd主配置文件里
#Include /etc/httpd/extra/httpd-proxy.conf
Include /etc/httpd/extra/httpd-jk.conf
编辑/etc/httpd/extre/httpd-jk.conf
# Load the mod_jk
LoadModule  jk_module  modules/mod_jk.so
JkWorkersFile  /etc/httpd/extra/workers.properties
JkLogFile  logs/mod_jk.log
JkLogLevel  debug
JkMount  /*  tomcat1
JkMount  /status/  stat1
编辑/etc/httpd/extre/workers.properties
worker.list=tomcat1,tomcat2
worker.TomcatA.port=8009
worker.TomcatA.host=10.0.0.2
worker.TomcatA.type=ajp13
worker.TomcatA.lbfactor=1
worker.stat1.type = status
mod_jk负载
worker.list = lbcluster1,stat1
worker.tomcat1.type = ajp13
worker.tomcat1.host = 10.0.0.2
worker.tomcat1.port = 8009
worker.tomcat1.lbfactor = 5
worker.tomcat2.type = ajp13
worker.tomcat2.host = 10.0.0.3
worker.tomcat2.port = 8009
worker.tomcat2.lbfactor = 5
worker.lbcluster1.type = lb
worker.lbcluster1.sticky_session = 1
worker.lbcluster1.balance_workers = tomcat1, tomcat2
worker.stat1.type = status
~
检查语法重启httpd
[root@localhost extra]# /etc/init.d/httpd configtest
Syntax OK
[root@localhost extra]# /etc/init.d/httpd restart
Stopping httpd:                                            [  OK  ]
Starting httpd:                                            [  OK  ]
测试:

表示OK
以上是以个请求代理至一个后端tomcat下面来做下如何负载均衡多台后端而且实现了session会话绑定
worker.lbcluster1.sticky_session = 1
等于1表示启用会话绑定 等于0取消会话绑定
启用第2台tomcat配置和第一台一样实际生产环境中2台的页面完全一致,我这里做测试就改了一下
修改虚拟主机httpd-proxy.conf
ProxyRequests Off
<proxy balancer://lbcluster1>
 BalancerMember ajp://10.0.0.2:8009 loadfactor=1 route=tomcat1
 BalancerMember ajp://10.0.0.3:8009 loadfactor=1 route=tomcat2
 ProxySet lbmethod=byrequests
</proxy>
<VirtualHost *:80>
 ServerName www.9527.com
 ProxyVia On
 ProxyPass / balancer://lbcluster1/
 ProxyPassReverse / balancer://lbcluster1/
 <Proxy *>
        Require all granted
 </Proxy>
 <Location />
   Require all granted
 </Location>
</VirtualHost>
重启httpd
测试

在刷新页面

表示已经负载OK!
刷新页面已经表示负载,但是session回话刷新变一次,来绑定seeion绑定
代码如下:
ProxyRequests Off
<proxy balancer://lbcluster1>
 BalancerMember ajp://10.0.0.2:8009 loadfactor=1 route=tomcat1
 BalancerMember ajp://10.0.0.3:8009 loadfactor=1 route=tomcat2
 ProxySet lbmethod=byrequests
</proxy>
<VirtualHost *:80>
 ServerName www.9527.com
 ProxyVia On
 ProxyPass / balancer://lbcluster1/ stickysession=jsessionid
 ProxyPassReverse / balancer://lbcluster1/
 <Proxy *>
        Require all granted
 </Proxy>
 <Location />
   Require all granted
 </Location>
</VirtualHost>
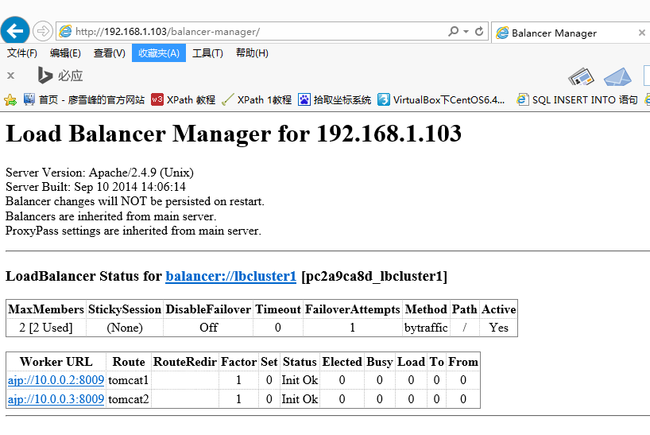
如果使用虚拟主机实现反向代理,如何在虚拟主机上完成虚拟主机状态输出
ProxyRequests Off
<proxy balancer://lbcluster1>
 BalancerMember ajp://10.0.0.2:8009 loadfactor=1 route=tomcat1
 BalancerMember ajp://10.0.0.3:8009 loadfactor=1 route=tomcat2
 ProxySet lbmethod=bytraffic
</proxy>

 <VirtualHost *:80>
  ServerName localhost
  ProxyVia On
  ProxyPass / balancer://lbcluster1/  stickysession=JSESSIONID|jsessionid nofailover=On
  ProxyPassReverse / balancer://lbcluster1/
  <Location /balancer-manager>
    SetHandler balancer-manager
    Proxypass !
    Require all granted
  </Location>
  <Proxy *>
    Require all granted
  </Proxy>
  <Location  / >
    Require all granted
  </Location>
</VirtualHost>
在2台tomcat上实现会话复制集群
在2台tomcat服务器的/web/webapps 目录下复制WEB-INF目录并且修改web.xml 在每台tomcat都做如下操作
[root@TOMCAT1 webapps]# mkdir WEB-INF
[root@TOMCAT1 webapps]# cp /usr/local/tomcat/conf/web.xml WEB-INF/
[root@TOMCAT1 webapps]# cd WEB-INF/
[root@TOMCAT1 WEB-INF]# vim web.xml
22  version="3.0">
23   <distributable/>

root@TOMCAT1 webapps]# scp -r WEB-INF 192.168.1.108:/web/webapps/
[email protected]'s password:
web.xml                                                                                100%  160KB 159.6KB/s   00:00
在2台TOMCAT服务主配置文件中添加进群信息session以实现session复制
<Engine name="Catalina" defaultHost="www.9527.com" jvmRouter="tomcat2">
    <!--session复制内容-->

       <Cluster className="org.apache.catalina.ha.tcp.SimpleTcpCluster"      #启用集群会话管理器

                 channelSendOptions="8">     #cluster 发送消息的方式

          <Manager className="org.apache.catalina.ha.session.DeltaManager"    #定义集群会话管理器 使用Delta管理器来实现会话信息传递

                   expireSessionsOnShutdown="false"

                   notifyListenersOnReplication="true"/>


<Channel className="org.apache.catalina.tribes.group.GroupChannel">

<Membership className="org.apache.catalina.tribes.membership.McastService"    #定义组播地址

                        address="228.0.0.4"

                        port="45564"

                        frequency="500"

                        dropTime="3000"/>

<Receiver className="org.apache.catalina.tribes.transport.nio.NioReceiver"    #绑定在那个接口上提供传递信息

                      address="10.0.0.3"

                      port="4000"

                      autoBind="100"

                      selectorTimeout="5000"

                      maxThreads="6"/>

            <!-- timeout="60000"-->

            <Sender className="org.apache.catalina.tribes.transport.ReplicationTransmitter">

              <Transport className="org.apache.catalina.tribes.transport.nio.PooledParallelSender" />

            </Sender>

            <Interceptor className="org.apache.catalina.tribes.group.interceptors.TcpFailureDetector"/>

            <Interceptor className="org.apache.catalina.tribes.group.interceptors.MessageDispatch15Interceptor"/>

            <Interceptor className="org.apache.catalina.tribes.group.interceptors.ThroughputInterceptor"/>

          </Channel>

          <!--过滤的文件-->

          <Valve className="org.apache.catalina.ha.tcp.ReplicationValve"  filter=".*\.gif;.*\.js;.*\.jpg;.*\.png;.*\.htm;.*\.html;.*\.css;.*\.txt;"/>

          <Valve className="org.apache.catalina.ha.session.JvmRouteBinderValve"/>


          <Deployer className="org.apache.catalina.ha.deploy.FarmWarDeployer"

                    tempDir="/tmp/war-temp/"

                    deployDir="/tmp/war-deploy/"

                    watchDir="/tmp/war-listen/"

                    watchEnabled="false"/>

          <ClusterListener className="org.apache.catalina.ha.session.JvmRouteSessionIDBinderListener"/>

          <ClusterListener className="org.apache.catalina.ha.session.ClusterSessionListener"/>

        </Cluster>

      <!--session复制内容-->
详细参数介绍点击这里:http://blog.csdn.net/flyliuweisky547/article/details/21980825
重启tomcat
catalina.sh stop
catalina.sh configtest
catalina.sh start
查看监听端口4000
然后查看日志
在10.0.0.2上看日志
信息: Manager [www.9527.com#/webapps], requesting session state from org.apache.catalina.tribes.membership.MemberImpl[tcp://{10, 0, 0, 3}:4000,{10, 0, 0, 3},4000, alive=22114, securePort=-1, UDP Port=-1, id={-14 71 -64 -102 -32 -115 72 -67 -102 -20 -128 -29 34 113 123 39 }, payload={}, command={}, domain={}, ]. This operation will timeout if no session state has been received within 60 seconds.
2014-9-11 12:07:31 org.apache.catalina.ha.session.DeltaManager waitForSendAllSessions
在10.0.0.3上看日志
信息: Replication member added:org.apache.catalina.tribes.membership.MemberImpl[tcp://{10, 0, 0, 2}:4000,{10, 0, 0, 2},4000, alive=1023, securePort=-1, UDP Port=-1, id={37 -78 38 51 44 125 66 3 -71 113 -101 117 118 72 12 -62 }, payload={}, command={}, domain={}, ]
测试


好,可以看出刷新前端apache页面session会话不会变,这样就可以实现session共享。