一个多maven项目聚合的实例
第一次用maven构建多构件时看了这边文章http://kyfxbl.iteye.com/blog/1680045,受益匪浅
本文介绍一个多maven项目的实例demo,展示了聚合、继承、工程依赖、单元测试、多war聚合、cargo发布等场景
一、工程介绍
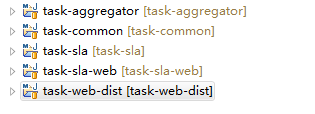
该项目由5个maven项目组成 
task-aggregator是父工程,同时承担聚合模块和父模块的作用,没有实际代码和资源文件
task-common是基础工程,里面是公共的代码
task-sla是某一个业务子模块,不包含web内容
task-sla-web是某一个web子模块
task-web-dist是最外围的web工程,聚合多个web工程,形成最终的war包
依赖关系是:task-common <-- task-sla <-- task-sla-web <-- task-web-dist
二、task-aggregator 
这个工程是起到聚合作用,并充当parent pom,所以没有任何实际代码和资源文件。我这里选择了平行结构,另外一种方式是树形结构,我个人感觉平行结构看起来更舒服一点
下面是pom,有所简化:
Xml代码 ![]()
<project xmlns="http://maven.apache.org/POM/4.0.0" xmlns:xsi="http://www.w3.org/2001/XMLSchema-instance"
xsi:schemaLocation="http://maven.apache.org/POM/4.0.0 http://maven.apache.org/xsd/maven-4.0.0.xsd">
<!-- 定义公共变量 -->
<properties>
<spring.version>3.1.0.RELEASE</spring.version>
<struts2.version>2.3.1</struts2.version>
<hibernate.version>3.2.7.ga</hibernate.version>
</properties>
<modelVersion>4.0.0</modelVersion>
<groupId>com.xxx.task</groupId>
<artifactId>task-aggregator</artifactId>
<version>0.0.1-SNAPSHOT</version>
<packaging>pom</packaging>
<!-- 待聚合模块 -->
<modules>
<module>../task-common</module>
<module>../task-sla</module>
<module>../task-sla-web</module>
<module>../task-web-dist</module>
</modules>
<!-- 配置部署的远程仓库 -->
<distributionManagement>
<snapshotRepository>
<id>nexus-snapshots</id>
<name>nexus distribution snapshot repository</name>
<url>http://10.78.68.122:9090/nexus-2.1.1/content/repositories/snapshots/</url>
</snapshotRepository>
</distributionManagement>
<build>
<pluginManagement>
<plugins>
<plugin>
<groupId>org.apache.maven.plugins</groupId>
<artifactId>maven-resources-plugin</artifactId>
<version>2.6</version>
<configuration>
<encoding>UTF-8</encoding>
</configuration>
</plugin>
<plugin>
<groupId>org.apache.maven.plugins</groupId>
<artifactId>maven-compiler-plugin</artifactId>
<version>2.5.1</version>
<configuration>
<encoding>UTF-8</encoding>
</configuration>
</plugin>
</plugins>
</pluginManagement>
</build>
<dependencyManagement>
<dependencies>
<dependency>
<groupId>com.sun</groupId>
<artifactId>tools</artifactId>
<version>1.6.0</version>
<scope>system</scope>
<systemPath>${env.JAVA_HOME}/lib/tools.jar</systemPath>
</dependency>
</dependencies>
</dependencyManagement>
</project>
基本上是一目了然,只是有几点注意下:
1、这里配置了<distributionManagement>,这样子项目就不需要重复配置了
2、通过<pluginManagement>,对一些插件进行了公共的配置,这里主要是为了消除构建时的告警
3、配置tools,是因为实际中发现,其他开发人员从svn上check out工程以后,有的人会报错,找不到tools.jar,这样配置以后就好了
三、task-common
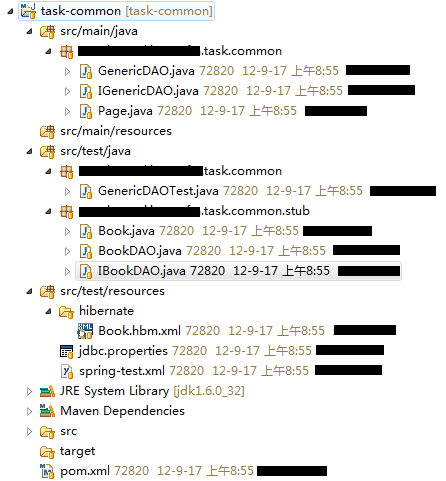
该工程是公共工程,提供了项目中的公共代码,这里只包括了通用的DAO组件,作为示例。
该工程不依赖任何其他工程 
该工程里有几点要点:
1、在代码内部用了Spring的注解
Java代码 ![]()
public abstract class GenericDAO<T> implements IGenericDAO<T> {
private Class<T> entityClass;
public GenericDAO(Class<T> clazz) {
this.entityClass = clazz;
}
@Autowired
private HibernateTemplate hibernateTemplate;
}
这里用到了@Autowired注解,所以最终形成的war包,必须在spring配置文件中声明HibernateTemplate类型的bean,否则会报错
我这里用的maven环境是maven3.0.4,这个版本打出的jar包,带有Directory Entries信息,所以spring的注解即使在jar包中也可生效,如果是比较老的版本,spring的注解在jar包中不好用,关于这个问题的详细描述,见另外一篇博客:http://kyfxbl.iteye.com/blog/1675368
2、单元测试的写法
Java代码 ![]()
@RunWith(SpringJUnit4ClassRunner.class)
@ContextConfiguration(locations = "classpath:spring-test.xml")
@Transactional
public class GenericDAOTest {
@Autowired
private IBookDAO bookDAO;
@Test
public void testInsert() {
Book book = new Book();
book.setName("thinking in java");
book.setIsbn("111");
bookDAO.insert(book);
}
}
这里用到了几个注解,@RunWith是为了在spring容器环境下跑这个单元测试类,以支持依赖注入。@ContextConfiguration是声明spring配置文件的位置。@Transactional注解之后,在单元测试方法中的事务会自动回滚,这个比较方便,这样在前面执行的方法,不会对后面的方法造成影响
这个单元测试类,可以直接在maven里跑起来,让我比较惊喜。之前这样写,在ant里跑没有成功,可能是我没有找到合适的插件的原因
3、除了测试的java代码之外,还有3个资源文件,都是放在src/test/resources下,这些资源文件只在test阶段生效,package阶段不会被打包,也就是专门供测试阶段使用
这个各有利弊,优点是测试的配置文件与开发的配置文件隔离,互不干扰。缺点是配置文件似乎缺少了集中放置的地点,这样如果多个maven工程都需要跑单元测试,要共享测试用配置文件,比较麻烦一点
不过从我个人来看,也算是利大于弊。只是在每个maven项目下,都需要独立的测试相关资源文件,其实也有利于分别修改
另外,可以看到这里的hibernate映射文件,不是和model类放在一个package下,而是放在resources目录下的,这样做可以避免一些潜在的问题,也有利于后续的聚合
4、pom文件没有什么特别的,只是要引入<scope>为test的junit和spring-test
四、task-sla
该工程依赖task-common(因为用到了GenericDAO),是某一个业务模块的逻辑部分,包含了数据库访问层和业务逻辑层,但是不包括web相关的部分 
这里没有什么特别要注意的,目录结构和task-common基本一样。比较特别的是可以看到Maven Dependencies里,有一个task-common工程,所以task-common里的任何修改,都可以第一时间在这个工程里体现出来,是比较方便的
关于这个问题,见另外一篇博客:http://kyfxbl.iteye.com/blog/1679806
另外就是前面说过的,hibernate的映射文件,应该放在src/main/resources下,而不是与Model类放在一起
五、task-sla-web
这个工程是上述task-sla工程的web层,依赖于task-sla,由于task-sla又依赖task-common,所以这个工程最终会同时依赖task-common和task-sla 
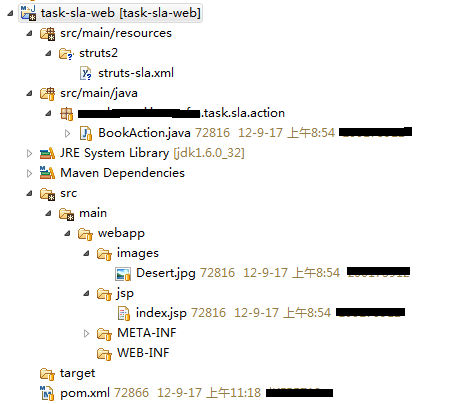
然后这个工程里包含了web层的东西,包括Action类、jsp、图片、struts2的配置文件等,这些东西放在web工程里是最合适的 
这里需要注意2点:
1、这个工程的packaging类型是war,而不是jar。但是最终它不会独立打出war包来,其src/main/webapp里的所有文件,都会被最外围的task-web-dist工程聚合成一个总的war
2、这个工程的WEB-INF目录下,没有web.xml(有也没用,最终会被覆盖)。默认情况下,packaging类型为war的项目,如果没有web.xml,则构建会失败,因此需要在pom里做一个配置
该项目的pom如下,省略了依赖部分:
Xml代码 ![]()
<project xmlns="http://maven.apache.org/POM/4.0.0" xmlns:xsi="http://www.w3.org/2001/XMLSchema-instance"
xsi:schemaLocation="http://maven.apache.org/POM/4.0.0 http://maven.apache.org/maven-v4_0_0.xsd">
<parent>
<groupId>com.xxx.task</groupId>
<artifactId>task-aggregator</artifactId>
<version>0.0.1-SNAPSHOT</version>
<relativePath>../task-aggregator</relativePath>
</parent>
<modelVersion>4.0.0</modelVersion>
<artifactId>task-sla-web</artifactId>
<packaging>war</packaging>
<build>
<plugins>
<plugin>
<groupId>org.apache.maven.plugins</groupId>
<artifactId>maven-war-plugin</artifactId>
<configuration>
<failOnMissingWebXml>false</failOnMissingWebXml>
</configuration>
</plugin>
</plugins>
</build>
<!-- 配置依赖 -->
<dependencies>
<dependency>
<groupId>org.springframework</groupId>
<artifactId>spring-beans</artifactId>
</dependency>
</dependencies>
</project>
上面的<failOnMissingWebXml>,就是配置缺少web.xml也不使构建失败
六、task-web-dist
这个工程是最外围的web工程,起到聚合的作用,即把所有的web项目,打成最终的war包。同时,在这个工程里,放置里公共的配置文件,比如struts.xml、ssoconfig.properties等 
这个工程的聚合意图十分明显,比如struts.xml
Xml代码 ![]()
<?xml version="1.0" encoding="UTF-8"?>
<!DOCTYPE struts PUBLIC "-//Apache Software Foundation//DTD Struts Configuration 2.3//EN" "http://struts.apache.org/dtds/struts-2.3.dtd">
<struts>
<constant name="struts.objectFactory" value="spring" />
<constant name="struts.ui.theme" value="simple" />
<constant name="struts.i18n.encoding" value="UTF-8" />
<constant name="struts.action.extension" value="action" />
<constant name="struts.enable.DynamicMethodInvocation" value="false" />
<constant name="struts.devMode" value="true" />
<include file="struts2/struts-sla.xml" />
</struts>
提供了项目通用的配置,并把各子项目的struts2配置文件聚合起来。war包中的web.xml也是在这里提供的
下面是该工程的pom,也省略了依赖的配置:
Xml代码 ![]()
<project xmlns="http://maven.apache.org/POM/4.0.0" xmlns:xsi="http://www.w3.org/2001/XMLSchema-instance"
xsi:schemaLocation="http://maven.apache.org/POM/4.0.0 http://maven.apache.org/maven-v4_0_0.xsd">
<parent>
<groupId>com.xxx.task</groupId>
<artifactId>task-aggregator</artifactId>
<version>0.0.1-SNAPSHOT</version>
<relativePath>../task-aggregator</relativePath>
</parent>
<modelVersion>4.0.0</modelVersion>
<artifactId>task-web-dist</artifactId>
<packaging>war</packaging>
<build>
<finalName>task</finalName>
<plugins>
<!-- 合并多个war -->
<plugin>
<groupId>org.apache.maven.plugins</groupId>
<artifactId>maven-war-plugin</artifactId>
<configuration>
<packagingExcludes>WEB-INF/web.xml</packagingExcludes>
<overlays>
<overlay>
<groupId>com.huawei.inoc.wfm.task</groupId>
<artifactId>task-sla-web</artifactId>
</overlay>
</overlays>
</configuration>
</plugin>
<!-- 利用cargo启动容器 -->
<plugin>
<groupId>org.codehaus.cargo</groupId>
<artifactId>cargo-maven2-plugin</artifactId>
<version>1.2.3</version>
<configuration>
<container>
<containerId>tomcat7x</containerId>
<home>D:\apache-tomcat-7.0.29</home>
</container>
<configuration>
<type>standalone</type>
<home>${project.build.directory}/tomcat7.0.29</home>
<properties>
<cargo.jvmargs>
-Xdebug
-Xrunjdwp:transport=dt_socket,server=y,suspend=n,address=8787
</cargo.jvmargs>
</properties>
</configuration>
</configuration>
<executions>
<execution>
<id>cargo-run</id>
<phase>pre-integration-test</phase>
<goals>
<goal>run</goal>
</goals>
</execution>
</executions>
</plugin>
</plugins>
</build>
</project>
这里主要是对maven-war-plugin和cargo-maven2-plugin这2个插件进行了配置,以起到聚合war,以及通过cargo启动容器的作用
关于多war聚合,以及cargo,见另外2篇博客:http://kyfxbl.iteye.com/blog/1678121、http://kyfxbl.iteye.com/blog/1677608
七、启动构建
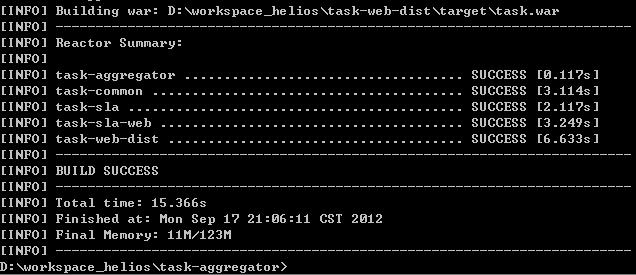
在task-aggregator目录下,执行mvn clean deploy或者mvn clean install,就可启动整个构建过程,并将容器启动起来,跑最终生成的war包 