linux系统中实现多网卡的绑定
(一)原理:
Linux双网卡绑定实现就是使用两块网卡虚拟成为一块网卡;linux设置bond网卡绑定---有些用。
Linux双网卡绑定实现就是使用两块网卡虚拟成为一块网卡,这个聚合起来的设备看起来是一个单独的以太网接口设备,
通俗点讲就是两块网卡具有相同的IP地址而并行链接聚合成一个逻辑链路工作。其实这项 技术在Sun和Cisco中早已存在,
被称为Trunking和Etherchannel技术,在Linux的2.4.x的内核中也采用这这种技术,被称为bonding。
bonding技术的最早应用是在集群――beowulf上,为了提高集群节点间的数据传输而设计的。下面我们讨论一下bonding 的原理,
什么是bonding需要从网卡的混杂(promisc)模式说起。我们知道,在正常情况下,网卡只接收目的硬件地址(MAC Address)是自身Mac的以太网帧,
对于别的数据帧都滤掉,以减轻驱动程序的负担。但是网卡也支持另外一种被称为混杂promisc的模式,可以接收网络上所有的帧,
比如说tcpdump,就是运行在这个模式下。bonding也运行在这个模式下,而且修改了驱动程序中的mac地址,将两块网卡的Mac地址改成相同,
可以接收特定mac的数据帧。然后把相应的数据帧传送给bond驱动程序处理。
(二)配置步骤:
配置一共四个步骤:
1.编辑虚拟网络接口配置文件,指定网卡IP
vi /etc/sysconfig/ network-scripts/ ifcfg-bond0
[root@rhas-13 root]# cp /etc/sysconfig/network-scripts/ifcfg-eth0 ifcfg-bond0
2 #vi ifcfg-bond0
将第一行改成 DEVICE=bond0
# cat ifcfg-bond0
DEVICE=bond0
BOOTPROTO=static
IPADDR=172.31.0.13
NETMASK=255.255.252.0
BROADCAST=172.31.3.254
ONBOOT=yes
TYPE=Ethernet
这里要主意,不要指定单个网卡的IP 地址、子网掩码或网卡 ID。将上述信息指定到虚拟适配器(bonding)中即可。
[root@rhas-13 network-scripts]# cat ifcfg-eth0
DEVICE=eth0
ONBOOT=yes
BOOTPROTO=dhcp
[root@rhas-13 network-scripts]# cat ifcfg-eth1
DEVICE=eth0
ONBOOT=yes
BOOTPROTO=dhcp
3 # vi /etc/modules.conf
编辑 /etc/modules.conf 文件,加入如下一行内容,以使系统在启动时加载bonding模块,对外虚拟网络接口设备为 bond0
加入下列两行
alias bond0 bonding
options bond0 miimon=100 mode=1
说明:miimon是用来进行链路监测的。 比如:miimon=100,那么系统每100ms监测一次链路连接状态,如果有一条线路不通就转入另一条线路;
mode的值表示工作模式,他共有0,1,2,3四种模式,常用的为0,1两种。
mode=0表示load balancing (round-robin)为负载均衡方式,两块网卡都工作。
mode=1表示fault-tolerance (active-backup)提供冗余功能,工作方式是主备的工作方式,也就是说默认情况下只有一块网卡工作,另一块做备份.
bonding只能提供链路监测,即从主机到交换机的链路是否接通。如果只是交换机对外的链路down掉了,而交换机本身并没有故障,
那么bonding会认为链路没有问题而继续使用
4 # vi /etc/rc.d/rc.local
加入两行
ifenslave bond0 eth0 eth1
route add -net 172.31.3.254 netmask 255.255.255.0 bond0
到这时已经配置完毕重新启动机器.
重启会看见以下信息就表示配置成功了
................
Bringing up interface bond0 OK
Bringing up interface eth0 OK
Bringing up interface eth1 OK
(三)配置实例
拓扑图:

linux系统中实现多网卡的绑定中的模式0(即mode=0 负载均衡方式)
[root@localhost ~]# cd /etc/sysconfig/network-scripts/ //切换目录:
[root@localhost ~]# cp ifcfg-eth0 ifcfg-bond0 //拷贝文件ifcfg-bond0
[root@localhost network-scripts]# vim ifcfg-eth0 //编辑eth0
1 # Advanced Micro Devices [AMD] 79c970 [PCnet32 LANCE]
2 DEVICE=eth0 //网卡设备名
3 BOOTPROTO=statice // 获得地址方式
4 IPADDR=192.168.100.12 //静态地址
5 MASTER=bond0 //6 slave=yes //与模式1的区别
7 ONBOOT=yes //自动启动
[root@localhost network-scripts]# vim ifcfg-eth1 //编辑eth1
1 # Advanced Micro Devices [AMD] 79c970 [PCnet32 LANCE]
2 DEVICE=eth1
3 BOOTPROTO=statice
4 IPADDR=192.168.100.11
5 MASTER=bond06 slave=yes
5 ONBOOT=yes
[root@localhost network-scripts]# vim ifcfg-bond0 //编辑bond0
1 # Advanced Micro Devices [AMD] 79c970 [PCnet32 LANCE]
2 DEVICE=bond0 //对外虚拟网络接口设备
3 BOOTPROTO=none
4 IPADDR=192.168.100.100
5 NETMASK=255.255.255.0
6 ONBOOT=yes
在下面文件中添加两行 :
[root@localhost ~]# vim /etc/modprobe.conf
1 alias eth0 pcnet32
2 alias bond0 bonding //bonding只能提供链路监测,即从主机到交换机的链路是否接通
3 alias scsi_hostadapter mptbase
4 alias scsi_hostadapter1 mptspi
5 alias scsi_hostadapter2 ata_piix
6 alias snd-card-0 snd-ens1371
7 options snd-card-0 index=0
8 options snd-ens1371 index=0
9 remove snd-ens1371 { /usr/sbin/alsactl store 0 >/dev/null 2>&1 || : ; }; /sbin/modpro be -r --ignore-remove snd-ens1371
10 alias eth1 pcnet32
11 options bond0 miimon=100 mode=1 //miimon=100,那么系统每100ms监测一次链路连接状态,如果有一条线路不通就转入另一条线路;
mode的值表示工作模式,他共有0,1,2,3四种模式,常用的为0,1两种。
设置系统启动时加载:
[root@localhost ~]# vim /etc/rc.d/rc.local
1 #!/bin/sh
2 #
3 # This script will be executed *after* all the other init scripts.
4 # You can put your own initialization stuff in here if you don't
5 # want to do the full Sys V style init stuff.
6
7
8 touch /var/lock/subsys/local
9 ifenslave bond0 eth0 eth1 //声明绑定网卡
配置好之后重启:
测试:
重启服务:

(待定。。。。)
linux系统中实现多网卡的绑定中的模式1(即mode=1 主备的工作方式)
[root@localhost ~]# cd /etc/sysconfig/network-scripts/ //切换目录:
[root@localhost ~]# cp ifcfg-eth0 ifcfg-bond0 //拷贝文件ifcfg-bond0
[root@localhost network-scripts]# vim ifcfg-eth0 //编辑eth0
1 # Advanced Micro Devices [AMD] 79c970 [PCnet32 LANCE]
2 DEVICE=eth0 //网卡设备名
3 BOOTPROTO=statice // 获得地址方式
4 IPADDR=192.168.100.12 //静态地址
5 ONBOOT=yes //自动启动
[root@localhost network-scripts]# vim ifcfg-eth1
1 # Advanced Micro Devices [AMD] 79c970 [PCnet32 LANCE]
2 DEVICE=eth1
3 BOOTPROTO=statice
4 IPADDR=192.168.100.11
5 ONBOOT=yes
[root@localhost network-scripts]# vim ifcfg-bond0
1 # Advanced Micro Devices [AMD] 79c970 [PCnet32 LANCE]
2 DEVICE=bond0 //对外虚拟网络接口设备
3 BOOTPROTO=none
4 IPADDR=192.168.100.100
5 NETMASK=255.255.255.0
6 ONBOOT=yes
在下面文件中添加两行
[root@localhost ~]# vim /etc/modprobe.conf
1 alias eth0 pcnet32
2 alias bond0 bonding //bonding只能提供链路监测,即从主机到交换机的链路是否接通
3 alias scsi_hostadapter mptbase
4 alias scsi_hostadapter1 mptspi
5 alias scsi_hostadapter2 ata_piix
6 alias snd-card-0 snd-ens1371
7 options snd-card-0 index=0
8 options snd-ens1371 index=0
9 remove snd-ens1371 { /usr/sbin/alsactl store 0 >/dev/null 2>&1 || : ; }; /sbin/modpro be -r --ignore-remove snd-ens1371
10 alias eth1 pcnet32
11 options bond0 miimon=100 mode=1 //miimon=100,那么系统每100ms监测一次链路连接状态,如果有一条线路不通就转入另一条线路;
mode的值表示工作模式,他共有0,1,2,3四种模式,常用的为0,1两种。
设置系统启动时加载:
[root@localhost ~]# vim /etc/rc.d/rc.local
1 #!/bin/sh
2 #
3 # This script will be executed *after* all the other init scripts.
4 # You can put your own initialization stuff in here if you don't
5 # want to do the full Sys V style init stuff.
6
7
8 touch /var/lock/subsys/local
9 ifenslave bond0 eth0 eth1 //声明绑定网卡
测试:
重启服务:

检测链路状态:

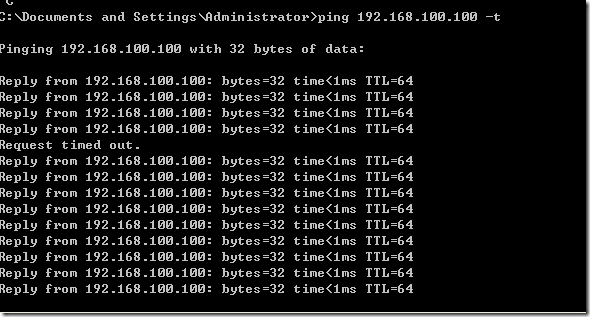
链路正常:

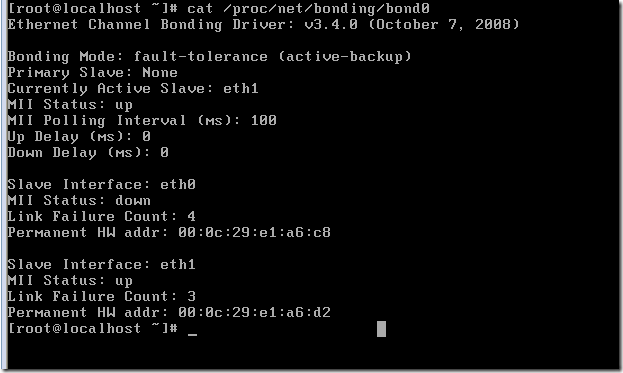
接口eth1断开:出现丢包,然后重新ping通

链路状态:

linux系统中实现多网卡的绑定中有多种模式,但用的比较多的模式就是0和1,其他模式用的比较少。。。。。