linux PXE kickstart 无人值守安装RHEL5
PXE kickstart无人值守安装RHEL5
――以下所有服务均安装在同一个服务器上
――安装RHEL5.9
理论部分请看:
PXE网络装机概述
一、搭建YUM
――用于提供各种安装包
1、挂载光盘
[root@localhost /]# mount /dev/cdrom  /mnt
mount: block device /dev/cdrom is write-protected, mounting read-only
[root@localhost /]#
2、修改YUM仓库配置文件
注意YUM源的仓库名字要以rhel开头,不然在后面配置自应答文件会出错,无法读取rpm包
[root@localhost /]# vim /etc/yum.repos.d/rhel-debuginfo.repo
  1 [rhel-debuginfo]
  2 name=Red Hat Enterprise Linux 6.4
  3 baseurl=file:///mnt/Server
  4 enabled=1
  5 gpgcheck=0
3、清理缓存,并验证YUM是否搭建成功
[root@localhost /]# yum clean all
Loaded plugins: product-id, security, subscription-manager
This system is not registered to Red Hat Subscription Management. You can use subscription-manager to register.
Cleaning up Everything
[root@localhost /]# yum list | wc
   3356   10030  271265
[root@localhost /]#
二、搭建DNS服务
――此步是可选的,安装dns是为了给服务器批量分配有规律的主机名
1、安装bind、bind-chroot、caching-nameserver
[root@localhost /]# yum -y install bind bind-chroot caching-nameserver
2、建立dns服务主配置文件。也可以用模板
[root@localhost /]# vim /var/named/chroot/etc/named.conf
  1 options{
  2         directory "/var/named";
  3 };
  4 zone "tarena.com"{
  5         type master;
  6         file "tarena.com.zone";
  7 };
  8 zone "10.168.192.in-addr.arpa"{
  9         type master;
 10         file "tarena.com.arpa";
 11 };
检查是否有错
[root@localhost /]# cd /var/named/chroot/etc/
[root@localhost etc]#
[root@localhost etc]# named-checkconf named.conf
[root@localhost etc]#
3、建立正向区域文件
[root@localhost named]# vim tarena.com.zone
  1 $TTL 3600
  2 @       IN      SOA     tarena.com.     root.tarena.com. (
  3                         2014030300
  4                         28800
  5                         14400
  6                         17200
  7                         86400
  8 )
  9         IN      NS      dns.tarena.com.
 10 dns     IN      A       192.168.10.2
 11 $GENERATE       3-253   student$        IN      A       192.168.10.$
4、建立反向区域文件
1 $TTL 3600
 2 @       IN      SOA     tarena.com.     root.tarena.com. (
 3                         2014030300
 4                         28800
 5                         14400
 6                         17200
 7                         86400
 8 )
 9         IN      NS      dns.tarena.com.
10 dns     IN      PTR     192.168.10.2
11 $GENERATE       3-253    $      IN      PTR     student$.tarena.com.
5、检查区域文件是否有错
[root@localhost named]# named-checkzone tarena.com tarena.com.zone
zone tarena.com/IN: loaded serial 2014030300
OK
[root@localhost named]# named-checkzone tarena.com tarena.com.arpa
zone tarena.com/IN: loaded serial 2014030300
OK
[root@localhost named]#
6、启动服务并验证
[root@localhost /]# service named restart
停止 named:                                               [确定]
启动 named:                                               [确定]
[root@localhost /]# nslookup
> student10.tarena.com
Server:         192.168.10.2
Address:        192.168.10.2#53
Name:   student10.tarena.com
Address: 192.168.10.10
> 192.168.10.20
Server:         192.168.10.2
Address:        192.168.10.2#53
20.10.168.192.in-addr.arpa      name = student20.tarena.com.
>
三、搭建DHCP服务
1、安装dhcp服务主程序包
[root@localhost /]# yum -y install dhcp
2、编辑主配置文件/etc/dhcpd.conf
注意比常规配置多加了next-server和filename
[root@localhost /]# vim /etc/dhcpd.conf
  1 ddns-update-style interim;
  2 ignore client-updates;
  3 subnet 192.168.10.0 netmask 255.255.255.0 {
  4         option routers                  192.168.10.254;
  5         option subnet-mask              255.255.255.0;
  6         option domain-name              "tarena.com";
  7         option domain-name-servers      tarena.com;
  8         option time-offset              -18000;
  9         range dynamic-bootp 192.168.10.2 192.168.10.253;
 10         default-lease-time 21600;
 11         max-lease-time 43200;
 12         next-server 192.168.10.2;
 13         filename "pxelinux.0";
 14 }
3、启动服务。
如果启动失败可用dhcpd命令排错
[root@localhost /]# service dhcpd restart
关闭 dhcpd:                                               [确定]
启动 dhcpd:                                               [确定]
[root@localhost /]#
四、搭建tftp服务
1、安装tftp主程序包
一般默认已安装
[root@localhost /]# rpm -q tftp-server
tftp-server-0.49-2
[root@localhost /]#
2、配置/etc/xinetd.d/tftp
把disable=yes改为disable=no,启用tftp
8 disable = no
3、重启xinetd服务,使TFTP服务器生效。查看udp69号端口是否监听
[root@localhost /]# netstat -anlup | grep :69
udp        0      0 0.0.0.0:69                  0.0.0.0:*                               5148/xinetd
[root@localhost /]#
4、把系统引导文件pxelinux.0共享到tftp的家目录下/tftpboot
4.1查看是否安装syslinux
――syslinux是一个功能强大的引导加载程序
[root@localhost /]# rpm -q syslinux
syslinux-4.02-7.2.el5
[root@localhost /]#
4.2、把pxelinux.0复制到tftp根目录
[root@localhost /]# rpm -ql syslinux | grep pxelinux.0
/usr/share/syslinux/gpxelinux.0
/usr/share/syslinux/pxelinux.0
[root@localhost /]# cp /usr/share/syslinux/pxelinux.0 /tftpboot/
[root@localhost /]# ls /tftpboot/pxelinux.0
/tftpboot/pxelinux.0
[root@localhost /]#
5、把光盘中的initrd.img (驱动文件)和vmlinuz(内核文件)拷贝到tftp根目录
进入/mnt/isolinux目录
[root@localhost /]# cd /mnt/isolinux/
[root@localhost isolinux]# cp initrd.img vmlinuz /tftpboot/
[root@localhost isolinux]# ls /tftpboot/initrd.img vmlinuz
/tftpboot/initrd.img  vmlinuz
[root@localhost isolinux]#
6、设置默认的启动菜单文件default
――当系统调用pxelinux.0的时候必定要读取pxelinux.cfg目录下的配置文件default。复制光盘镜像下的isolinux.cfg到pxelinux.cfg,并改名为default
[root@localhost /]# mkdir -p /tftpboot/pxelinux.cfg
[root@localhost /]#cp /mnt/isolinux/isolinux.cfg    /tftpboot/pxelinux.cfg/default
6.1修改default文件
要实现pxe无人值守安装linux,要指明自应答文件ks.cfg的位置
[root@localhost /]# vim /tftpboot/pxelinux.cfg/default
  1 default linux
  2 prompt 1
  3 timeout 600
  4 display boot.msg
  5 F1 boot.msg
  6 F2 options.msg
  7 F3 general.msg
  8 F4 param.msg
  9 F5 rescue.msg
 10 label linux
 11   kernel vmlinuz
 12   append initrd=initrd.img ks=nfs:192.168.10.2:/ks/ks.cfg
五、搭建nfs服务
1、确认已安装nfs-until、portmap包
[root@localhost /]# rpm -q portmap
portmap-4.0-65.2.2.1
[root@localhost /]# rpm -q nfs-utils
nfs-utils-1.0.9-66.el5
[root@localhost /]#
2、配置/etc/exports,并重启服务
共享ks.cfg文件和安装时所需的rpm包
后面实验生成的ks.cfg会放在/ks目录;rpm包就用光盘镜像的
[root@localhost /]# vim /etc/exports
  1 /ks       *(ro)
  2 /mnt      *(ro)
  3
[root@localhost /]# service portmap restart
停止 portmap:                                             [确定]
启动 portmap:                                             [确定]
[root@localhost /]# service nfs restart
关闭 NFS mountd:                                          [确定]
关闭 NFS 守护进程:                                        [确定]
关闭 NFS quotas:                                          [确定]
关闭 NFS 服务:                                            [确定]
启动 NFS 服务:                                            [确定]
关掉 NFS 配额:                                            [确定]
启动 NFS 守护进程:                                        [确定]
启动 NFS mountd:                                          [确定]
Stopping RPC idmapd:                                       [确定]
正在启动 RPC idmapd:                                      [确定]
[root@localhost /]#
3、生成Kickstart自应答配置文件ks.cfg
通过Kickstart自应答配置文件,在安装过程中安装程序就可以自己从该文件中读取安装配置,这样就避免了繁琐的人机交互,实现无人值守的自动化安装。
生成Kickstart自动应答配置文件ks.cfg有两种方式:
(1)通过图形化Kickstart配置程序进行配置然后生成
(2)直接复制/root/anaconda-ks.cfg改名为ks.cfg。/root/anaconda-ks.cfg是装系统后就会存在的一个文件。记录了装系统的过程
第二种方法难度很大,直接第一种
3.1、先安装system-config-kickstart
[root@localhost /]# yum -y install system-config-kickstart
3.2运行system-config-kickstart 启动kickstart配置程序
以下配置仅按照基本实验需求设置。
1)基本配置
注意:‘安装后重新引导系统’的勾要去掉,不然还没来得及修改BOIS设置,又重新来一次安装

2)安装方法
――指定YUM源

3)引导装载程序选项。按照默认
4)分区信息。仅建两个分区,启动分区和根分区

5)网络配置。添加eth0网卡,用动态获取IP

6)验证。默认
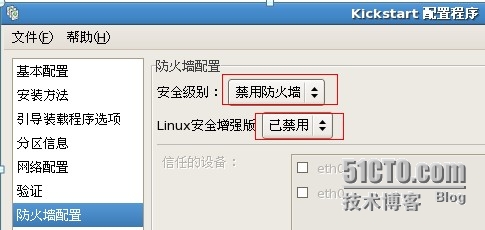
7)防火墙配置。禁用防火墙和selinux

7)显示配置。默认
8)软件包选择
――选择常用的
9)预安装脚本。默认
10)安装后脚本。默认
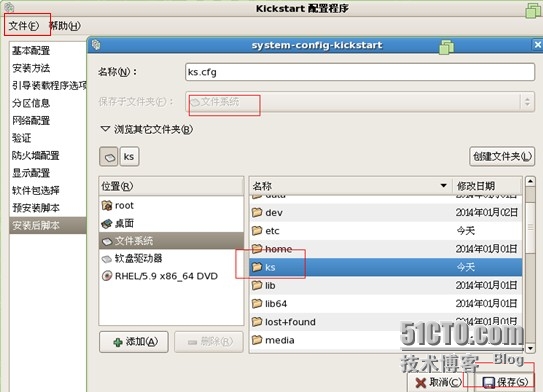
3.3保存文件
――文件名为ks.cfg,保存到/ks目录下

4、验证
可去掉文件的注释内容;在加上 key �Cskip 跳过需要输入序列号;
[root@localhost /]# sed -i '/^#/d' /ks/ks.cfg
[root@localhost /]# ls /ks/ks.cfg
/ks/ks.cfg
[root@localhost /]# vim /ks/ks.cfg
  1 auth  --useshadow  --enablemd5
  2 key --skip
六、重启所有服务
七、客户机测试
――bois设置引导方式为网络引导
――安装完成后改回从硬盘启动