深度剖析WinPcap之(九)――数据包的发送过程(2)
1.3 重复发送单个数据包的示例
我们采用实际代码演示如何重复发送单个数据包。
在
send
工程的
main.cpp
添加下面的代码
:
[send_n
工程]
#include
<pcap-int.h>
/*
调用
Packet.dll
库提供的
PacketSetNumWrites
函数设置重复发送次数
*/
//
重复
50
次
PacketSetNumWrites((LPADAPTER)(adhandle->adapter),50);
同时给Linker->Input->Additional Dependencies添加工程依赖的库文件Packet.dll,同时从WinPcap库源代码wpcap\libpcap目录下复制
pcap-int.h
文件到F:\WpdPack\Include目录下。
运行示例程序,用Wireshark接收示例程序所发送的数据包如图9-3所示。

图9-3 Wireshark所接收的数据包
1.4 使用发送队列发送数据包的示例(同步方式)
我们采用实际代码演示如何通过pcap_sendqueue_transmit函数以同步方式发送大量数据包。在main()函数中选择适合的适配器,确定发送数据包的个数为100,每个数据包之间的时间间隔dus为20微秒,然后调用应用程序的send_queue函数发送数据包。
send_queue(adhandle,100,20);
示例程序代码如下:[send_queue工程]
#define
WIN32
#define
HAVE_REMOTE
#include
<stdio.h>
#include
"pcap.h"
#include
"Win32-Extensions.h"
void
send_queue(pcap_t *fp,unsigned int npacks,unsigned int dus);
void
genPacket(unsigned char *buf,int len);
timeval add_stamp(timeval *ptv,unsigned int dus);
int
main()
{
pcap_if_t *alldevs;
pcap_if_t *d;
int inum;
int i=0;
pcap_t *adhandle;
char errbuf[PCAP_ERRBUF_SIZE];
/*
获取本机网络设备列表
*/
if
(pcap_findalldevs_ex(PCAP_SRC_IF_STRING, NULL,
&alldevs, errbuf) == -1)
{
fprintf(stderr,"Error in pcap_findalldevs:
%s\n"
, errbuf);
exit(1);
}
/*
打印网络设备列表
*/
for(d=alldevs; d; d=d->next)
{
printf("%d. %s", ++i, d->name);
if (d->description)
printf(" (%s)\n", d->description);
else
printf(" (No description available)\n");
}
if(i==0)
{
printf("\nNo interfaces found!
Make sure WinPcap is installed.\n"
);
return -1;
}
/*
选择网络设备接口
*/
printf("Enter the interface number (1-%d):",i);
scanf("%d", &inum);
if(inum < 1 || inum > i)
{
printf("\nInterface number out of range.\n");
/*
释放设备列表
*/
pcap_freealldevs(alldevs);
return -1;
}
/*
跳转到选中的适配器
*/
for(d=alldevs, i=0; i< inum-1 ;d=d->next, i++);
/*
打开设备
*/
if
( (adhandle= pcap_open(d->name, 65536, PCAP_OPENFLAG_PROMISCUOUS, 1000,
NULL, errbuf ) ) == NULL)
{
fprintf(stderr,"\nUnable to open the adapter.
%s is not supported by WinPcap\n"
, d->name);
/*
释放设备列表
*/
pcap_freealldevs(alldevs);
return -1;
}
/*
在选中的设备接口上监听数据
*/
printf("\nlistening on %s...\n", d->description);
/*
开始数据包发送
*/
send_queue(adhandle,100,20);
pcap_close(adhandle);
pcap_freealldevs(alldevs);
return 0;
}
函数send_queue
负责生成发送队列与发送发送队列,代码具体实现如下:
void
send_queue(pcap_t *fp,unsigned int npacks,unsigned int dus)
{
char errbuf[PCAP_ERRBUF_SIZE];
int i;
unsigned int res;
pcap_send_queue *squeue; //
发送队列
const int MaxPacketLen=100; //
数据包长度
struct pcap_pkthdr mpktheader; //
数据包的包头
struct pcap_pkthdr *pktheader;
pktheader=&mpktheader;
timeval tv; //
时间戳
tv.tv_sec=0;
tv.tv_usec=0;
//
分配发送队列
squeue=pcap_sendqueue_alloc(
(unsigned int)(
(MaxPacketLen+sizeof(struct pcap_pkthdr))*npacks)
);
//
用数据包填充发送队列
unsigned char *pBuf=new unsigned char[MaxPacketLen];
for(i=0;i<npacks;i++)
{
memset(pBuf,0x0,MaxPacketLen);
//
获得生成的数据包,长度为
MaxPacketLen
genPacket(pBuf,MaxPacketLen);
//
设置数据包的包头
pktheader->ts=tv;
pktheader->caplen = MaxPacketLen;
pktheader->len = MaxPacketLen;
if (pcap_sendqueue_queue(squeue, pktheader, pBuf) == -1)
{
printf("
警告
:
数据包缓冲区太小,
不是所有的数据包被发送
.\n"
);
return;
}
add_stamp(&tv,dus); //
增加时间戳
pktheader->ts=tv; //
更新数据包头的时间戳
}
delete [] pBuf;
//
发送数据包
if ((res = pcap_sendqueue_transmit(fp, squeue, 1))
< squeue->len)//
同步发送
{
printf("
发送数据包时出现错误:
%s.
仅
%d
字节被发送
\n"
,
pcap_geterr(fp), res);
return;
}
//
释放发送队列
pcap_sendqueue_destroy(squeue);
return;
}
函数add_stamp增加时间戳,参数ptv修改前后的时间戳结构体指针,参数dus为时间增加的微秒数。函数源代码如下:
timeval add_stamp(timeval *ptv,unsigned int dus)
{
ptv->tv_usec=ptv->tv_usec+dus;
if(ptv->tv_usec>=1000000)
{
ptv->tv_sec=ptv->tv_sec+1;
ptv->tv_usec=ptv->tv_usec-1000000;
}
return *ptv;
}
用
Wireshark
接收示例程序所发送的数据包如图
9-4
所示。

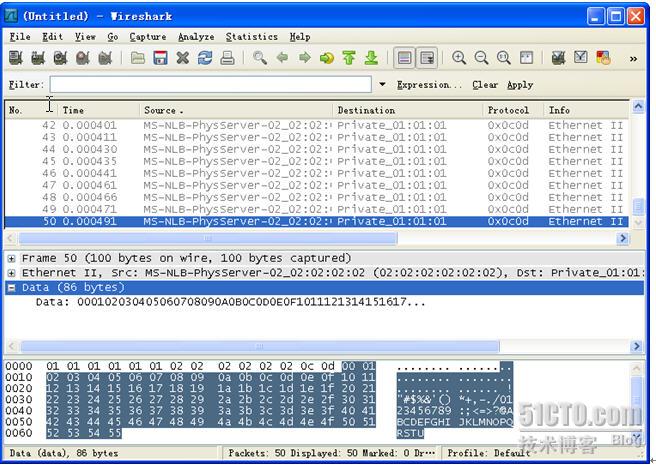
图9-4 Wireshark
所接收的数据包
在
Wireshark
概要区域的
Time
字段中可见,接收的时间戳间隔为
20
微秒,精度差别为
2
微秒左右,
100
个数据包总共耗费
1966
微秒(理论上应该为
20*(100-1)=1980
微秒);协议
Protocol
字段显示为
0x 0c 0d
。
在
Wireshark
详情区域中可看到目标
MAC
地址为
01:01:01:01:01:01,
源
MAC
地址为
02:02:02:02:02:02
。
从
Wireshark
数据区域中可看到数据包的内容从
0
开始递增只到
0x55
(十进制
85
)。