Linux服务器部署系列之一―Apache篇(下)
四、管理日志文件
Apache
日志分为访问日志和错误日志两种:
1
)访问日志
用于记录客户端的访问信息,文件名默认为
access_log
,可以通过参数
CustomLog
设置日志文件存放的位置和文件名:
CustomLog logs/access_log combined
2
)错误日志
用于记录
Apache
在启动和运行时产生的错误,默认为
error_log
,可以通过参数
ErrorLog
进行设置:
ErrorLog logs/error_log
ErrorLog logs/error_log
1.
日志滚动
1
)
Rotatelogs
#vi /usr/local/apache/bin/httpd.conf
将
CustomLog logs/access_log combined
改为
CustomLog “|/usr/sbin/rotatelogs logs/access_log 172800” combined
其中,
172800
单位为秒,即两天。滚动后的日志文件命名为
/usr/local/apache/httpd/logs/access_logxxxxxxxxxx
。
10
个
x
表示的是开始记录日志时的时间距
1970
年
1
月
1
日
的秒数。日志每滚一次产生一个新文件,后缀值为前一个日志文件的后缀值加上
172800
。
2
)
Logrotate
系统提供了一个日志滚动工具
Logrotate
,与
Crond
配合可实现
Apache
日志滚动。
#vi /etc/logrotate.conf //
查看
logrotate.conf
文件
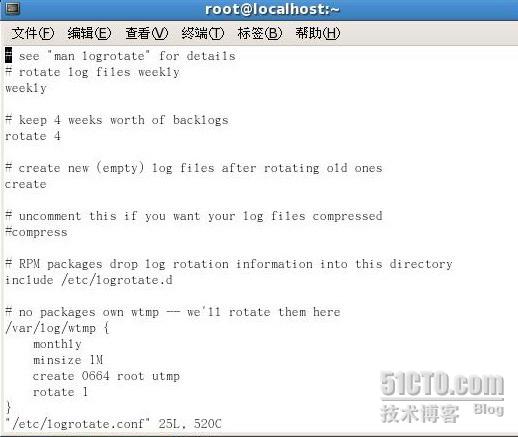
在
logrotate.conf
文件中包含了
/etc/logrotate.d
目录,在该目录下,可查看
httpd
文件,内容如下:
#vi /etc/logrotate.d/httpd
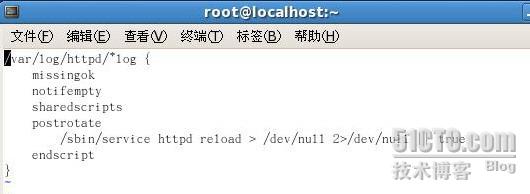
Missingok
表示如果日志文件丢失则重新生成新的日志文件。
Notifempty
表示如果日志文件中没有数据,则不滚动。
Sharedscripts
表示调用日志滚动函数。
Postrotate
表示日志滚动后,将重启
Apache
。
在
/etc/cron.daily/
文件夹下查看
logrotate
文件,内容如下:
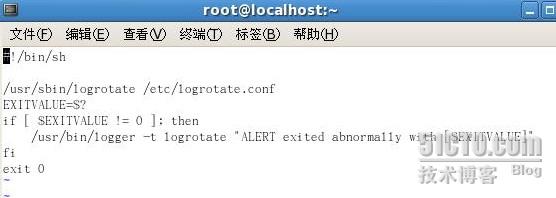
由此看出,
Logrotate
工具由
Crond
每天运行一次从而实现日志滚动。
2. Webalizer
日志统计分析工具
下载地址:
http://www.mrunix.net/webalizer/
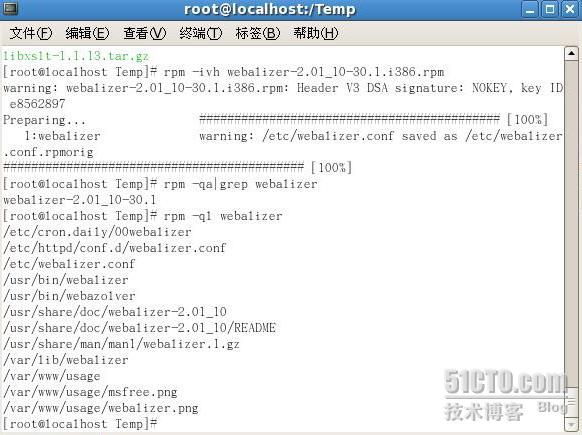
1
)安装
Webalizer
2
)配置
webalizer
工具
(1) # vi /etc/webalizer.conf
修改以下行:
LogFile /usr/local/apache/logs/access_log
用来指示配置文件的路径信息,
webalizer
会将该日志文件作为输入进行统计分析;
OutputDir /usr/local/apache/htdocs/usage
用来指示生成的统计报表的保存目录。
(2) # vi /etc/httpd/conf.d/webalizer.conf
(2) # vi /etc/httpd/conf.d/webalizer.conf
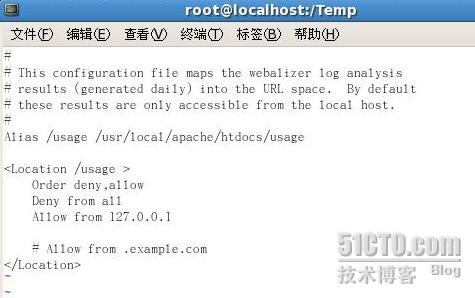
# cp /etc/httpd/conf.d/webalizer.conf /etc/httpd/conf/webalizer.conf
(3) # crontab �Ce
添加以下行:
23 0 * * * ./usr/bin/webalizer -c /etc/webalizer.conf
//
按
wq
保存退出,该行表示每天
23
点进行当天的数据流量统计。
(4) # /usr/local/apachectl �Ck stop //
重启
apache
# /usr/local/apachectl �Ck start
(5) # /usr/local/bin/webalizer -c /etc/webalizer.conf
3
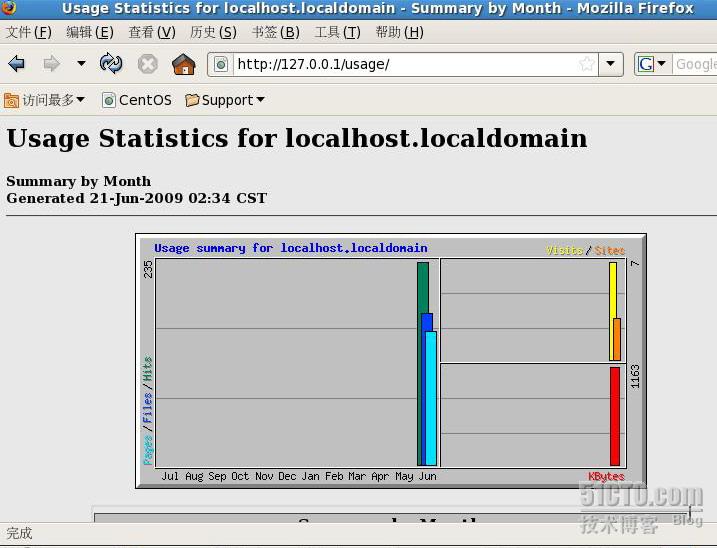
)测试
输入地址
http://127.0.0.1/usage
测试,如下:
五、配置
PHP
运行环境
为了让
PHP
支持
GD
库,我们需要先安装
zlib, libpng, freetype,jpeg
,
GD
等组件。
1. 安装 zlib
1. 安装 zlib
下载地址:
http://www.zlib.net/zlib- 1.2.3 .tar.gz
# tar zlib- 1.2.3 .tar.gz
# cd zlib-1.2.3
# ./configure --prefix=/usr/local/zlib
# make
# make install
# cd zlib-1.2.3
# ./configure --prefix=/usr/local/zlib
# make
# make install
2. 安装 libpng
下载地址:
http://www.libpng.org/pub/png/libpng.html
# tar zxvf libpng- 1.2.18 .tar.tar
# cd libpng-1.2.18
# cd scripts/
# mv makefile.linux ../makefile
# cd ..
# make
# make install
注意,这里的 makefile 不是用 ./configure 生成,而是直接从 scripts/ 里拷一个
# cd libpng-1.2.18
# cd scripts/
# mv makefile.linux ../makefile
# cd ..
# make
# make install
注意,这里的 makefile 不是用 ./configure 生成,而是直接从 scripts/ 里拷一个
3. 安装 freetype
下载地址:
http://sourceforge.net/projects/freetype
# tar zxvf freetype- 2.3.9 .tar.gz
# cd freetype-2.3.9
# ./configure --prefix=/usr/local/freetype
# make
# make install
# cd freetype-2.3.9
# ./configure --prefix=/usr/local/freetype
# make
# make install
4. 安装 Jpeg
下载地址:
http://www.ijg.org/files/jpegsrc.v6b.tar.gz
# tar zxvf jpegsrc.v6b.tar.gz
# cd jpeg-6b/
# mkdir /usr/local/libjpeg
# mkdir /usr/local/libjpeg/include
# mkdir /usr/local/libjpeg/bin
# mkdir /usr/local/libjpeg/lib
# mkdir /usr/local/libjpeg/man
# mkdir /usr/local/libjpeg
# mkdir /usr/local/libjpeg/include
# mkdir /usr/local/libjpeg/bin
# mkdir /usr/local/libjpeg/lib
# mkdir /usr/local/libjpeg/man
# mkdir /usr/local/libjpeg/man/man1
# ./configure --prefix=/usr/local/libjpeg --enable-shared --enable-static
# make
# make
# make install
注意,这里 configure 一定要带 --enable-shared 参数,不然,不会生成共享库
注意,这里 configure 一定要带 --enable-shared 参数,不然,不会生成共享库
5. 安装 GD
下载地址:
http://www.libgd.org/Downloads
# tar zxvf gd- 2.0.35 .tar.gz
# cd gd-2.0.35
# ./configure --prefix=/usr/local/libgd --with-png --with-freetype=/usr/local/freetype --with-jpeg=/usr/local/libjpeg
# cd gd-2.0.35
# ./configure --prefix=/usr/local/libgd --with-png --with-freetype=/usr/local/freetype --with-jpeg=/usr/local/libjpeg
# make
# make install
# make install
6.
编辑
/etc/ld.so.conf
,添加以下几行到此文件中。
/usr/local/zlib/lib
/usr/local/freetype/lib
/usr/local/libjpeg/lib
/usr/local/libgd/lib
执行
ldconfig
命令,
#ldconfig
使用动态装入器装载找到共享库
7.
安装
libxml
下载地址:
ftp://xmlsoft.org/libxml2/libxml2- 2.6.32 .tar.gz
# tar zxvf libxml2-2.6.32.tar.gz
# cd libxml2-2.6.32
# tar zxvf libxml2-2.6.32.tar.gz
# cd libxml2-2.6.32
# ./configure
# make
# make install
# make
# make install
8.
安装
PHP
PHP
下载地址:
http://www.php.net/downloads.php
# tar zxvf php- 5.2.9 .tar.gz
# cd php-5.2.9
# ./configure --prefix=/usr/local/php --with-apxs2=/usr/local/apache/bin/apxs --with-mysql=/usr/local/mysql --with-gd=/usr/local/libgd --enable-gd-native-ttf --with-ttf --enable-gd-jis-conv --with-freetype-dir=/usr/local/freetype --with-jpeg-dir=/usr/local/libjpeg --with-png-dir=/usr --with-zlib-dir=/usr/local/zlib --enable-xml --enable-mbstring --enable-sockets
# make
# make install
# cp php.ini-recommended /usr/local/php/lib/php.ini
# ln
�C
s /usr/local/php/bin/* /usr/local/bin/
9.
配置
Apache
# vi /usr/local/apache/conf/httpd.conf
查找
AddType application/x-compress .Z
AddType application/x-gzip .gz .tgz
在其下加入
AddType application/x-tar .tgz
AddType application/x-httpd-php .php
AddType image/x-icon .ico
修改
DirectoryIndex
行,添加
index.php
修改为
DirectoryIndex index.php index.html
10.
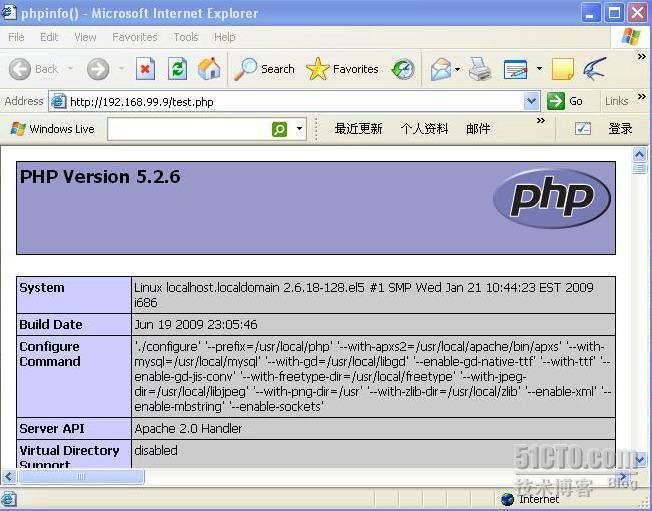
测试
# vi /usr/local/apache/htdocs/test.php
添加以下行:
<?php
Phpinfo();
?>
# /usr/local/apache/bin/apachectl
�C
k stop
#/usr/local/apache/bin/apachectl
�C
k start
在浏览器中输入:
http://192.168.99.9/test.php
进行测试。
OK
,至此
Apache
的相关部署就已经讲完了。
出自: http://guoxuemin.blog.51cto.com/379574/168534