跨平台渲染框架尝试 - Texture管理
纹理是渲染器重要的资源,也是比较简单的资源。本文将详细讨论纹理资源的管理。
在资源管理概述中提到,资源就是一堆内存和CPU与GPU的访问权限。纹理管理在资源管理之上,要负责如何使用者一堆内存构造纹理对象,并告诉渲染器如何使用平台相关的纹理对象。下面,我们开始详细论述。
1. 纹理资源
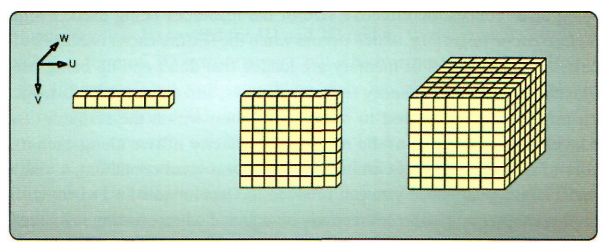
首先纹理资源是GPU可以使用到的资源。它与Buffer资源不同的地方在于,相邻像素的插值计算中,纹理比Buffer简单并快得多,因为有相应的硬件实现。纹理资源字面意义上就像是一张像素图,但它不仅限于二维的像素的图,还有一维和三维的。如下图,截于Practise Rendering and Computation with Direct3D 11
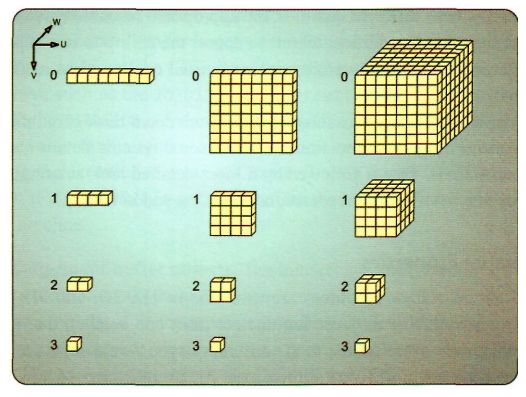
此外,除了作为RenderTarget和DepthStencil的纹理,一般都有mipmap. 纹理的原始数据作为mipmap的第零级,而每往下一级的mipmap尺寸是上一级的一半。这些基本的概念都会在一些图形学的书中出现,这里就不赘述了。
有的纹理资源除了有mipmap之外,还是一个纹理数组(Texutre Array)。Cube Map是一个很特别的纹理数组,其数组大小始终为6,Cube Map Array始终是6的倍数。而Texture3D Array出于存储大小的原因,暂时不被各种API支持。
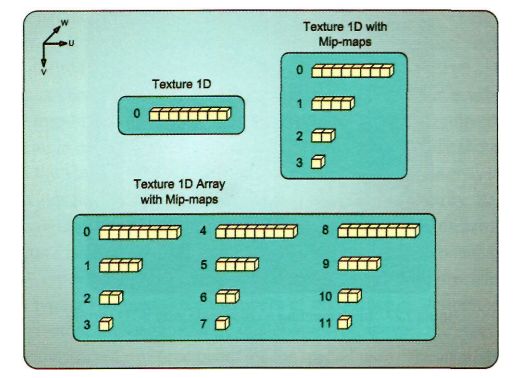
纹理数组与mipmap通常是统一管理的,使用Subresource的概念。如下图
以一个纹理大小为8个像素,数组大小为3的Texture1D Array对象为例,其subresource的编号一次由第一张纹理的mipmap第0级至第一张的第3级,再从第二级的mipmap第0级开始一次类推。
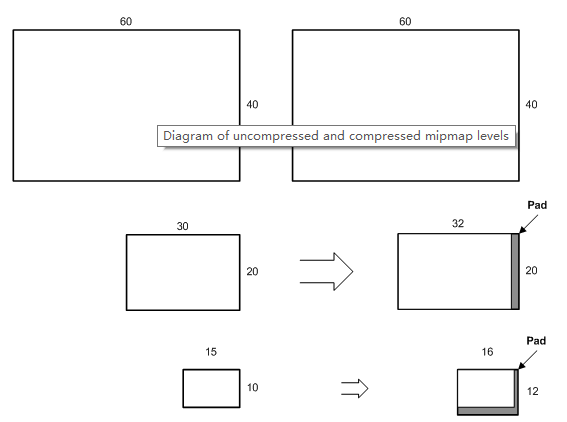
纹理的管理还有一个很重要的内容,就是像素格式。像素格式有压缩与无压缩之分,压缩的像素格式主要是以BC1-7位代表的有损压缩格式,由于其以4x4像素为单位的存储方式,它会影响其subresource真正的物理大小。如下图
无压缩的纹理在生成mipmap的时候,纹理大小始终与占用的物理内存大小一致,如上图左边的纹理。而BC压缩纹理,其纹理有一个虚拟尺寸,需要将纹理的大小向4对齐,所以其实际占用的内存大小要更多一些。详细请参阅文档 https://msdn.microsoft.com/en-us/library/windows/desktop/bb694531(v=vs.85).aspx
综上所述,纹理需要管理如下内容。纹理类型,像素格式,纹理大小及Subresource.
2. 设计
在管理纹理的类型,上一文中已经展示方法,就是object_type的scoped枚举类型中赋予相应的值,再来回顾一下
namespace pipeline
{
    enum class object_type
    {
        texture_1d,
        texture_2d,
        texture_3d,
        texture_cube,
        texture_1d_array,
        texture_2d_array,
        texture_cube_array,
        texture_rt,
        texture_dp,
    };
}
像素格式,同样适用一个scoped枚举类型。
namespace pipeline
{
    enum class pixel_format
    {
        unknown,
        rgba_32,
        //.......
        bc_1,
        //.......
    };
}
下面先给出texture纹理模板的实现,再来详细讨论。
namespace pipeline
{
    template <typename Impl>
    struct texture_traits;

    struct subresource
  {
    uint16_t widht;
    uint16_t height;
    uint16_t depth;
    uint16_t array_size;
    uint16_t mip_level;
    size_t  row_pitch;
    size_t  slice_pitch;
    byte*   ptr;
  };

    template <typename Impl>
    class texture : public resource<texture<Impl>>
    {public:
        using base_type = resource<texture<Policy>>;
        using this_type = texture;using subresource_constainer = std::vector<subresource>;
        using traits_type = texture_traits<Impl>;

    protected:

        texture(string const& name, pixel_format format, uint16_t width,
            uint16_t height, uint16_t depth, uint16_t array_size, bool has_mipmap) noexcept
            : base_type(name)
        , pixel_format_(format)
            , width_(width)
            , height_(height)
            , depth_(depth)
            , array_size_(size)
            , has_mipmap_(has_mipmap)
            , subresources_()
        {

        }

    public:

        template <typename = std::enable_if_t<traits_type::is_texture_1d()>>
        void resize(uint16_t widht) noexcept
        {
            width_ = widht;
        }

        template <typename = std::enable_if_t<traits_type::is_texture_2d()>>
        void resize(uint16_t widht, uint16_t height) noexcept
        {
            width_ = widht;
            height_ = height;
        }

        template <typename = std::enable_if_t<traits_type::is_texture_3d()>>
        void resize(uint16_t widht, uint16_t height, uint16_t depth) noexcept
        {
            width_ = widht;
            height_ = height;
            depth_ = depth
        }

        template <typename = std::enable_if_t<traits_type::is_texture_array()>>
        void set_array_size(uint16_t array_size) noexcept
        {
            array_size_ = array_size * traits_type::array_size_unit();
        }

        void set_pixel_format(pixel_format pixel_format)
        {
            traits_type::validate_format(pixel_format);
            pixel_format_ = pixel_format;
        }

        uint16_t width() const noexcept
        {
            return width_;
        }

        uint16_t height() const noexcept
        {
            return height_;
        }

        uint16_t depth() const noexcept
        {
            return depth_;
        }

        uint16_t array_size() const noexcept
        {
            return array_size_;
        }

        bool& mipmap() noexcept
        {
            return has_mipmap_;
        }

        bool mipmap() const noexcept
        {
            return has_mipmap_;
        }

        void construct()
        {
            detail::subresource_generator gen
            {
                pixel_format_, width_, height_, depth_,  array_size_ , has_mipmap_
            };

            data_ = std::move(gen.data());
            size_ = data_.size();
            subresources_ = std::move(gen.subresource());
        }

        decltype(auto) begin() noexcept
        {
            return subresources_.begin();
        }

        decltype(auto) end() noexcept
        {
            return subresources_.end();
        }

    private:
        pixel_format    pixel_format_;
        uint16_t        width_;
        uint16_t        height_;
        uint16_t        depth_;
        uint16_t        array_size_;
        bool            has_mipmap_;

        subresource_constainer    subresources_;
    };
}
这里之所以要用模板,是为了尽可能的不写DRY的代码。
剖析resize函数。这个函数有三个知识点。
1. default tempalte parameter & template member function overload resolution;
2. substitution failure is no an error(SFINAE); http://en.cppreference.com/w/cpp/language/sfinae
3. std::enable_if; http://www.boost.org/doc/libs/1_59_0/libs/core/doc/html/core/enable_if.html
如果把resize函数在texture_2D,texture_rt,texture_2d_array等都实现一遍,代码就很DRY了,并且texture_1d不能resize height分量。这里就使用了一些元编程的技巧,通过模板的traits模式做编译期的反射,配合enable_if帮我们在编译期决议resize函数是否有效。简而言之,就是texture_1d如果尝试使用resize两个参数的重载,在编译器就会报错。这样,代码只需要在texture基类实现一遍就能保证既不会出现重复代码, 又保证了编译期的安全性。类似的函数同理。
set_pixel_format函数把当前像素格式是否有效的任务分派给了traits来完成。比如texture_3d不能是bc系列的格式,texture_rt与texture_dp都有特定的像素格式。
由于texture是一个复杂对象(complex object),中间有stl容器作为成员变量,RAII的模式不太适合,因此设置参数的函数都只是一些成员变量的赋值,construct函数才是真正创建它的函数。construct函数会为texture分配内存并填充subresource. detail::subresource_generator是一个辅助类,传递texture创建所需要的全部参数,它将在构造函数中完成对texture的内存分配和填充subresource. 这里为了异常安全(exceptional safe),所有的创建都在辅助类里面,创建完毕后使用move语义,高效的将创建好的内存和subresource信息移动到texture相应的成员中。如果在创建过程中发生异常,texture的状态不会发生改变,并且辅助类对象可以完美地保证资源不会泄露。下面给出辅助类的设计。
namespace pipeline { namespace detail
{
    struct subresource_generator
    {
        subresource_generator(
            pixel_format format,
            uint16_t width,
            uint16_t height,
            uint16_t depth,
            uint16_t array_size,
            bool mipmap)
        {
            construct(format, width, height, depth, array_size, mipmap);
        }

        void construct(pixel_format format, uint16_t width, uint16_t height, uint16_t depth, uint16_t array_size, bool mipmap)
        {
            // 没有texture3D array
            if (depth > 1 && array_size > 1)
                throw std::exception();

            // 不支持超过15层的mipmap,原始像素太大
            auto mip_levels = mipmap ? uint16_t{ 0 } : calculate_mipmap_level(width, height, depth);
            if (mip_levels > 15)
                throw std::exception();

            auto subresource_count = (mip_levels + 1) * array_size;
            subresources_.resize(subresource_count);

            size_t texture_size = 0;
            auto loop = size_t{ 0 };
            for (uint16_t array_index = 0; array_index < array_size; ++array_index)
            {
                for (uint16_t mip_level = 0; mip_level <= mip_levels; ++mip_level)
                {
                    auto& subres = subresources_[loop++];
                    subres.mip_level = mip_level;
                    subres.array_index = array_index;
                    subres.width  = std::max<uint16_t>(width >> mip_level, 1);
                    subres.height = std::max<uint16_t>(height >> mip_level, 1);
                    subres.depth  = std::max<uint16_t>(depth >> mip_level, 1);
                    std::tie(subres.row_pitch, subres.slice_pitch) =
                        calculate_pitch_size(format, subres.width, subres.height);

                    texture_size += subres.slice_pitch * depth;
                }
            }

            data_.resize(texture_size);
            auto ptr = data_.data();
            for (auto& sub_res : subresources_)
            {
                sub_res.pointer = ptr;
                ptr += sub_res.slice_pitch * sub_res.depth;
            }
        }

        auto move_data()->std::vector<byte>&&
        {
            return std::move(data_);
        }

        auto move_subres()->std::vector<subresource>&&
        {
            return std::move(subresources_);
        }

    private:
        std::vector<subresource>    subresources_;
        std::vector<byte>            data_;
    };
} }
辅助类主要就是实现构造函数中调用的construct函数,首先它会调用calculate_mipmap_level来计算这张纹理会产生多少级的mipmap,如果它有纹理的话。接着再根据纹理的像素格式,纹理是否是Texture Array等信息为每一个subresource计算信息。这里要提到的两个函数,一个就是calculate_mipmap_level,其实现大概如下
namespace pipeline { namespace detail
{
    uint16_t calculate_mipmap_level(uint16_t width, uint16_t height, uint16_t depth)
    {
        auto mipmap_level = std::max<uint16_t>(log2_integral(width), log2_integral(height));
        mipmap_level = std::max<uint16_t>(log2_integral(depth), mipmap_level);
        return mipmap_level;
    }
} }
其中调用的log2_integral是针对整数计算有快速优化的版本。
template <typename T>
    auto log2_integral(T t)
        -> std::enable_if_t<std::is_integral<T>::value, T>
    {
        T log2 = (t & 0xAAAAAAAAu) != 0;
        log2 |= ((t & 0xFFFF0000u) != 0) << 4;
        log2 |= ((t & 0xFF00FF00u) != 0) << 3;
        log2 |= ((t & 0xF0F0F0F0u) != 0) << 2;
        log2 |= ((t & 0xCCCCCCCCu) != 0) << 1;
        return log2;
    }
其次就是calculate_pitch_size函数,给定纹理的像素格式与宽和高,就能算出subresource需要的row_pitch和slice_pitch. 如果是对非压缩的像素格式,直接使用纹理的宽高原始数据就好了。但是如果使用的是压缩格式,例如BC系列的纹理格式,那么就不能逐像素(pixel wise)计算,而得逐块计算,并且也有额外的内存分配。这个函数实现比较长就不贴出来了,大家自行脑补。
接下来就是如何实作纹理的类型了。object_type中全部的纹理类型都会对应一个实作的类,篇幅原因这里以texture_2d为例。
namespace pipeline
{
    template <>
    struct texture_traits<texture_2d>
    {
        static constexpr bool is_texture_1d()
        {
            return false;
        }

        static constexpr bool is_texture_2d()
        {
            return true;
        }

        static constexpr bool is_texture_3d()
        {
            return false;
        }

        static constexpr bool is_texture_cube()
        {
            return false;
        }

        static constexpr bool is_texture_array()
        {
            return false;
        }

        static void validate_format()
        {

        }
    };


    class texture_2d : public texture<texture_2d>
    {
        typedef texture<texture_2d> base_type;
    public:
        static constexpr object_type type()
        {
            return object_type::texture_2d;
        }

    public:
        explicit texture_2d(std::string const& name)
            : base_type(name, pixel_format::unknown, 0, 0, 0, 1, false) noexcept
        {

        }
    };
}
实作的texture_2d首先需要特化texture_traits模板,提供给texture模板使用。而texture_2d实作的代码就很少了,仅仅只需要实现一个type函数,提供给texture模板的构造函数使用。如果有特殊需求,还可以给出更复杂的构造函数以方便使用。texture_2d以奇异递归模板模式(CRTP)传递类型信息到texture模板,再与texture_traits合作能够避免实作中大量的重复代码,还能保证编译期的里氏替换原则(LSP)。
Texture管理的平台无关实作就介绍到这里,下面几篇将介绍Buffer的平台无关的管理。Buffer的管理比Texture更复杂。


