Activity到底是啥?生命周期是怎么回事?xml有什么关系?
看了这几天书,终于有点收获了,开始看书一头雾水,现在有种学c++时的明白一部分的感觉,但还是有学习c++时的茫然,就像头文件包含及命名空间,总是用可还是有点摸不着头脑。最近仔细看了看有关Activity的生命周期,及与main.xml和string.xml的联系,似乎有点理解了。
重在体会:
下面是我在书上的代码,重要的是对于其中的:onRestart(),onResume(),onStart(),onStop(),onPause(),onDestroy()有了认识,以前每次看到super都觉得是个啥难点,其实是在继承中对于父类抽象方法的重写,有点类似this的功能,但this指向的是本对象。再就是"@Override"每次看到都觉得别扭,现在也明白就是对于在对父类方法的重写时的声明吧,告知一下不是自定义方法,如若不写则看做是自定义的方法。至于Log部分其实就是对想要部分的"打印",涉及到不同的"打印"形式,例如Log.v是任何消息都“打印”,Log.e是“打印”错误信息等等。用于观察程序的运行比较好。
代码:
MainActivity:
package com.himi;

import android.app.Activity;
import android.content.Intent;
import android.os.Bundle;
import android.util.Log;
import android.view.View;
import android.view.View.OnClickListener;
import android.widget.Button;

public class MainActivity extends Activity implements OnClickListener {
	private Button btn;

	@Override
	public void onCreate(Bundle savedInstanceState) {
		super.onCreate(savedInstanceState);
		setContentView(R.layout.main);
		Log.v("MainActivity", "onCreate");
		btn = (Button) findViewById(R.id.Main_btn);
		btn.setOnClickListener(this);
		//this.finish(); //结束当前MainActivity
	}

	@Override
	public void onClick(View arg0) {
		if (arg0 == btn) {
			Intent intent = new Intent();
			intent.setClass(this, OtherActivity.class);
			this.startActivity(intent);
		}
	}

	@Override
	protected void onDestroy() {
		// TODO Auto-generated method stub
		super.onDestroy();
		Log.v("MainActivity", "onDestroy");
	}

	@Override
	protected void onPause() {
		// TODO Auto-generated method stub
		super.onPause();
		Log.v("MainActivity", "onPause");
	}

	@Override
	protected void onRestart() {
		// TODO Auto-generated method stub
		super.onRestart();
		Log.v("MainActivity", "onRestart");
	}

	@Override
	protected void onResume() {
		// TODO Auto-generated method stub
		super.onResume();
		Log.v("MainActivity", "onResume");
	}

	@Override
	protected void onStart() {
		// TODO Auto-generated method stub
		super.onStart();
		Log.v("MainActivity", "onStart");
	}

	@Override
	protected void onStop() {
		// TODO Auto-generated method stub
		super.onStop();
		Log.v("MainActivity", "onStop");
	}

}
OtherActivity.java:
package com.himi;

import android.app.Activity;
import android.os.Bundle;
import android.util.Log;
import android.view.View;
import android.view.View.OnClickListener;
import android.widget.Button;

public class OtherActivity extends Activity implements OnClickListener {
	private Button btn;

	@Override
	public void onCreate(Bundle savedInstanceState) {
		super.onCreate(savedInstanceState);
		setContentView(R.layout.other);
		Log.v("MainActivity", "onCreate");
		btn = (Button) findViewById(R.id.Other_btn);
		btn.setOnClickListener(this);
	}

	@Override
	public void onClick(View arg0) {
		if (arg0 == btn) {
			this.finish();
		}
	}

	@Override
	protected void onDestroy() {
		// TODO Auto-generated method stub
		super.onDestroy();
		Log.v("MainActivity", "onDestroy");
	}

	@Override
	protected void onPause() {
		// TODO Auto-generated method stub
		super.onPause();
		Log.v("MainActivity", "onPause");
	}

	@Override
	protected void onRestart() {
		// TODO Auto-generated method stub
		super.onRestart();
		Log.v("MainActivity", "onRestart");
	}

	@Override
	protected void onResume() {
		// TODO Auto-generated method stub
		super.onResume();
		Log.v("MainActivity", "onResume");
	}

	@Override
	protected void onStart() {
		// TODO Auto-generated method stub
		super.onStart();
		Log.v("MainActivity", "onStart");
	}

	@Override
	protected void onStop() {
		// TODO Auto-generated method stub
		super.onStop();
		Log.v("MainActivity", "onStop");
	}

}
由于MainActivity.java是顶层,当触发Button组建时会使OtherActivity.java的界面弹出,具体体会的是Activity声明周期是啥,怎么运行结束。
至于xml部分其实是设计界面属性,不论是主界面还是一个Button组建的属性,属性基本的包括宽度,高度,自定义的名称,ID 属性,ID属性就是一个将界面与java代码联系起来的属性,具体会在R.java中分配,只要你在对应的xml中做出的声明,R文件不需要自己担心,由系统分配。
至于宽度高度设置,仅仅牵扯到布局问题,简单的讲仅仅是定义为“填充类型”还是“按内容填充”两种(fill_parent 和 wrap_content),但布局问题分的比较细,需要单独讨论。
代码:
main.xml:
<?xml version="1.0" encoding="utf-8"?>
<LinearLayout xmlns:android="http://schemas.android.com/apk/res/android"
    android:orientation="vertical"
    android:layout_width="fill_parent"
    android:layout_height="fill_parent"
    >
<TextView
    android:layout_width="fill_parent"
    android:layout_height="wrap_content"
    android:text="@string/hello"
    />
<Button
    android:layout_width="fill_parent"
    android:layout_height="wrap_content"
    android:text="@string/btn_Open"
    android:id="@+id/Main_btn"
    />
</LinearLayout>
Other.xml:
<?xml version="1.0" encoding="utf-8"?>
<LinearLayout xmlns:android="http://schemas.android.com/apk/res/android"
    android:orientation="vertical"
    android:layout_width="fill_parent"
    android:layout_height="fill_parent"
    >
<TextView
    android:layout_width="fill_parent"
    android:layout_height="wrap_content"
    android:text="@string/OtherActiviy_hello"
    />
<Button
    android:layout_width="fill_parent"
    android:layout_height="wrap_content"
    android:text="@string/OtherActiviy_BtnClose"
    android:id="@+id/Other_btn"
    />
</LinearLayout>
string.xml:
<?xml version="1.0" encoding="utf-8"?>
<resources>
	<string name="hello">Hello World, MainActivity!</string>
	<string name="app_name">MyFirstProject</string>
	<string name="btn_Open">打开OtherActivity!</string>
	<string name="OtherActiviy_hello">I‘m OtherActivity!</string>
	<string name="OtherActiviy_app_name">OterActivity</string>
	<string name="OtherActiviy_BtnClose">关闭当前Activity!</string>

</resources>
其中的TextView和Button是对不同组件的设置,< />可以看做是一种特有的定义形式。从结构上看是在“LinearLayout”线性布局下的文本组建和按键组建,每个组件中都是特有形式“android:”layout是布局位置layout_width就是宽度设置了,至于"@string/"是通过这种形式引用string.xml文件中的内容,顶部是版本声明<?xml version="1.0" encoding="utf-8"?>
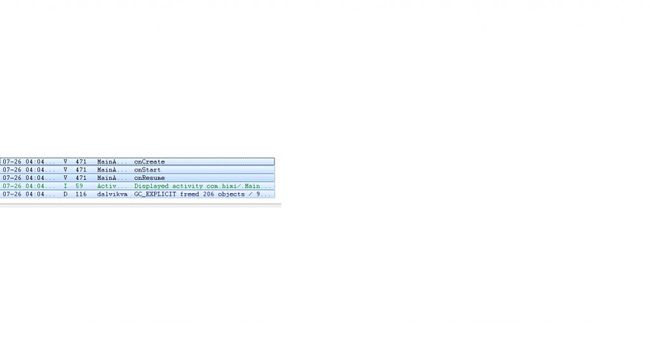
截图体会: