在Windows下运行Felzenszwalb的Deformable Part Models(voc-release4.01)目标检测matlab源码
可变形部件模型Deformable Part Models是目前最好的目标检测算法,由Felzenszwalb提出,本文介绍如何在windows下运行Felzenszwalb给出的matlab源码。
有关Deformable Part Model参见论文
A Discriminatively Trained, Multiscale,Deformable Part Model[CVPR 2008]的中文翻译
Object Detection with Discriminatively Trained Part Based Models[PAMI 2010]的中文翻译
及 有关可变形部件模型(Deformable Part Model)的一些说明
Deformable Part Model 相关网页(其中有源码下载):http://www.cs.berkeley.edu/~rbg/latent/index.html
Pedro Felzenszwalb的个人主页:http://cs.brown.edu/~pff/
PASCAL VOC 目标检测挑战:http://pascallin.ecs.soton.ac.uk/challenges/VOC/
Felzenszwalb给出了matlab版本的实现,且只能运行在linux和Mac操作系统上,有网友给出了其中的第四版voc-release4.01修改后在windows上运行的方法,这里进行一下总结。
本文参考以下三篇博客:
Win7+VS2010+Matlab2011b下运行Discriminatively Trained Deformable PartModels(4.01版)代码-运行demo()-详细步骤
如何在window下运行Discriminatively Trained Deformable PartModels代码
在windows下运行Felzenszwalb的Discriminatively Trained Deformable Part Models代码
我的环境:Win7 + Matlab R2010a(其中配置VC++6.0中的c++编译器)
在网站http://www.cs.berkeley.edu/~rbg/latent/index.html上下载voc-release4.01源码并解压。
步骤1 在Matlab中配置c++编译器
在matlab命令行中输入:
mex –setup
回车,出现提示:
	Please choose your compiler for building external interface (MEX) files:
	Would you like mex to locate installed compilers [y]/n?
输入n,回车,此时会列出matlab支持的编译器:
       Select a compiler:
         [1]Intel C++ 11.1 (with Microsoft Visual C++ 2008 SP1 linker)
         [2]Intel C++ 9.1 (with Microsoft Visual C++ 2005 SP1 linker)
         [3]Intel Visual Fortran 11.1 (with Microsoft Visual C++ 2008 SP1 linker)
         [4]Intel Visual Fortran 11.1 (with Microsoft Visual C++ 2008 Shell linker)
         [5]Intel Visual Fortran 10.1 (with Microsoft Visual C++ 2005 SP1 linker)
         [6]Lcc-win32 C 2.4.1
         [7]Microsoft Visual C++ 6.0
         [8]Microsoft Visual C++ 2005 SP1
         [9]Microsoft Visual C++ 2008 Express
         [10]Microsoft Visual C++ 2008 SP1
         [11]Open WATCOM C++

         [0]None
根据自己机器上安装的VC版本,选择对应的编译器,输入序号,回车,提示:
       Your machine has a Microsoft Visual C++compiler located at
       C:\Program Files\Microsoft Visual Studio.Do you want to use this compiler [y]/n?
如果自动检测给出的是正确的VC目录,输入y,否则可以输入n后手动输入VC目录。
步骤2 尝试调用compile()编译源码
将matlab工作目录设置为文件夹voc-release4.01所在的目录,在matlab命令行中输入compile,即调用compile()函数尝试编译源码,我们看看会出现什么错误,然后挨个解决,错误提示如下:
       Command line warning D4024 : unrecognizedsource file type 'resize.cc', object file assumed
       Command line warning D4027 : source file'resize.cc' ignored
       Command line warning D4021 : no actionperformed
说明编译器无法识别.cc文件,打开compile.m文件,如下:
mex -O resize.cpp
mex -O dt.cpp
mex -O features.cpp
mex -O getdetections.cpp

% use one of the following depending on your setup
% 0 is fastest, 3 is slowest

% 0) multithreaded convolution using SSE
% mex -O fconvsse.cc -o fconv

% 1) multithreaded convolution using blas
%    WARNING: the blas version does not work with matlab >= 2010b
%    and Intel CPUs
% mex -O fconvblasMT.cc -lmwblas -o fconv

% 2) mulththreaded convolution without blas
% mex -O fconvMT.cc -o fconv

% 3) convolution using blas
% mex -O fconvblas.cc -lmwblas -o fconv

% 4) basic convolution, very compatible
% mex -O fconv.cc -o fconv

%在windows下使用时加上下面这句,并注释掉0)
mex -O fconv.cpp
发现首先会编译resize.cc,dt.cc,features.cc,getdetections.cc 这四个文件,既然不识别.cc文件,就将这四个.cc文件的扩展名都改为.cpp,同时也修改compile.m文件,将前四句改为:
       mex -O resize.cpp
       mex -O dt.cpp
       mex -O features.cpp
       mex -O getdetections.cpp
步骤3 修改resize.cpp文件
然后调用compile(),错误提示:
resize.cpp(36) : error C2057: expected constant expression
resize.cpp(36) : error C2466: cannot allocate an array of constant size 0
resize.cpp(36) : error C2133: 'ofs' : unknown size
resize.cpp(70) : error C2065: 'bzero' : undeclared identifier
resize.cpp(95) : error C2065: 'round' : undeclared identifier
为解决此问题,修改resize.cpp文件,在前面加上bzero和round的定义:
#define bzero(a,b) memset(a,0,b)
int round(float a){float tmp = a-(int)a; if(tmp>=0.5) return(int)a+1;else return (int)a;}
并并修改ofs数组的定义,将
alphainfo ofs[len];这句改成:
alphainfo *ofs = new alphainfo[len];
当然在同一作用域后面加上:
delete [] ofs;
修改完后的resize.cpp文件如下:
#include <math.h>
#include <assert.h>
#include <string.h>
#include "mex.h"

/*
 * Fast image subsampling.
 * This is used to construct the feature pyramid.
 */

//在windows下使用时加上下面这句
#define bzero(a,b) memset(a,0,b)
int round(float a){float tmp = a-(int)a; if(tmp>=0.5) return (int)a+1;else return (int)a;}

// struct used for caching interpolation values
struct alphainfo {
  int si, di;
  double alpha;
};

// copy src into dst using pre-computed interpolation values
void alphacopy(double *src, double *dst, struct alphainfo *ofs, int n) {
  struct alphainfo *end = ofs + n;
  while (ofs != end) {
    dst[ofs->di] += ofs->alpha * src[ofs->si];
    ofs++;
  }
}

// resize along each column
// result is transposed, so we can apply it twice for a complete resize
void resize1dtran(double *src, int sheight, double *dst, int dheight,
		  int width, int chan) {
  double scale = (double)dheight/(double)sheight;
  double invscale = (double)sheight/(double)dheight;

  // we cache the interpolation values since they can be
  // shared among different columns
  int len = (int)ceil(dheight*invscale) + 2*dheight;
  //alphainfo ofs[len];
  alphainfo *ofs = new alphainfo[len];//在windows下使用时加上这句,注释掉上面一句
  int k = 0;
  for (int dy = 0; dy < dheight; dy++) {
    double fsy1 = dy * invscale;
    double fsy2 = fsy1 + invscale;
    int sy1 = (int)ceil(fsy1);
    int sy2 = (int)floor(fsy2);

    if (sy1 - fsy1 > 1e-3) {
      assert(k < len);
      assert(sy-1 >= 0);
      ofs[k].di = dy*width;
      ofs[k].si = sy1-1;
      ofs[k++].alpha = (sy1 - fsy1) * scale;
    }

    for (int sy = sy1; sy < sy2; sy++) {
      assert(k < len);
      assert(sy < sheight);
      ofs[k].di = dy*width;
      ofs[k].si = sy;
      ofs[k++].alpha = scale;
    }

    if (fsy2 - sy2 > 1e-3) {
      assert(k < len);
      assert(sy2 < sheight);
      ofs[k].di = dy*width;
      ofs[k].si = sy2;
      ofs[k++].alpha = (fsy2 - sy2) * scale;
    }
  }

  // resize each column of each color channel
  bzero(dst, chan*width*dheight*sizeof(double));
  for (int c = 0; c < chan; c++) {
    for (int x = 0; x < width; x++) {
      double *s = src + c*width*sheight + x*sheight;
      double *d = dst + c*width*dheight + x;
      alphacopy(s, d, ofs, k);
    }
  }
  delete[] ofs;//在windows下使用时加上这句
}

// main function
// takes a double color image and a scaling factor
// returns resized image
mxArray *resize(const mxArray *mxsrc, const mxArray *mxscale) {
  double *src = (double *)mxGetPr(mxsrc);
  const int *sdims = mxGetDimensions(mxsrc);
  if (mxGetNumberOfDimensions(mxsrc) != 3 ||
      mxGetClassID(mxsrc) != mxDOUBLE_CLASS)
    mexErrMsgTxt("Invalid input");

  double scale = mxGetScalar(mxscale);
  if (scale > 1)
    mexErrMsgTxt("Invalid scaling factor");

  int ddims[3];
  ddims[0] = (int)round(sdims[0]*scale);
  ddims[1] = (int)round(sdims[1]*scale);
  ddims[2] = sdims[2];
  mxArray *mxdst = mxCreateNumericArray(3, ddims, mxDOUBLE_CLASS, mxREAL);
  double *dst = (double *)mxGetPr(mxdst);

  double *tmp = (double *)mxCalloc(ddims[0]*sdims[1]*sdims[2], sizeof(double));
  resize1dtran(src, sdims[0], tmp, ddims[0], sdims[1], sdims[2]);
  resize1dtran(tmp, sdims[1], dst, ddims[1], ddims[0], sdims[2]);
  mxFree(tmp);

  return mxdst;
}

// matlab entry point
// dst = resize(src, scale)
// image should be color with double values
void mexFunction(int nlhs, mxArray *plhs[], int nrhs, const mxArray *prhs[]) {
  if (nrhs != 2)
    mexErrMsgTxt("Wrong number of inputs");
  if (nlhs != 1)
    mexErrMsgTxt("Wrong number of outputs");
  plhs[0] = resize(prhs[0], prhs[1]);
}
步骤4 修改dt.cpp文件
修改完resize.cpp文件后,继续compile,错误提示如下:
dt.cpp(61): error C2065: 'int32_t' : undeclared identifier
等等。
为解决此问题,在dt.cpp文件前面加上:
#defineint32_t int
然后继续compile,错误提示如下:
dt.cpp(77): error C2374: 'x' : redefinition; multiple initialization
dt.cpp(70) : seedeclaration of 'x'
说明有变量的二次定义,其实这是VC++6.0编译器的一个bug,在VC++6.0中,如果有如下的语句:
for(int i=0; i < 10; i++)
	{...}
for(int i=0; i <10; i++)
	{...}
则编译器会提示第二个变量i是重复定义,也就是说,编译器不认为在for语句内定义的变量的作用域仅限于for语句内,这与C++语法不符,现在的VS2010中已经没有这个问题了。所以在resize.cpp文件的对应位置注释掉二次定义就可以了,或者如果你选择的编译器不是VC++6.0的话,就没有这个问题。
步骤5 修改features.cpp文件
修改好dt.cpp文件后,再次compile,错误提示如下:
	features.cpp(48) : error C2065: 'round' : undeclared identifier
	features.cpp(158) : error C2374: 'x' : redefinition; multiple initialization
    		features.cpp(65) : see declaration of 'x'
	features.cpp(195) : error C2374: 'o' : redefinition; multiple initialization
        features.cpp(179) : see declaration of 'o'
可以看出有三个问题,round()函数未定义,变量x和o重复定义,
所以在features.cpp文件中加入round()函数的定义:
intround(float a){float tmp = a-(int)a; if(tmp>=0.5) return (int)a+1;elsereturn (int)a;}
并根据出错位置注释掉变量x和o的二次定义
步骤6 再次修改compile.m文件
修改完features.cpp文件后,再次compile,错误提示如下:
	Usage:
        MEX [option1 ... optionN] sourcefile1 [... sourcefileN]
            [objectfile1 ... objectfileN] [libraryfile1 ... libraryfileN]
Use the -help option for more information, or consult the MATLAB API Guide.
Error in ==> compile at 10
mex -O fconvsse.cc -o fconv
打开compile.m文件,查看第10行之前的注释:
% use one of thefollowing depending on your setup
% 0 is fastest, 3 isslowest(应该是0 is fastest, 4 is slowest)
可以看到0-4只是效率不同,作用一样,既然第10行的0号出问题了,就换一个,根据网友pozen的说明:其他几个fconv用了其他平台的multiThread在windows上跑不起,所以在最后加上:
mex -O fconv.cpp
并将第10行的
mex -O fconvsse.cc -o fconv
注释掉。
注意这里要先将fconv.cc文件的扩展名改为cpp,否则还会出现一开始的不识别.cc文件的问题。
修改完后的compile.m文件如下:
mex -O resize.cpp
mex -O dt.cpp
mex -O features.cpp
mex -O getdetections.cpp

% use one of the following depending on your setup
% 0 is fastest, 3 is slowest

% 0) multithreaded convolution using SSE
% mex -O fconvsse.cc -o fconv

% 1) multithreaded convolution using blas
%    WARNING: the blas version does not work with matlab >= 2010b
%    and Intel CPUs
% mex -O fconvblasMT.cc -lmwblas -o fconv

% 2) mulththreaded convolution without blas
% mex -O fconvMT.cc -o fconv

% 3) convolution using blas
% mex -O fconvblas.cc -lmwblas -o fconv

% 4) basic convolution, very compatible
% mex -O fconv.cc -o fconv

%在windows下使用时加上下面这句,并注释掉0)
mex -O fconv.cpp
步骤7 修改fconv.cpp文件
修改完compile.m文件后,再次compile,错误提示如下:
fconv.cpp(75): error C4716: 'process' : must return a value
所以修改fconv.cpp文件,将
void*process(void *thread_arg)
改为:
void process(void*thread_arg)
即去掉指针符号。
然后再次compile,没错误提示了,编译成功了。
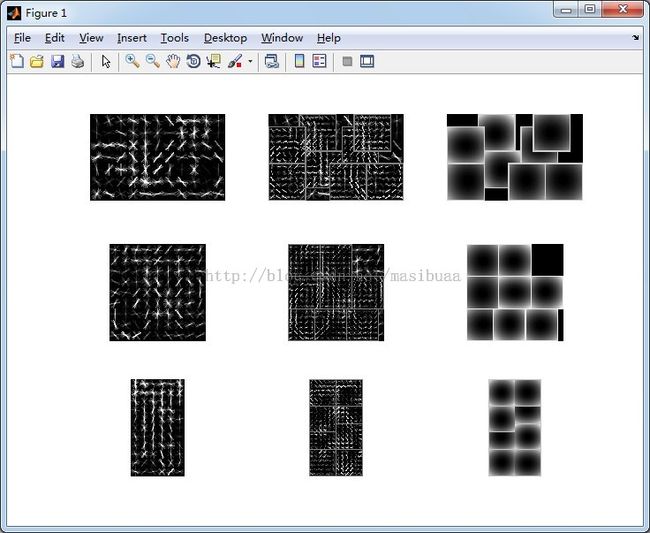
步骤8 运行demo(),进行目标检测试验
编译完成后,在matlab命令行中输入demo,进行目标检测试验,根据提示,依次会出现小轿车、人、自行车的部件模型和检测结果,如果想检测其他图片,修改demo文件即可。
结果
(1) 小轿车

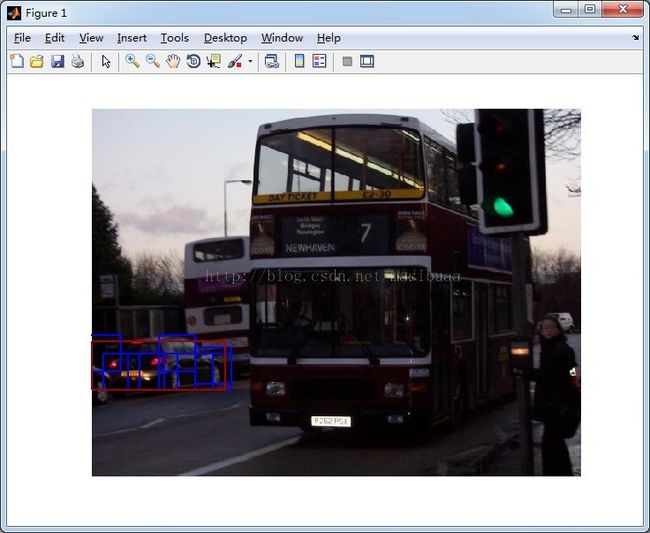
(2) 人


(3) 自行车