五、CCNode
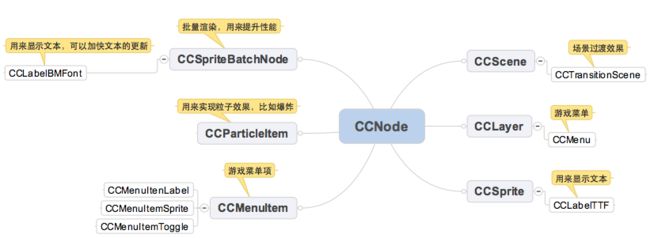
本将主要介绍下CCNode这个类,CCNode是所有节点的基类,其中包括我们常用的CCScene(场景)、CCLayer(图层)、CCSprite(精灵)等,它是一个不能够可视化显示的抽象类,只是用来定义所有节点的公共属性和方法的。本讲纯粹是理论。
首先来看看CCNode的继承结构图,只列举了常用的类
节点的处理
1.创建一个新的节点
CCNode *node = [CCNode node];
2.添加子节点
// 先创建子节点
CCNode *childNode = [CCNode node];

// 方法1:直接添加
[node addChild:childNode];

// 方法2:z决定了节点的绘制顺序,按照z值从小到大的顺序来绘制节点,即先绘制z值小的节点,再绘制z值大的节点
// 如果多个节点拥有相同的z值,就按照添加它们的先后顺序进行绘制
[node addChild:childNode z:0];

// 方法3:tag的作用是给节点设置一个标记,父节点可以根据设置的tag标记找到对应的子节点
[node addChild:childNode z:0 tag:100];
3.根据tag找到对应的子节点
// 如果多个节点拥有相同的tag值,这个方法将返回最先匹配tag值的节点
[node getChildByTag:100];
4.删除子节点
// 方法1:将子节点childNode从父节点node中移除
// "cleanup"设置为YES代表停止子节点运行的所有动作和消息调度
[node removeChild:childNode cleanup:YES];

// 方法2:根据tag值将对应的子节点从父节点node中移除
[node removeChildByTag:100 cleanup:YES];

// 方法3:移除node中的所有子节点
[node removeAllChildrenWithCleanup:YES];

// 方法4:将childNode从它的父节点中移除
[childNode removeFromParentAndCleanup:YES];
5.重新设置子节点的z值
[node reorderChild:childNode z:1];
6.停止节点运行的所有动作和消息调度
[node cleanup];
常用属性和方法
1.添加节点时设置的z值,决定了节点的绘制顺序
@property(nonatomic,readonly) NSInteger zOrder;
2.节点的旋转角度,默认是0,大于0是顺时针旋转,小于0则是逆时针旋转。子节点会继承父节点的这个属性
@property(nonatomic,readwrite,assign) float rotation;
既然是旋转,肯定是绕着一个点进行旋转,究竟是绕着哪个点旋转,取决于anchorPoint
@property(nonatomic,readwrite,assign) float scale;
既然是缩放,肯定是绕着一个点进行缩放,究竟是绕着哪个点缩放,取决于anchorPoint
@property(nonatomic,readwrite,assign) float scaleX;
5.节点Y方向(即高度)的缩放比例。子节点会继承父节点的这个属性
@property(nonatomic,readwrite,assign) float scaleY;
6.节点的大小(不受scale和rotation影响)
@property (nonatomic,readwrite) CGSize contentSize
7.节点在父节点中的位置(以父节点左下角为(0, 0))
@property(nonatomic,readwrite,assign) CGPoint position;
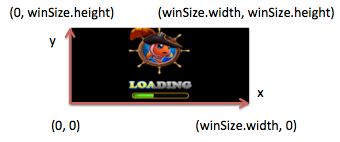
cocos2d的坐标系:(0,0)在屏幕的左下角,x值向右正向延伸,y值向上正向延伸.
winSize代表屏幕的尺寸
认真思考一下,不难发现,其实position的含义还是很模糊的。
假设一个节点的大小是20x20,则包含了400个点,那么在400个点中究竟是哪个点在position属性指定的位置上呢?
这个就取决于anchorPoint和isRelativeAnchorPoint属性,如果isRelativeAnchorPoint为NO,节点的左下角会在position属性指定的位置上;如果isRelativeAnchorPoint为YES,position的含义还会受anchorPoint的影响
8.可以称之为"定位点",这个anchorPoint影响的东西很多,比如节点position的含义、节点绕着哪个点进行缩放或旋转,anchorPoint的x、y取值范围都是0到1
@property(nonatomic,readwrite) CGPoint anchorPoint;
默认情况下,CCSprite、CClayer、CCScene的anchorPoint都为(0.5, 0.5),即默认情况下它们的定位点都是自己的中心点。
下面我分别详细描述下anchorPoint对position、缩放、旋转的影响
1> anchorPoint对position的影响
anchorPoint要对position造成影响,前提条件是isRelativeAnchorPoint为YES
我先做个总结:
* 如果anchorPoint = (0, 0),那么节点的左下角就会在position属性指定的位置上
* 如果anchorPoint = (0.5, 0.5),那么节点的中心点就会在position属性指定的位置上
* 如果anchorPoint = (1, 1),那么节点的右上角就会在position属性指定的位置上
* anchorPoint为其他值,以此类推
下面画图解释一下
// 红色(red)是蓝色的子节点,所以是以蓝色的左下角位置为坐标原点(0, 0)。假设蓝色的大小是100x100,红色的大小是50x50
red.position = CGPointMake(50, 50); // 可以看出,(50, 50)是在蓝色的正中间
由于anchorPoint的不同,改变了红色在蓝色中的位置
2> anchorPoint对缩放的影响
我先做个总结:
* 如果anchorPoint = (0, 0),那么节点就会绕着自己的左下角进行缩放
* 如果anchorPoint = (0.5, 0.5),那么节点就会绕着自己的中点进行缩放
* 如果anchorPoint = (1, 1),那么节点就会绕着自己的右上角进行缩放
* anchorPoint为其他值,以此类推
node.scale = 0.5f; // 宽高变为原来的1/2蓝色代表缩放前,红色代表缩放后
3> anchorPoint对旋转的影响
我先做个总结:
* 如果anchorPoint = (0, 0),那么节点就会绕着自己的左下角进行旋转
* 如果anchorPoint = (0.5, 0.5),那么节点就会绕着自己的中点进行旋转
* 如果anchorPoint = (1, 1),那么节点就会绕着自己的右上角进行旋转
* anchorPoint为其他值,以此类推
下面画图解释一下
node.rotation = 45; // 顺时针旋转45°
蓝色代表旋转前,红色代表旋转后
@property(nonatomic,readwrite,assign) BOOL isRelativeAnchorPoint;* 如果为YES,代表anchorPoint影响position;如果为NO,代表anchorPoint不影响position,那么节点的左下角就会在position属性指定的位置上
* 默认情况下,CCSprite的isRelativeAnchorPoint为YES,CCScene、CCLayer的isRelativeAnchorPoint为NO
10.父节点
@property(nonatomic,readwrite,assign) CCNode* parent;
11.所有的子节点
@property(nonatomic,readonly) CCArray *children;
12.是否可见
@property(nonatomic,readwrite,assign) BOOL visible;
13.添加节点时设置的标记
@property(nonatomic,readwrite,assign) NSInteger tag;
14.返回节点的边界(包含position和大小)
- (CGRect) boundingBox;
动作的处理
动作是指在特定时间内完成移动、缩放、旋转等操作的行为。CCNode可以运行动作实现一些动画效果。
1.运行动作
-(CCAction*) runAction: (CCAction*) action;
// 初始化一个平移动作,这是向左边移动100的距离
CCAction *action = [CCMoveBy actionWithDuration:2 position:CGPointMake(-100, 0)];
// 可以给动作设置一个标记
action.tag = 100;
 // 运行动作
[node runAction:action];
当动作执行完毕后,会自动从节点上删除
2.停止动作
停止节点上的所有动作
-(void) stopAllActions;停止某个特定的动作
-(void) stopAction: (CCAction*) action;根据 tag停止对应的动作
-(void) stopActionByTag:(NSInteger) tag;
3.根据tag获取对应的动作
-(CCAction*) getActionByTag:(NSInteger) tag;
4.节点上当前包含的动作总数
-(NSUInteger) numberOfRunningActions;
消息调度
节点可以进行消息调度,也就是指系统会每隔一段时间调用一次节点的某个方法。节点的消息调度是很常用的,比如一个子弹射出去了,我们需要隔一段时间就调用子弹的某个方法来改变的子弹的位置
为了说明消息调度的用法,我定义一个子弹类,因为子弹是看得见的,所以应该继承CCSprite,而不是继承CCNode
// Bullet.h
#import "CCSprite.h"

@interface Bullet : CCSprite

@end
1.最简单的做法是直接调用节点的scheduleUpdate方法,就可以开始消息调度
#import "Bullet.h"

@implementation Bullet
- (id)init {
    if (self = [super init]) {
        // 在节点初始化的时候开始消息调度
        [self scheduleUpdate];
    }
    return self;
}

- (void)update:(ccTime)delta {
    // 在这里改变子弹的位置
    // ....

}
@end
当
调用了scheduleUpdate方法,系统会以每帧的频率调用一次update:方法(方法名和参数都是固定的),意思是每次刷帧都会调用一次。参数delta代表上次调用方法到现在所经过的时间
2.设置消息调度的优先级
-(void) scheduleUpdateWithPriority:(NSInteger)priority;优先 级默认为0,系统是按照优先级从低到高的顺序调用update:方法
下面举个例子:
// 节点A
[nodeA scheduleUpdate];

// 节点B
[nodeB scheduleUpdateWithPriority:-1];

// 节点C
[nodeC scheduleUpdateWithPriority:1];
节点A、B、C都需要以每帧的频率调用update:方法,但是有顺序之分:最先调用节点B的update:方法,因为节点B的优先级最低;然后调用节点A的update:方法,因为节点A为默认优先级0;最后调用节点C的update:,因为节点C的优先级最高
3.如果想在消息调度时调用另外一个方法,或者不想以每帧的频率调用该方法,应该采取下面这种做法
- (id)init {
    if (self = [super init]) {
        // 开始消息调度
        // [self schedule:@selector(changePosition:)];  // 以每帧的频率调用changePosition:方法
        [self schedule:@selector(changePosition:) interval:0.2f]; // 每隔0.2秒就调用changePosition:方法
    }
    return self;
}

- (void)changePosition:(ccTime)delta {
    // do something here

}
4.取消消息调度
取消调用update:方法
-(void) unscheduleUpdate;取消调用特定的方法
-(void) unschedule: (SEL) s;取消调用所有的 方法(包括update:)
-(void) unscheduleAllSelectors;


