Android4.2.2 Gallery2源码分析(1)——从布局入手
使用的是现有的项目的源码进行分析,它在Android原生源码之上有一些修改,主要是添加了一些功能,但整体部分仍然是原生的架构。从零开始,逐步分析。
点开Gallery,进入该程序查看图片,在手机上看到的主视图如下,
使用Hierarchy Viewer工具查看UI布局,此时看到的布局就是Gallery框架的主界面:
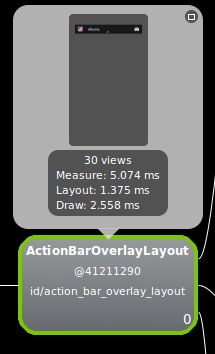
PhoneWindow$DecorView——ActionBarOverlayLayout(id/action_bar_overlay_layout)
PhoneWindow$DecorView是系统提供的框架视图,对应于屏幕上就是整块屏幕,包括顶部的状态条。所有的布局都是从这里开始,如果分析过Android的Surface框架的话,会对此有比较深刻的理解。这里不深究。
紧接下来的ActionBarOverlayLayout不同于我之前见过的大部分布局,之前见过的大部分为LinearLayout。也就是layout/main.xml中最顶层的标签<LinearLayout>,这是用户自定义布局部分的开始。但这里使用了ActionBarOverlayLayout,这是我首先想要了解的地方。
查看源码ActionBarOverLayout.java
/**
 * Special layout for the containing of an overlay action bar (and its
 * content) to correctly handle fitting system windows when the content
 * has request that its layout ignore them.
 */
public class ActionBarOverlayLayout extends FrameLayout {
它定义了ActionBar(控制条)的overlay(覆盖)模式,在经常需要显示和隐藏控制条的布局中,我们需要设置控制条的覆盖模式。通常在activity使用的主题中设置android:windowActionBarOverlay=true即可。也就是说,这个ActionBarOverlayLayout只负责状态条部分的内容。不太明白的一点是,它把这个视图作为了所有自定义布局视图的根视图,难道它的所有子视图都是围绕控制条写的吗?
留下疑点1,继续往下看,是ActionBarlayLayout的三个子视图:
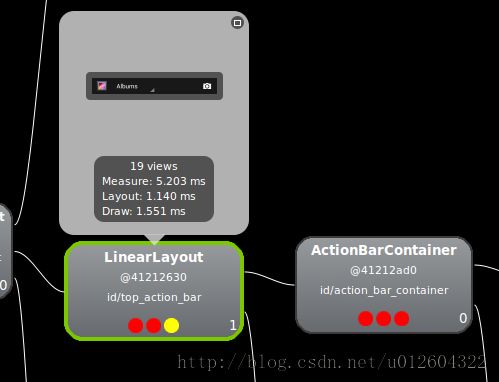
LinearLayout(id/top_action_bar),从Hierarchy View工具的snapshot中,我们可以清晰的看出这部分视图就是顶部的控制条视图部分,如下所示:它的子视图的布局我们先不作分析,我们的重点放在Gallery的主视图。
ActionBarContainer(id/split_action_bar),工具中,该部分暂无任何内容,以往的几乎所有布局中,都能看到它的身影,从名字上看它也与控制条有关,查看源码,它也是一个FrameLayout。因此只在某些条件下才会显现出来。它具体有何作用,这里先留下第二个疑问?
FrameLayout(id/content),工具显示它的大小包括除了顶层系统显示时间等的状态栏外的所有应用程序的视图空间。尽管我在手机上可以看到有图片内容的存在,如图1。但是snapshot里没有任何内容,如同图2中显示的一样。也就是说我们在手机上看到的Gallery的主空间的内容视图并不包含在这里(是否如此,具体原因是什么,我们作为第三个疑问点)。
接下来我们分析id/gallery_root的视图和子视图,
Gallery的layout/main.xml如下:
<?xml version="1.0" encoding="utf-8"?>
<RelativeLayout xmlns:android="http://schemas.android.com/apk/res/android"
        android:id="@+id/gallery_root"
        android:orientation="vertical"
        android:layout_width="match_parent"
        android:layout_height="match_parent">
    <include layout="@layout/gl_root_group"/>
    <FrameLayout android:id="@+id/header"
            android:visibility="gone"
            android:layout_alignParentTop="true"
            android:layout_width="match_parent"
            android:layout_height="wrap_content"/>
    <FrameLayout android:id="@+id/footer"
            android:visibility="gone"
            android:layout_alignParentBottom="true"
            android:layout_alignParentLeft="true"
            android:layout_alignParentRight="true"
            android:layout_width="match_parent"
            android:layout_height="wrap_content"/>
</RelativeLayout>
也就是说,Gallery显示图片内容的主视图是从这里开始的。header和footer从布局上看很容易分析出来,这里暂且不管。重要的是这个gl_root_group。layout/gl_root_group.xml如下:
<merge xmlns:android="http://schemas.android.com/apk/res/android">
    <com.android.gallery3d.ui.GLRootView
            android:id="@+id/gl_root_view"
            android:layout_width="match_parent"
            android:layout_height="match_parent"/>
    <View android:id="@+id/gl_root_cover"
            android:layout_width="match_parent"
            android:layout_height="match_parent"
	        android:background="@android:color/black"/>
...
</merge>
从这里我们知道,Gallery的主视图使用了Opengl,这样做的好处是增加图片浏览的流畅度。具体内容则要交给GLRootView.java,从代码中去寻找蛛丝马迹了。
这里需要说明的是,为什么id/content。也就是显示Opengl这部分视图的父视图是个Framelayout呢?我们点击图片到下一级,再到最终的浏览一张图片的层级,如下。从工具中我们发现,原来这些使用的都是这一个视图,并没有跳转到新的activity中去。这也是布局复杂应用的结果,并不是一个屏幕就是一个activity,通过FrameLayout我们可以很好的隐藏和显示需要的视图。


