如何在UWP中统一处理不同设备间的页面回退逻辑
已经有一段时间没有写博客来记录自己的学习点滴了。现在回想起来确实有些惭愧,期间经历了一些事情,到目前为止算是平息了,是时候该收收心来充实自己了。
在本篇缪文中,楼主打算给UWP开发的初学者讲述一个在开发中经常遇到的很现实的问题:页面回退逻辑 。
众所周知,UWP的应用程序理论上是可以运行在Windows上的各种设备上,其中包括Windows PC、WindowsMobile、XBox、IOT等。当我们的UWP应用程序运行在不同的设备上时,不同设备间的页面回退逻辑我们就要考虑周全,要考虑不同设备间的页面回退操作该如何设计才能更好的满足用户的使用需求。因此,我们有必要将不同设备间的页面回退逻辑进行统一封装,这样一来不仅有利于代码的维护,而且也有利于回退功能的扩充,实现了实现了“高内聚低耦合“。为了方便,楼主这里只简单论述一下当我们的UWP应用程序运行在PC上和Mobile上时该如何处理不同平台的页面回退逻辑。当应用程序运行在PC上时,页面回退常常是通过用户点击应用程序提供的一个回退按钮来进行页面回退,但是当我们的应用程序运行在Mobile上时,用户更愿意使用手机设备上提供的物理后退键来进行页面回退,这样一来,我们就需要使用封装的思想来进行封装。
1、理论分析:
在新的MSDN中,微软为我们提供了一套新的API:SystemNavigationManager 。当UWP应用程序在PC上运行的时候,通过此API,我们可以为应用程序提供一个回退按钮来向用户暗示此页面是可以回退的,当用户点击该按钮后,页面成功回退。但是当我们的UWP应用程序运行在Mobile上时,如果还是用这种方法来进行页面回退的的话,对用户来说就可能不是很友好,因此,我们要投其说好,用手机设备上的物理后退键来实现相应的页面回退逻辑,其对应的API为:HardwareButtons.BackPressed。分析到这,我们基本上明白该如何处理这两中设备间的回退逻辑的差异。So,问题来了:我们该把这套逻辑放到哪里合适?何时使用这套逻辑较为合适? 这是两道主观题,仁者见仁智者见智。楼主这里抛砖引玉,为初学者论述一种方法。
由于应用程序刚启动的时候会触发App.OnLaunched()函数,所以我们需要修改OnLaunched()函数;其次,为了保证页面的唯一性,我们这里使用“框架页”的方法来承载不同的页面,通过Frame来完成页面的跳转;最后,我们还需要实现一个用户控件来方式应用程序的主题框架。
总结一句话就是:让应用程序来加载我们的用户控件,让用户控件来承载我们的框架页,让框架页来完成应用程序的页面跳转。
是不是感觉很绕口??没关系,接下来我们看看实际的代码改如何写………………
2、代码实现:
首先:
我们需要为我们的应用程序创建一个页面跳转服务类:NavigationService,该类封装来不同平台间的页面回退逻辑。需要指出的是:由于该类使用来不同回退逻辑,因此我们使用哪个平台的回退逻辑就添加对哪个平台的扩展引用,我这里只添加来对Mobile的扩展引用。代码很简单,我相信你看一下就会的。
 1 public class NavigationService
 2     {
 3         public static NavigationService Instance { get; protected set; }
 4
 5         private Frame frame;
 6
 7         public Stack<Type> PageStack { get; protected set; }
 8
 9         public NavigationService(ref Frame frame)
10         {
11             if (Instance != null)
12             {
13                 throw new Exception("Only one navigation service can exist in a App.");
14             }
15             Instance = this;
16             this.frame = frame;
17             this.PageStack = new Stack<Type>();
18
19             SystemNavigationManager.GetForCurrentView().BackRequested += NavigationService_BackRequested;
20             if (ApiInformation.IsTypePresent("Windows.Phone.UI.Input.HardwareButtons"))
21             {
22                 HardwareButtons.BackPressed += HardwareButtons_BackPressed;
23             }
24         }
25
26         public void NavigateTo(Type pageType, object parameter)
27         {
28             if (PageStack.Count > 0)
29             {
30                 //返回位于Stack顶部的对象但不将其移除。
31                 if (PageStack.Peek() == pageType)
32                 {
33                     return;
34                 }
35             }
36             PageStack.Push(pageType);
37             frame.Navigate(pageType, parameter);
38             UpdateBackButtonVisibility();
39         }
40
41         public void NavigateToHome()
42         {
43             while (frame.CanGoBack)
44             {
45                 frame.GoBack();
46                 UpdatePageStack();
47             }
48             UpdateBackButtonVisibility();
49         }
50         private void UpdatePageStack()
51         {
52             if (PageStack.Count > 0)
53             {
54                 PageStack.Pop();
55             }
56         }
57
58         private void UpdateBackButtonVisibility()
59         {
60             SystemNavigationManager.GetForCurrentView().AppViewBackButtonVisibility = frame.CanGoBack ?
61                  AppViewBackButtonVisibility.Visible : AppViewBackButtonVisibility.Collapsed;
62         }
63
64         private void HardwareButtons_BackPressed(object sender, BackPressedEventArgs e)
65         {
66             if (frame.CanGoBack)
67             {
68                 frame.GoBack();
69                 UpdatePageStack();
70                 e.Handled = true;
71             }
72         }
73
74         private void NavigationService_BackRequested(object sender, BackRequestedEventArgs e)
75         {
76             if (frame.CanGoBack)
77             {
78                 frame.GoBack();
79                 UpdatePageStack();
80             }
81             UpdateBackButtonVisibility();
82         }
83     }
其次:
页面跳转服务类算是已经封装完成,接下来我们就需要创建一个用户控件来承载应用程序的主体框架。
 1 <UserControl
 2     x:Class="NavigationDemo.ShellView"
 3     xmlns="http://schemas.microsoft.com/winfx/2006/xaml/presentation"
 4     xmlns:x="http://schemas.microsoft.com/winfx/2006/xaml"
 5     xmlns:local="using:NavigationDemo"
 6     xmlns:d="http://schemas.microsoft.com/expression/blend/2008"
 7     xmlns:mc="http://schemas.openxmlformats.org/markup-compatibility/2006"
 8     mc:Ignorable="d"
 9     d:DesignHeight="300"
10     d:DesignWidth="400">
11     <UserControl.Resources>
12         <x:String x:Key="home">首页</x:String>
13         <x:String x:Key="article">文章</x:String>
14         <x:String x:Key="question">问题</x:String>
15         <x:String x:Key="thing">东西</x:String>
16     </UserControl.Resources>
17     <Grid>
18         <SplitView IsPaneOpen="True" DisplayMode="CompactInline" OpenPaneLength="100">
19             <SplitView.Pane>
20                 <ListView>
21                     <ListViewItem x:Name="homeCmd" Content="{StaticResource home}">
22                     <ListViewItem x:Name="articleCmd" Content="{StaticResource article}"/>
23                     <ListViewItem x:Name="questionCmd" Content="{StaticResource question}"/>
24                     <ListViewItem x:Name="thingCmd" Content="{StaticResource thing}"/>
25                 </ListView>
26             </SplitView.Pane>
27             <SplitView.Content>
28                 <Frame x:Name="frame" x:FieldModifier="public"/>
29             </SplitView.Content>
30         </SplitView>
31
32     </Grid>
33 </UserControl>
然后:
主体框架控件已经设计完成,接下来我们就修改改造App类。我们需要为应用程序提供一个全局的页面跳转,这样方便使用;其次我们需要将应用程序的初始页面改造为一个用户控件,这样就保证引用程序始终加载的是一个用户控件。
 1 public static NavigationService NavService { get; set; }
 2
 3   protected override void OnLaunched(LaunchActivatedEventArgs e)
 4         {
 5             //ShellView是我们创建的用户控件
 6             ShellView rootFrame = Window.Current.Content as ShellView;
 7
 8             // Do not repeat app initialization when the Window already has content,
 9             // just ensure that the window is active
10             if (rootFrame == null)
11             {
12                 // Create a Frame to act as the navigation context and navigate to the first page
13                 rootFrame = new ShellView();
14                 if (rootFrame.frame == null)//frame是我们在用户控件中创建的框架页面
15                 {
16                     rootFrame.frame = new Frame();
17                 }
18                 NavService = new NavigationService(ref rootFrame.frame);
19
20                 rootFrame.frame.NavigationFailed += OnNavigationFailed;
21
22                 if (e.PreviousExecutionState == ApplicationExecutionState.Terminated)
23                 {
24                     //TODO: Load state from previously suspended application
25                 }
26
27                 // Place the frame in the current Window
28                 Window.Current.Content = rootFrame;
29             }
30
31             if (rootFrame.frame.Content == null)
32             {
33                 // When the navigation stack isn't restored navigate to the first page,
34                 // configuring the new page by passing required information as a navigation
35                 // parameter
36                 //确保应用程序初始加载的是指定的首页
37                 NavService.NavigateTo(typeof(MainPage), e.Arguments);
38             }
39             // Ensure the current window is active
40             Window.Current.Activate();
41         }
最后:
代码敲到这儿算是已经完成的差不多,现在万事俱备,只欠东风,注册我们的跳转事件,我这里只简单跳转4个页面,脑洞大的朋友可以多设计几个。在我们的用户控件对应的后台代码中为应用程序的全局菜单注册页面跳转事件。
 1    private void homeCmd_Tapped(object sender, TappedRoutedEventArgs e)
 2         {
 3             App.NavService.NavigateToHome();
 4         }
 5
 6         private void articleCmd_Tapped(object sender, TappedRoutedEventArgs e)
 7         {
 8             App.NavService.NavigateTo(typeof(BlankPage1), null);
 9         }
10
11         private void questionCmd_Tapped(object sender, TappedRoutedEventArgs e)
12         {
13             App.NavService.NavigateTo(typeof(BlankPage2), null);
14         }
15
16         private void thingCmd_Tapped(object sender, TappedRoutedEventArgs e)
17         {
18             App.NavService.NavigateTo(typeof(BlankPage3), null);
19         }
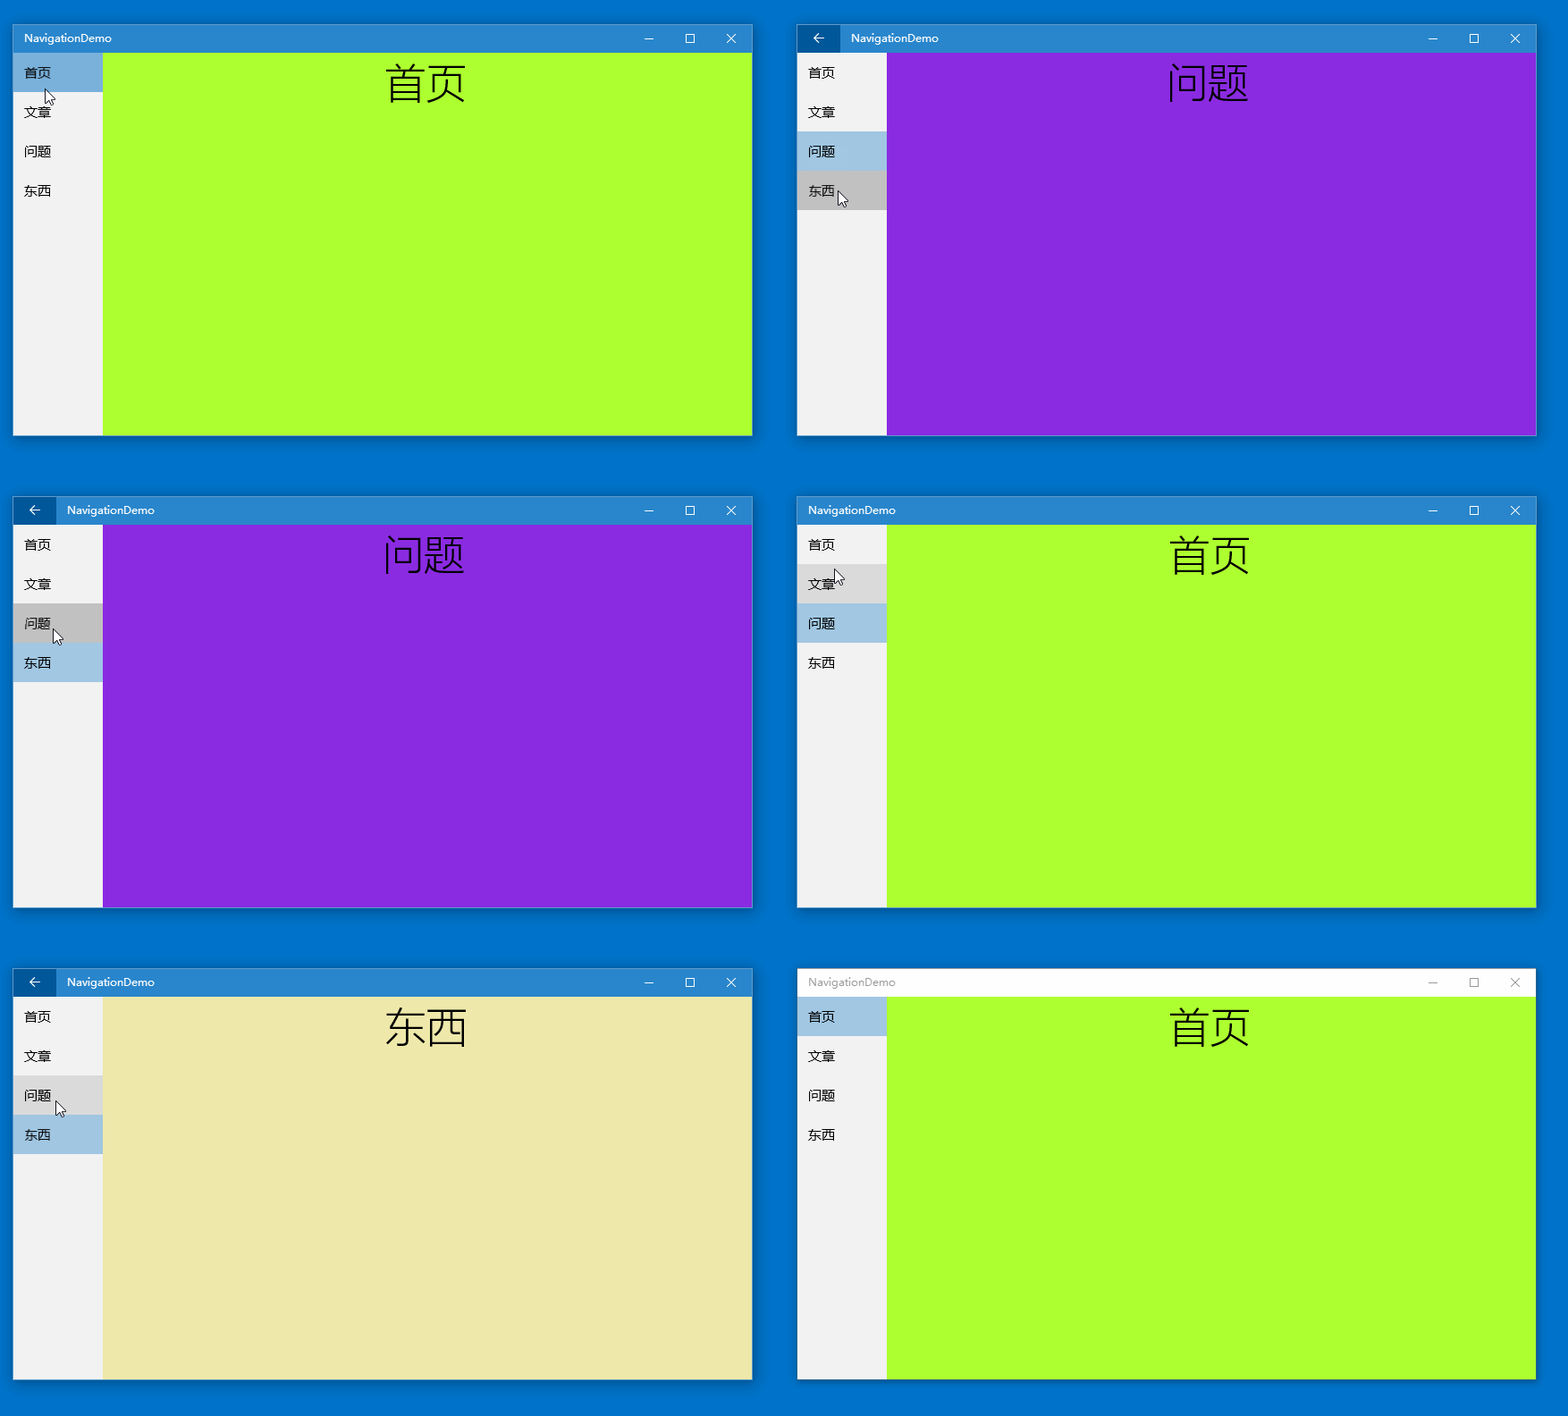
好了,写到这了算是已经大功告成了。我们还是看一下实际的运行效果吧。
这是在PC上运行的效果,在手机上运行的效果和这类似,但是页面回退是使用物理后退键来完成的,感兴趣的朋友可以自行尝试一下。
需要指出的是,如果你在手机上运行的话,你会发现这种方法会给你额外赠送一个彩蛋:当我们需要对系统标题栏的颜色进行设置的时候,我们完全可以在我们的用户控件中实现,哪怕我们需要填充一种图片或者其他复杂的元素都可以通过简单几行XAML代码都是可以搞定的。
3、总结:
这种处理方法不知能否满足各位的某种实际需求? 需求千千万,代码改不断,所以作为一个程序猿,我们不仅要提高我们的编码能力,同时解决问题的能力也要不断提高。这里简要总结一下使用到的知识:
封装的思想;
用户控件;
框架页;
好像也没啥了:)
废话说来这么多,不知各位看官是否看懂???俗话说得好:实践出真知。所以建议感兴趣的朋友还是亲自尝试一下比较好。
点击下载示例
