WarmGUI(3-1) 对DirectX2D坐标变换的讨论 【绘图类封装、多线程绘图和优化处理(1)】
前一篇 说明了最基本的绘图封装eArtist类,这一篇通过探讨坐标变换说明使用方法,重点在说明eArtist坐标变换容易让人迷惑的地方,但是这个类的函数这样设计是有原因的,或许有更好的实现来避免这些迷惑。
首先写一个class CTestDx2d帮助窗体完成绘图
容易混淆的地方在于,如果屏幕上的图形有很多部分,每部分用到了不同的变换,对于一个智商低下的我来说,很容易搞乱
第一种办法是在单线程绘图中先对原来的变换作个备份,用完之后再恢复:
如果有多个线程同时使用,用互斥锁又等于把多线程绘图变成了单线程绘图,因此第二个方法是使用Bitmap-RT绘图,然后再从Bitmap-RT绘制到Hwnd-RT.由于每个Bitmap-RT是独立的,对他的变换设定不会影响到其他线程,首先按照微软的建议,在CTestDx2d中添加一个ID2D1Bitmap *_bmp_screen,这个位图资源在初始时被创建,大小为窗口客户区大小,把这句话加到OnSize函数中就可以使用了,并且不要忘记在~CTestDx2d中释放资源:
现在用Bitmap-RenderTarget画第三个线段,用一个小矩形标出Bmp-RT绘制的区域:
![]()
第18行使用了Bitmap-RT绘图,注意所有的坐标还是从0,0开始的
看这几句话,
但这么设计是有原因的,原因在于绘图的函数可以写的很简单,比如_artist->DrawLine(),可以不同绘图策略中使用同样的代码绘制图形,图形被绘制到了不同的RenderTarget上,所以要小心的使用坐标变换,确保正确。实践中,尽可能保持HwndRT的变换始终为单位矩阵,变换更多的在BmpRT中做。如果是多线程绘图更应该使用这样的方法。
首先写一个class CTestDx2d帮助窗体完成绘图
1
class
CTestDx2d
2 {
3 public :
4 CTestDx2d( void );
5 ~ CTestDx2d( void );
6
7 int OnCreate(HWND hwnd);
8 void OnSize( int cx, int cy);
9 void Render();
10
11 protected :
12 HWND _hwnd; /// 保存窗口句柄
13 WARMGUI::eArtist * _artist; /// i am Artist!
14 RECT _rectClient; /// 窗口大小
15 };
在WM_CREATE消息时,初始化_artist
2 {
3 public :
4 CTestDx2d( void );
5 ~ CTestDx2d( void );
6
7 int OnCreate(HWND hwnd);
8 void OnSize( int cx, int cy);
9 void Render();
10
11 protected :
12 HWND _hwnd; /// 保存窗口句柄
13 WARMGUI::eArtist * _artist; /// i am Artist!
14 RECT _rectClient; /// 窗口大小
15 };
1
int
CTestDx2d::OnCreate(HWND hwnd)
2 {
3 _hwnd = hwnd;
4
5 // create render target
6 CDxFactorys::GetInstance() -> CreateRenderTarget(_hwnd, & _pHwndRT);
7 _artist = new WARMGUI::eArtist();
8 _artist -> Init(_hwnd);
9
10 return ( 0 );
11 }
响应WM_SIZE消息,改变RenderTarget的大小,实际上不改变他的大小也是没有任何问题的,因为DirectX会自动根据新窗口大小按比例缩放。这里我们还是让他改变
2 {
3 _hwnd = hwnd;
4
5 // create render target
6 CDxFactorys::GetInstance() -> CreateRenderTarget(_hwnd, & _pHwndRT);
7 _artist = new WARMGUI::eArtist();
8 _artist -> Init(_hwnd);
9
10 return ( 0 );
11 }
1
void
CTestDx2d::OnSize(
int
cx,
int
cy)
2 {
3 _rectClient.left = _rectClient.top = 0 , _rectClient.right = cx, _rectClient.bottom = cy;
4 _artist -> ResizeRenderTarget(cx, cy);
5 }
在响应WM_PAINT消息时,调用Render()函数,我们在这个函数中展示坐标变换的用法。
2 {
3 _rectClient.left = _rectClient.top = 0 , _rectClient.right = cx, _rectClient.bottom = cy;
4 _artist -> ResizeRenderTarget(cx, cy);
5 }
D2D1_MATRIX_3X2_F 是一个3X2的矩阵,其中前2X2方阵是坐标变换方阵,可以完成旋转和缩放,第3行的两个点是原点的平移位置。这些内容可以参考任何线性代数书,计算机绘图书或游戏开发材料,在此不多说了。
下面这个函数用三种颜色分段画了一条从左上角到右下角的直线,如下图:
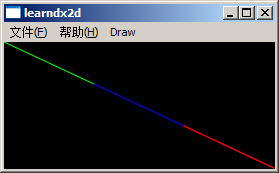
代码如下:注意画出三个线段的代码是同样的,由于坐标原点平移了,划线的位置也不同。
代码如下:注意画出三个线段的代码是同样的,由于坐标原点平移了,划线的位置也不同。
1
#define
BGR(b,g,r) ((COLORREF)(((BYTE)(b)|((WORD)((BYTE)(g))<<8))|(((DWORD)(BYTE)(r))<<16)))
2
3 void CTestDx2d::_test_trns()
4 {
5 int width = _rectClient.right / 3 , height = _rectClient.bottom / 3 ;
6
7 D2D1_MATRIX_3X2_F m = D2D1::Matrix3x2F::Identity();
8 _artist -> BeginDraw( true );
9
10 // 设定坐标变换为单位矩阵
11 _artist -> SetTransform( & m);
12 _artist -> SetSolidColorBrush(D2D1::ColorF(BGR( 0 , 255 , 0 )));
13 // 画出第一段
14 _artist -> DrawLine( 0 , 0 , width, height);
15
16 // 设定坐标原点的平移
17 m._31 = _rectClient.right / 3 , m._32 = _rectClient.bottom / 3 ;
18 _artist -> SetTransform( & m);
19 // 设定蓝色线段
20 _artist -> SetSolidColorBrush(D2D1::ColorF(BGR( 255 , 0 , 0 )));
21 // 同样的代码画出第二段
22 _artist -> DrawLine( 0 , 0 , width, height);
23
24
25 // 设定坐标原点的平移
26 m._31 = _rectClient.right * 2 / 3 , m._32 = _rectClient.bottom * 2 / 3 ;
27 _artist -> SetTransform( & m);
28 // 红色线段
29 _artist -> SetSolidColorBrush(D2D1::ColorF(BGR( 0 , 0 , 255 )));
30 // 同样的代码画出第三段
31 _artist -> DrawLine( 0 , 0 , width, height);
32
33 _artist -> EndDraw();
34 }
宏BGR按照blue, green, red的顺序定义颜色,这与一般使用的RGB定义顺序不同,是因为这样的顺序能获得更好的性能,RenderTarget的兼容格式一般也设定为BGRA,A是alpha透明度。具体的可以看微软图像兼容格式规格文档。
2
3 void CTestDx2d::_test_trns()
4 {
5 int width = _rectClient.right / 3 , height = _rectClient.bottom / 3 ;
6
7 D2D1_MATRIX_3X2_F m = D2D1::Matrix3x2F::Identity();
8 _artist -> BeginDraw( true );
9
10 // 设定坐标变换为单位矩阵
11 _artist -> SetTransform( & m);
12 _artist -> SetSolidColorBrush(D2D1::ColorF(BGR( 0 , 255 , 0 )));
13 // 画出第一段
14 _artist -> DrawLine( 0 , 0 , width, height);
15
16 // 设定坐标原点的平移
17 m._31 = _rectClient.right / 3 , m._32 = _rectClient.bottom / 3 ;
18 _artist -> SetTransform( & m);
19 // 设定蓝色线段
20 _artist -> SetSolidColorBrush(D2D1::ColorF(BGR( 255 , 0 , 0 )));
21 // 同样的代码画出第二段
22 _artist -> DrawLine( 0 , 0 , width, height);
23
24
25 // 设定坐标原点的平移
26 m._31 = _rectClient.right * 2 / 3 , m._32 = _rectClient.bottom * 2 / 3 ;
27 _artist -> SetTransform( & m);
28 // 红色线段
29 _artist -> SetSolidColorBrush(D2D1::ColorF(BGR( 0 , 0 , 255 )));
30 // 同样的代码画出第三段
31 _artist -> DrawLine( 0 , 0 , width, height);
32
33 _artist -> EndDraw();
34 }
容易混淆的地方在于,如果屏幕上的图形有很多部分,每部分用到了不同的变换,对于一个智商低下的我来说,很容易搞乱
第一种办法是在单线程绘图中先对原来的变换作个备份,用完之后再恢复:
1
ID2D1_MATRIX_3X2_F mOld, mNew;
2 _artist -> GetTransform( & mOld;)
3 _artist -> SetTransform( & mNew;)
4
5 DrawSomething();
6
7 _artist -> SetTransform( & mOld;)
2 _artist -> GetTransform( & mOld;)
3 _artist -> SetTransform( & mNew;)
4
5 DrawSomething();
6
7 _artist -> SetTransform( & mOld;)
如果有多个线程同时使用,用互斥锁又等于把多线程绘图变成了单线程绘图,因此第二个方法是使用Bitmap-RT绘图,然后再从Bitmap-RT绘制到Hwnd-RT.由于每个Bitmap-RT是独立的,对他的变换设定不会影响到其他线程,首先按照微软的建议,在CTestDx2d中添加一个ID2D1Bitmap *_bmp_screen,这个位图资源在初始时被创建,大小为窗口客户区大小,把这句话加到OnSize函数中就可以使用了,并且不要忘记在~CTestDx2d中释放资源:
1
_artist
->
CreateBitmap(
&
_bmp_screen, _rectClient);
CreateBitmap的内部实现是这样的:
1
inline HRESULT eArtist::CreateBitmap(WGBitmap
**
pBitmap, RECT
&
rect)
2 {
3 SafeRelease(pBitmap);
4 return _pHwndRT -> CreateBitmap(
5 D2D1::SizeU(RectWidth(rect), RectHeight(rect)),
6 D2D1::BitmapProperties(D2D1::PixelFormat(DXGI_FORMAT_B8G8R8A8_UNORM, D2D1_ALPHA_MODE_PREMULTIPLIED)),
7 pBitmap);
8 }
先释放现有的位图资源,然后创建了BGRA格式的位图。Again, 位图创建后应尽量重复使用,直到程序退出再释放。
2 {
3 SafeRelease(pBitmap);
4 return _pHwndRT -> CreateBitmap(
5 D2D1::SizeU(RectWidth(rect), RectHeight(rect)),
6 D2D1::BitmapProperties(D2D1::PixelFormat(DXGI_FORMAT_B8G8R8A8_UNORM, D2D1_ALPHA_MODE_PREMULTIPLIED)),
7 pBitmap);
8 }
现在用Bitmap-RenderTarget画第三个线段,用一个小矩形标出Bmp-RT绘制的区域:
第18行使用了Bitmap-RT绘图,注意所有的坐标还是从0,0开始的
1
void
CTestDx2d::Render()
2 {
3 int width = _rectClient.right / 3 , height = _rectClient.bottom / 3 ;
4
5 MATRIX_2D_t m = D2D1::Matrix3x2F::Identity();
6 _artist -> BeginDraw( true );
7
8 //
9 // 画前两段的代码同上
10 //
11
12 // 画第三段
16 m._31 = _rectClient.right * 2 / 3 , m._32 = _rectClient.bottom * 2 / 3 ;
17 _artist -> SetTransform( & m);
18
19 // 红色线段
20 _artist -> SetSolidColorBrush(D2D1::ColorF(BGR( 0 , 0 , 255 )));
21 // 同样的代码画出第三段
22 // 注意坐标原点是从0,0开始的,说明Bitmap-RT已经继承了来自Hwnd-RT的坐标变换
23 _artist -> DrawLine( 0 , 0 , width, height);
24
25 // 画一个矩形以清楚的表明Bitmap的位置
26 _artist -> SetSolidColorBrush(D2D1::ColorF(BGR( 255 , 255 , 255 )));
27 _artist -> DrawRectangle( 0 , 0 , width, height);
28
29 // 结束Bmp-RT画图
30 _artist -> EndBmpDraw();
31
32 // 从Bitmap-RenderTarget上获得位图
33 POINT p0 = { 0 , 0 };
34 RECT rect = { 0 , 0 , width, height};
35 _artist -> CopyFromRenderTarget(_bmp_screen, p0, rect);
36
37 // 绘制位图
38 _artist -> UsingHwndRT();
39 _artist -> DrawBitmap(_bmp_screen, rect, rect);
40
41 _artist -> EndDraw();
42 }
2 {
3 int width = _rectClient.right / 3 , height = _rectClient.bottom / 3 ;
4
5 MATRIX_2D_t m = D2D1::Matrix3x2F::Identity();
6 _artist -> BeginDraw( true );
7
8 //
9 // 画前两段的代码同上
10 //
11
12 // 画第三段
13
//
使用Bitmap-RenderTarget画图
14 _artist -> BeginBmpDraw();
15
//
设定坐标原点的平移
14 _artist -> BeginBmpDraw();
16 m._31 = _rectClient.right * 2 / 3 , m._32 = _rectClient.bottom * 2 / 3 ;
17 _artist -> SetTransform( & m);
18
19 // 红色线段
20 _artist -> SetSolidColorBrush(D2D1::ColorF(BGR( 0 , 0 , 255 )));
21 // 同样的代码画出第三段
22 // 注意坐标原点是从0,0开始的,说明Bitmap-RT已经继承了来自Hwnd-RT的坐标变换
23 _artist -> DrawLine( 0 , 0 , width, height);
24
25 // 画一个矩形以清楚的表明Bitmap的位置
26 _artist -> SetSolidColorBrush(D2D1::ColorF(BGR( 255 , 255 , 255 )));
27 _artist -> DrawRectangle( 0 , 0 , width, height);
28
29 // 结束Bmp-RT画图
30 _artist -> EndBmpDraw();
31
32 // 从Bitmap-RenderTarget上获得位图
33 POINT p0 = { 0 , 0 };
34 RECT rect = { 0 , 0 , width, height};
35 _artist -> CopyFromRenderTarget(_bmp_screen, p0, rect);
36
37 // 绘制位图
38 _artist -> UsingHwndRT();
39 _artist -> DrawBitmap(_bmp_screen, rect, rect);
40
41 _artist -> EndDraw();
42 }
看这几句话,
12
//
画第三段
16 m._31 = _rectClient.right * 2 / 3 , m._32 = _rectClient.bottom * 2 / 3 ;
17 _artist -> SetTransform( & m);
注意BeginBmpDraw在SetTransfor之前,这样就是给Bmp-RT设定坐标变换,如果这两句反过来写,就是给Hwnd-RT设定变换,在这个例子中,这两者的效果是一样的,但是如果想在Bmp-RT中再画一条线小矩形区域外的线,就会在错误的地方画一条先,甚至产生种种让人迷惑费解的效果,原因就是设定了不同的RenderTarget。或者可以在设定坐标变换之前显示的使用UsingBmpRT(),然后再设定坐标。这是非常容易误解的地方。
13
//
使用Bitmap-RenderTarget画图
14 _artist -> BeginBmpDraw();
15
//
设定坐标原点的平移
14 _artist -> BeginBmpDraw();
16 m._31 = _rectClient.right * 2 / 3 , m._32 = _rectClient.bottom * 2 / 3 ;
17 _artist -> SetTransform( & m);
但这么设计是有原因的,原因在于绘图的函数可以写的很简单,比如_artist->DrawLine(),可以不同绘图策略中使用同样的代码绘制图形,图形被绘制到了不同的RenderTarget上,所以要小心的使用坐标变换,确保正确。实践中,尽可能保持HwndRT的变换始终为单位矩阵,变换更多的在BmpRT中做。如果是多线程绘图更应该使用这样的方法。