cocos2d-x格斗游戏教程
cocos2d-x格斗游戏教程(一)
本文实践自 Allen Tan 的文章《How To Make A Side-Scrolling Beat ‘Em Up Game Like Scott Pilgrim with Cocos2D – Part 1》,文中使用Cocos2D,我在这里使用Cocos2D-x 2.0.4进行学习和移植。在这篇文章,将会学习到如何制作一个简单的横版格斗过关游戏。在这当中,学习如何跟踪动画状态、碰撞盒、添加方向键、添加简单敌人AI和更多其它的。
步骤如下:
1.新建Xcode工程,工程名为"PompaDroid",去除"Box2D"选项,勾选"Simple Audio Engine in Cocos Denshion"选项;
2.添加游戏场景类GameScene,派生自CCScene类。添加GameLayer类和HudLayer类,派生自CCLayer类。删除HelloWorldScene.h和HelloWorldScene.cpp文件。
3.HudLayer类增加一个方法:
|
1
|
CREATE_FUNC(HudLayer);
|
和GameLayer类增加一个方法:
|
1
|
CREATE_FUNC(GameLayer);
|
4.文件GameScene.h代码如下:
- #include "cocos2d.h"
- #include "GameLayer.h"
- #include "HudLayer.h"
- USING_NS_CC;
- class GameScene:public CCScene
- {
- public:
- //构造函数
- GameScene();
- //析构函数
- ~GameScene();
- virtual bool init();
- CREATE_FUNC(GameScene);
- //利用cocos2d-x中的宏定义实现Get和Set方法
- CC_SYNTHESIZE(GameLayer*, _gameLayer, GameLayer);
- CC_SYNTHESIZE(HudLayer*, _hudLayer, HudLayer);
- };
文件GameScene.cpp代码如下:
- GameScene::GameScene(void)
- {
- //在构造函数中将指针置空防止野指针
- _gameLayer = NULL;
- _hudLayer = NULL;
- }
- GameScene::~GameScene(void)
- {
- }
- bool GameScene::init()
- {
- bool bRet = false;
- do
- {
- CC_BREAK_IF(!CCScene::init());
- //初始化游戏层
- _gameLayer = GameLayer::create();
- //将该层加在0的位置数越小越在下面
- this->addChild(_gameLayer,0);
- //初始化游戏的虚拟手柄层
- _hudLayer = HudLayer::create();
- //将该层加在1的位置1比0大,所以手柄层在游戏层的上面
- this->addChild(_hudLayer,1);
- bRet = true;
- } while (0);
- return bRet;
- }
5.修改AppDelegate.cpp文件,代码如下:
|
1
2 3 4 5 6 7 8 9 10 11 12 13 |
//#include "HelloWorldScene.h" #include "GameScene.h" bool AppDelegate::applicationDidFinishLaunching() { //... // create a scene. it's an autorelease object //CCScene *pScene = HelloWorld::scene(); CCScene *pScene = GameScene::create(); //... } |
6.编译运行,此时只是空空的界面。
7.下载本游戏所需资源,将资源放置"Resources"目录下;
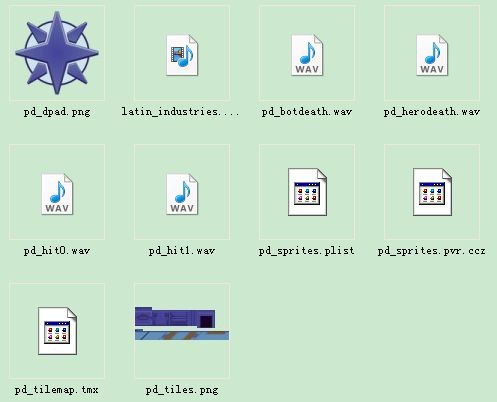
8.用Tiled工具打开pd_tilemap.tmx,就可以看到游戏的整个地图:
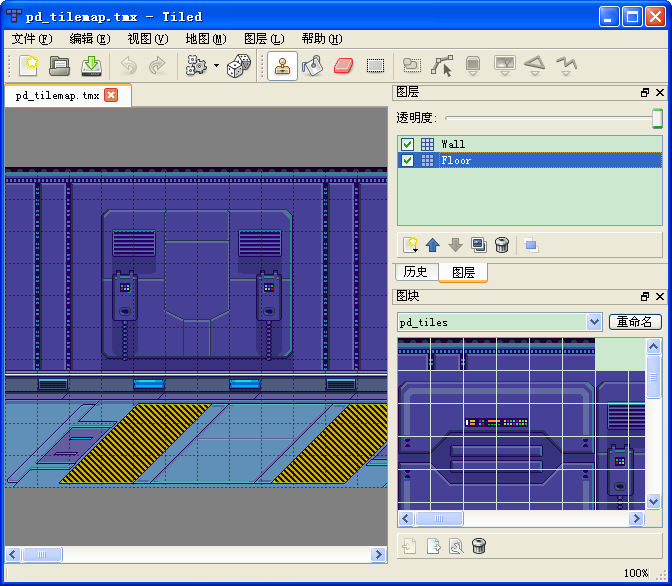
地图上有两个图层:Wall和Floor,即墙和地板。去掉每个图层前的打钩,可以查看层的组成。你会发现下数第四行是由两个图层一起组成的。每个tile都是32x32大小。可行走的地板tile位于下数三行。
9.打开GameLayer.h文件,添加如下代码:
- //初始化方法
- bool init();
- //初始化地图的方法
- void initTileMap();
- //创建地图对象
- cocos2d::CCTMXTiledMap *_tileMap;
打开GameLayer.cpp,在构造函数,添加如下代码:
|
1
|
_tileMap =
NULL;
|
添加如下代码:
- bool GameLayer::init()
- {
- bool bRet = false;
- do
- {
- CC_BREAK_IF(!CCLayer::init());
- //调用initTileMap()函数
- this->initTileMap();
- bRet = true;
- } while (0);
- return bRet;
- }
- void GameLayer::initTileMap()
- {
- //初始化地图 大家在导入文件时要注意在记得AddTarget工程 否则回找不到资源,如果这个程序崩溃,找不到资源,就把资源删了重新导入,记得AddTarget工程
- _tileMap = CCTMXTiledMap::create("pd_tilemap.tmx");
- //声明一个CCObject对象 , 用来接受地图中的对象
- CCObject *pObject = NULL;
- //-X为我们提供的遍历的方法
- CCARRAY_FOREACH(_tileMap->getChildren(), pObject)
- {
- //将地图中每一个子节点就相当于一个对象 取出
- CCTMXLayer *child = (CCTMXLayer*)pObject;
- //取出的目的是为了 setAliasTexParameters()消除锯齿效果
- child->getTexture()->setAliasTexParameters();
- }
- //将瓦片地图加在-6的位置
- this->addChild(_tileMap, -6);
- }
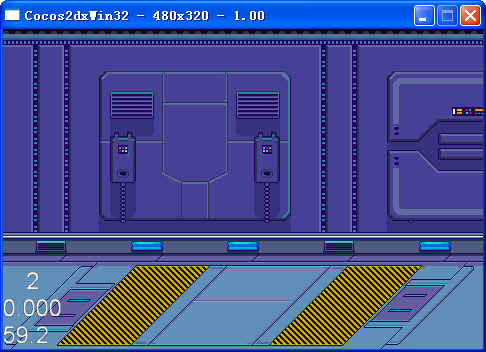
10.编译运行,可以看到地图显示在屏幕上,如下图所示:
11.创建英雄。在大多数2D横版游戏中,角色有不同的动画代表不同类型的动作。我们需要知道什么时候播放哪个动画。这里采用状态机来解决这个问题。状态机就是某种通过切换状态来改变行为的东西。单一状态机在同一时间只能有一个状态,但可以从一种状态过渡到另一种状态。在这个游戏中,角色共有五种状态,空闲、行走、出拳、受伤、死亡,如下图所示:
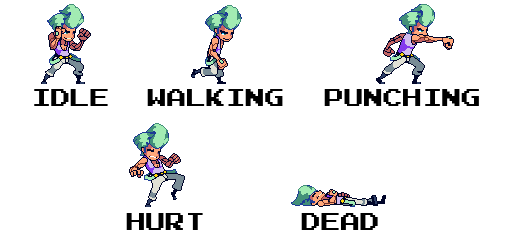
为了有一个完整的状态流,每个状态应该有一个必要条件和结果。例如:行走状态不能突然转变到死亡状态,因为你的英雄在死亡前必须先受伤。
12.新建一个头文件Defines.h,代码如下:
- // 1 - convenience measurements
- //得到屏幕的尺寸
- #define SCREEN CCDirector::sharedDirector()->getWinSize()
- //得到中心点
- #define CENTER ccp(SCREEN.width / 2, SCREEN.height / 2)
- #define CURTIME do { \
- timeval time; \
- gettimeofday(&time, NULL); \
- unsigned long millisecs = (time.tv_sec * 1000) + (time.tv_usec / 1000); \
- return (float)millisecs; \
- } while (0)
- //返回随机的整形或者浮点型
- // 2 - convenience functions
- #define random_range(low, high) (rand() % (high - low + 1)) + low
- #define frandom (float)rand() / UINT64_C(0x100000000)
- #define frandom_range(low, high) ((high - low) * frandom) + low
- //设置枚举状态
- // 3 - enumerations
- typedef enum _ActionState {
- kActionStateNone = 0,
- kActionStateIdle,
- kActionStateAttack,
- kActionStateWalk,
- kActionStateHurt,
- kActionStateKnockedOut
- } ActionState;
- //碰撞检测
- // 4 - structures
- typedef struct _BoundingBox {
- cocos2d::CCRect actual;
- cocos2d::CCRect original;
- } BoundingBox;
- #endif /* defined(__HeroGame1__Defines__) */
简要说明下:
①.定义了一些便利的宏,如直接使用SCREEN获取屏幕大小;
②.定义了一些便利的函数,随机返回整型或者浮点型;
③.定义ActionState类型,这个是ActionSprite可能处在不同状态的类型枚举;
④.定义BoundingBox结构体,将用于碰撞检测。
添加ActionSprite类,派生自CCSprite类,ActionSprite.h文件代码如下:
- #include "cocos2d.h"
- #include "Defines.h"
- //这个类作为主人公和敌人的基类包含一些公有方法
- class ActionSprite : public cocos2d::CCSprite
- {
- public:
- //构造函数
- ActionSprite(void);
- //析构函数
- ~ActionSprite(void);
- //动作状态
- //action methods
- //站立状态
- void idle();
- //攻击状态
- void attack();
- //受伤状态
- void hurtWithDamage(float damage);
- //死亡状态
- void knockout();
- //行走状态,后面的参数目的地的坐标
- void walkWithDirection(cocos2d::CCPoint direction);
- //scheduled methods
- //每帧更新的方法
- void update(float dt);
- //actions 创建动作集合的set和get方法
- CC_SYNTHESIZE_RETAIN(cocos2d::CCAction*, _idleAction, IdleAction);
- CC_SYNTHESIZE_RETAIN(cocos2d::CCAction*, _attackAction, AttackAction);
- CC_SYNTHESIZE_RETAIN(cocos2d::CCAction*, _walkAction, WalkAction);
- CC_SYNTHESIZE_RETAIN(cocos2d::CCAction*, _hurtAction, HurtAction);
- CC_SYNTHESIZE_RETAIN(cocos2d::CCAction*, _knockedOutAction, KnockedOutAction);
- //states
- //状态的枚举这个枚举定义在Defines.h中 要记得导入头文件
- CC_SYNTHESIZE(ActionState, _actionState, ActionState);
- //attributes
- //行走速度
- CC_SYNTHESIZE(float, _walkSpeed, WalkSpeed);
- CC_SYNTHESIZE(float, _hitPoints, HitPoints);
- CC_SYNTHESIZE(float, _damage, Damage);
- //movement 用于计算精灵如何沿着地图移动
- //速度
- CC_SYNTHESIZE(cocos2d::CCPoint, _velocity, Velocity);
- //目的地
- CC_SYNTHESIZE(cocos2d::CCPoint, _desiredPosition, DesiredPosition);
- //measurements 保存对精灵的实际图像有用的测量值。需要这些值,是因为你将要使用的这些精灵画布大小是远远大于内部包含的图像
- CC_SYNTHESIZE(float, _centerToSides, CenterToSides);
- CC_SYNTHESIZE(float, _centerToBottom, CenterToBottom);
- };
打开ActionSprite.cpp文件,构造函数、析构函数、Update函数如下:
|
1
2 3 4 5 6 7 8 |
ActionSprite::ActionSprite(
void)
{ _idleAction = NULL; _attackAction = NULL; _walkAction = NULL; _hurtAction = NULL; _knockedOutAction = NULL; } |
- ActionSprite::~ActionSprite()
- {
- }
- void ActionSprite::update(float dt)
- {
- }
各个方法实现暂时为空。以上代码声明了基本变量和方法,可以分为以下几类:
-
Actions:这些是每种状态要执行的动作。这些动作是当角色切换状态时,执行精灵动画和其他触发的事件。
States:保存精灵的当前动作/状态,使用ActionState类型,这个类型待会我们将会进行定义。
Attributes:包含精灵行走速度值,受伤时减少生命点值,攻击伤害值。
Movement:用于计算精灵如何沿着地图移动。
Measurements:保存对精灵的实际图像有用的测量值。需要这些值,是因为你将要使用的这些精灵画布大小是远远大于内部包含的图像。
Action methods:不直接调用动作,而是使用这些方法触发每种状态。
Scheduled methods:任何事需要在一定的时间间隔进行运行,比如精灵位置和速度的更新,等等。打开GameLayer.h文件,添加如下代码:
- //创建动画表单集合对象
- cocos2d::CCSpriteBatchNode *_actors;
打开GameLayer.cpp文件,在init函数里面添加如下代码:
- //加载精灵表单,这个精灵表单包含我们的所有精灵
- CCSpriteFrameCache::sharedSpriteFrameCache()->addSpriteFramesWithFile("pd_sprites.plist");
- //创建一个CCSpriteBatchNode。
- _actors = CCSpriteBatchNode::create("pd_sprites.pvr.ccz");
- //setAliasTexParameters()消除锯齿效果
- _actors->getTexture()->setAliasTexParameters();
- //它的z值高于CCTMXTiledMap对象,这样才能出现在地图前。 Z轴为-5
- this->addChild(_actors, -5);
加载精灵表单,创建一个CCSpriteBatchNode。这个精灵表单包含我们的所有精灵。它的z值高于CCTMXTiledMap对象,这样才能出现在地图前。
添加Hero类,派生自ActionSprite类,添加如下代码:
|
1
2 |
CREATE_FUNC(Hero);
bool init(); |
Hero类的init函数的实现如下所示:
- bool Hero::init()
- {
- bool bRet = false;
- do
- {
- CC_BREAK_IF(!ActionSprite::initWithSpriteFrameName("hero_idle_00.png"));
- int i;
- //idle animation 创建休息时的动画数组
- CCArray *idleFrames = CCArray::createWithCapacity(6);
- //用循环从精灵表单中取图片
- for (i = 0; i <6; i++)
- {
- //从精灵表单中去图片 ,取出的类型为CCSpriteFrame是一个精灵帧,可以简单理解为一个精灵图片
- CCSpriteFrame *frame = CCSpriteFrameCache::sharedSpriteFrameCache()->spriteFrameByName(CCString::createWithFormat("hero_idle_%02d.png", i)->getCString());
- //将精灵帧放入数组
- idleFrames->addObject(frame);
- }
- //创建动画对象 createWithSpriteFrames方法参数的意思第一个参数动画数组,第二个参数是每个图片停留的时间 ,就是说该数越小动画越快
- CCAnimation *idleAnimation = CCAnimation::createWithSpriteFrames(idleFrames,1.0 / 12.0);
- //对该动作进行设置CCRepeatForever永远执行 CCAnimate执行的动画
- this->setIdleAction(CCRepeatForever::create(CCAnimate::create(idleAnimation)));
- //从精灵中心到底部的距离
- this->setCenterToBottom(39.0);
- //从精灵中心到边界的距离
- this->setCenterToSides(29.0);
- //攻击范围
- this->setHitPoints(100.0);
- //伤害力度
- this->setDamage(20.0);
- //行动速度
- this->setWalkSpeed(80.0);
- bRet = true;
- } while (0);
- return bRet;
- }
我们用初始空闲精灵帧创建了英雄角色,配备了一个CCArray数组包含所有的属于空闲动画的精灵帧,然后创建一个CCAction动作播放来这个动画。以每秒12帧的速率进行播放。接下去,为英雄设置初始属性,包括精灵中心到边到底部的值。如下图所示:

英雄的每个精灵帧都在280x150像素大小的画布上创建,但实际上英雄精灵只占据这个空间的一部分。所以需要两个测量值,以便更好的设置精灵的位置。需要额外的空间,是因为每个动画精灵绘制的方式是不同的,而有些就需要更多的空间。
打开GameLayer.h文件,添加头文件声明:
|
1
|
#include
"Hero.h"
|
GameLayer类添加如下代码:
|
1
|
Hero *_hero;
|
- void initHero();
|
1
|
_hero =
NULL;
|
在init函数this->addChild(_actors, -5);后面添加如下代码:
|
1
|
this->initHero();
|
添加initHero方法,代码如下:
- void GameLayer::initHero()
- {
- //创建英雄对象
- _hero = Hero::create();
- //让精灵显示在屏幕上
- _actors->addChild(_hero);
- //设置英雄的位置
- _hero->setPosition(ccp(_hero->getCenterToSides(), 80));
- //设置目标位置,因为是初始位置,所以就是英雄当前位置
- _hero->setDesiredPosition(_hero->getPosition());
- //初始动画为idle()
- _hero->idle();
- }
- void ActionSprite::idle()
- {
- //这个idle方法只有当ActionSprite不处于空闲状态才能调用。当它触发时,它会执行空闲动作,改变当前状态到kActionStateIdle,并且把速度置零。
- if (_actionState != kActionStateIdle)
- {
- //让所有动作停止
- this->stopAllActions();
- //执行动作
- this->runAction(_idleAction);
- //设置动作状态的标记
- _actionState = kActionStateIdle;
- //速度置为零
- _velocity = CCPointZero;
- }
- }
这个idle方法只有当ActionSprite不处于空闲状态才能调用。当它触发时,它会执行空闲动作,改变当前状态到kActionStateIdle,并且把速度置零。
13.编译运行,可以看到英雄处于空闲状态。如下图所示:
14.出拳动作。打开Hero.cpp文件,在init函数idle animation后面,添加如下代码:
- //这个方法与上面的方法基本是一个意思,只是加载的图片名就好
- //attack animation
- CCArray *attackFrames = CCArray::createWithCapacity(3);
- for (i = 0; i <3; i++)
- {
- CCSpriteFrame *frame = CCSpriteFrameCache::sharedSpriteFrameCache()->spriteFrameByName(CCString::createWithFormat("hero_attack_00_%02d.png", i)->getCString());
- attackFrames->addObject(frame);
- }
- CCAnimation *attackAnimation = CCAnimation::createWithSpriteFrames(attackFrames, 1.0 / 24.0);
- //这里有些不同 执行完动画后有一个回调方法CCCallFunc ,这个方法再次调用idle方法
- this->setAttackAction(CCSequence::create(CCAnimate::create(attackAnimation), CCCallFunc::create(this, callfunc_selector(Hero::idle)),NULL));
- void ActionSprite::attack()
- {
- //英雄只有在空闲、攻击、行走状态才能进行出拳。确保英雄正在受伤时、或者死亡时不能进行攻击。
- if (_actionState == kActionStateIdle || _actionState == kActionStateAttack || _actionState == kActionStateWalk)
- {
- //执行其他动作前要先,停止所有的动作
- this->stopAllActions();
- //执行攻击的动作
- this->runAction(_attackAction);
- //重置英雄的状态
- _actionState = kActionStateAttack;
- }
- }
|
1
|
this->setTouchEnabled(
true);
//
开启触摸事件,多点触摸
|
重载ccTouchesBegan方法,代码如下:
- //添加这个方法后注意要ccTouch es 注意要有es 这个是多点触摸的回调方法 之后还会报错,因为没有在.h文件中声明,将该方法复制在.h文件中声明。
- void GameLayer::ccTouchesBegan(cocos2d::CCSet *pTouches, cocos2d::CCEvent *pEvent)
- {
- _hero->attack();
- }
- void ccTouchesBegan(cocos2d::CCSet *pTouches, cocos2d::CCEvent *pEvent);
1 5.编译运行,点击屏幕进行出拳,如下图所示:
代码例子 http://vdisk.weibo.com/s/BDn59yfnBVk57
16.创建8个方向的方向键。我们需要创建虚拟的8个方向的方向键来让英雄在地图上进行移动。添加SimpleDPad类,派生自CCSprite类,SimpleDPad.h文件代码如下:
- #include "cocos2d.h"
- class SimpleDPad;
- class SimpleDPadDelegate
- {
- public:
- //改变
- virtual void didChangeDirectionTo(SimpleDPad *simpleDPad, cocos2d::CCPoint direction) =0;
- //保持
- virtual void isHoldingDirection(SimpleDPad *simpleDPad, cocos2d::CCPoint direction) =0;
- //触摸结束
- virtual void simpleDPadTouchEnded(SimpleDPad *simpleDPad) =0;
- };
- //SimpleDPad也遵循一种协议,即CCTargetedTouchDelegate。当SimpleDPad被触摸时,进行处理触摸事件,而GameLayer将不会得到触摸。 否则的话,在触摸方向键的时候,英雄就会出拳攻击,显然,这不是希望看到的。
- class SimpleDPad : public cocos2d::CCSprite, public cocos2d::CCTargetedTouchDelegate
- {
- public:
- SimpleDPad(void);
- ~SimpleDPad(void);
- //初始化方法
- static SimpleDPad* dPadWithFile(cocos2d::CCString *fileName,float radius);
- bool initWithFile(cocos2d::CCString *filename,float radius);
- void onEnterTransitionDidFinish();
- void onExit();
- void update(float dt);
- virtual bool ccTouchBegan(cocos2d::CCTouch *pTouch, cocos2d::CCEvent *pEvent);
- virtual void ccTouchMoved(cocos2d::CCTouch *pTouch, cocos2d::CCEvent *pEvent);
- virtual void ccTouchEnded(cocos2d::CCTouch *pTouch, cocos2d::CCEvent *pEvent);
- void updateDirectionForTouchLocation(cocos2d::CCPoint location);
- //虚拟手柄的代理
- CC_SYNTHESIZE(SimpleDPadDelegate*, _delegate, Delegate);
- //isHeld:布尔值表示玩家触摸着方向键。
- CC_SYNTHESIZE(bool, _isHeld, IsHeld);
- protected:
- //虚拟手柄的半径
- float _radius;
- //当前所按下的方向。这是一个矢量,(-1.0, -1.0)是左下方向,(1.0, 1.0)是右上方向。
- cocos2d::CCPoint _direction;
- };
-
radius:圆形方向键的半径。
direction:当前所按下的方向。这是一个矢量,(-1.0, -1.0)是左下方向,(1.0, 1.0)是右上方向。
delegate:方向键的委托,后续进行介绍。
isHeld:布尔值表示玩家触摸着方向键。
对于SimpleDPad类,使用了委托模式。意味着一个委托类(并非SimpleDPad),将会处理由被委托类(SimpleDPad)启动的任务。在某些你指定的点上,主要是当涉及到处理任何游戏相关的东西,SimpleDPad将会将职责传递给委托类。这使得SimpleDPad无需知道任何游戏逻辑,从而允许你在开发任何其他游戏时,可以进行重用。如下图所示:
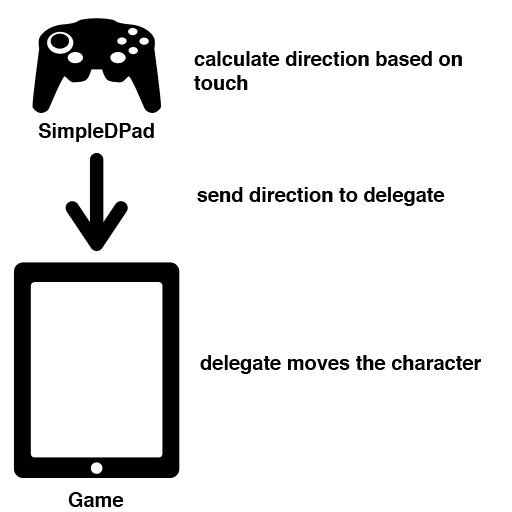
当SimpleDPad检测到在方向键内的触摸,它会计算触摸的方向,然后发送消息到委托类指明方向。在这之后的任何事情都不是SimpleDPad所关心的了。为了实施这个模式,SimpleDPad需要至少了解其委托的有关信息,特别是将触摸方向传递给委托的方法。这是另一种设计模式:协议。可以看到SimpleDPad的委托定义了所需的方法,在这种方式中,SimpleDPad强制其委托有三个指定的方法,以便确保每当它想传递东西放到委托中时,它能调用这些方法中的任何一种。事实上,SimpleDPad也遵循一种协议,即CCTargetedTouchDelegate。当SimpleDPad被触摸时,进行处理触摸事件,而GameLayer将不会得到触摸。否则的话,在触摸方向键的时候,英雄就会出拳攻击,显然,这不是希望看到的。打开SimpleDPad.cpp文件,添加如下代码:
- USING_NS_CC;
- SimpleDPad::SimpleDPad(void)
- {
- _delegate = NULL;
- }
- SimpleDPad::~SimpleDPad(void)
- {
- }
- SimpleDPad* SimpleDPad::dPadWithFile(CCString *fileName, float radius)
- {
- SimpleDPad *pRet = new SimpleDPad();
- if (pRet && pRet->initWithFile(fileName, radius))
- {
- return pRet;
- }
- else
- {
- delete pRet;
- pRet = NULL;
- return NULL;
- }
- }
- bool SimpleDPad::initWithFile(CCString *filename,float radius)
- {
- bool bRet = false;
- do
- {
- CC_BREAK_IF(!CCSprite::initWithFile(filename->getCString()));
- //设置半径
- _radius = radius;
- //设置方向为精灵的中心
- _direction = CCPointZero;
- //默认手柄不被触摸
- _isHeld = false;
- //开启每帧更新的方法
- this->scheduleUpdate();
- bRet = true;
- } while (0);
- return bRet;
- }
- //程序加载该类是注册触摸事件
- void SimpleDPad::onEnterTransitionDidFinish()
- {
- //这里的三个参数,第一个:是哪个对象进行触摸注册,第二个:触摸优先级 第三个是否吞噬掉本次触摸事件 为true时时吞噬调触摸事件 就是不让触摸事件向下传递
- CCDirector::sharedDirector()->getTouchDispatcher()->addTargetedDelegate(this,1, true);
- }
- //在程序移除该类时,移除触摸事件的代理
- void SimpleDPad::onExit()
- {
- CCDirector::sharedDirector()->getTouchDispatcher()->removeDelegate(this);
- }
- //update方法是当方向键被触摸时,
- void SimpleDPad::update(float dt)
- {
- //_isHeld是控制手柄是否被触摸的开关
- if (_isHeld)
- {
- //传递方向值到委托类 方向值为 _direction
- _delegate->isHoldingDirection(this, _direction);
- }
- }
- //触摸开始时执行该方法
- bool SimpleDPad::ccTouchBegan(CCTouch *pTouch, CCEvent *pEvent)
- {
- //获取触摸的坐标点
- CCPoint location = pTouch->getLocation();
- //计算触摸点和当前类即虚拟手柄对象中心点的距离 ,this->getPosition()获取的是精灵中心点的坐标
- float distanceSQ = ccpDistanceSQ(location, this->getPosition());
- // 判断触摸点是否在虚拟手柄精灵内
- if (distanceSQ <= _radius * _radius)
- {
- //updateDirectionForTouchLocation方法计算触摸点到方向键中心距离值,转换成角度,得到正确的方向值,然后传递值到委托。
- //因此需要将触摸点的坐标传过去
- this->updateDirectionForTouchLocation(location);
- //开启手柄的开关
- _isHeld = true;
- return true;
- }
- return false;
- }
- void SimpleDPad::ccTouchMoved(CCTouch *pTouch, CCEvent *pEvent)
- {
- //获取移动时的坐标
- CCPoint location = pTouch->getLocation();
- this->updateDirectionForTouchLocation(location);
- }
- void SimpleDPad::ccTouchEnded(CCTouch *pTouch, CCEvent *pEvent)
- {
- //当触摸事件结束的时候方向置为中心点
- _direction = CCPointZero;
- //手柄开关关闭
- _isHeld = false;
- //出发代理事件结束的方法
- _delegate->simpleDPadTouchEnded(this);
- }
- //CCPoint location 参数是手指触摸屏幕的坐标点
- void SimpleDPad::updateDirectionForTouchLocation(CCPoint location)
- {
- //弧度 根据触摸点的坐标与精灵中心点的坐标计算出弧度
- float radians = ccpToAngle(ccpSub(location, this->getPosition()));
- //角度 根据弧度计算出角度
- float degrees = -1 * CC_RADIANS_TO_DEGREES(radians);
- if (degrees <= 22.5 && degrees >= -22.5)
- {
- //right右
- _direction = ccp(1.0,0.0);
- }
- else if (degrees >22.5 && degrees <67.5)
- {
- //bottomright右下
- _direction = ccp(1.0, -1.0);
- }
- else if (degrees >=67.5 && degrees <=112.5)
- {
- //bottom下
- _direction = ccp(0.0, -1.0);
- }
- else if (degrees >112.5 && degrees <157.5)
- {
- //bottomleft左下
- _direction = ccp(-1.0, -1.0);
- }
- else if (degrees >=157.5 || degrees <= -157.5)
- {
- //left左
- _direction = ccp(-1.0,0.0);
- }
- else if (degrees < -22.5 && degrees > -67.5)
- {
- //topright右上
- _direction = ccp(1.0,1.0);
- }
- else if (degrees <= -67.5 && degrees >= -112.5)
- {
- //top上
- _direction = ccp(0.0,1.0);
- }
- else if (degrees < -112.5 && degrees > -157.5)
- {
- //topleft左上
- _direction = ccp(-1.0,1.0);
- }
- //将得到的方向传递到采用代理的类中, _ direction就是得到的方向
- _delegate->didChangeDirectionTo(this, _direction);
- }
打开HudLayer.h文件,添加头文件声明:
|
1
|
#include
"SimpleDPad.h"
|
添加如下代码:
|
1
2 |
bool init();
CC_SYNTHESIZE(SimpleDPad*, _dPad, DPad); HudLayer(); |
打开HudLayer.cpp文件,添加如下代码:
- HudLayer::HudLayer(void)
- {
- _dPad = NULL;
- }
- bool HudLayer::init()
- {
- bool bRet = false;
- do
- {
- CC_BREAK_IF(!CCLayer::init());
- //初始化手柄虚拟手柄对象 ,第一个参数为精灵对象,第二个参数为半径
- _dPad = SimpleDPad::dPadWithFile(CCString::create("pd_dpad.png"),64);
- //虚拟手柄的坐标
- _dPad->setPosition(ccp(64.0,64.0));
- //透明度
- _dPad->setOpacity(100);
- //将精灵加到层上
- this->addChild(_dPad);
- bRet = true;
- } while (0);
- return bRet;
- }
以上代码实例化SimpleDPad,并且添加到HudLayer上。现在GameScene同时控制GameLayer和HudLayer,但有时候想直接通过HudLayer访问GameLayer。打开GameLayer.h文件,添加头文件声明:
|
1
2 |
#include
"SimpleDPad.h"
#include "HudLayer.h" |
将GameLayer类声明修改成如下:
|
1
|
class GameLayer :
public cocos2d::CCLayer,
public SimpleDPadDelegate
|
并添加以下声明:
|
1
2 3 4 5 |
virtual
void didChangeDirectionTo(SimpleDPad *simpleDPad, cocos2d::CCPoint direction);
virtual void isHoldingDirection(SimpleDPad *simpleDPad, cocos2d::CCPoint direction); virtual void simpleDPadTouchEnded(SimpleDPad *simpleDPad); //下面方法是为了在GameLayer中添加了HudLayer的引用 就是可以对HudLayer进行操作 CC_SYNTHESIZE(HudLayer*, _hud, Hud); |
以上方法的实现暂时为空。
在GameLayer.cpp中添加如下方法
- void didChangeDirectionTo(SimpleDPad *simpleDPad, cocos2d::CCPoint direction)
- {
- }
- void isHoldingDirection(SimpleDPad *simpleDPad, cocos2d::CCPoint direction)
- {
- }
- void simpleDPadTouchEnded(SimpleDPad *simpleDPad)
- {
- }
|
1
2 |
//设置代理对象为游戏层_gameLayer
_hudLayer->getDPad()->setDelegate(_gameLayer);
_gameLayer->setHud(_hudLayer); |
17.编译运行,可以看到左下角的虚拟方向键,如下图所示:

别试着压下方向键,英雄不会有任何反应,因为还未实现协议方法,这在第二部分将完成。
代码例子 http://vdisk.weibo.com/s/BDn59yfnBVkAS
在第一篇《如何制作一个横版格斗过关游戏》基础上,增加角色运动、碰撞、敌人、AI和音乐音效,原文《How To Make A Side-Scrolling Beat ‘Em Up Game Like Scott Pilgrim with Cocos2D – Part 2》,在这里继续以Cocos2d-x进行实现。有关源码、资源等在文章下面给出了地址。
步骤如下:
1.使用上一篇的工程;
2.移动英雄。在第一部分我们创建了虚拟方向键,但是还未实现按下方向键移动英雄,现在让我们进行实现。打开Hero.cpp文件,在init函数attack animation后面,添加如下代码:
|
1
2 3 4 5 6 7 8 9 |
//walk animation CCArray *walkFrames = CCArray::createWithCapacity( 8); for (i = 0; i < 8; i++) { CCSpriteFrame *frame = CCSpriteFrameCache::sharedSpriteFrameCache()->spriteFrameByName(CCString::createWithFormat( "hero_walk_%02d.png", i)->getCString()); walkFrames->addObject(frame); } CCAnimation *walkAnimation = CCAnimation::createWithSpriteFrames(walkFrames, float( 1. 0 / 12. 0)); this->setWalkAction(CCRepeatForever::create(CCAnimate::create(walkAnimation))); |
打开ActionSprite.cpp文件,实现walkWithDirection方法,代码如下:
- void ActionSprite::walkWithDirection(CCPoint direction)
- {
- //检查前置动作状态是否空闲
- if (_actionState == kActionStateIdle)
- {
- //停止所有动作
- this->stopAllActions();
- //执行行走的动作
- this->runAction(_walkAction);
- //标记状态为行走
- _actionState = kActionStateWalk;
- }
- if (_actionState == kActionStateWalk)
- {
- //根据_walkSpeed值改变精灵的速度
- _velocity = ccp(direction.x * _walkSpeed, direction.y * _walkSpeed);
- //检查精灵的左右方向
- if (_velocity.x >= 0)
- {
- //用setScaleX来翻转精灵 看清楚是有 setScaleX是有X的 精灵可以左右变换
- this->setScaleX(1.0);
- }
- else
- {
- this->setScaleX(-1.0);
- }
- }
- }
- void GameLayer::didChangeDirectionTo(SimpleDPad *simpleDPad, CCPoint direction)
- {
- //传递的参数为方向数据
- _hero->walkWithDirection(direction);
- }
- void GameLayer::isHoldingDirection(SimpleDPad *simpleDPad, CCPoint direction)
- {
- _hero->walkWithDirection(direction);
- }
- void GameLayer::simpleDPadTouchEnded(SimpleDPad *simpleDPad)
- {
- //触摸停止后 如果之前的状态为行走 让精灵变为空闲状态
- if (_hero->getActionState() == kActionStateWalk)
- {
- _hero->idle();
- }
- }
此时,编译运行程序的话,通过方向键移动英雄,发现英雄只是原地踏步。改变英雄的位置是ActionSprite和GameLayer共同的责任。一个ActionSprite永远不会知道它在地图上的位置。因此,它并不知道已经到达了地图的边缘,它只知道它想去哪里。而GameLayer的责任就是将它的期望位置转换成实际的位置。打开ActionSprite.cpp文件,实现以下方法:
- void ActionSprite::update(float delta)
- {
- //在每次游戏更新场景的时候都会进行调用,当精灵处于行走状态时,
- if (_actionState == kActionStateWalk)
- {
- //它更新精灵的期望位置。位置+速度*时间,实际上就是意味着每秒移动X和Y点
- //这里的this指针就是指 谁调用就代表谁,英雄调用的就代表英雄,敌人调用的就代表敌人
- _desiredPosition = ccpAdd(this->getPosition(), ccpMult(_velocity, delta));
- }
- }
这个方法在每次游戏更新场景的时候都会进行调用,当精灵处于行走状态时,它更新精灵的期望位置。位置+速度*时间,实际上就是意味着每秒移动X和Y点。打开GameLayer.cpp文件,在init函数this->initTileMap();后面添加如下代码:
|
1
|
this->scheduleUpdate();
|
|
1
2 3 4 |
GameLayer::~GameLayer(
void)
{ this->unscheduleUpdate(); } |
- void GameLayer::update(float delta)
- {
- _hero->update(delta);
- this->updatePositions();
- this->setViewpointCenter(_hero->getPosition());
- this->reorderActors();
- }
- void GameLayer::updatePositions()
- {
- //_tileMap->getMapSize().width 得到的是地图中横向有多少个瓦片地图
- float widthMap = _tileMap->getMapSize().width;
- //_tileMap->getTileSize().width 得到的时每个瓦片地图的宽度
- float widthTile = _tileMap->getTileSize().width;
- //widthMap * widthTile 代表的是整个地图的宽
- //widthMap * widthTile - _hero->getCenterToSides()用整个地图的宽减去精灵中心到精灵边界的距离
- //相减得到的值就是精灵能够横向移动的最大位置
- //desiredPositionX x轴的目标位置 就是在当前位置和目标
- float desiredPositionX = MAX(_hero->getCenterToSides(), _hero->getDesiredPosition().x);
- float posX = MIN( widthMap * widthTile - _hero->getCenterToSides(),desiredPositionX);
- //得到每个瓦片地图的高
- float heightTile = _tileMap->getTileSize().height;
- //下面的3 是指属于地板的瓦片只有3个
- float posY = MIN(3 * heightTile + _hero->getCenterToBottom(),
- MAX(_hero->getCenterToBottom(), _hero->getDesiredPosition().y));
- _hero->setPosition(ccp(posX, posY));
- }
-
mapSize:地图tile数量。总共有10x100个tile,但只有3x100属于地板。
tileSize:每个tile的尺寸,在这里是32x32像素。
GameLayer还使用到了ActionSprite的两个测量值,centerToSides和centerToBottom,因为ActionSprite要想保持在场景内,它的位置不能超过实际的精灵边界。假如ActionSprite的位置在已经设置的边界内,则GameLayer让英雄达到期望位置,否则GameLayer会让英雄留停在原地。
3.编译运行,此时点击方向键,移动英雄,如下图所示:
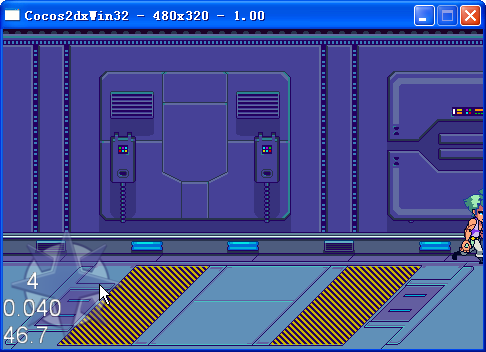
但是,很快你就会发现英雄可以走出地图的右边界,然后就这样从屏幕上消失了。
4.以上的问题,可以通过基于英雄的位置进行滚动地图,这个方法在文章《如何制作一个基于Tile的游戏》中有描述过。打开GameLayer.cpp文件,在update函数里最后添加如下代码:
|
1
|
this->setViewpointCenter(_hero->getPosition());
|
|
1
2 3 4 5 6 7 8 9 10 11 12 13 14 |
void GameLayer::setViewpointCenter(CCPoint position)
{ CCSize winSize = CCDirector::sharedDirector()->getWinSize(); int x = MAX(position.x, winSize.width / 2); int y = MAX(position.y, winSize.height / 2); x = MIN(x, (_tileMap->getMapSize().width * _tileMap->getTileSize().width) - winSize.width / 2); y = MIN(y, (_tileMap->getMapSize().height * _tileMap->getTileSize().height) - winSize.height / 2); CCPoint actualPosition = ccp(x, y); CCPoint centerOfView = ccp(winSize.width / 2, winSize.height / 2); CCPoint viewPoint = ccpSub(centerOfView, actualPosition); this->setPosition(viewPoint); } |
以上代码让英雄处于屏幕中心位置,当然,英雄在地图边界时的情况除外。编译运行,效果如下图所示:
代码例子 http://vdisk.weibo.com/s/BDn59yfnBVkre