协议代理Delegate与通知中心NSNotificationCenter实现页面传值
先介绍一下Delegate实现传值的方法。
Delegate的作用是帮助类去完成一些实现,举个例子就是指当你需要喝咖啡的时候,你需要洗杯子,洗咖啡机,煮咖啡(你自己就是一个类,以上所有的工作都是你要实现的方法和属性),但是你把洗杯子的工作交给了你弟弟来做(你弟弟也可以看成是一个类),这就是委托。当一个类把自己内部的一部分实现暴露给另外一个类去做的时候,就叫实际做事的类为delegate。
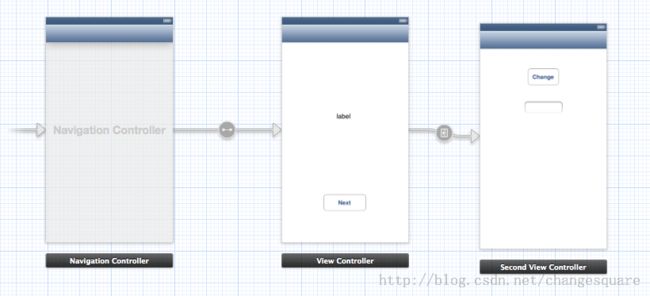
我的storyboard,在第一个view中按了next按钮然后跳到下一个view,在下一个view的textfield中输入值,传回第一个view,按change按钮回到第一个view并且把第一个view中label的值改成传回来的textfield的值。
AppDelegate.h
#import <UIKit/UIKit.h>
@protocol PassValueDelegate <NSObject>


 //此方为必须实现的协议方法,用来传值

- (void)changeValue:(NSString *)value;

@end
@interface AppDelegate : UIResponder <UIApplicationDelegate>

@property (strong, nonatomic) UIWindow *window;

@end
protocol为协议,协议就是定义了一个接口,相当于Java里面的Interface,就是一个有很多函数的抽象类,是用于继承的,这里的声明就是说PassValueDelegate这个协议里面有一个changeValue:方法,所有继承了这个协议的类都要定义并实现这个方法。
协议还可以在其他头文件例如SecondViewController中声明,但必须在使用到这个协议的类中包含有这个协议的头文件,才能继承。
SecondViewController.h
#import <UIKit/UIKit.h>
#import "AppDelegate.h"


@interface SecondViewController : UIViewController

-(IBAction)pressedChange:(id)sender;
@property (strong, nonatomic) IBOutlet UITextField *txtValue;

@property (nonatomic, unsafe_unretained) id<PassValueDelegate> delegate;

@end
在SecondViewController中定义一个遵循PassValueDelegate协议的delegate委托,之后我会把ViewController作为这个委托。
SecondViewController.m
#import "SecondViewController.h"
#import "ViewController.h"
@interface SecondViewController ()

@end

@implementation SecondViewController


- (void)viewDidLoad
{
    [super viewDidLoad];
	// Do any additional setup after loading the view.
}


- (IBAction)pressedChange:(id)sender {
    // 发送代理,并把文本框中的值传过去
    [self.delegate changeValue:self.txtValue.text];
    [self.navigationController popViewControllerAnimated:YES];

}

@end
在这里定义了委托需要做的工作,就是调用changeValue:函数,而参数就是SecondViewController要传给它的值。
在网上有很多代码是在这里定义了一个新的ViewController对象,然后调用它的changeValue:函数,但是这样这个对象就不是我们前一个view了,它传过去的值也没有回到第一个view中。所以我们要告诉第二个viewController第一个viewController是它的委托,这就要用到segue,segue本身也可以传值,但是只能从前一个传到后一个,不能反过来传。
ViewController.h
#import <UIKit/UIKit.h>
#import "SecondViewController.h"
@interface ViewController : UIViewController<PassValueDelegate>{//声明要继承的协议
    NSString *valueTemp;
}
@property (strong, nonatomic) IBOutlet UILabel *lblValue;


@end
ViewController,m
#import "ViewController.h"

@interface ViewController ()

@end

@implementation ViewController

- (void)viewDidLoad
{
    [super viewDidLoad];
	// Do any additional setup after loading the view, typically from a nib.

}


//此方为必须实现的协议方法,用来传值
- (void)changeValue:(NSString *)value{
        valueTemp = value;
    self.lblValue.text = valueTemp;// 改变UILabel的值
}

-(void)prepareForSegue:(UIStoryboardSegue *)segue sender:(id)sender{
    SecondViewController *secondViewController = [segue destinationViewController];
    secondViewController.delegate =self;

}


@end
在ViewController.m中定义了changeValue的实现,然后通过 prepareForSegue:sender:方法把self赋值给secondViewController的delegate,这样就可以实现传值了。
要详细理解delegate与proptocol可以参考[iOS]delegate和protocol
然后要讲一下NSNotificationCenter传值
NSNotificationCenter是一个消息中心,它负责接收与派发消息,就好比是一个快递公司,当有人寄邮件的时候就会给到快递公司手上,而如果刚好收件人的名字是你,那么快递公司就会通知你过来拿快递。而这个快递就是NSNotification,它是消息的载体,而你是收件人(observer监听者),你先告诉快递公司(NSNotificationCenter)你需要的快递的名字(name)(注册),当有人(poster)发送了具有这个name的快递(NSNotification),你就会得到通知并接收到poster发过来的的信息。当我们要实现页面间的传值时,可以设置一个class为poster,一个为observer,这样就可以通过NSNotificationCenter传递信息了。当然poster本身也可以是observe。一个Notification可以被多个observer接收,只要对应的名字相同就可以了。
可以通过静态方法取得NSNotification的对象,它是一个单例对象,存在于应用的整个生命周期。
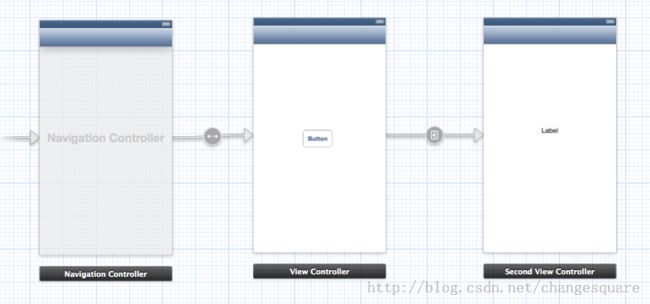
我的demo中有两个类,一个ViewController另一个SecondViewController。
storyboard
SecondViewController.m
#import "SecondViewController.h"
#import "ViewController.h"
@interface SecondViewController ()

@end

@implementation SecondViewController

- (void)viewDidLoad
{
    [super viewDidLoad];
	// Do any additional setup after loading the view.
    NSNotificationCenter *center = [NSNotificationCenter defaultCenter];

    [center addObserver:self selector:@selector(GetInfo:) name:@"logInfo" object:nil];//注册自己为监听者observer


    [center postNotificationName:@"logInfo" object:@"00000"];//注册自己为发送者并发送信息
    }
//本对象中...
-(void) GetInfo:(NSNotification *) notificaion{
    //取得接受数据并打印
    NSString *data = [notificaion object];
    NSLog(@">> %@",data);
}
[NSNotificationCenter defaultCenter]生成一个消息中心,然后用addObserver:selector:name:object方法把自己注册到NSNotification中,告诉消息中心要接收叫logInfo的消息,接收到之后就调用GetInfo:方法。object是poster发送过来的消息,通过[notification object]调用。
postNotificationName:object:方法定义了要发送的消息的名字与内容。也可用[center postNotificationName:@"logInfo"object:@"00000"userinfo:[NSDictionary dictionaryWithObject:@"objectValue" forKey:@"objectKey"],然后像取得object的值一样NSDictionary *dictionary =[notification userInfo]就可取得传过来的值。
[center postNotificationName:@"logInfo"object:"00000"]注册了自己为发送者并发送了消息,因为自己也是监听者所以会输出data。
#import "ViewController.h"

@interface ViewController ()

@end

@implementation ViewController

- (void)viewDidLoad
{
    [super viewDidLoad];
	// Do any additional setup after loading the view, typically from a nib.


    NSNotificationCenter *center2 = [NSNotificationCenter defaultCenter];//取得NSNotification对象
   [center2 addObserver:self selector:@selector(oneObjectHandleInfo:) name:@"logInfo" object:nil];//注册自己为监听者,当有消息过来

    }


-(void)oneObjectHandleInfo:(NSNotification *)notification{
    NSString *data = [notification object];
    NSLog(@">>2>> %@",data);
}

@end
在ViewController中用同样的方法注册监听者,因为要先注册监听者然后才可以收到Notification,如果在注册前就发了的Notificatoin是收不到的,所以我是在第一个界面注册了observer,然后按了button跳到第二个界面,在第二个界面load的时候就发送了信息,于是第一个界面也会有data输出。
当不需要再接收Notification时,可以remove移除掉监听,
例如在SecondViewController中
[center addObserver:self selector:@selector(GetInfo:) name:@"logInfo" object:nil];//注册自己为监听者observer后面加上[center removeObserver:self]就不会再接收任何消息,removeObserver:方法后面加对象,如果想只不再接收其中的某一个Notification可以用removeObserver:name:object:实现,例如[center removeObserver:self name:logInfo object:nil];就可以只移除对logInfo的监听。


