转载文章:原贴地址:http://ohcoder.com/blog/2012/11/30/using-debug-draw/
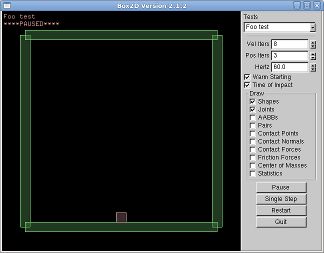
testbed使用一个称为“debug draw”的特性来画你所见到的形状。不过很显然,如果你想让游戏能够更加吸引眼球,还是需要替换那些无聊的多边形的,但是当物理场景中产生问题时,debug draw会变的非常有用。有时候问题发生在游戏场景中的某个部分,比如精灵被显示在错误的位置或错误的旋转方式,产生不正确的物理现象。如果你想准确的检测Box2d世界正在发生什么,那么我建议你保留debug draw的功能。
它的工作方式非常简单。它会告诉你Box2d中所有的形状以及这些形状的位置等。“在x,y位置,半径为r的弧形”,或者“一条从a到b的边”,等其他你所需要的形状。你不必做任何的变换或者担心物体的位置或者哪个定制器属于哪个物体,你可以轻松的画出这些几何形状。这就是说如果你只会画几条线段,也不会把事情搞砸:-)。
testbed中默认的debug draw由包含一堆虚方法的子类b2DebugDraw类完成。这里列出主要的方法:
1
2
3
4
5
6
|
virtual void DrawPolygon(b2Vec2* vertices, int32 vertexCount, b2Color& color) = 0; virtual void DrawSolidPolygon(b2Vec2* vertices, int32 vertexCount, b2Color& color) = 0; virtual void DrawCircle(b2Vec2& center, float32 radius, b2Color& color) = 0; virtual void DrawSolidCircle(b2Vec2& center, float32 radius, b2Vec2& axis, b2Color& color) = 0; virtual void DrawSegment(b2Vec2& p1, b2Vec2& p2, b2Color& color) = 0; virtual void DrawTransform(const b2Transform& xf) = 0;
|
把专门的渲染代码放到一个独立的地方,就像用DirectX或者OpenGL ES一样,轻松调用不同API来实现渲染调试,又或者可以在不同的渲染方法之间简单的切换。
虽然testbed中的debug draw工作的很好,而且我们真的不需要对它进行自定义,但是既然我们在讨论这个话题,那么就让我们使用我们自定义的子类来做一点改变吧。任何之前所讨论话题中的场景都可以进行尝试-这里我将会使用匀速运动(moving at constant speed)话题中所讨论的场景。

为了实现自定义的debug draw类,我们需要实现所有纯虚函数。现在先让我们清空这些方法。
1
2
3
4
5
6
7
8
9
10
|
class FooDraw : public b2DebugDraw { public: void DrawPolygon(const b2Vec2* vertices, int32 vertexCount, const b2Color& color) {} void DrawSolidPolygon(const b2Vec2* vertices, int32 vertexCount, const b2Color& color) {} void DrawCircle(const b2Vec2& center, float32 radius, const b2Color& color) {} void DrawSolidCircle(const b2Vec2& center, float32 radius, const b2Vec2& axis, const b2Color& color) {} void DrawSegment(const b2Vec2& p1, const b2Vec2& p2, const b2Color& color) {} void DrawTransform(const b2Transform& xf) {} };
|
我们可以使用SetDebugDraw方法,告诉Box2D世界使用此类代替默认的那个。这个方法的参数使用了一个指向b2DebugDraw对象的指针,所以我们需要有一个指向此类的对象指针。可以声明一个新的全局变量。
1
2
3
4
5
6
|
//at global scope FooDraw fooDrawInstance; //in constructor, usually m_world->SetDebugDraw( &fooDrawInstance ); //somewhere appropriate fooDrawInstance.SetFlags( b2DebugDraw::e_shapeBit );
|
这样就可以告诉物理世界所要渲染的任务是有新指定的类对象来完成。注意最后一行代码中设置的标志是进行渲染的类型。现在如果你想在查看物理世界时,让其中的形状(定制器)变的更有趣,你还需要设置包括如下标志:
-e_shapeBit(画形状(draw shapes))
-e_jointBit(画连接器(draw joint connections))
-e_aabbBit(轴对齐包围盒(draw axis aligned bounding boxes)
-e_pairBit(画broad-phase对(draw broad-phase pairs))
-e_centerOfMassBit(在物体上标出质心(draw a marker at body CoM))
其实,我的意思是想把这些设置放到一个‘合适的地方’,因为可能有些设置你想在运行的时候进行设置,就像上面提到的情况,当你偶尔想判断一下你所渲染的游戏实体和Box2D是否是同一个事物的时候。在testbed中,你可以看到一些设置放到了右边选择面板上。
如果你在自己的项目中使用了debug draw类,有另一个重要的需要注意的点是:你需要在你的物理世界中调用DrawDebugData()方法,这个方法会让Box2D对所要渲染形状回调每一个需要调用的debug draw类方法。
现在运行testbed,在场景中你应该什么也看不到。这是因为我们仍然没有实现对应的debug draw方法。从这一点来说,你所实现的渲染方法取决于是什么平台以及你所使用的渲染的API。作为一个例子,让我们用在嵌入式平台iPhone上使用OpenGL ES来实现DrawSolidPolygon方法。这是一个灵活的例子,因为OpenGL ES是OpenGL的一个子集,所以我们也可以在PC平台的testbed上像普通程序一样运行,而且跨平台问题也是我们经常遇到的问题。
OpenGL ES不会有glBegin/glEnd/glVertex方法,所以使用顶点数组代替进行渲染:
1
2
3
4
5
6
7
8
9
10
11
12
13
14
15
16
17
18
19
20
21
22
|
void DrawSolidPolygon(const b2Vec2* vertices, int32 vertexCount, const b2Color& color) { //set up vertex array GLfloat glverts[16]; //allow for polygons up to 8 vertices glVertexPointer(2, GL_FLOAT, 0, glverts); //tell OpenGL where to find vertices glEnableClientState(GL_VERTEX_ARRAY); //use vertices in subsequent calls to glDrawArrays //fill in vertex positions as directed by Box2D for (int i = 0; i < vertexCount; i++) { glverts[i*2] = vertices[i].x; glverts[i*2+1] = vertices[i].y; } //draw solid area glColor4f( color.r, color.g, color.b, 1); glDrawArrays(GL_TRIANGLE_FAN, 0, vertexCount); //draw lines glLineWidth(3); //fat lines glColor4f( 1, 0, 1, 1 ); //purple glDrawArrays(GL_LINE_LOOP, 0, vertexCount); }
|

其它渲染方法也可以类比。取决于你所使用的API,圆弧可以使用多个短的线段来渲染。
更新:我注意到在iPhone上Box2D源代码中,有一个好的使用OpenGL ES实现debug draw的方法。这是为Obj-C所写,但只是使用了普通的C++,所以你可以不用做任何修改:GLES-Render.mm

