android版天气预报程序开发总结
一,开发中所涉及到的技术概括:
tabhost选项卡组件,pagerAdapter左右滑屏的实现,json数据解析,xml数据解析,ListActivity与BaseAdapter的结合实现数据和图片的列表显示,handler更新UI,单例模式实现在整个project下数据的共享,httpClient访问网络,sqlite轻量级数据库的运用
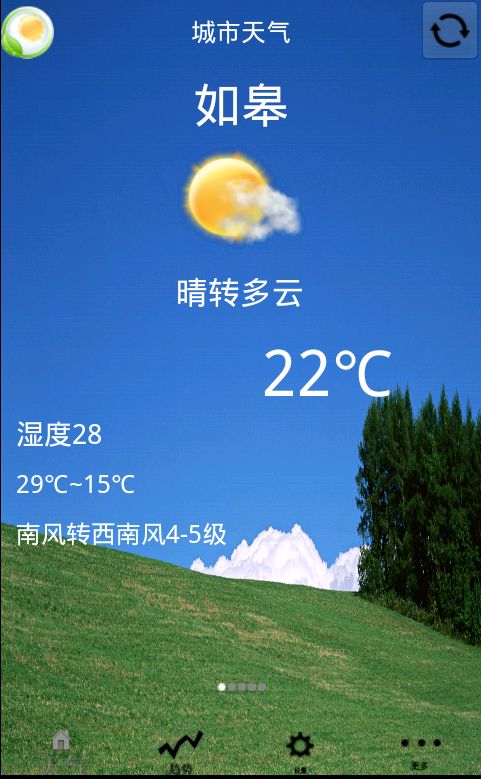
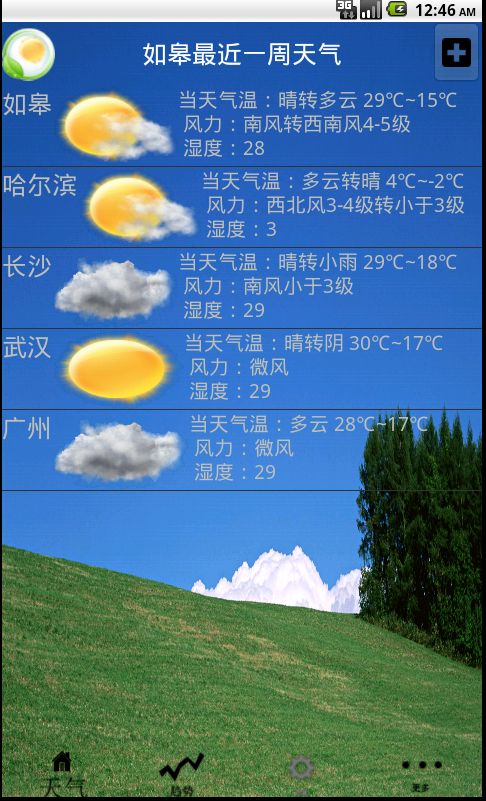
二,程序运行效果展示:
三,关键代码注解:
1.tabhost组件运用:
布局文件代码如下
<?xml version="1.0" encoding="utf-8"?>
<TabHost xmlns:android="http://schemas.android.com/apk/res/android"
    android:id="@android:id/tabhost"
    android:layout_width="fill_parent"
    android:layout_height="fill_parent"
 >

    <LinearLayout
        android:layout_width="fill_parent"
        android:layout_height="fill_parent"
         android:background="@drawable/yun4"
        android:orientation="vertical" >

	<RelativeLayout
	    xmlns:android="http://schemas.android.com/apk/res/android"
	    android:id="@+id/biaotouFramelayout"
	    android:layout_width="fill_parent"
	    android:layout_height="64dp" >

	    <!--
	     <ImageButton
	         android:id="@+id/shuaxinButton"
	         android:layout_width="wrap_content"
	         android:layout_height="wrap_content"
	         android:layout_gravity="right"
	         android:layout_marginTop="10dp"
	         android:src="@drawable/shuaxin" />
	    -->

	    <ImageView
	        android:id="@+id/imageView5"
	        android:layout_width="53dp"
	        android:layout_height="65dp"
	        android:src="@drawable/weather" />

	    <TextView
	        android:id="@+id/title_textview"
	        style="@style/activity_title_text"
	        android:layout_width="wrap_content"
	        android:layout_centerHorizontal="true"
	        android:layout_centerVertical="true" />

	    <ImageButton
	        android:id="@+id/shuaxinImageBtn"
	        android:layout_width="wrap_content"
	        android:layout_height="wrap_content"
	        android:layout_alignParentBottom="true"
	        android:layout_alignParentRight="true"
	        android:layout_alignParentTop="true"
	        android:src="@drawable/shuaxin" />

	</RelativeLayout>

        <FrameLayout
            android:id="@android:id/tabcontent"
            android:layout_width="fill_parent"
            android:layout_height="fill_parent"
            android:layout_weight="1"
           >
        </FrameLayout>

        <TabWidget
             android:id="@android:id/tabs"
              android:layout_width="fill_parent"
            android:layout_height="wrap_content"
            android:paddingLeft="1dip"
            android:visibility="gone"  />

        <LinearLayout
            android:layout_width="fill_parent"
            android:layout_height="53dp"

            android:paddingTop="5dip" >

            <LinearLayout
                android:id="@+id/channel1"
                style="@style/main_tab_but_linear" >

                <ImageView
                    android:id="@+id/imageView1"
                    android:layout_width="wrap_content"
                    android:layout_height="54dp"
                    android:src="@drawable/tianqi" />

                <TextView
                    android:id="@+id/textView1"
                    android:layout_width="wrap_content"
                    android:layout_height="wrap_content"
                    android:layout_weight="1"
                    android:text="1" />
            </LinearLayout>

            <LinearLayout
                android:id="@+id/channel2"
                style="@style/main_tab_but_linear" >

                <ImageView
                    android:id="@+id/imageView2"
                    android:layout_width="wrap_content"
                    android:layout_height="52dp"
                    android:src="@drawable/qushi" />

                <TextView
                    android:id="@+id/textView2"
                    android:layout_width="wrap_content"
                    android:layout_height="wrap_content"
                    android:layout_weight="1"
                    android:text="2" />
            </LinearLayout>

            <LinearLayout
                android:id="@+id/channel3"
                style="@style/main_tab_but_linear"
                android:layout_width="fill_parent"
                android:layout_height="fill_parent"
                android:layout_weight="1"
                android:orientation="vertical" >

                <ImageView
                    android:id="@+id/imageView3"
                    android:layout_width="wrap_content"
                    android:layout_height="52dp"
                    android:src="@drawable/shezhi" />
            </LinearLayout>

            <LinearLayout
                android:id="@+id/channel4"
                style="@style/main_tab_but_linear"
                android:layout_width="fill_parent"
                android:layout_height="fill_parent"
                android:layout_weight="1"
                android:orientation="vertical" >

                <ImageView
                    android:id="@+id/imageView4"
                    android:layout_width="fill_parent"
                    android:layout_height="54dp"
                    android:src="@drawable/gengduo" />

                <TextView
                    android:id="@+id/textView4"
                    android:layout_width="wrap_content"
                    android:layout_height="wrap_content"
                    android:layout_weight="1"
                    android:text="4" />
            </LinearLayout>


        </LinearLayout>


    </LinearLayout>

</TabHost>
a.使用tabhost的activity需要继承TabActivity,调用getTabHost()获取tabhost对象。
b. 使用tabhost选项卡实现按钮处透明化方法 tabHost
.newTabSpec(tagName)
.setIndicator(getResources().getString(tagLable),
getResources().getDrawable(icon)).setContent(content); setIndicator()方法用来设置选项卡tab按钮的背景以及文字,添加透明背景的TextView对象即可实现按钮背景的透明。
2. xml解析,包括读取,删除,写入数据
自定义的xml格式如下:
<?xml version="1.0" encoding="GB2312"?>
-<city> <item>如皋</item> <item>沈阳</item><item>长沙</item><item>武汉</item></city>
public class XMLManager {
	private Context context;
	DocumentBuilderFactory docBuilderFactory = null;
	DocumentBuilder docBuilder = null;
	Document doc = null;
	File file = new File(Environment.getExternalStorageDirectory()
			+ File.separator + "citydata" + File.separator + "city.xml");// 要输出文件的路径

	public XMLManager(Context context) {
		this.context = context;
		docBuilderFactory = DocumentBuilderFactory.newInstance();
		try {
			docBuilder = docBuilderFactory.newDocumentBuilder();

			doc = docBuilder.parse(new BufferedInputStream(new FileInputStream(
					file)));
			doc.normalize();
		} catch (ParserConfigurationException e) {
			// TODO Auto-generated catch block
			e.printStackTrace();
		} catch (SAXException e) {
			// TODO Auto-generated catch block
			e.printStackTrace();
		} catch (IOException e) {
			// TODO Auto-generated catch block
			e.printStackTrace();
		}
		// xml file 放到 assets目录中的

	}

	public void ReadXML() {

		// root element
		Element root = doc.getDocumentElement();
		NodeList nodeList = root.getElementsByTagName("item");
		Log.i("nodesize", String.valueOf(root.getChildNodes().getLength()));
		for (int i = 0; i < nodeList.getLength(); i++) {
			Element nd = (Element) nodeList.item(i);
			Log.i("node", nd.getFirstChild().getNodeValue());
			CityDataManager.getInstance()
					.add(nd.getFirstChild().getNodeValue());
		}
		Log.i("node",
				String.valueOf(CityDataManager.getInstance().getItems().size()));
	}

	public void removeItem(String name) {
		Element root = (Element) (doc.getDocumentElement()
				.getElementsByTagName("city").item(0));
		Log.i("node cityname", name);
		for (int i = 0; i < root.getElementsByTagName("item").getLength(); i++) {
			Element e = (Element) root.getElementsByTagName("item").item(i);
			Log.i("node vlaue", e.getFirstChild().getNodeValue());
			if (e.getFirstChild().getNodeValue().equals(name)) {
				if (root.removeChild(e) != null)
					save();
			}
		}
	}

	public void addItem(String name) {
		Element root = (Element) (doc.getDocumentElement()
				.getElementsByTagName("city").item(0));
		Log.i("root",
				String.valueOf(root.getElementsByTagName("item").getLength()));
		Element citynode = doc.createElement("item");
		citynode.appendChild(doc.createTextNode(name));
		// citynode.setNodeValue("北京");

		root.appendChild(citynode);
		Log.i("root",
				String.valueOf(root.getElementsByTagName("item").getLength()));

		save();

	}

	private void save() {
		if (!Environment.getExternalStorageState().equals(
				Environment.MEDIA_MOUNTED)) {// sdcard不存在
			return;// 返回程序被调用处
		}
		File file = new File(Environment.getExternalStorageDirectory()
				+ File.separator + "citydata" + File.separator + "city.xml");// 要输出文件的路径

		if (!file.getParentFile().exists()) {// 父路径不存在
			file.getParentFile().mkdirs();// 创建父文件夹

		}

		TransformerFactory tFactory = TransformerFactory.newInstance();
		Transformer transformer = null;

		try {
			transformer = tFactory.newTransformer();
		} catch (TransformerConfigurationException e) {
			// TODO Auto-generated catch block
			e.printStackTrace();
		}

		transformer.setOutputProperty(OutputKeys.ENCODING, "GB2312");
		DOMSource source = new DOMSource(doc);
		StreamResult result = new StreamResult(file);

		try {
			transformer.transform(source, result);
		} catch (TransformerException e) {
			// TODO Auto-generated catch block
			e.printStackTrace();
		}
	}
}
3.android平台的sqlite数据库的应用:
public class DBManager {

	public static final String _DB_PATH = "/data/data/com.android.weather/databases";
	// private final int BUFFER_SIZE = 400000;
	public static final String DB_NAME = "db_weather.db"; // 保存的数据库文件名
	public static final String PACKAGE_NAME = "com.android.weather";
	public static final String DB_PATH = "/data"
			+ Environment.getDataDirectory().getAbsolutePath() + "/"
			+ PACKAGE_NAME; // 在手机里存放数据库的位置(/data/data/com.cssystem.activity/cssystem.db)

	private SQLiteDatabase database;
	private Context context;

	public DBManager(Context context) {
		this.context = context;
	}

	public SQLiteDatabase getDatabase() {
		return database;
	}

	public void setDatabase(SQLiteDatabase database) {
		this.database = database;
	}

	public void openDatabase() {
		System.out.println(DB_PATH + "/" + DB_NAME);
		this.database = this.openDatabase(DB_PATH + "/" + DB_NAME);
	}

	private SQLiteDatabase openDatabase(String dbfile) {

		try {
			if (!(new File(dbfile).exists())) {
				// 判断数据库文件是否存在,若不存在则执行导入,否则直接打开数据库
				InputStream is = this.context.getResources().openRawResource(
						R.raw.db_weather); // 欲导入的数据库
				FileOutputStream fos = new FileOutputStream(dbfile);
				byte[] buffer = new byte[is.available()];
				int count = 0;
				while ((count = is.read(buffer)) > 0) {
					fos.write(buffer, 0, count);
				}
				fos.close();
				is.close();
			}

			SQLiteDatabase db = SQLiteDatabase.openOrCreateDatabase(dbfile,
					null);
			return db;

		} catch (FileNotFoundException e) {
			Log.e("Database", "File not found");
			e.printStackTrace();
		} catch (IOException e) {
			Log.e("Database", "IO exception");
			e.printStackTrace();
		}
		return null;
	}

	public void closeDatabase() {
		this.database.close();
	}

	public String getCityCodeByName(String cityName) {
		Cursor cursor = database.query("cities", new String[] { "city_num" },
				"name = ?", new String[] { cityName }, null, null, null);
		String cityCode = null;
		if (!cursor.isLast()) {
			cursor.moveToNext();
			cityCode = cursor.getString(0);
		}
		cursor.close();
		// database.close();
		return cityCode;
	}

}
4. 使用pagerView实现左右滑屏
布局文件代码
<?xml version="1.0" encoding="utf-8"?>
<FrameLayout xmlns:android="http://schemas.android.com/apk/res/android"
    android:layout_width="fill_parent"
    android:layout_height="fill_parent"
    android:orientation="vertical"
    android:theme="@android:style/Theme.Translucent"  >

    <android.support.v4.view.ViewPager
        android:id="@+id/viewPager"
        android:layout_width="fill_parent"
        android:layout_height="wrap_content" />

    <RelativeLayout
        android:layout_width="fill_parent"
        android:layout_height="wrap_content"
        android:orientation="vertical"
        >

        <LinearLayout
            android:id="@+id/viewGroup"
            android:layout_width="fill_parent"
            android:layout_height="wrap_content"
            android:layout_alignParentBottom="true"
            android:layout_marginBottom="30dp"
            android:gravity="center_horizontal"
            android:orientation="horizontal" >
        </LinearLayout>
    </RelativeLayout>

</FrameLayout>
activity的调用:
main = (ViewGroup) inflater.inflate(R.layout.circle_viewflow_layout,
				null);
		group = (ViewGroup) main.findViewById(R.id.viewGroup);
		viewPager = (ViewPager) main.findViewById(R.id.viewPager);
通过list<View>数组添加要加载的view,然后将此数组添加到继承了PagerAdapter的Myadatper中
MyAdapter myadapter = new MyAdapter(list, WeatherMainActivity.this,
				inflater, viewPager);
		MySingleInstance.getInstance().setMyadapter(myadapter);
		viewPager.setAdapter(myadapter);

		createDot();
		MyDotHandler dotHandler = new MyDotHandler();
		HandlerApp.getInstance().setDotHandler(dotHandler);
注:在adatper适配器中最好自定义一个List数组,更新数据后调用以下方法,更新UI。
MySingleInstance.getInstance().getMyadapter().notifyDataSetChanged();
5. handler的使用更新UI
自定义Handler
	public class MyHandler extends Handler {
		@Override
		public void handleMessage(Message msg) {
			super.handleMessage(msg);
			if (msg.what == CHANGED) { // 更新UI
				mListAdapter = new MyListAdapter(MoreActivity.this,
						CityListItemsDataManager.getInstance().getListData());
				setListAdapter(mListAdapter);
			}
		}
	}
在activity 实例化Handler
protected void onCreate(Bundle savedInstanceState) {
		// TODO Auto-generated method stub
		super.onCreate(savedInstanceState);
		instance = this;
		Log.i("listadapter",
				String.valueOf(CityListItemsDataManager.getInstance()
						.getListData().size()));
		mListAdapter = new MyListAdapter(this, CityListItemsDataManager
				.getInstance().getListData());
		setListAdapter(mListAdapter);

		mHandler = new MyHandler();
		HandlerApp.getInstance().setMyHandler(mHandler);

	}
更新数据后,需要取得实例化的Handler对象发送CHANGE消息,才能调用handler中方法,从而实现UI更新
HandlerApp.getInstance().getDotHandler().sendEmptyMessage(CHANGED);
源码下载地址: 点击打开链接


